Spring Awakening Shawl- Knitting Pattern
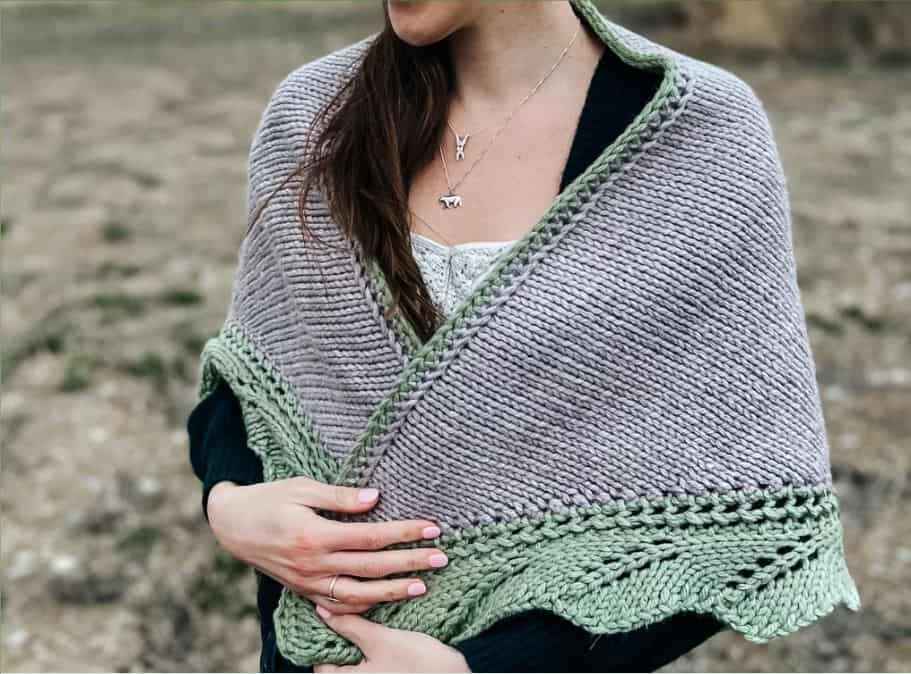
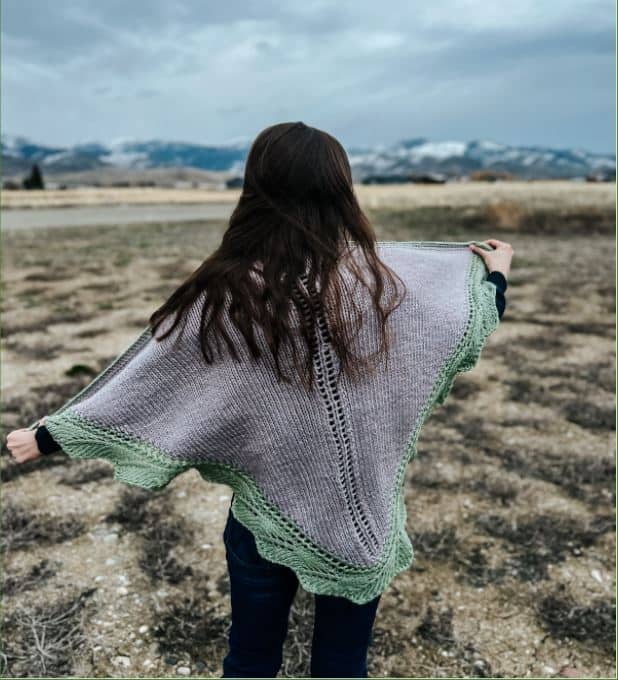
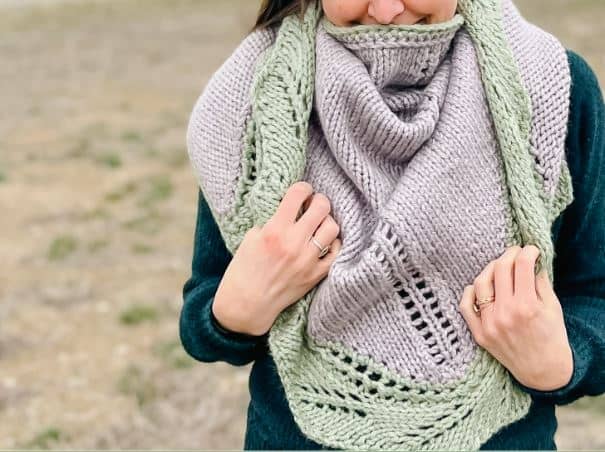
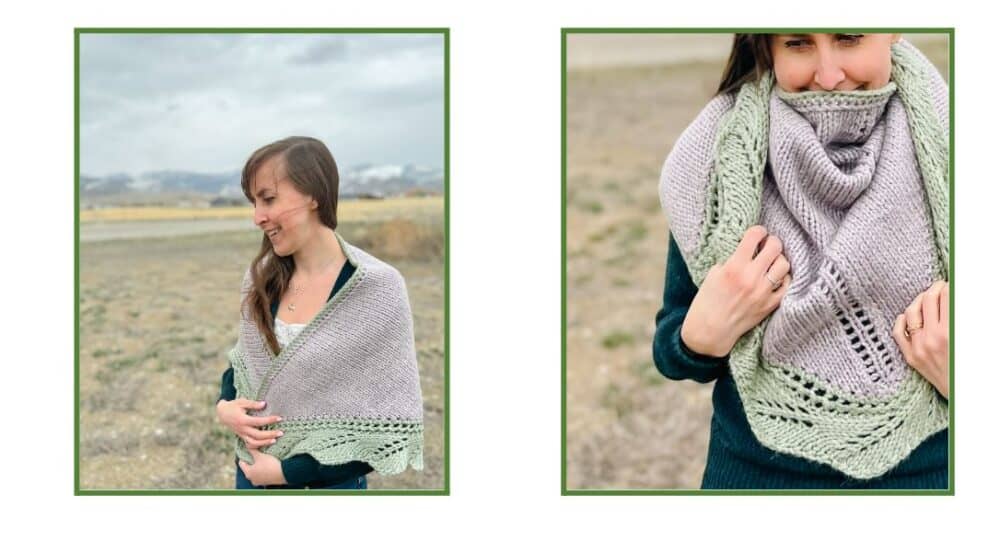
Happy Spring Knitters! Hannah here, the knitwear designer, blogger, and maker behind Bears Den Essentials (@bearsdenessentials) with a lovely pattern that you can knit up in time for Mother’s Day. Knit with the lovely colors of Lion Brand’s Hue + Me Yarn, this shawl uses a combination of stockinette stitch and lacework to create a textured look without being too busy.
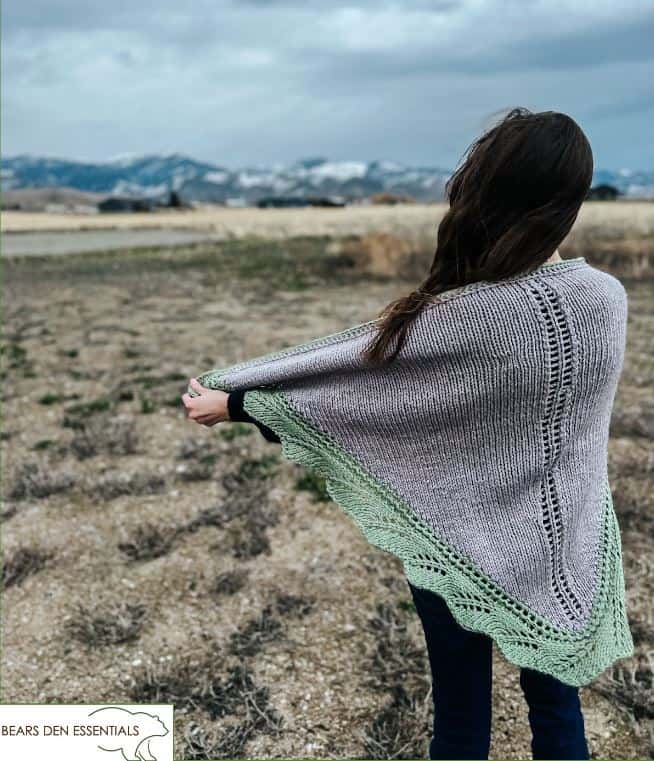
I love spring in Montana because all of the colors and textures of the landscape start to re-emerge after a long winter of snow-covered vistas. As a big fan of using lacework to evoke nature scenes, I designed the leafy border of this shawl after being inspired by the spring awakening I’m witnessing outside my window. I love this season of vibrant green foliage, even if it does also mean mud gets everywhere in our house!
The mornings and evenings still have a bit of a nip to them, which is why I created this shawl. My mom taught me how to knit over 30 years ago, and I wanted to create a shawl that she will enjoy wearing over her shoulders as she drinks her morning tea. As a fellow knitter, I wanted to create something that she can also wear comfortably around her shoulders while working on one of her knitting projects as well!
Knitted from the bottom up, the shawl is completed by attaching a lace border edging across the base of the shawl and an i-cord edging across the top of the shawl. The best gifts are those that are given from the heart, and this shawl will make the strong women in your life feel wrapped up in love.
Difficulty Level: Advanced Beginner
Skills Required/Techniques Used:
-Knit & Purl
-Casting On/Casting Off
-Increasing Stitches
-Decreasing Stitches
-Working Flat
-Working with Double-Pointed Needles
-Joining pieces of knitting together
-I-Cord
MATERIALS
Yarn: Hue + Me Yarn by Lion Brand Yarn.
137 Yards (125 meters) | 125 grams | Bulky / Chunky Weight (Category 5)
- Shawl requires:
- Main Color (MC) – 2 Skeins
- Contrast Color (CC) – 1 Skein
- RECOMMENDED COLORS:
- MC – “Haze”
- CC – “Artichoke”
Knitting Needles:
–Takumi 29″ Circular Bamboo Knitting Needles size US 10.5 (6.50mm)Art No 3016/29-10.5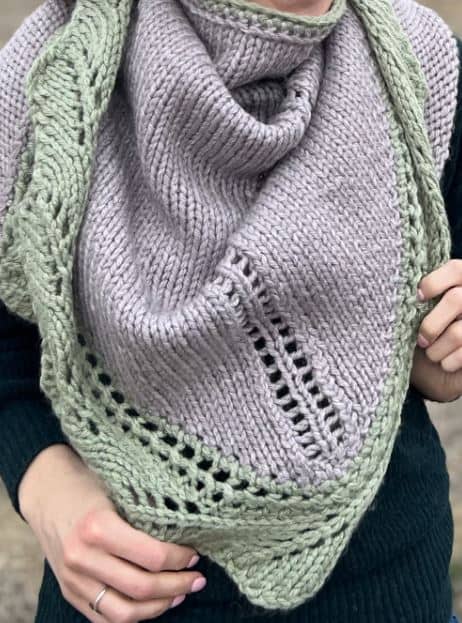
Notions:
–Jumbo Darning Needle- Art No. 339
–Clover Row Counter- Art No. 336
–Clover Yarn Cutter Pendant- Art No. 3106
–Clover Knitting Needle Point Protectors- Art No. 333/s
–Clover Triangle Stitch Markers (Medium(- Art No 3150
GAUGE: Approx 14 sts X 18 rows = 4” x 4” using 6.50mm/US 10.5 needles
SIZE INFORMATION:
The Spring Awakening Shawl is designed to fit comfortably over your shoulders.
Finished Measurements:
Finished Width Across (Including Lace Border): Approx. 58” (147.5 cm)
Finished Length from Bottom to Top (Including Lace & I-cord Border): Approx. 34” (86.5 cm)
ABBREVIATIONS AND STITCH GLOSSARY:
- Approx: Approximately
- BO: Bind off
- CO: Cast on [Note: The beginning of the shawl is cast on using the Long-Tail Cast On Method]
- COFF: Cast off
- K: Knit
- Kfb: Knit front and back of stitch
- K2tog: Knit two stitches together
- LH: Left hand
- M(s): Marker(s)
- P: Purl
- P2tog: Purl two stitches together
- Pm: Place marker
- Psso: Pass slipped stitch over
- Rem: Remain
- RH: Right hand
- Sm: Slip the stitch marker over
- Ssk: Slip slip knit
- St(s): Stitch(es)
- Sl 1 kwise: Slip one stitch knitwise
- Ws/ Rs: Wrong side of the work / Right side of the work
- Yo: Yarn over increase
- ” / cm(s): Inch(es) / Centimeter(s)
PATTERN:
CONSTRUCTION OVERVIEW:
This shawl is knit from the bottom up, and then the border is created by attaching a lace edging around the bottom of the shawl and an i-cord edging across the top of the shawl.
CASTING ON:
With size US 10.5 (6.50 mm) 29” circular needles and MC yarn, CO 3 sts.
BODY:
Rows 1: K to end of row.
Row 2: P to end of row.
Row 3: Kfb, K1, kfb. (5 sts)
Row 4: P to end of row.
Row 5: Kfb, K3, kfb. (7 sts)
Row 6: P to end of row.
Row 7: Kfb, pm, ssk, yo, K1, yo, k2tog, pm, kfb. (9 sts)
Row 8: P to end of row.
Row 9: Kfb, k1, sm, ssk, yo, k1, yo, k2tog, sm, k1, kfb. (11 sts)
Row 10: P to end of row.
Row 11: Kfb, k to first m, sm, ssk, yo, k1, yo, k2tog, sm, k to last st, kfb.
Row 12: P to end of row.
Repeat rows 11-12 to continue in pattern until piece measures 27” (68.5 cm) from CO edge.
Beginner’s Note: For troubleshooting common challenges, such as dropped stitches, knitting too tightly, or too loosely, check out this video on how to knit and troubleshoot.
Cast Off. Cut yarn leaving roughly 10” (25.5 cm). Weave in your ends.
BORDER:
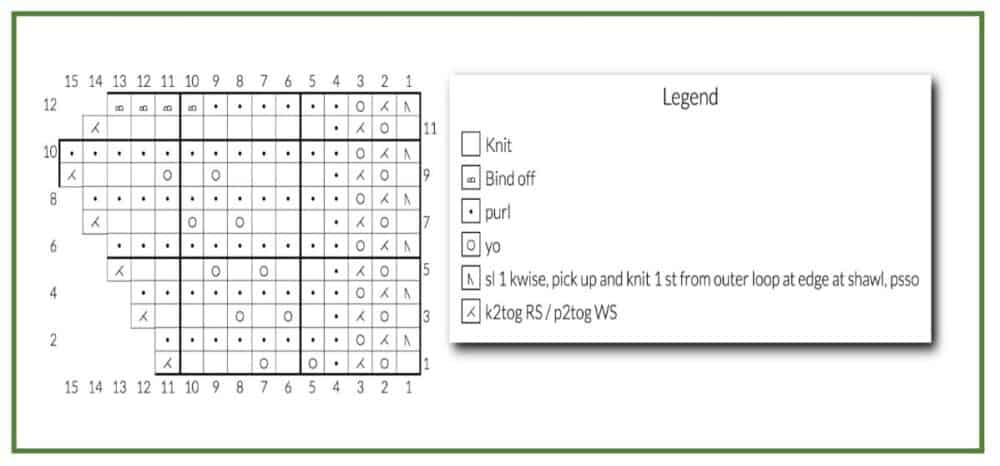
Lace Edging Across the Base of the Shawl: [See Pattern Stitch Chart for reference]
For lace edging, the first row is done unattached to the body of the shawl. With size US 10.5 (6.50 mm) 29” circular needles and CC yarn, CO 10 sts.
Row 1: K1, yo, k2tog, p1, yo, k1, yo, k3, k2tog. (11 sts)
For the first join (and all joins following), turn shawl so the WS is facing you and the widest part of the shawl is closest to you. The shawl should be upside down and WS up. You will be working the lace edging around the base of the shawl starting at the right corner in a counterclockwise direction. Row 2 and all even rows are the rows you join the edging to the body.
Row 2: P8, yo, p2tog, sl 1 kwise, pick up and knit 1 st from shawl edge, psso. (11 sts)
Tips for joining: Slip 1 stitch knitwise, grab the outermost loop from the ridge of the shawl body with your left needle, and knit it. Pass the slipped stitch over that knitted st. This final step is the key to anchoring the edging.
The border will now be joined to the shawl by 1 st. For every two rows of lacework edging, your border will be joined to the body of the shawl by one row (or one st). One lacework pattern repeat = 12 rows, so you’ll be attached by 6 joining stitches.
Turn shawl so RS is facing you for row 3 (and all odd rows following).
Row 3: K1, yo, k2tog, p1, k1, yo, k1, yo, k3, k2tog. (12 sts)
Row 4: P9, yo, p2tog, sl 1 kwise, pick up and knit 1 st from shawl edge, psso. (12 sts)
Row 5: K1, yo, k2tog, p1, k2, yo, k1, yo, k3, k2tog. (13 sts)
Row 6: P10, yo, p2tog, sl 1 kwise, pick up and knit 1 st from shawl edge, psso. (13 sts)
Row 7: K1, yo, k2tog, p1, k3, yo, k1, yo, k3, k2tog. (14 sts)
Row 8: P11, yo, p2tog, sl 1 kwise, pick up and knit 1 st from shawl edge, psso. (14 sts)
Row 9: K1, yo, k2tog, p1, k4, yo, k1, yo, k3, k2tog. (15 sts)
Row 10: P12, yo, p2tog, sl 1 kwise, pick up and knit 1 st from shawl edge, psso. (15 sts)
Row 11: K1, yo, k2tog, p1, k9, k2tog. (14 sts rem)
Row 12: BO 4 sts, p6, yo, p2tog, sl 1 kwise, pick up and knit 1 st from shawl edge, psso. (10 sts rem)
Work pattern repeat flat in a counterclockwise direction across both sides of the bottom of the shawl for ~20 repeats or until you reach the opposite corner of the shawl. BO loosely. Weave in your ends. If you end the border in the middle of a pattern repeat, not to worry. The design is meant to be textured and multidimensional, so it will look beautiful regardless.
Pattern Stitch Chart:
I-Cord Edging Across the Top of the Shawl:
An i-cord edging gives a pretty border across the top of your shawl and creates a nice, seamless connection at the corners where the lacework meets the body of the shawl.
With size US 10.5 (6.50 mm) 29” circular needles and CC yarn, CO 3 sts.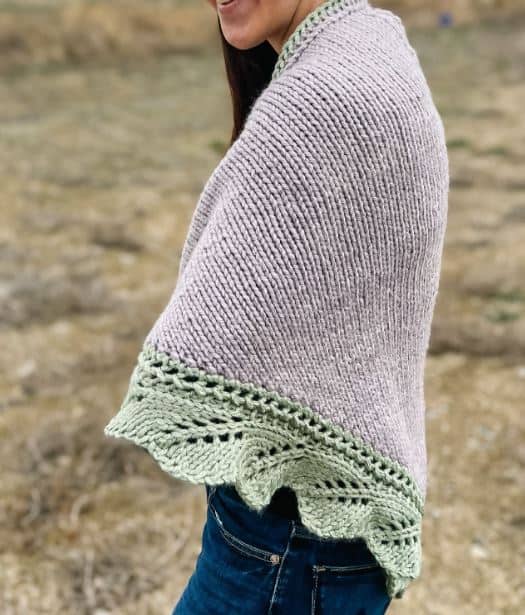
For the first join (and all joins following), turn shawl so the WS is facing you. You will be working across the full width of the top of the shawl (lacework edges included) starting at the same corner where you just finished BO your lacework edge.
Row 1: K2, sl 1 kwise, pick up and knit 1 st from shawl edge, psso, do not turn. (3 sts).
Row 2: With WS still facing you, slip 3 sts back to LH needle. Bring yarn behind the work to the right-hand side of the LH needle and pull tightly on the working yarn.
Tips for row 2: Slip the 3 stitches on the RH needle back onto the LH needle one at a time, starting with the last stitch. Be careful not to twist any of the stitches when slipping them.
Repeat rows 1-2 across the entire width of the top of your shawl. Thread yarn through rem sts, pull tightly. Weave in your ends.
FINISHING:
Wash with your favorite wool wash, block, and enjoy!
I hope you had as much fun making this shawl as much as I did designing it for you! I am so happy to share something warm and cozy that you can make to celebrate the
For beginners, be sure to head to our YouTube Page (@bearsdenessentials) to get the full series of knitting tutorials we offer! For questions about this pattern and extra tips, email us at bearsdenessentials@gmail.com.
Find Bears Den Essentials on Instagram | Pinterest | Etsy | Ravelry | Facebook | Youtube
Stay connected with Clover on Facebook | Twitter | Instagram | Pinterest | YouTube | Ravelry