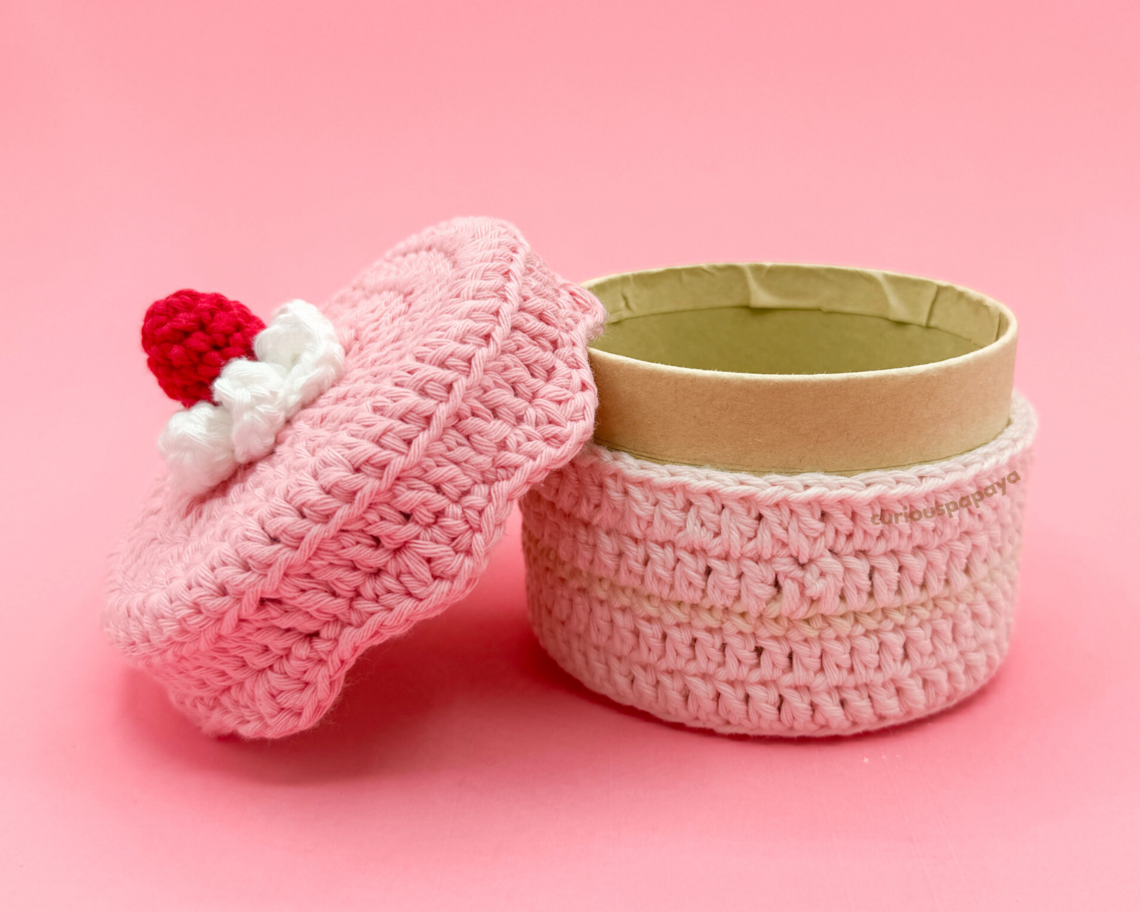
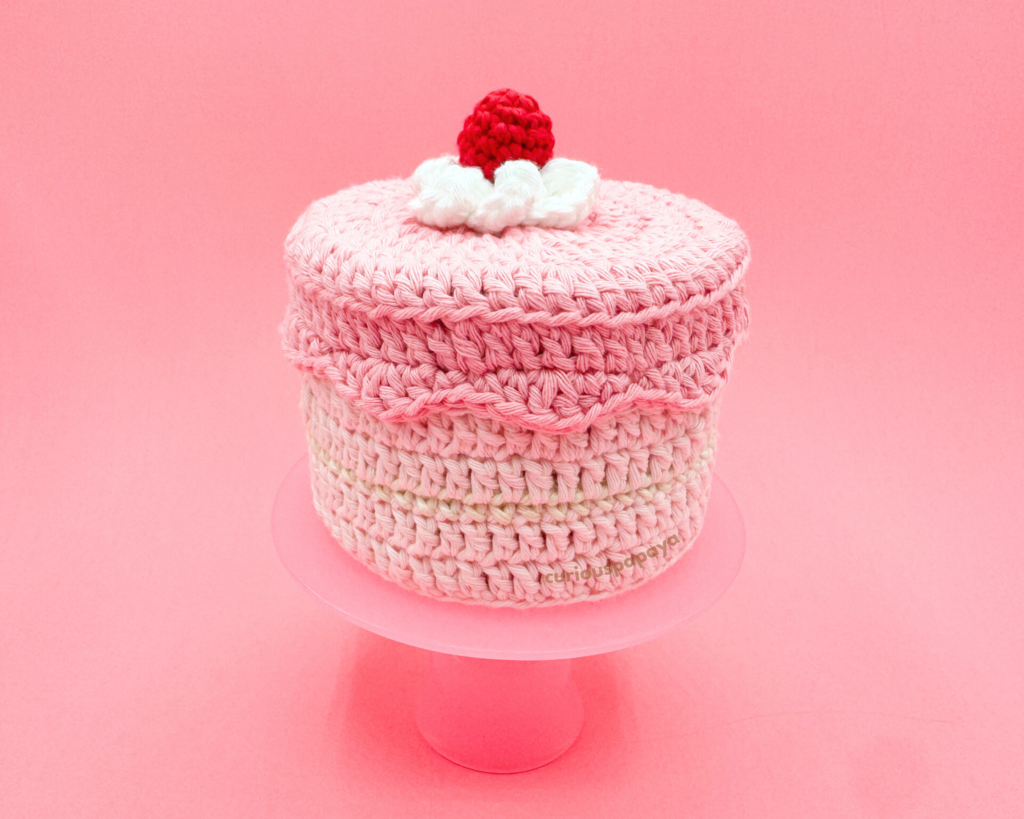
Crochet Cake Box Decoration (perfect for picnics or charcuterie boards!)
Hello everyone!! It’s Amy from @curiouspapaya 🙂 Here’s a sweet treat that’s equally cute and functional. This is SO perfect for a picnic decoration, or even for a charcuterie board decoration! AHHH I can just imagine allll the cute photos you could take! 😀
NOTES:
- Most of the pattern will be worked in joined rounds and the “ch” counts as the first st of each rnd. The strawberry will be worked in continuous rounds.
- This pattern is written in US terminology.
- Gauge: 1 in. x 1 in. = 2 rnds x 4 sts. Gauge is very important for this pattern since you’re making it fit around your box!
- Difficulty: Intermediate-beginner + due to hdc and dc stitches.
- Measurements: 4 in x 3 in
- Time: about 2.5 hrs
MATERIALS:
- Clover Amour Crochet Hook (2.75 mm)
- Patchwork Scissors
- Stitch Markers
- Yarn Needle
- Fiber fill stuffing (for the strawberry)
- Hot glue gun
- 4 in. x 3 in. cardboard box (I got mine from the Dollar Store)
- pencil
- #3 light worsted yarn – Hobbii Rainbow Cotton 8/8
-
- 1 skein of White (001)
- 1 skein of Nude (003)
- 1 skein of Pastel Pink (042)
- 1 skein of Rose (044)
- 1 skein of Red (058)
-
ABBREVIATIONS:
- blo: back loops only
- ch: chain
- dc: double crochet
- dc-inc: double crochet increase
- dec: (invisible) decrease *unless instructed otherwise
- flo: front loops only
- hdc: half double crochet
- inc: increase
- sc: single crochet
- slst: slip stitch
- st(s): stitch(es)
- rnd(s): round(s)
- [#]: stitch count
- (…) x #: repeat instructions the number of times
PATTERN:
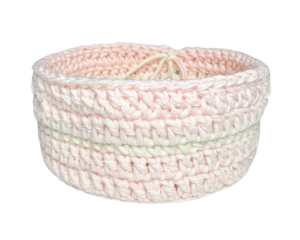
CAKE BASE:
Using your Clover Amour Crochet Hook (2.75 mm) and Pastel Pink yarn.
* = slst into the first st to join the rnd
- Round 1: make a magic circle and ch 2 (this will count as your first dc), (dc) x11, * [12]
- Round 2: ch 2, (dc-inc) x11, * [24]
- Round 3: ch 2, dc into the same st, dc into the next st, (dc-inc, dc) x11, * [36]
- Round 4: ch 2, dc into the same st, dc into the next two sts, (dc-inc, 2 dc) x11, * [48]
- Note: This is a great point to stop and check your gauge. If you are using the prescribed materials and notice that your gauge is a little off, adjust your hook size. Alternatively, you may work the last rnd of the bottom of the cake base with sc sts to be the right size.
- Round 5: ch 2, dc into the same st, dc into the next 3 sts, (dc-inc, 3 dc) x11 [60]
Now, we will work up the sides of the base.
- Round 6: (blo) ch 2, dc all around, * [60]
- Round 7: ch 2, dc all around, * in Nude yarn and do not cut the Pastel Pink yarn
- Round 8: ch 1, sc all around, * in Pastel Pink yarn and cut the Nude yarn [60]
- Rounds 9-10 (2 rnds total): ch 2, dc all around, * [60]
Fasten off and leave a short tail for weaving in.
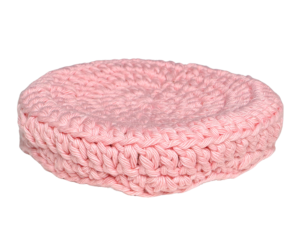
ICING:
Using your Clover Amour Hook (2.75 mm) and Rose yarn.
* = slst into the first st to join the rnd
- Round 1: make a magic circle and ch 2 (this will count as your first dc), (dc) x11, * [12]
- Round 2: ch 2, (dc-inc) x11, * [24]
- Round 3: ch 2, dc into the same st, dc into the next st, (dc-inc, dc) x11, * [36]
- Round 4: ch 2, dc into the same st, dc into the next two sts, (dc-inc, 2 dc) x11, * [48]
- Round 5: ch 2, dc into the same st, dc into the next 3 sts, (dc-inc, 3 dc) x11 [60]
Now, we will work up the drippy edges of the icing.
- Round 6: (blo) – ch 2, dc all around, * [60]
- Round 7: ch 1, hdc, dc-inc, hdc, sc, slst, (sc, hdc, dc-inc, hdc, sc, slst) x11 [72]
Fasten off and leave a tail for weaving in.
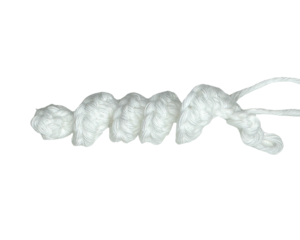
WHIPPED CREAM:
Using your Clover Amour Crochet Hook (2.75 mm) and White yarn.
- Step 1: ch 20 (adjust as needed), working into the second ch from the hook, make 3hdc into every ch [no st count necessary]
Fasten off and leave a tail for sewing. The piece should curl in on itself.
- Step 2: Twist the whipped cream a few more times to create more curls before sewing the two ends together.
- Step 3: Sew the whipped cream onto the top of the icing.
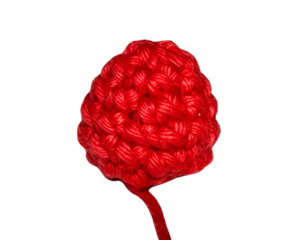
STRAWBERRY:
Using your Clover Amour Crochet Hook (2.75 mm) and Red yarn.
- Round 1: make a magic circle and (sc) x6 [6]
- Round 2: (sc, inc) x3 [9]
- Round 3: (2 sc, inc) x3 [12]
- Round 4: (2 sc, inc) x4 [16]
Lightly stuff.
- Round 5: (dec) x8 [8]
Fasten off and leave a tail for sewing. Sew the strawberry onto the whipped cream and icing. Secure all of the yarn tails into knots before cutting them short.
ASSEMBLY:
- Step 1: Trace where the lid meets the box lightly in pencil. We will want to make sure we secure the crocheted piece up until this line.
- Step 2: Use hot glue to secure the crocheted pieces onto the box, working small sections at a time.
- Warning: Try not to glob on too much or you might end up getting it all over the crocheted pieces!
You’re finished! We’d love to see your creations over on Instagram. Tag your creations with #cloversquad and #curiouspapaya to share your makes.
If you want to keep up with me, Amy, on social media for other fun projects, follow me on: Instagram
If you want to keep up with all things Clover, follow us on: Facebook | Twitter | Instagram | Pinterest | YouTube | Ravelry