Embroidered Bottleholder- DIY Craft
 Designed by Eloise Wagers
Walking outdoors is more enjoyable when you bring your water along. This carrier project is perfect for practicing or perfecting your embroidery skills.
This carrier makes it super convenient to take on your walk so you stay hydrated. So take this carrier with you when on-the-go, out and about, on a hike, at the beach, on a stroll, or even in your car!
It is hands-free!! Less dropping, less dents, less nicks, less spills and it is stylish.

Essential Clover tools for creating the Embroidered Bottleholder are Clover Embroidery Hoops which are designed to keep the thread from wrapping around the screw. They also keep the fabric nice and taut. Gold Eye Embroidery Needles and Tapestry Needles are a must along with the Embroidery Threader.
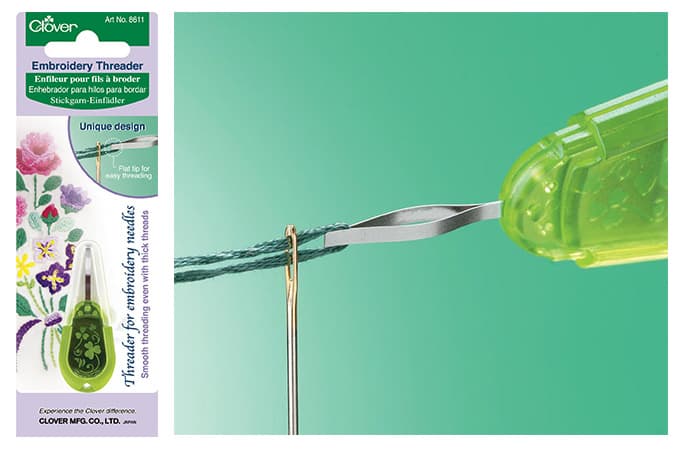
The Embroidery Threader is specially designed for embroidery threads and needles. It has a “flat tip” for easy and smooth threading even with thick embroidery threads.
Gather these supplies
Tools
- Embroidery Hoop (4 3/4 in.) – Art. No 8813
- Embroidery Threader – Art. No 8611
- Gold Eye Embroidery Needles (No. 3-9) – Art. No. 235 or Gold Eye Tapestry Needles (No. 18, 20, 22) – Art. No 238
- Depending on thickness of threads/yarn used
- White Marking Pen (Fine) – Art. No 517 or Water Erasable Marker (Fine) – Art. No 515 or Water Soluble Pencils – Art. No 5003
- Depending on whether it is light or dark fabric
- Protect and Grip Thimbles – Art. No. 6025-6027
- Bias Tape Maker (for desired strap width)- Art. No 464/6-50
- Roll & Press – Art. No 7812
- Mini Patchwork Scissors – Art. No 493/CW
- 5-in-1 Sliding Gauge – Art. No 9506
Materials
Fabric:
- Two 4-1/2 wide x 10-1/2 long pieces: one in a solid color and one in a print
- Two strips approximately 26” long and 1-2” wide
- One piece to cut a 4” circle
- Extra pieces for optional binding tape
Everything Else
- Selection of matching embroidery threads, yarn or Pearl Cotton (size 5) in colors to match print fabric
Embroidery Stitches Used
- Backstitch
- Running stitch
- Satin stitch
- Stem stitch
- Lazy Daisy stitch
- French knots
- Romanian stitch
- Herringbone stitch
- Blanket stitch
- Or any other embroidery stitch techniques
Embroidery has always been a popular hobby as it stimulates the imagination and at the same time provides much needed calm amid our fast-moving environments. Enjoy the process and do not be concerned with perfection but of creating a useful product! The directions are for guidance…feel free to “do you own thing”

Here’s How:
Step 1: Using the gauge or a compass draw a 4 “ circumference. Cut out and mark a ¼” seam

Step 2: Cut out two 4-1/2 x 10-1/2 pieces from fabrics

Step 3: Mark a 1/2 “ seam line at top of plain fabric and trace or free hand draw chosen design

Step 4: Insert fabric into hoop

Step 5: Embroider over traced design with selected threads and embroidery stitches.

Step 6: Finger press a ½” seam on one edge of print fabric to wrong side

Step 7: Match folded edge of print fabric to edge of embroidered piece and pin in place

Step 8: With herringbone stitch(or another stitch) attach the pieces together

Step 9: With wrong sides together, starting at edge, sew seam with a backstitch, rotating circle and matching edges


Step 10: With a backstitch and wrong sides together, close side of piece


Step 11: To finish raw edges cut straight or bias fabric strips and create double folded tape with a Clover Bias Tape Maker…or use a decorative embroidery stitch to finish edges.

Step 12:. Attach bias tape to raw edges using a running stitch

Step 13: Finish edges of straps…one side with Blanket Stitch and the other edge with a running stitch

Step 14: Sew straps to each side with a large cross stitch, repeating several times to secure

Step 15: Finished!

Step 16: Get your water bottle and go for a walk!

Stay connected with Clover on Facebook | Twitter | Instagram | Pinterest | YouTube | Ravelry
[mc4wp_form id=”11289″]