The Fates: Amigurumi Crochet Pattern

It’s time! Time for another character pattern release from the Alex In Yarnder Land Series! Hello to you all! I’m Alex and I’m the crochet and tunisian crochet designer behind With Alex and I”m also the creator of the Alex In Yarnder Land character pattern series and short story series. I am absolutely thrilled to share my newest crochet design, The Fates!
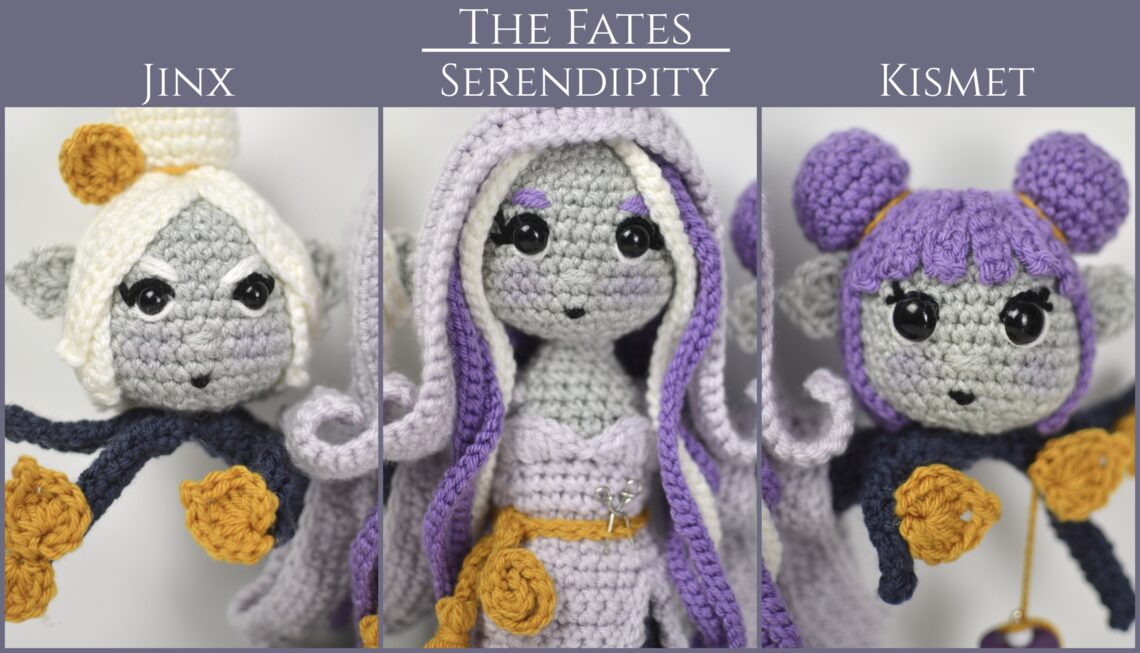
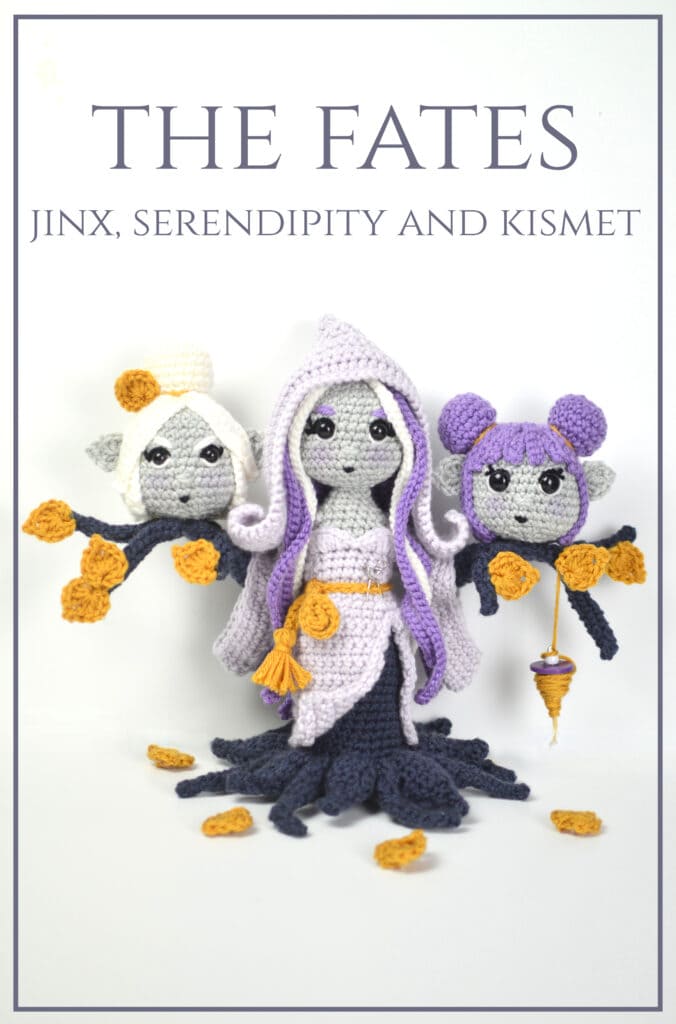
The Fates are the fourth character amigurumi pattern release, but don’t assume for even one second that The Fates are one character. Jinx, Serendipity and Kismet have their own jobs and they definitely have their own minds as well!
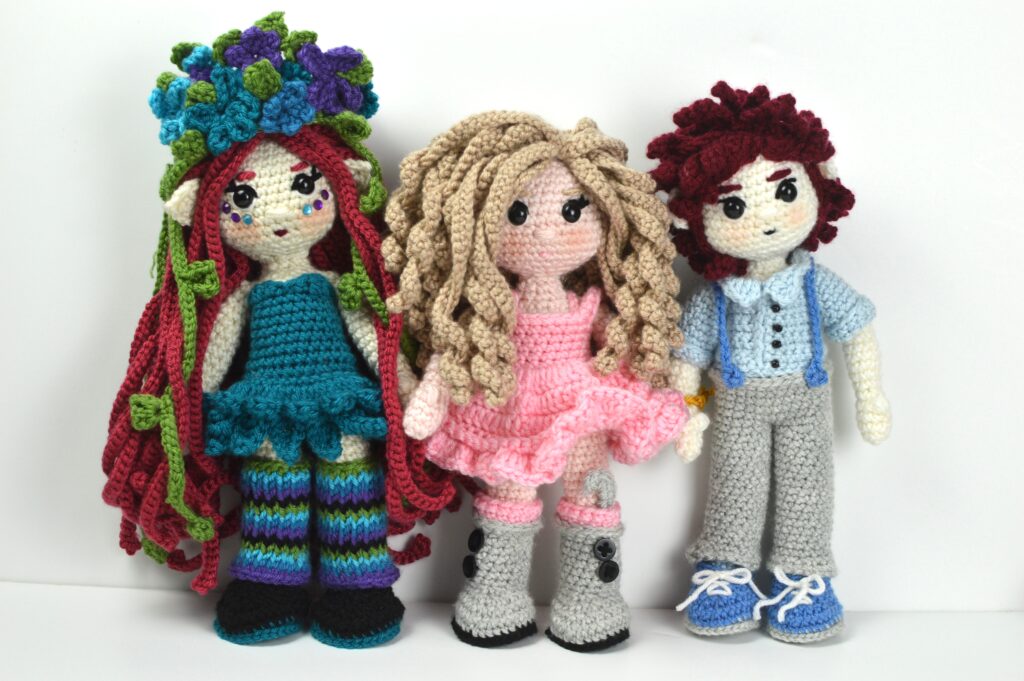
Alex, Blue Moon, and Aurora Lights have already been released and they each have a free crochet pattern on the Clover Blog. They also have their own short stories on the With Alex Blog. The Alex In Yarnder Land short story series podcast will be released in 2024, but the character short stories are being released with the characters. The character short stories are from the characters point of view and they are like commercials for the podcast short story series featuring Alex as the main character.
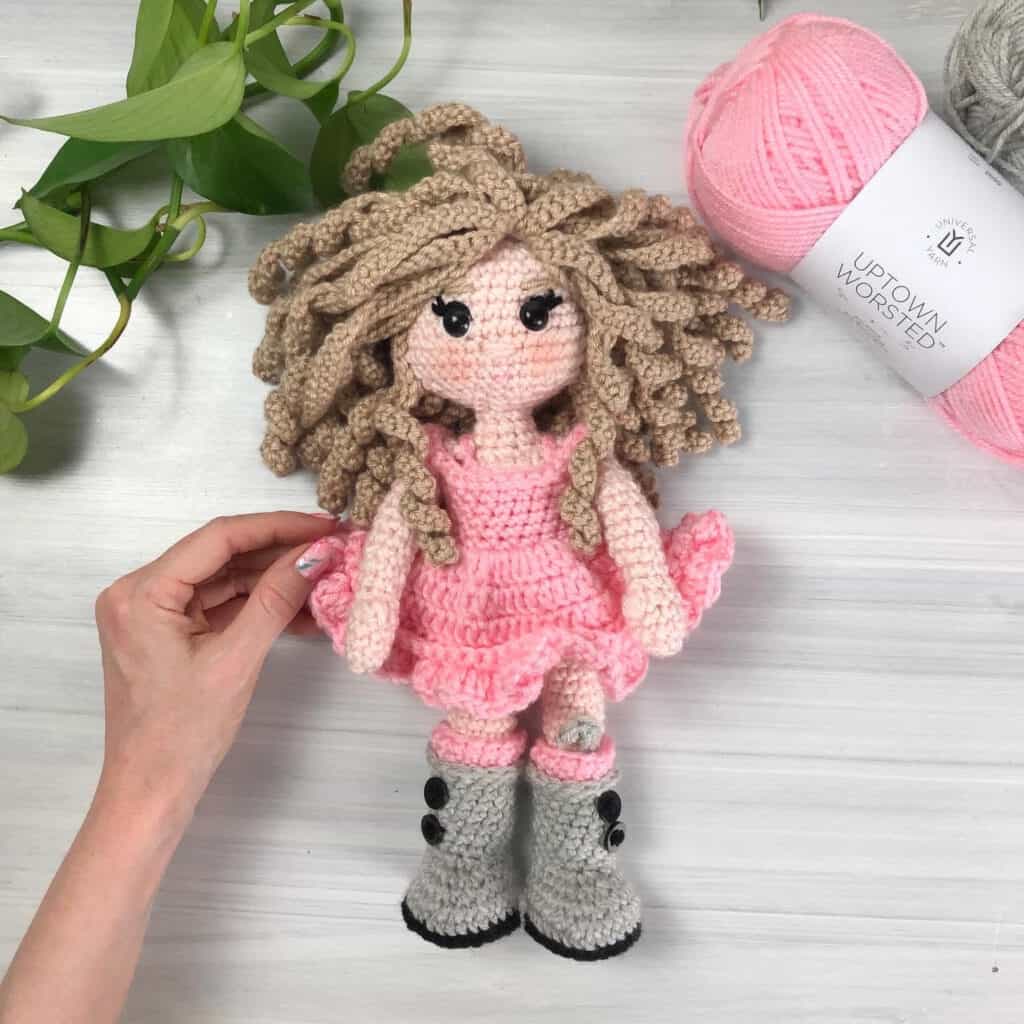
Find the free crochet pattern for Alex on the Clover Blog, here.
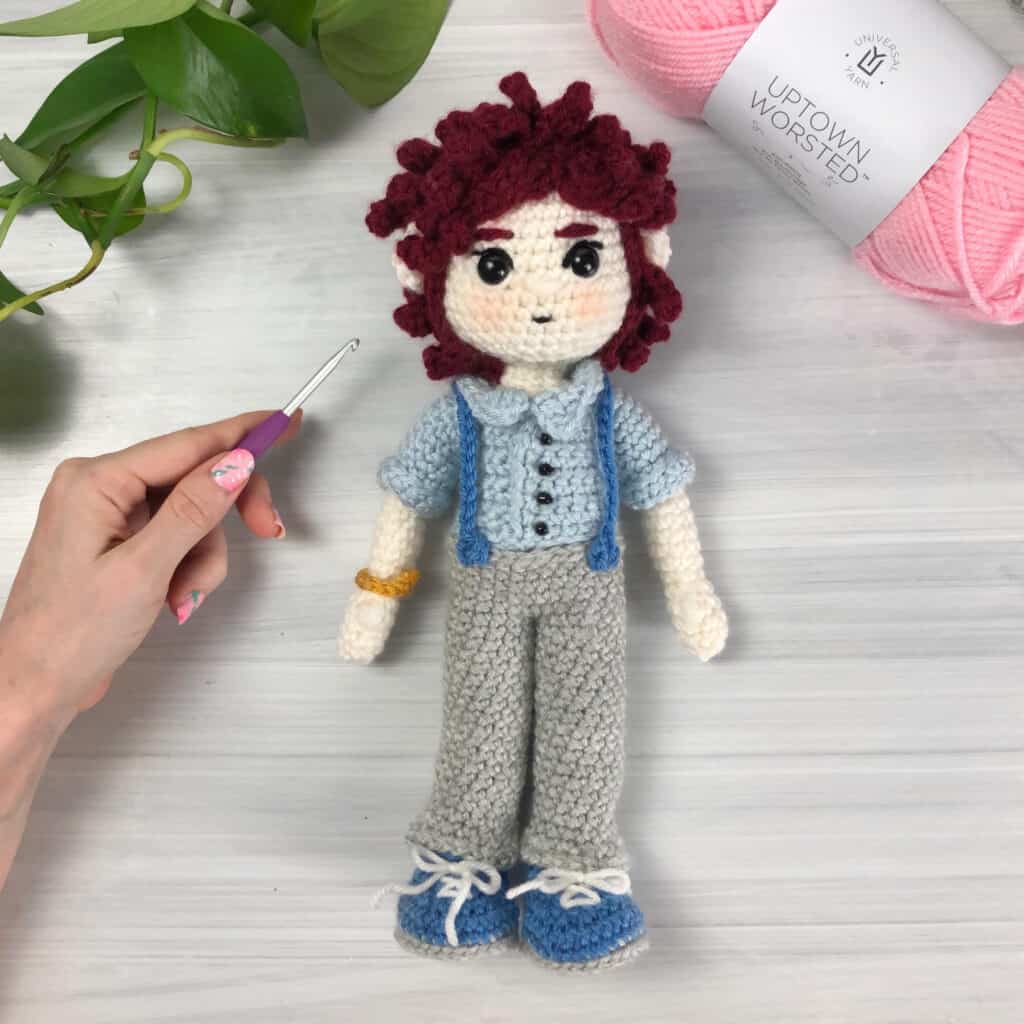
Find the free crochet pattern for Blue on the Clover Blog, here.
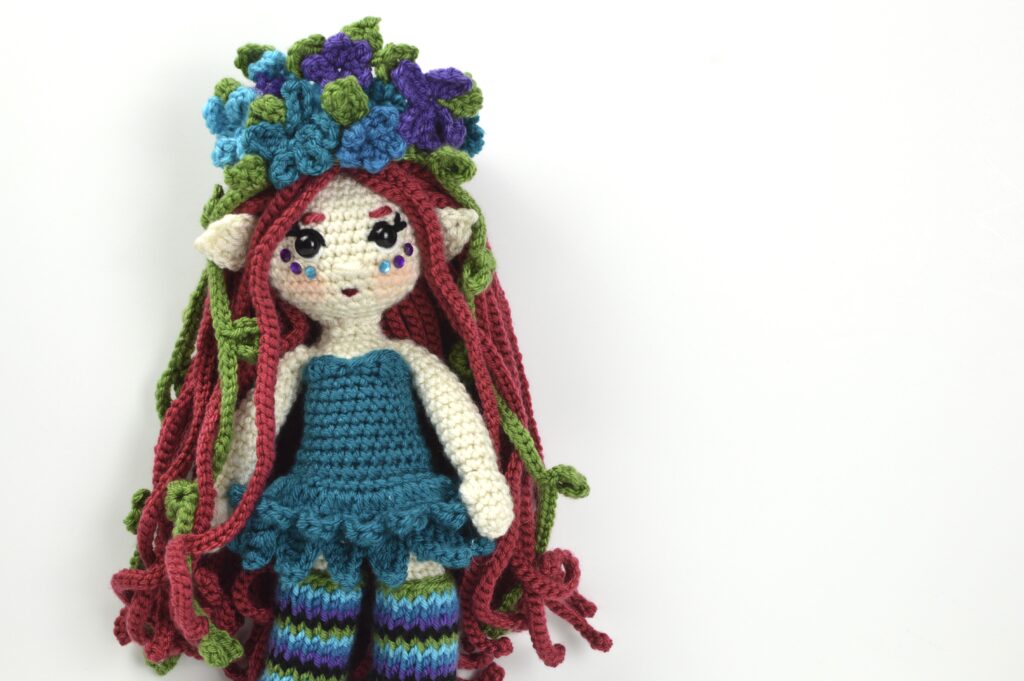
Find the free crochet pattern for Aurora on the Clover Blog, here.
Learn more about the Alex In Yarnder Land Series on the With Alex Blog, here.
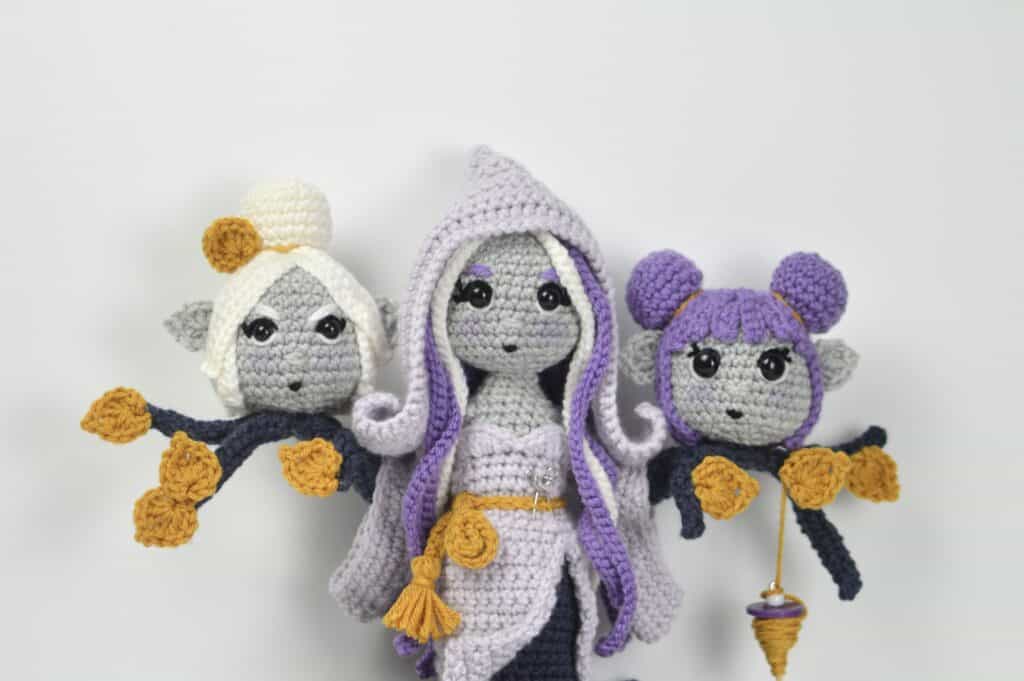
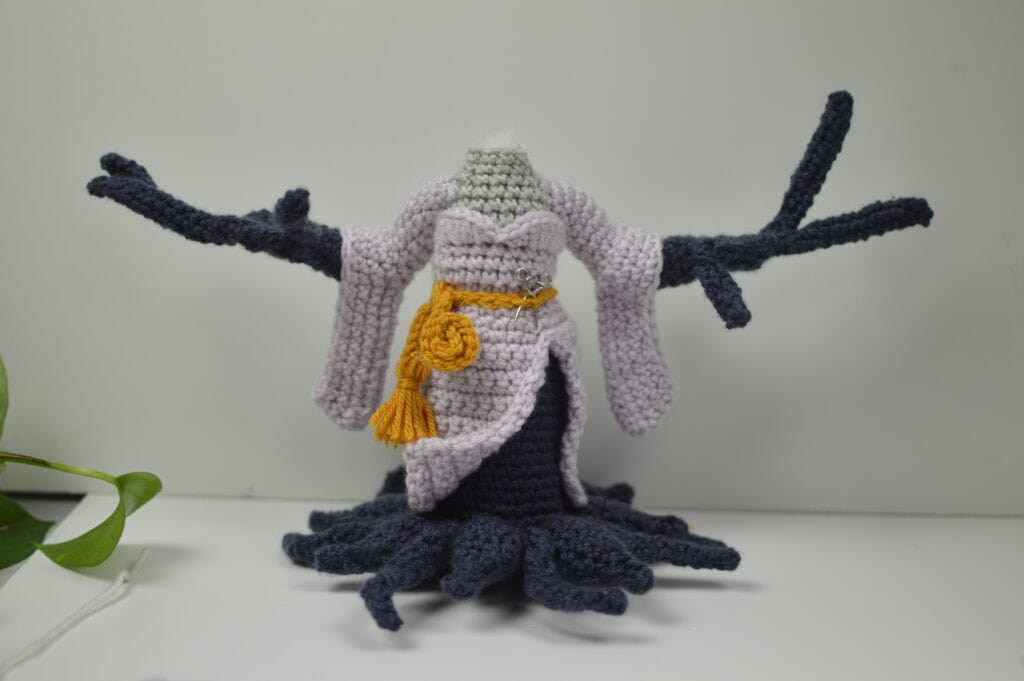
The Fates are a strong and mysterious creature that can be nowhere and everywhere at once, meaning they can materialize wherever they are needed but they can still see everything else that is going on. The Fates are not evil or benevolent, they are balance. These sisters consist of a tree trunk for a body covered by a long, flowing gown fit for the goddesses that they are, tree limbs for arms with golden leaves and three heads, each with their own personality.
Read The Fates Introduction Short Story on the With Alex Blog, here.

Serendipity, the middle sister, is the fate of love and good fortune. Her job is to use her spindle to spin a golden string that foretell a person’s future. As she spins the golden string she adds in love, friendship, and good fortune, hopeful that the new baby will have a beautiful life.
Jinx, the oldest of the sisters, is the fate of death, hate, and bad fortune. As Serendipity spins the golden string, Jinx adds in enemies, obstacles and bad fortune, balancing out the good that Serendipity has added in. She also uses her scissors to cut the string, signifying when a person will die but she doesn’t make the decision of when the person will die. That job goes to her younger sister.
Kismet, the youngest of the sisters, is the fate of life and balance. She considers everything that Serendipity and Jinx has added into a person’s life and then she uses her measuring tape to measure out how long that person should live. Kismet sees the whole picture of a person’s life which makes her more compassionate and sympathetic about the being who’s destiny they are creating. When Serendipity and Jinx argue, Kismet is the referee, which can be hard for her because she often wants to side with Serendipity even when Jinx is right.
Serendipity’s purple spindle hangs from one of the tree branch arms and is used to spin the golden thread of a person’s life. The spindle is made from a button, a bead, lobster clasp and a skewer that has been cut to the correct length.

Jinx’s scissors are tucked safely into their golden sash and she uses her scissors to cut the string, signifying when a person will die. Her scissors are made from a wire that has been bent into the correct shape.
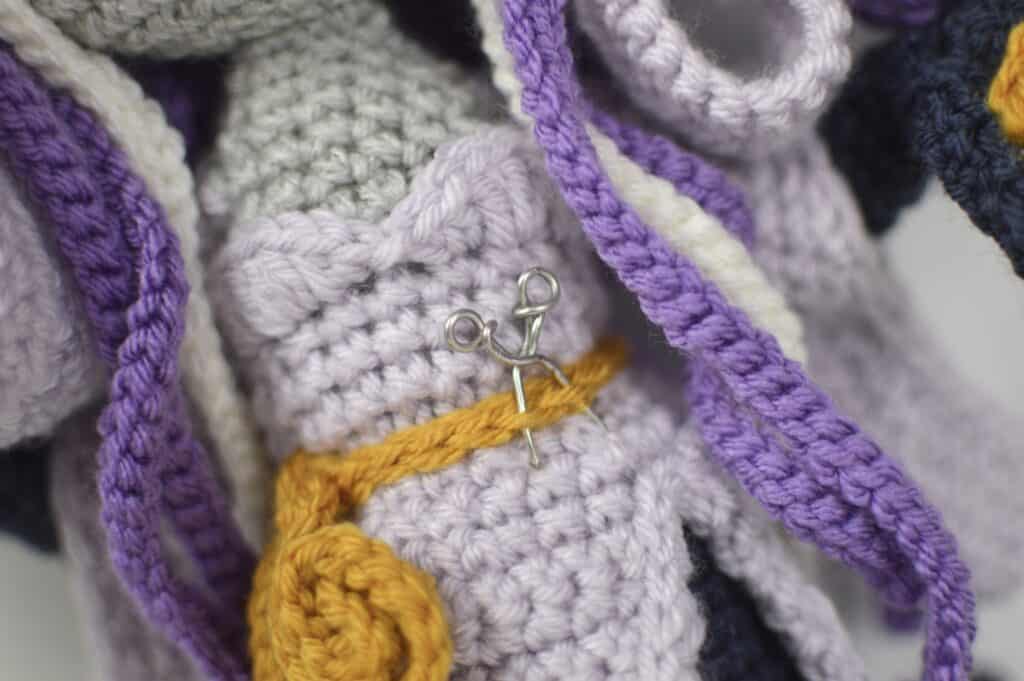
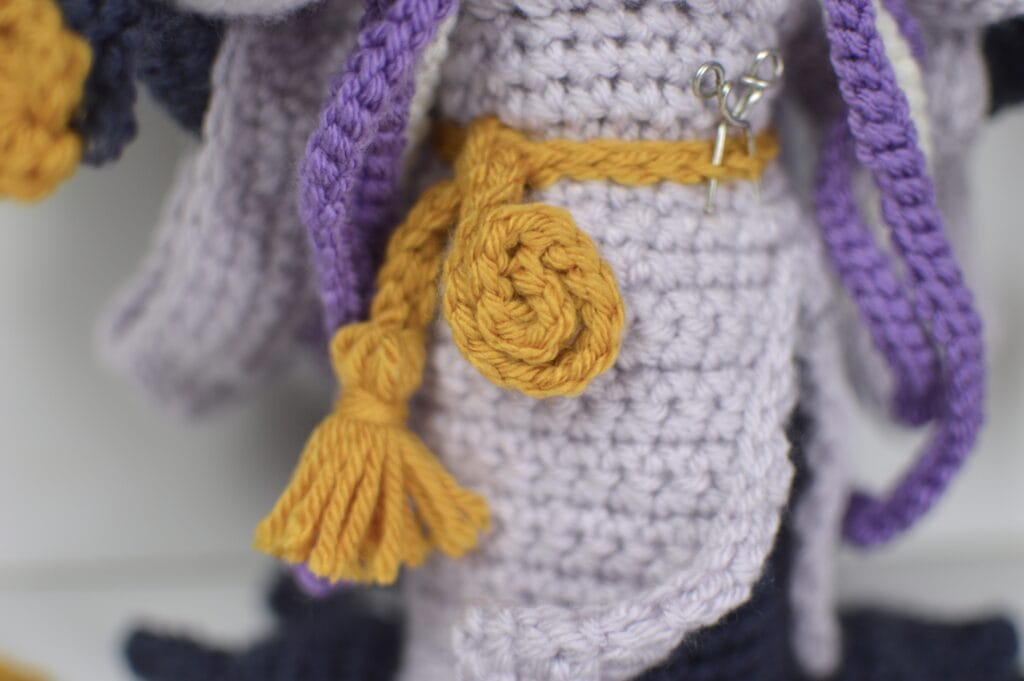
Kismet’s golden measuring tape is the golden sash that ties around their waist and she uses this measuring tape to measure out a person’s life. The measuring tape is made from a chain that has been slip stitched and then decorated with a tassel at the other end.
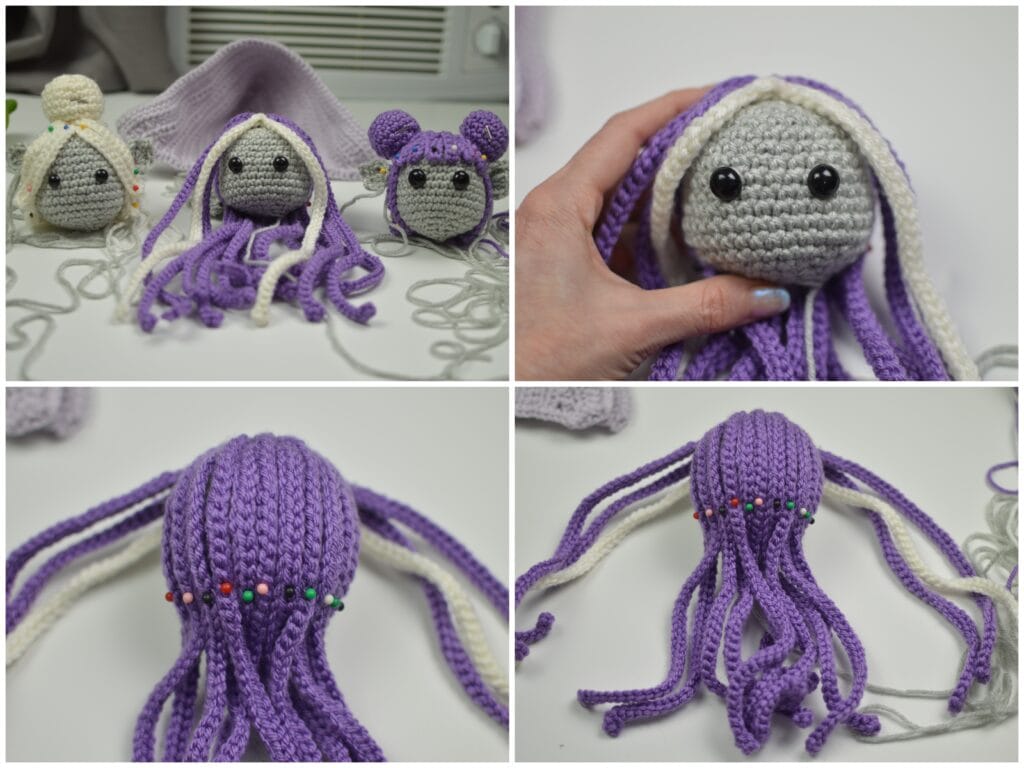
Serendipity’s long hair is crocheted by first making a circle, then crocheting hair strands into the back loops around the circle, and then more hair strands are crocheted in a spiral to the center, using the unworked front loops of the stitches. This is my favorite technique for crocheting/making hair for amigurumi.
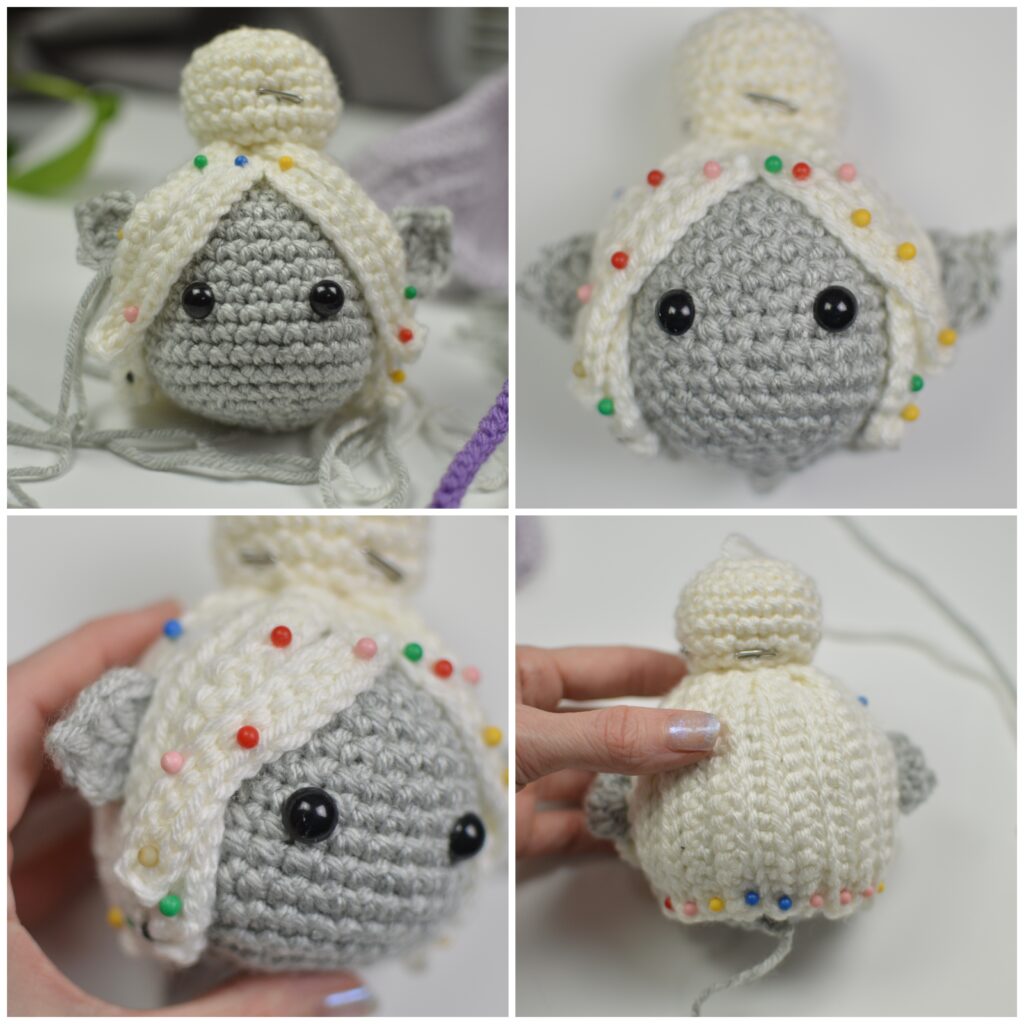
Jinx’s hair is worked similarly to Serendipity’s but is crocheted shorter and then glued to the head in a way to create the illusion that the hair is being pulled up into a bun on the top of her head. The bun is a crocheted ball that is glued to the top of the head and then decorated with the same golden leaf that the tree is covered by.
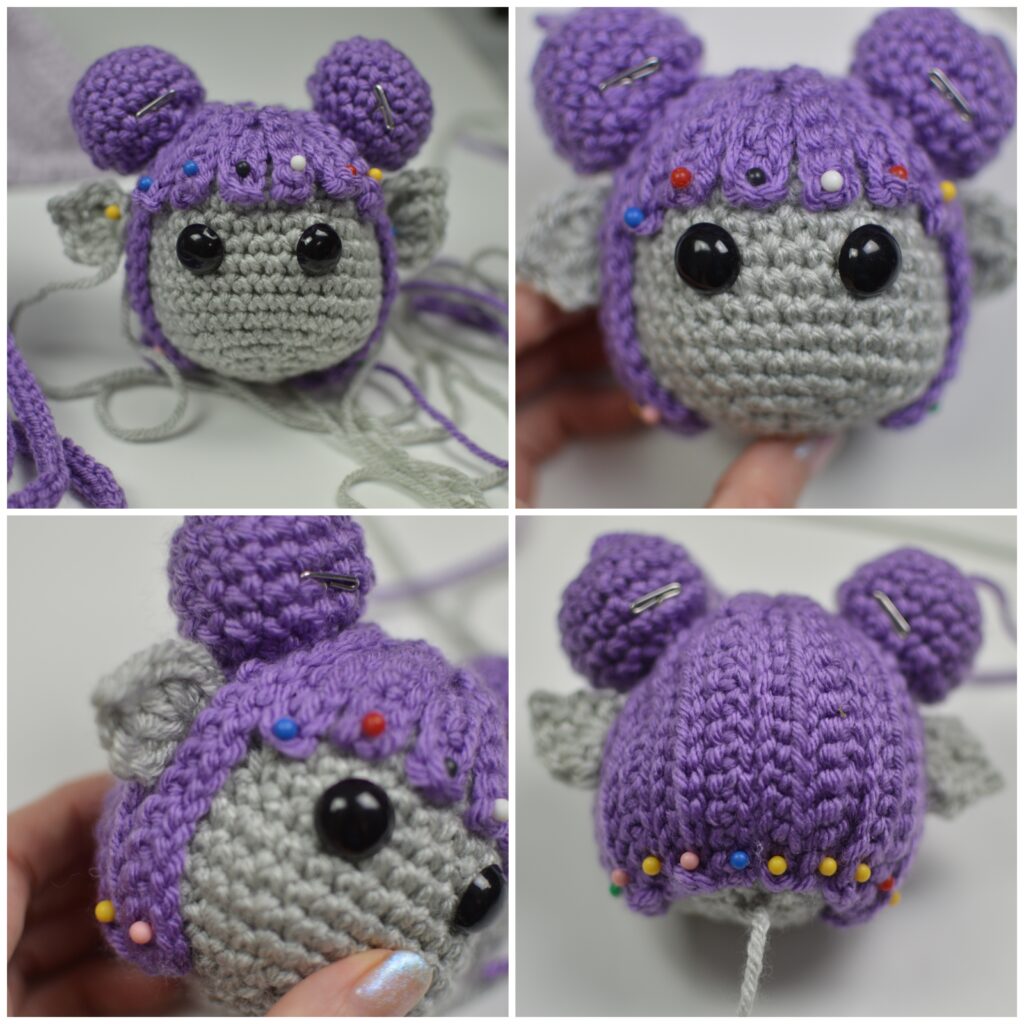
Kismet’s hair is very similar to Jinx but two smaller “space” buns have been added to the top of her head with golden strings tied around the bottom of each crocheted ball or bun.
The body of the Fates is made of a tree trunk that has long, winding roots and curling branches that stretch wide and act as the arms of the creature. The limbs are crocheted with wire in them to make the “arms” strong enough to hold Jinx’s and Kismet’s heads.
The same hook was used for The Fates as for Alex, Blue and Aurora. The Clover Amour Crochet Hook in size G 4.00 mm is perfect to crochet these patterns and I love using it because of the soft handle and how lightweight it is.
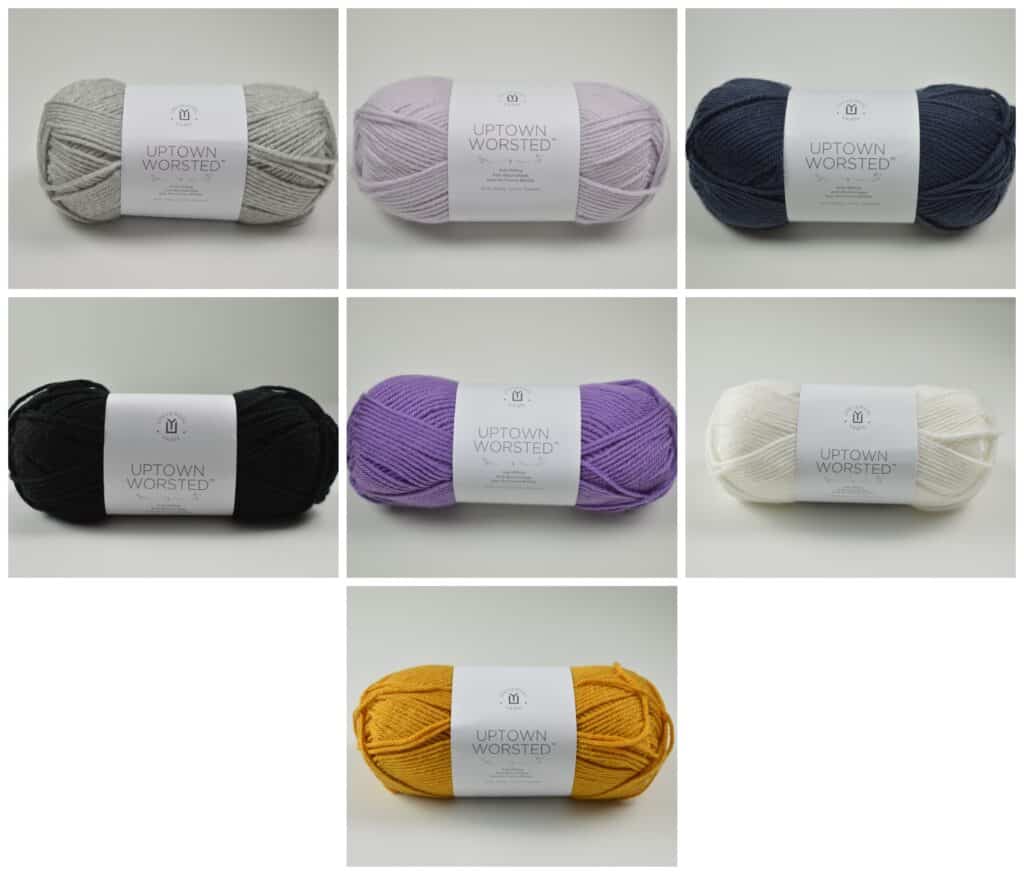
The yarn used for The Fates, is also the yarn I used for Alex, Blue and Aurora. I love using Universal Yarn Uptown Worsted to design with because of all the gorgeous colors, how great it frogs because it is anti-pilling acrylic yarn, and most of all because of the softness and feel. This yarn creates squishy stitches that are very defined and beautiful!
Now, let’s get started!
The Fates Amigurumi Pattern
Jinx, Serendipity and Kismet
Difficulty
Intermediate/Advanced
Size
11″ tall
Materials
- Size G 4.00 mm Clover Amour crochet hook
- Universal Yarn Uptown Worsted in Donahue (1), Pale Orchid (1), Black (1), Glow White (1), River (1), Dijon (1), Lavender (1)
- Polyester Fiberfill
- Stitch markers
- Scissors
- Darning needle
- Safety eyes (sizes 12 mm, 14 mm and 10 mm)
- Fabric glue
- Pins
- 16 gauge wire and wire cutter
- Hot glue and gun
- 1” purple button
- 12 mm white bead
- Lobster Clasp
- Wooden skewer, cut to 1.5” long
Abbreviations
- sc: single crochet
- 2sc: single crochet increase
- inv sc dec: invisible single crochet decrease
- st(s): stitch(es)
- sl st: slip stitch
- ch: chain
- sk: skip
- yo: yarn over
- yu: yarn under
- FLO: front loop only
- BLO: back loop only
- hdc: half double crochet
- dc: double crochet
- 2dc: double crochet increase
- 3dc: double crochet increase of 2
- tc: triple crochet
Notes, Tips and Tutorials
Some photo tutorials in this pattern are a different color to be seen better and some photo tutorials in this pattern are from Alex In Yarnder Land Amigurumi or Blue: Man In The Moon Amigurumi, but they teach the same things.
Tips
- This pattern is worked in a continuous round (in a spiral) unless otherwise noted. Mark the beginning of each round with a stitch marker.
- No gauge for this pattern but make sure to stay consistent with your stitches.
- You will need more than one stitch marker.Use the handle of the crochet hook or a chopstick to help with stuffing the doll with fiberfill.
- Keep the wire bent away from your face while crocheting around it.
Special Stitches
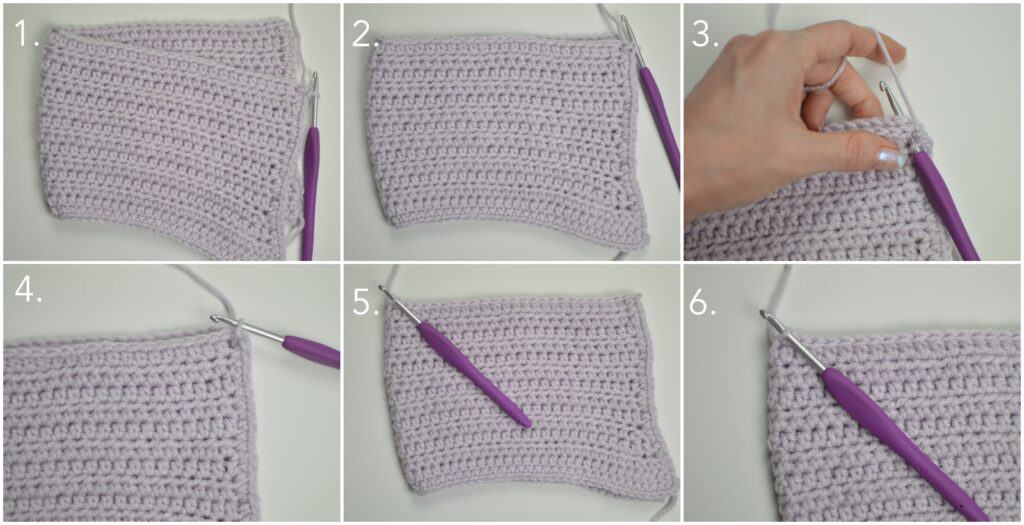
Invisible single crochet decrease (inv sc dec): insert the hook into the front loop only of the next 2 stitches (image 2), yarn under (image 3) and pull up a loop (image 4), yarn over (image 5) and pull through all of the loops on the hook. (image 6)

single crochet (sc): insert the hook into the next stitch (image 2), yarn under (image 3) and pull up a loop (image 4), yarn over (image 5) and pull through all of the loops on the hook. (image 6)
invisible join: Skip the stitch next to the last stitch made and insert the needle through the next stitch (image 2), pull through and insert the needle into the back loop only of the last stitch made (image 3) and pull through.
sl st 2tog: Insert the hook into the FLO of the next st, insert the hook into the FLO of the next st, yarn over and pull through the loops on the hook
Video Tutorials
The Pattern
- Please read all of the notes before beginning this pattern.
- This pattern is worked in a continuous round (in a spiral) unless otherwise noted.
- Mark the beginning of each round with a stitch marker.
Head: (Make 3)
Jinx: 10 mm safety eyes
Kismet: 14 mm safety eyes
Serendipity: 12 mm safety eyes
with donahue yarn:
R1: Make a magic ring or a loose slip knot, ch 1 and put 8 sc into the magic ring or loose slip knot. =8
Pull on the tail end to close the hole.
R2: 2sc into each st around. =16
R3: *2sc into the next st, sc into the next st. Repeat from the * around. =24
R4: sc into each st around. =24
R5: *2sc into the next st, sc into the next 2 sts. Repeat from the * around. =32
R6-R8: sc into each st around. =32
Weave in the end and flip right side out. Start stuffing the head with polyester fiberfill.
R9: sc into the next 14 sts, mark the middle of the 14th st with a new st marker, sc into the next 5 sts, mark the middle of the 5th st with another st marker, sc into the next 13 sts. =32
R10: sc into each st around. =32
R11: sc into the next 10 sts, 2sc into the next 2 sts, sc into the next 8 sts, 2sc into the next 2 sts, sc into the next 10 sts. =36
R12-R13: sc into each st around. =36
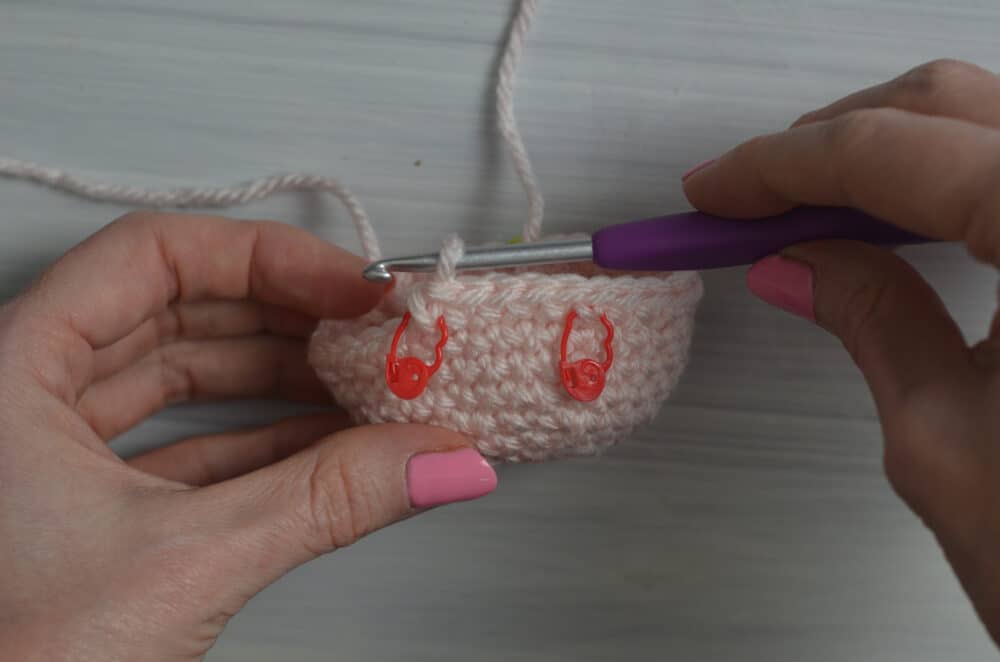
Take the 2 stitch markers out of R9 and replace them with safety eyes.
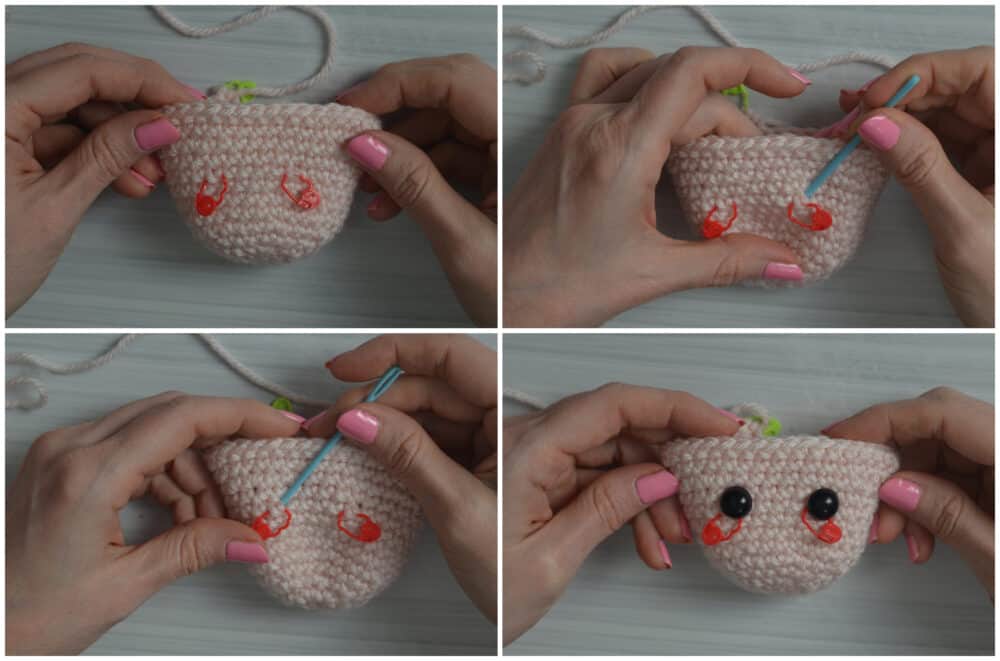
Continue stuffing the head as you continue the pattern.
R14: sc into the next 10 sts, (inv sc dec) x2, sc into the next 8 sts, (inv sc dec) x2, sc into the next 10 sts. =32
R15: *sc into the next 2 sts, inv sc dec. Repeat from the * around. =24
R16: *sc into the next st, inv sc dec. Repeat from the * around. =16
R17: inv sc dec, *sc into the next st, inv sc dec. Repeat from the * around until 2 sts remain, inv sc dec. =10
Do not cut the yarn for Jinx and Kismet, continue below.
Serendipity:
Cut the yarn but leave the tail end long enough to sew to the body, pull through the last stitch made and make an invisible join. Finish stuffing and shaping the head.
Add eyebrows, a nose, mouth, details to the eyes and blush to the cheeks.
Sew to the neck.
Jinx and Kismet:
R18: *sc into the next st, inv sc dec. Repeat from the * around until 1 st remains, sc into the last st. =7
Cut the yarn but leave the tail end long enough to close the hole and sew to the tree trunk limb, and pull through the last stitch. Finish stuffing and shaping the head.
Whip stitch around to close the hole, pull on the tail end.
Add eyebrows, a nose, mouth, details to the eyes and blush to the cheeks.
Sew or glue to the tree limbs.
Ear: (Make 4)
with donahue yarn:
R1: Make a magic ring or a loose slip knot, ch 1, (sc, hdc, 2dc) into the magic ring or loose slip knot, ch 2, sl st into the 2nd ch from the hook, 2dc into the magic ring or loose slip knot, ch 2 and sl st into the magic ring or loose slip knot. =8
Pull on the tail end to close the hole. Cut the yarn and pull through the last stitch before sewing to the head. Sew to the head 5 stitches away from the eyes.
Body/Trunk:
with river yarn:
R1: ch 24, mark the 1st ch from the hook with a st marker (leave in until later when working on this part) and sl st to the 1st ch. =24
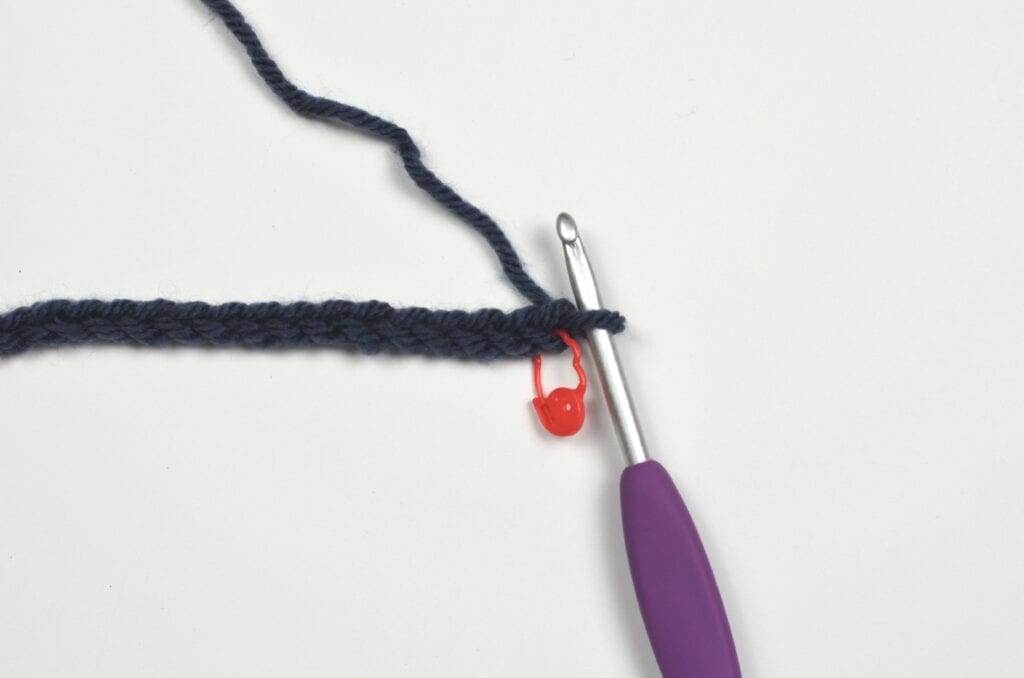
R2: sc into each ch around, mark the 1st sc of the round with a new st marker to mark the beginning of the round. =24
Flip right side out.
R3-R17: sc into each st around. =24
Weave in the end. Start stuffing the trunk with fiberfill and continue as you continue with the pattern.
R18: *2sc into the next st, sc into the next 5 sts. Repeat from the * around. =28
R19: sc into each st around. =28
Do not cut the yarn. Continue with the roots below.
Roots:
Small Root: ch 16, sl st into the 3rd ch from the hook, sl st into the next 2 chs, sc into the next 4 chs, hdc into the next 4 chs, dc into the next 3 chs, sl st into the same st.
Medium Root: 3sc into the next 2 sts, ch 1, turn the work, sc into the same st, sc into the next 5 sts, ch 1, turn the work, sc into the next 5 sts, ch 1, turn the work, sc into the next 4 sts, ch 1, turn the work, sc into the next 3 sts, ch 1, turn the work, sc into the next 2 sts, ch 1, turn the work, sc into the next st, (ch 1 , turn the work, sc into the same st) two times, ch 1 and sl st down the side of the root 9 times.
Large Root: 3sc into the next 2 sts, (ch 1, turn the work, sc into the same st, sc into the next 5 sts) three times, ch 1, turn the work, sc into the next 5 sts, ch 1, turn the work, sc into the next 4 sts, ch 1, turn the work, sc into the next 3 sts, ch 1, turn the work, sc into the next 2 sts, ch 1, turn the work, sc into the next st, (ch 1 , turn the work, sc into the same st) two times, ch 1 and sl st down the side of the root 11 times.
R20: medium root, sl st into the next st, small root, sl st into the next st, large root, sl st into the next st, small root, sl st into the next st, medium root, sl st into the next st, small root, sl st into the next st, large root, sl st into the next st, small root, sl st into the next st. Repeat from the * around. =14 roots
Cut the yarn, pull through the last stitch and make an invisible join but leave in the stitch marker to make lining up with the bottom piece easier.
Bottom of the Trunk/Roots:
with river yarn:
R1: Make a magic ring or a loose slip knot, ch 1 and put 6 sc into the magic ring or loose slip knot. =6
Pull on the tail end to close the hole.
R2: 2sc into each st around. =12
R3: *2sc into the next st, sc into the next st. Repeat from the * around. =18
R4: *2sc into the next st, sc into the next 2 sts. Repeat from the * around. =24
R5: *2sc into the next st, sc into the next 5 sts. Repeat from the * around. =28
R6: sc into each st around. =28
R7: medium root, sl st into the next st, small root, sl st into the next st, large root, sl st into the next st, small root, sl st into the next st, medium root, sl st into the next st, small root, sl st into the next st, large root, sl st into the next st, small root, sl st into the next st. Repeat from the * around. =14 roots
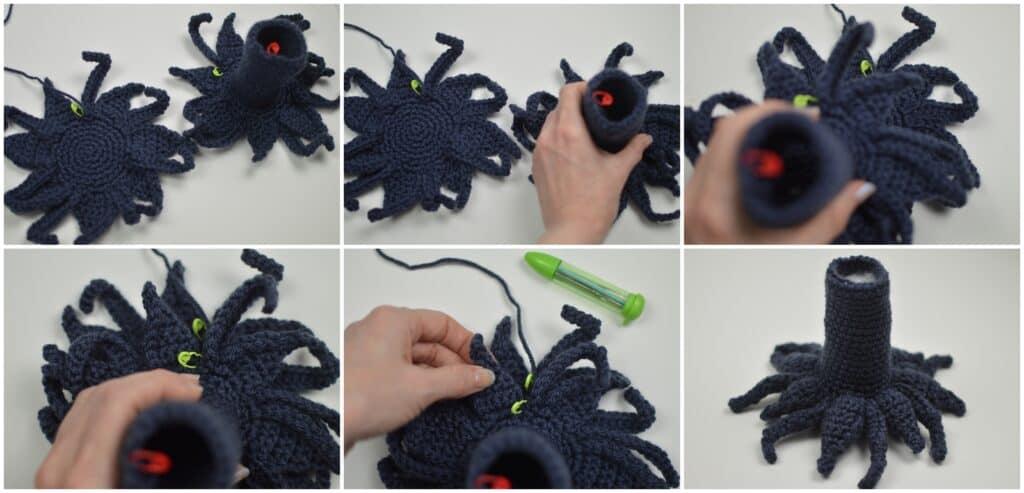
Cut the yarn, but leave the tail end long enough to sew the bottom of the roots to the trunk, and pull through the last stitch.
Line the bottom of the roots with the bottom of the roots on the trunk and sew together, stuffing with fiberfill as you sew around.
Waist, Body and Neck:
with pale orchid yarn:
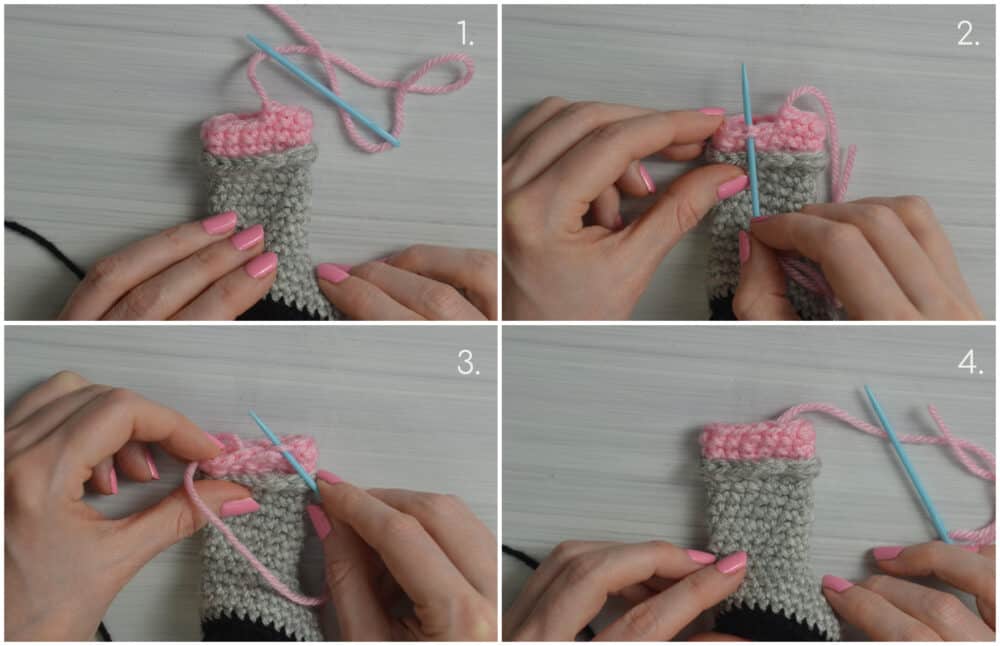
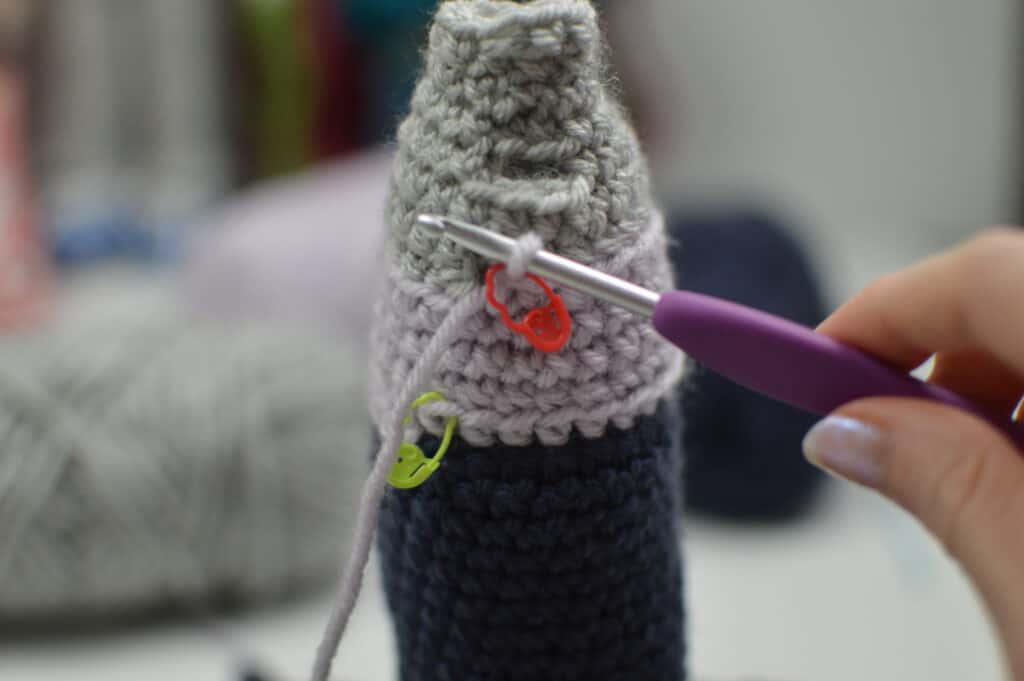
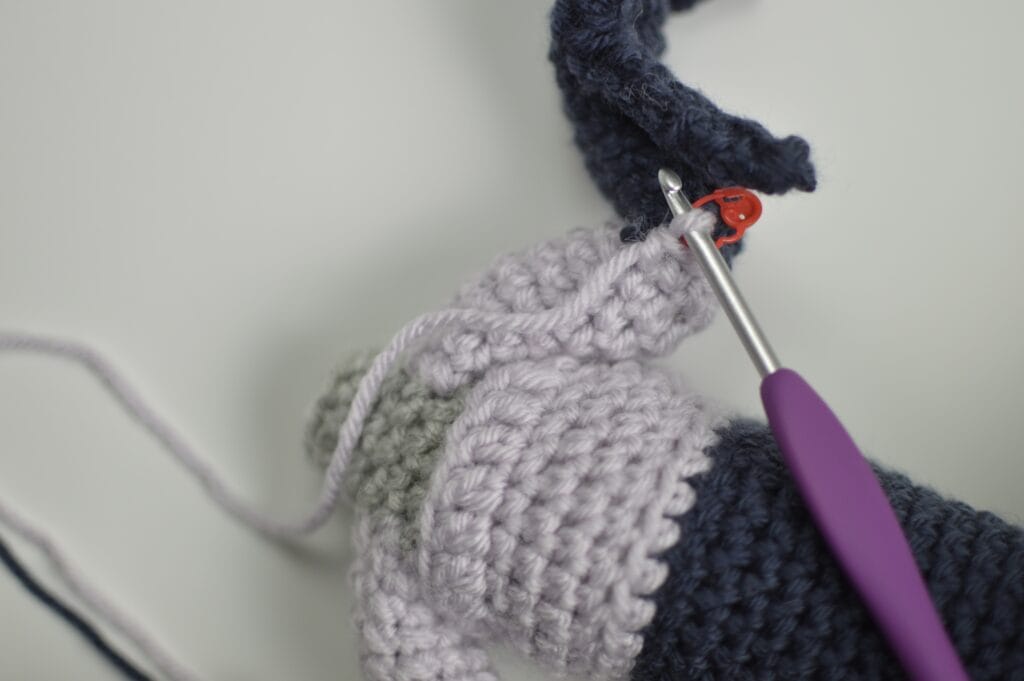
R1: Insert the hook into the marked st at the top of the trunk (image 1), yo and pull up a loop, ch 1, sc into the same st (image 2) and into each st around. (image 3) =24
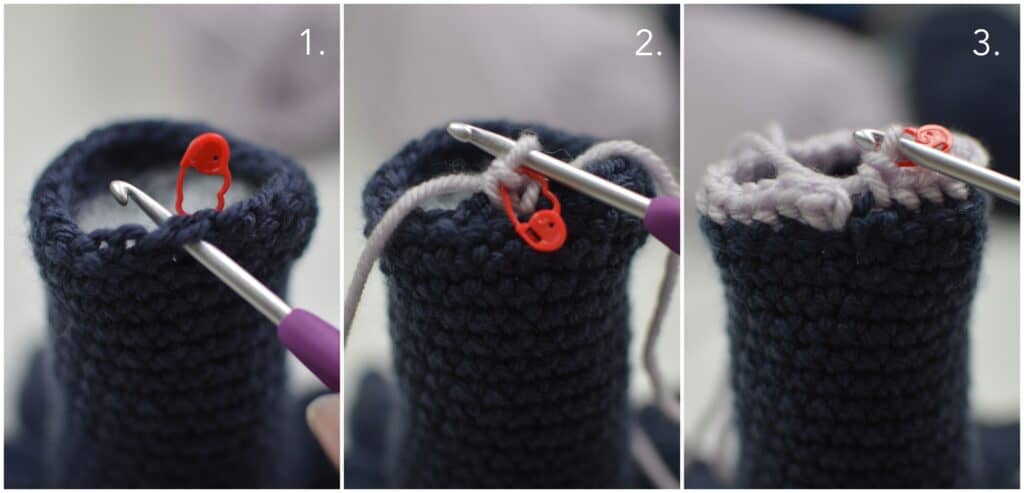
R2: sc BLO into each st around, mark the FLO of the last st made with a new st marker. =24
Weave in the end.
R3: sc into each st around. =24
R4: sc into the next 8 sts, inv sc dec, sc into the next 10 sts, inv sc dec, sc into the next 2 sts. =22
R5: sc into the next 7 sts, inv sc dec, sc into the next 9 sts, inv sc dec, sc into the next 2 sts. =20
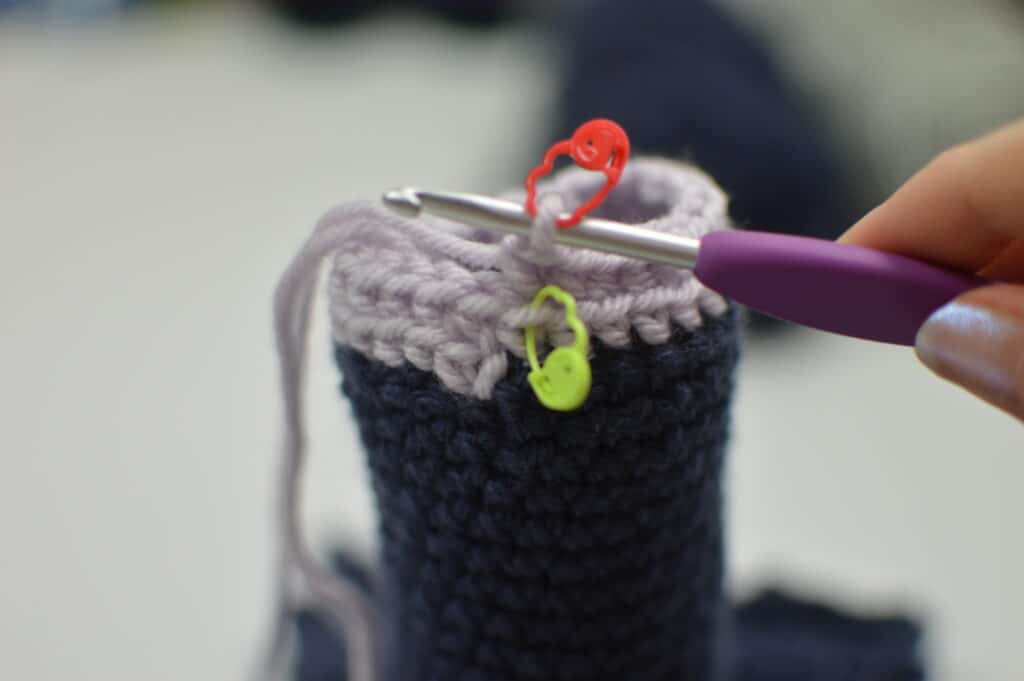
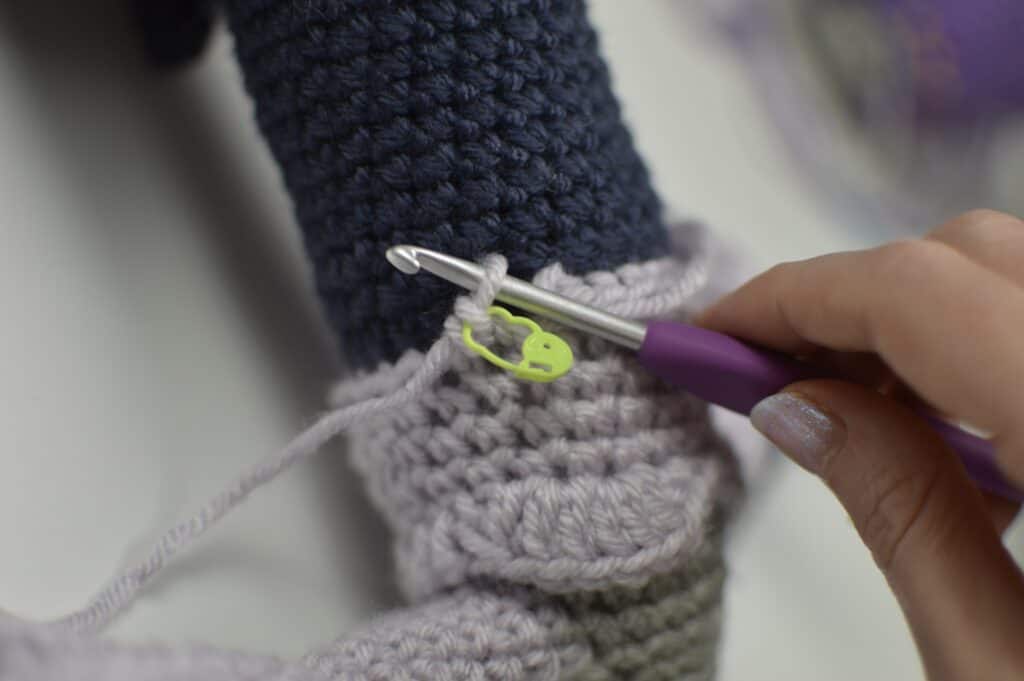
R6: Take the hook out of the working yarn and drop the pale orchid yarn but keep it at the front of the work. Insert the hook into the BLO of the next st (image 1), yo with the donahue yarn and pull up a loop, ch 1 (does not count as a st), sc BLO into the same st (mark this st with a new st marker) (image 2) and sc BLO into the next 19 sts. =20
with donahue yarn:
R7: sc into each st around. =20
Weave in the end.
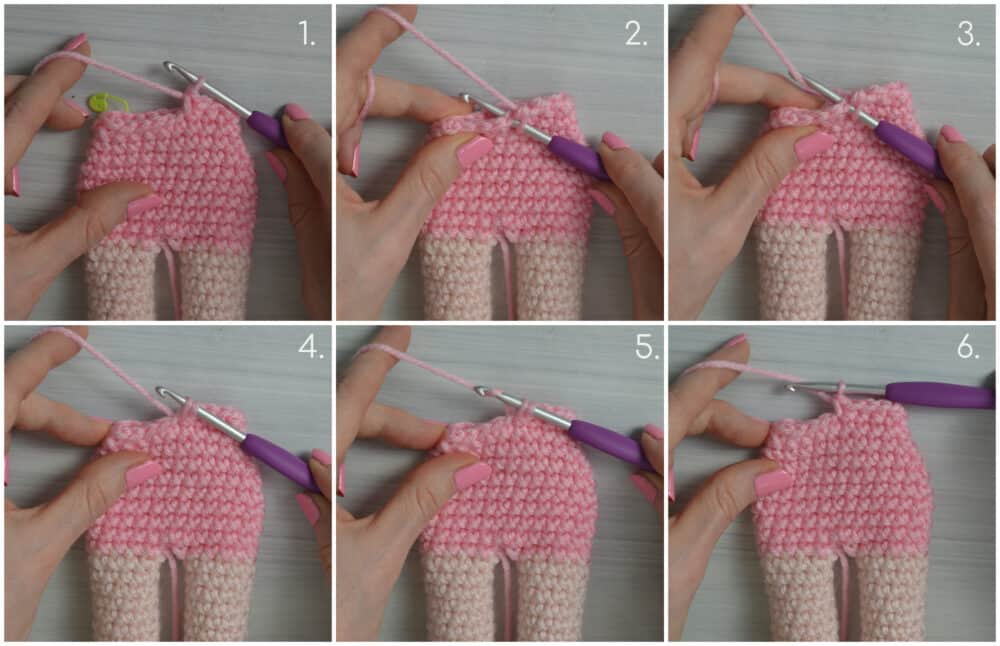
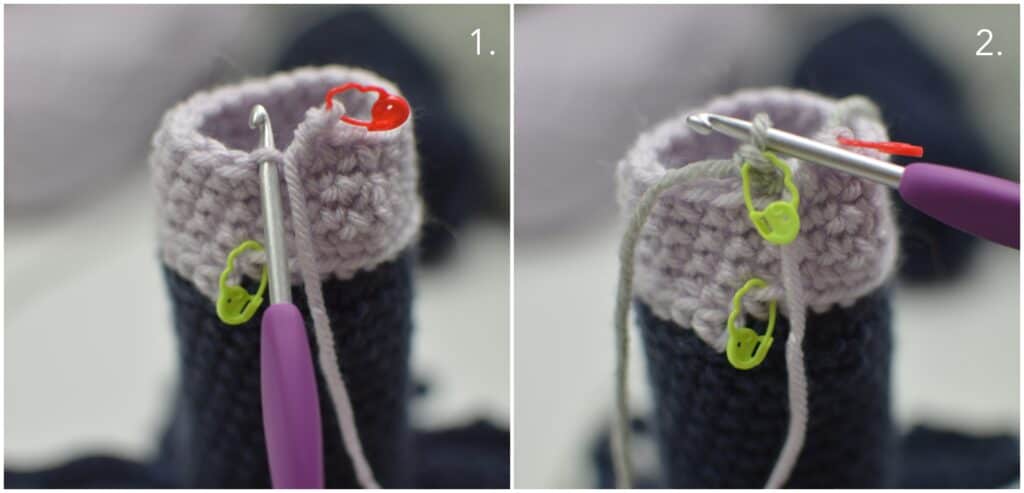
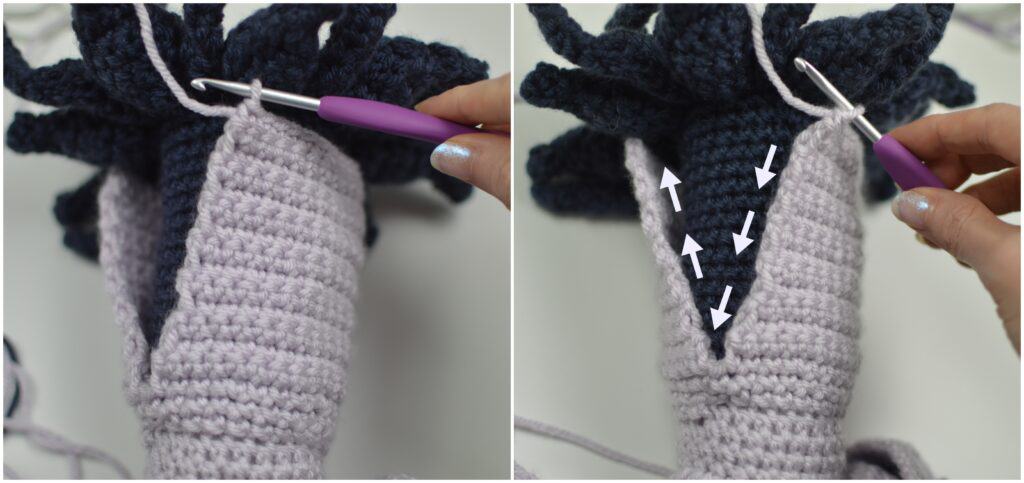
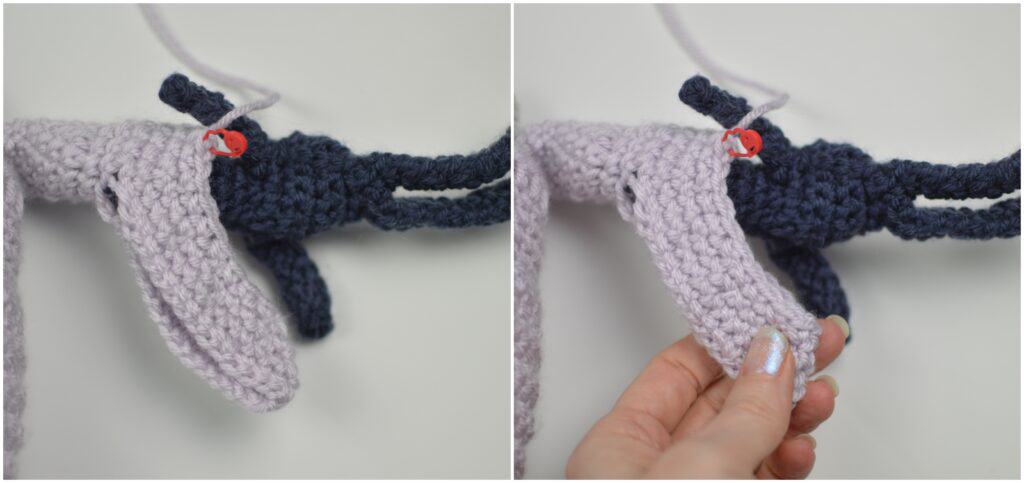
R8: sc into each st around until 3 sts remain (image 1), ch 2, sk 4 (image 2), and sc into the next st. (image 3) Mark this st as the 1st st of R9. (image 4)
R9: (sc is already made and marked in the first st), sc into the next 7 sts, ch 2, sk 4, sc into the next 4 sts, sc into the next 2 chs. =16
R10: inv sc dec, sc into the next 4 sts, inv sc dec, sc into the next 2 chs, inv sc dec, sc into the next 2 sts, inv sc dec. =12
R11: inv sc dec, sc into the next 3 sts, inv sc dec, sc into the next 5 sts. =10
R12: sc into each st around. =10
Cut the donahue yarn, pull it through the last stitch and make an invisible join before weaving in the end.
Go back to R6 and put the pale orchid working loop back on the hook. Continue with R6 below.
Neckline of the Dress:
with the pale orchid yarn:
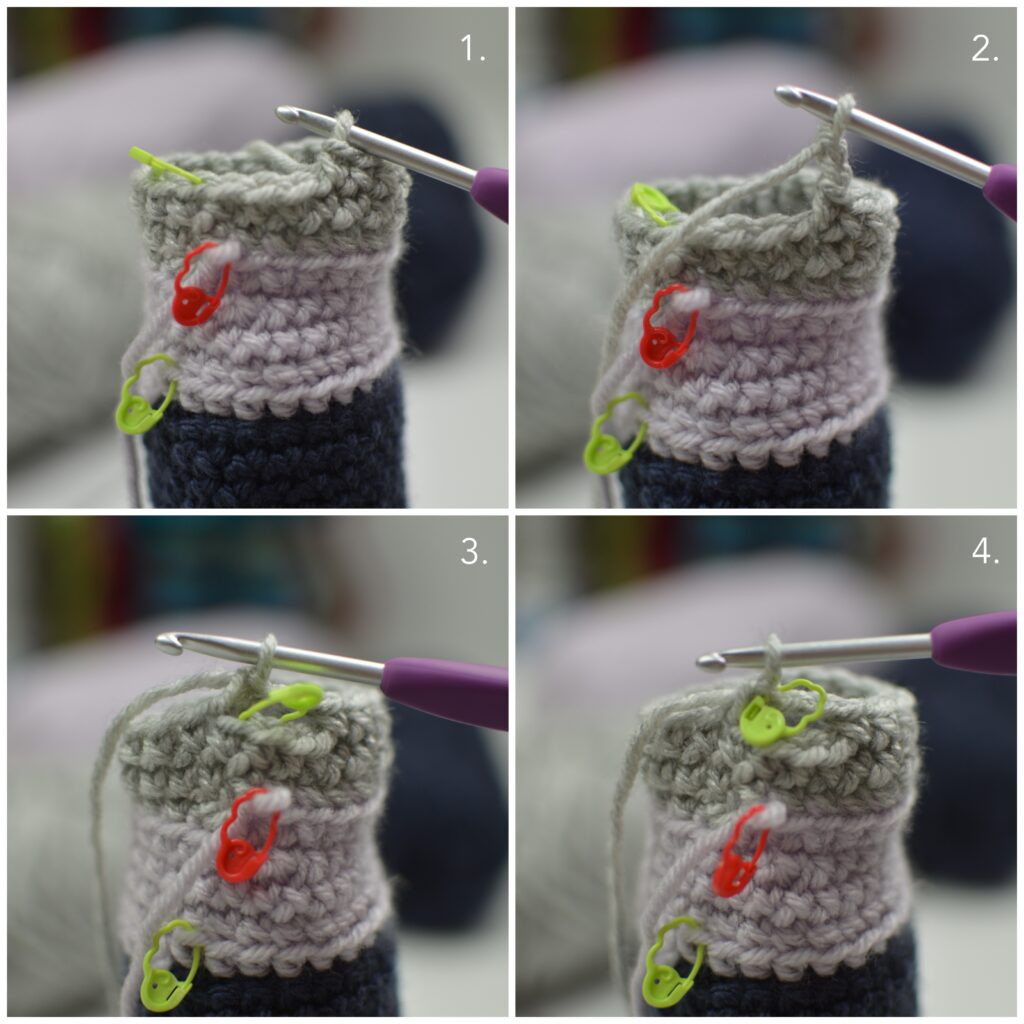
R6: dc FLO into the next st, 2dc FLO into the next st, 3dc FLO into the next st, hdc FLO and sc FLO into the next st, sl st FLO into the next st, sc FLO and hdc FLO into the next st, 3dc FLO into the next st, 2dc FLO into the next st, dc FLO into the next 12 sts. =28
Cut the yarn, pull through the last stitch and make an invisible join.
Dress Skirt:
with pale orchid yarn:
R1: Insert the hook into the marked st with the doll upside down, yo with pale orchid yarn, and pull up a loop, ch 1, sc into the same st and sc into each st around. =24
R2: sc into each st around. =24
R3: *2sc into the next st, sc into the next 3 sts. Repeat from the * around. =30
Row 4: ch 1 (does not count as a st), turn the work, sc into the same st and sc into each st around. =30
Row 5: ch 1, turn the work, sc into the next 29 sts. =29
Row 6: ch 1, turn the work, sc into the next 28 sts. =28
Row 7:-Row 17: ch 1, turn the work, sc into the same st and sc into each st around. =28
Border:
Row 1: ch 1, do not turn the work, sl st across the 1st side of the slit, sl st across the other side of the slit, ch 1, sl st around the bottom edge of the dress.
Cut the yarn, pull through the last stitch and make an invisible join before weaving in the ends.
Branches/Arms:
Cut a piece of wire double the length and longer than needed. Bend in half and twist the two wires together and then thread through the arm holes.
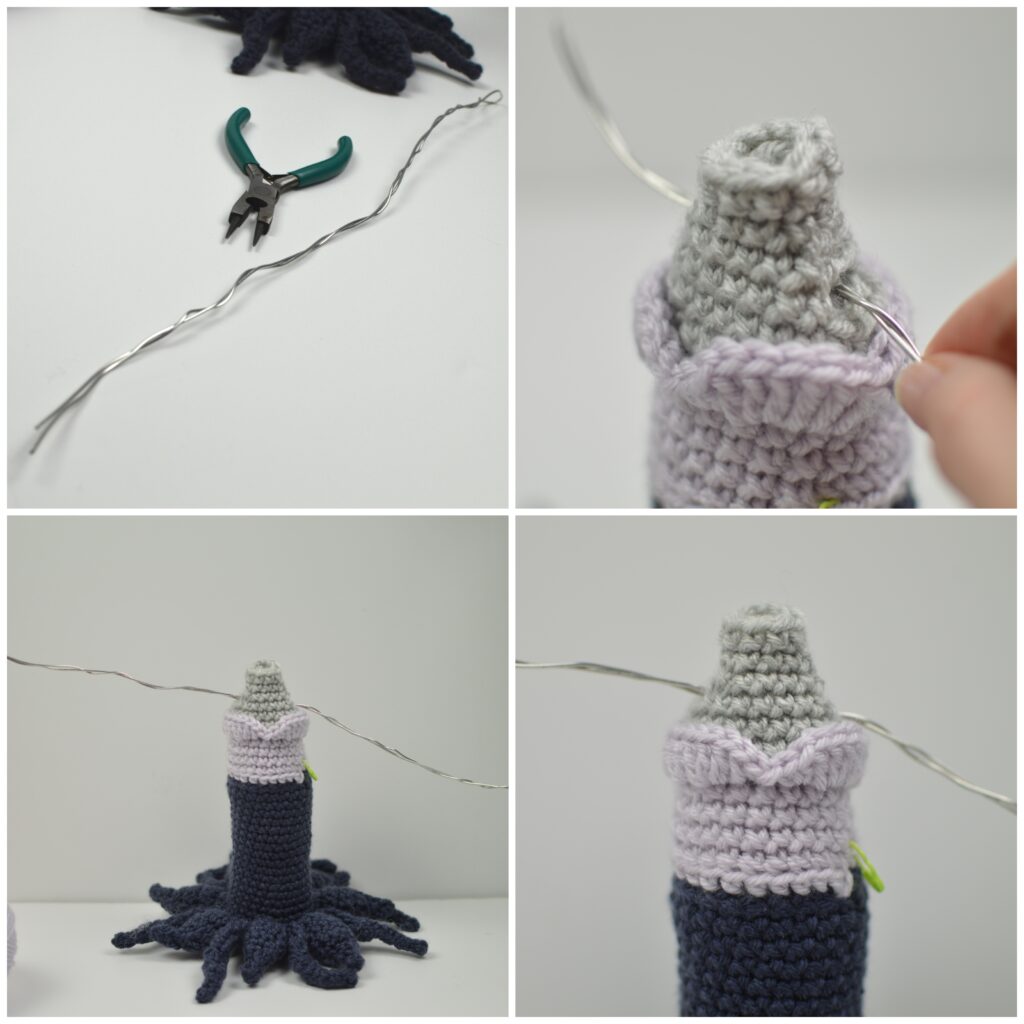
with pale orchid yarn:
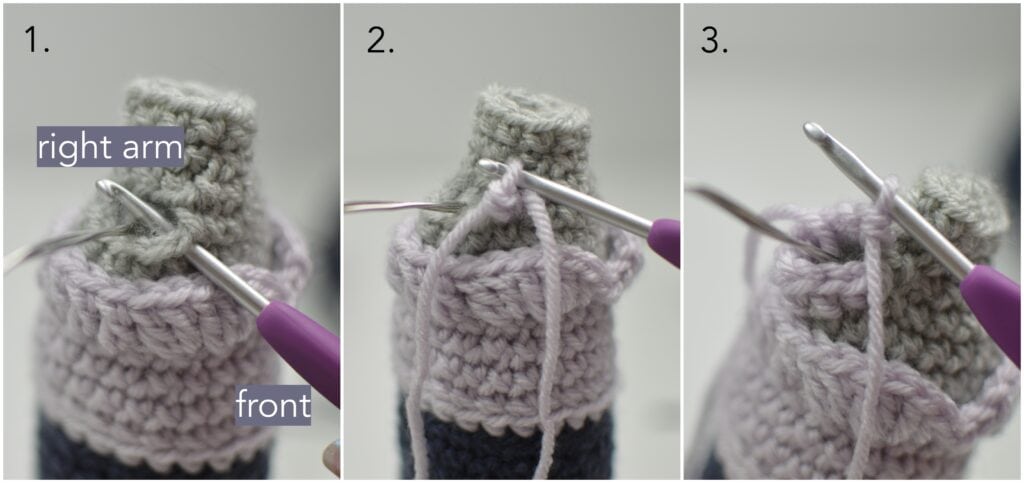
R1: Insert the hook into the corner of the arm hole (image 1), yo and pull up a loop, ch 1, sc into the same st (image 2), and sc around 9 more times. (image 3) =10
Right Arm Example:
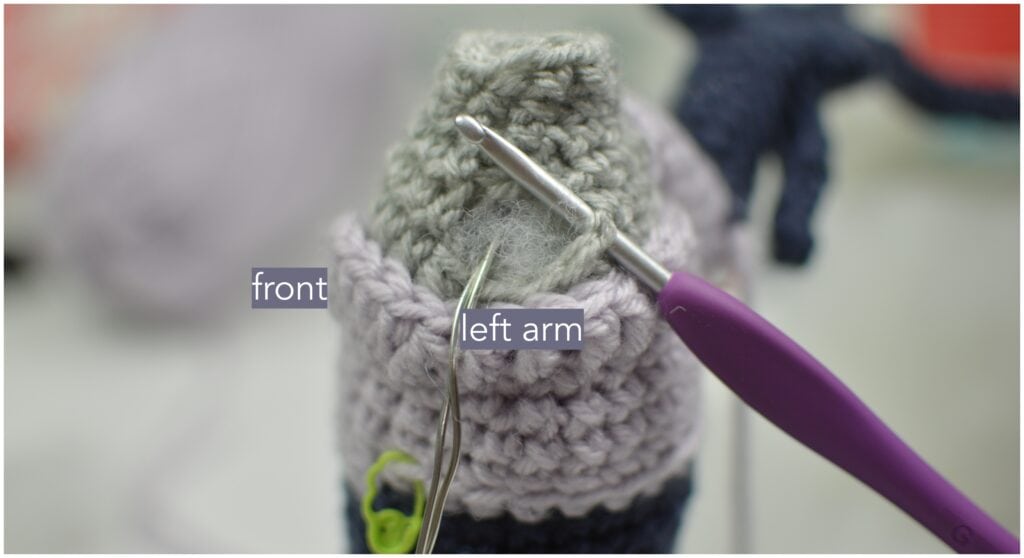
Left Arm Example:
R2-R8: sc into each st around. =10
Weave in the end and continue lightly stuffing.
R9: Take the hook out of the working yarn and drop the pale orchid yarn but keep it at the front of the work. Insert the hook into the BLO of the next st, yo with the river yarn and pull up a loop, ch 1 (does not count as a st), sc BLO into the same st (mark this st with a new st marker) and sc BLO into the next 9 sts. =10
with river yarn:
R10: sc into the next 4 sts, inv sc dec, sc into the next 4 sts. =9
Weave in the river end.
R11-R16: sc into each st around. =9
Do not cut the yarn, continue below.
Tree Limbs:
Small tree limb: ch 10, sl st into the 3rd ch from the hook, sc into the next 7 chs, sl st to the same st. =8
Big tree limb: 3sc into the next 2 sts, ch 1, turn the work, sc into the same st, sc into the next 5 sts, ch 1, turn the work, sc into the next 5 sts, ch 1, turn the work, sc into the next 4 sts, ch 1, turn the work, sc into the next 3 sts, ch 1, turn the work, sc into the next 2 sts, ch 1, turn the work, sc into the same st, ch 15, sl st into the 2nd ch from the hook, sl st into the next ch, sc into the next 12 chs, sl st into the same st, sc into the next st, ch 15, sl st into the 2nd ch from the hook, sl st into the next ch, sc into the next 12 chs, sl st into the same st, and sl st down the side of the limb 6 times.
R17: sc into the next 6 sts, remove the st marker and put it on the loop on the hook, big tree limb, small tree limb, sl st into the next st, small tree limb, st st into the next st, big tree limb, small tree limb, st st into the next st, small tree limb, sl st into the next 2 sts. =6 tree limbs
Bend the end of the wire into a circle and trim. Sew the two sides of the tree limbs together to form the “hand” and weave in the end.
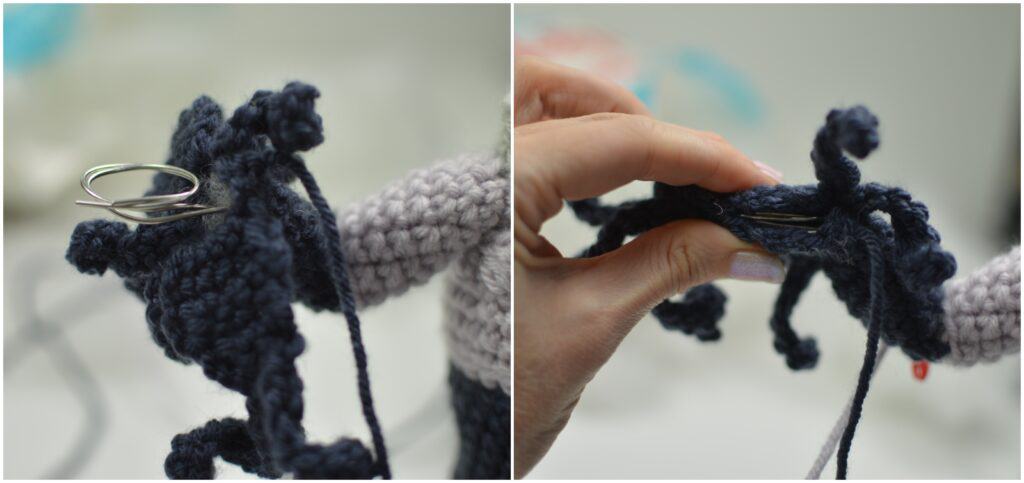
Bend the arm into the correct position.
Make another arm.
Sleeve: (2)
R1: Insert the hook into the pale orchid working loop from R8, sc FLO into the next 6 sts, ch 30, sc FLO into the next 4 sts. =40
R2: sc into each st and ch around. =40
R3: sc into the next 18 sts, (inv sc dec) x2, sc into the next 18 sts. =38
R4: sc into the next 6 sts, *inv sc dec, sc into the next 2 sts. Repeat from the * around. =30
R5: sc into the next 6 sts, *inv sc dec, sc into the next 2 sts. Repeat from the * around. =24
Cut the yarn, pull through the last stitch and make an invisible join. Seam down the sleeve to finish the bell sleeve. Weave in the end.
Hair:
Kismet:
with lavender yarn:
Wig:
R1: Make a magic ring or a loose slip knot, ch 1 and put 8 sc into the magic ring or the loose slip knot, sl st to the first st of the round. =8
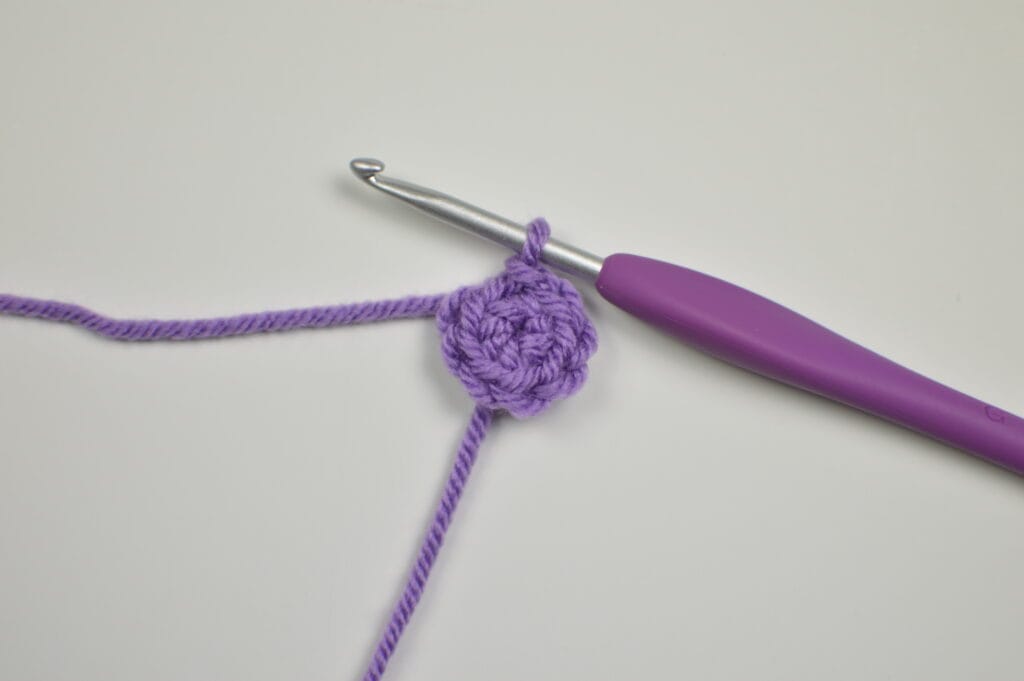
Pull on the tail end to close the hole.
R2: *ch 17, sc into the 3rd ch from the hook and into each ch across, sl st BLO into the next st on the circle. Repeat from the * around until 5 hair strands have been made.
*ch 7, sc into the 3rd ch from the hook and into each ch across, sl st BLO into the next st on the circle. Repeat from the * around until a total of 8 hair strands have been made.
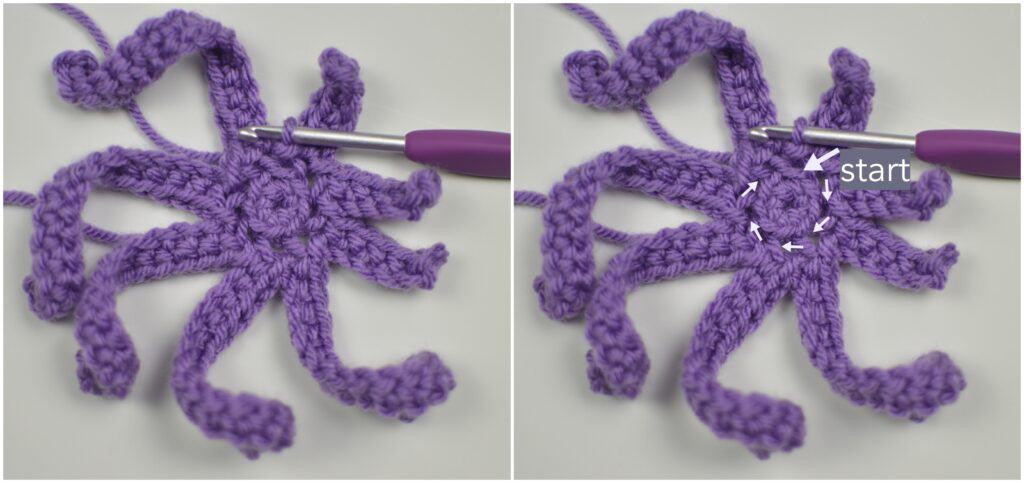
Continue by working in a spiral to the center of the circle. Work into the exposed front loops of the sts from R1.
*ch 7, sc into the 3rd ch from the hook and into each ch across, sl st FLO into the next st on the circle. Repeat from the * around until a total of 11 hair strands have been made.
*ch 17, sc into the 3rd ch from the hook and into each ch across, sl st FLO into the next st on the circle. Repeat from the * around until a total of 17 hair strands have been made.
Cut the yarn, pull through the last stitch and weave in the ends.
Bun: (Make 2)
R1: Make a magic ring or a loose slip knot, ch 1 and put 8 sc into the magic ring or the loose slip knot. =8
Pull on the tail end to close the hole.
R2: 2sc into each st around. =16
R3-R6: sc into each st around. =16
Weave in the end and flip right side out.
R7: *inv sc dec. Repeat from the * around. =8
Stuff with fiberfill.
Cut the yarn, pull through the last stitch and whip stitch to close. Weave in the ends. Use fabric glue to glue to the top sides of the head after gluing the hair strands. Glue the hair strands on with the shorter strands in the front and the longer strands in the back.
Jinx:
with glow white yarn:
Wig:
R1: Make a magic ring or a loose slip knot, ch 1 and put 8 sc into the magic ring or the loose slip knot, sl st to the first st of the round. =8
Pull on the tail end to close the hole.
R2: *ch 17, sc into the 3rd ch from the hook and into each ch across, sl st BLO into the next st on the circle. Repeat from the * around until 8 hair strands have been made.
Continue by working in a spiral to the center of the circle. Work into the exposed front loops of the sts from R1.
*ch 17, sc into the 3rd ch from the hook and into each ch across, sl st FLO into the next st on the circle. Repeat from the * around until a total of 17 hair strands have been made.
Cut the yarn, pull through the last stitch and weave in the ends.
Bun:
R1: Make a magic ring or a loose slip knot, ch 1 and put 8 sc into the magic ring or the loose slip knot. =8
Pull on the tail end to close the hole.
R2: 2sc into each st around. =16
R3: *2sc into the next st, sc into the next 3 sts. Repeat from the * around. =20
R4-R7: sc into each st around. =20
Weave in the end and flip right side out.
R8: *sc into the next 3 sts, inv sc dec. Repeat from the * around. =16
R9: *inv sc dec. Repeat from the * around. =8
Stuff with fiberfill.
Cut the yarn, pull through the last stitch and whip stitch to close. Weave in the ends. Use fabric glue to glue to the top of the head after gluing the hair strands.
Serendipity:
Wig:
with lavender yarn:
R1: Make a magic ring or a loose slip knot, ch 1 and put 8 sc into the magic ring or the loose slip knot, insert the hook into the 1st st of the round, yo over with glow white yarn and sl st. =8
Photo
Pull on the tail end to close the hole.
with glow white yarn:
R2: ch 50, 2sc into the 2nd ch from the hook, sl st into each remaining ch across, sl st BLO into the next st on the circle. ch 50, 2sc into the 2nd ch from the hook, sl st into each remaining ch across, insert the hook into the BLO of the next st on the circle, yo over with lavender yarn and sl st BLO.
with lavender yarn:
*ch 50, 2sc into the 2nd ch from the hook, sl st into each remaining ch across, sl st BLO into the next st on the circle. Repeat from the * around until a total of 8 hair strands have been made.
Continue by working in a spiral to the center of the circle. Work into the exposed front loops of the sts from R1.
*ch 50, 2sc into the 2nd ch from the hook, sl st into each remaining ch across, sl st FLO into the next st on the circle. Repeat from the * around until a total of 17 hair strands have been made.
Cut the yarn, pull through the last stitch and weave in the ends.
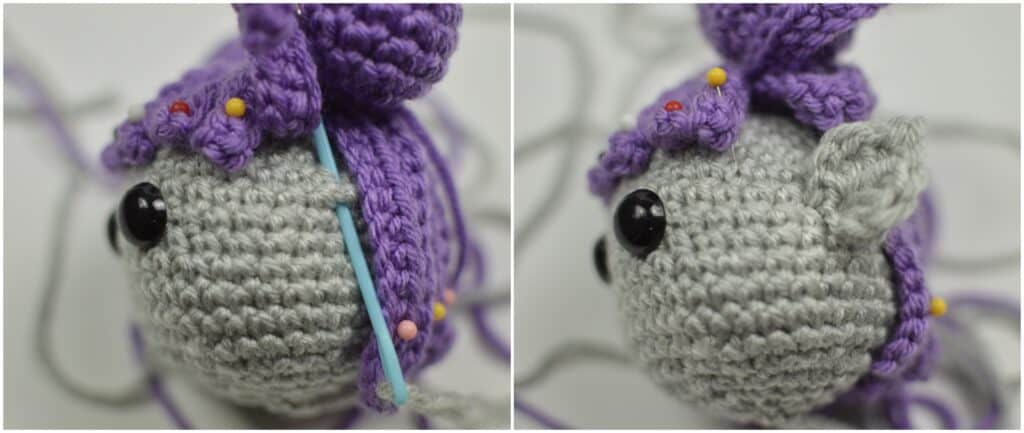
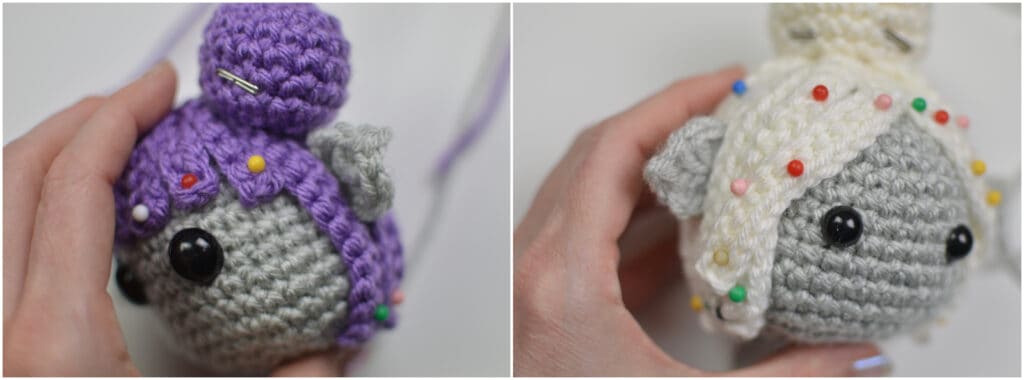
Glue the back layer to Serendipity’s head and then arrange 3 strands on each side around her face without glue.
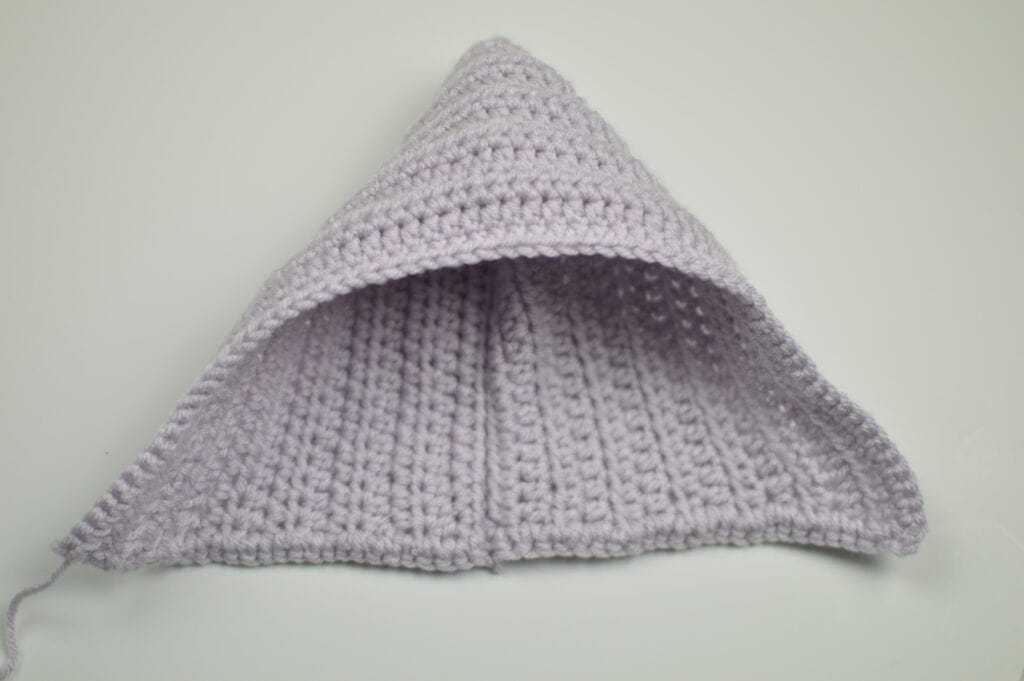
Hood:
with pale orchid yarn:
Row 1: ch 63, hdc into the 4th ch from the hook, hdc in each remaining ch across. =60
Row 2: ch 2 (does not count as a st), turn the work, hdc into the same st, (hdc2tog) x2, hdc across until 5 sts remain, (hdc2tog) x2, hdc into the last st. =56
Row 3: ch 2, turn the work, hdc into the same st, (hdc2tog) x2, hdc across until 5 sts remain, (hdc2tog) x2, hdc into the last st. =52
Row 4: ch 2, turn the work, hdc into the same st, hdc2tog, hdc across until 3 sts remain, hdc2tog, hdc into the last st. =50
Row 5-Row 13: ch 2, turn the work, hdc into the same st, hdc into each remaining st across. =50
Border:
Row 1: ch 1, do not turn the work, sc across the side, ch 3 and sc across the front, ch 3 and sc across the other side. Do not cut the yarn.
Fold the hood in half and slip stitch the two ends together to seam up the back of the hood.
Cut the yarn, pull through the last stitch and weave in the ends.
Leaves:
with dijon yarn:
R1: Make a loose slip knot or a magic ring, ch 1, (sc, hdc, 2dc, tc) into the loose slip knot or magic ring, ch 2, sl st into the 2nd ch from the hook, (tc, 2dc, hdc, sc, sl st) into the loose slip knot or magic ring. =11
Pull on the tail end to close the hole. Cut the yarn and pull through the last stitch.
Make 8 total leaves.
Use hot glue to glue to the tree branches, limbs and one to the side of Jinx’s bun.
Scissors:
- Cut a piece of wire to make it easier to work with.
- Bend the wire into the correct shape.
- Trim if needed.

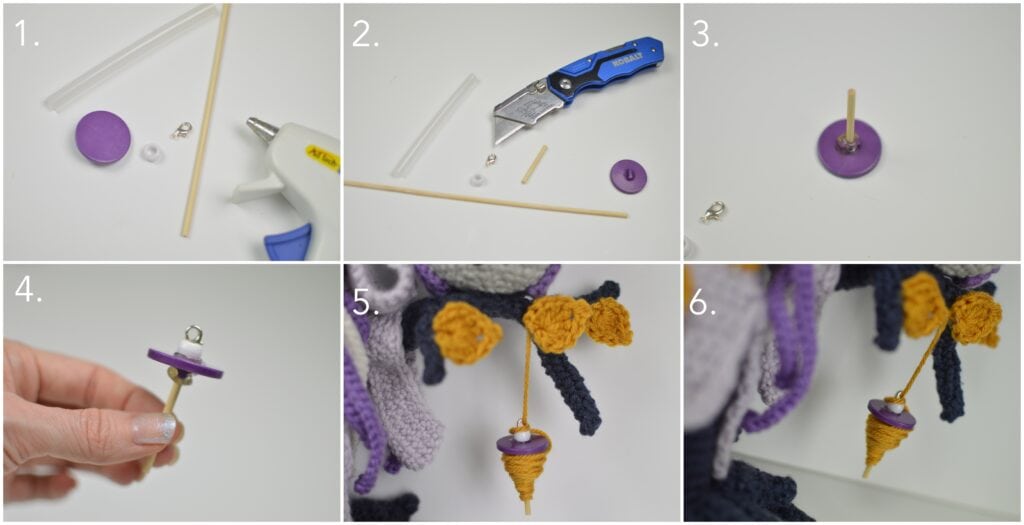
Spindle:
- Cut the skewer to 1.5 inches long.
- Glue the skewer to the bottom of the button with hot glue.
- Glue the bead to the top of the button.
- Glue the lobster clasp inside of the bead.
- Wrap dijon yarn around the skewer till the desired effect and thread through the lobster clasp.
- Tie to the tree branch with a golden leaf on top of the string.
Measuring Tape/Sash:
with dijon yarn:
Row 1: ch 61, sl st into the 2nd ch from the hook and across. =60
Cut the yarn, but leave the tail end long enough to sew the rolled measuring tape.
Tie to the waist and roll up one end of the measuring tape. Sew into the correct position.
Make a blank size tassel and add to the other side of the sash.
The End!
I would love to see your Alex In Yarnder Land Dolls! Tag @_with_alex and use #crochetingwithalex on Instagram so I can see and share your projects.
Join the Alex In Yarnder Land Facebook Group to keep up to date on all things Alex In Yarnder Land!
Read The Fates Introduction Short Story on the With Alex Blog.
Favorite the pattern on ravelry.
Pin the pattern for later on pinterest.
And check back on the With Alex Blog for more crochet and tunisian crochet patterns, tutorials and short stories.
Find With Alex on her Blog | Instagram | Facebook | YouTube | Pinterest | Ravelry
Stay connected with Clover on Facebook | Twitter | Instagram | Pinterest | YouTube | Ravelry