Blue: Man In the Moon Amigurumi
Hello to you all! I’m Alex, the crochet and tunisian crochet designer behind With Alex and I’m thrilled to be back on the Clover Blog today! I have another character for you all to meet from the Alex In Yarnder Land Series!
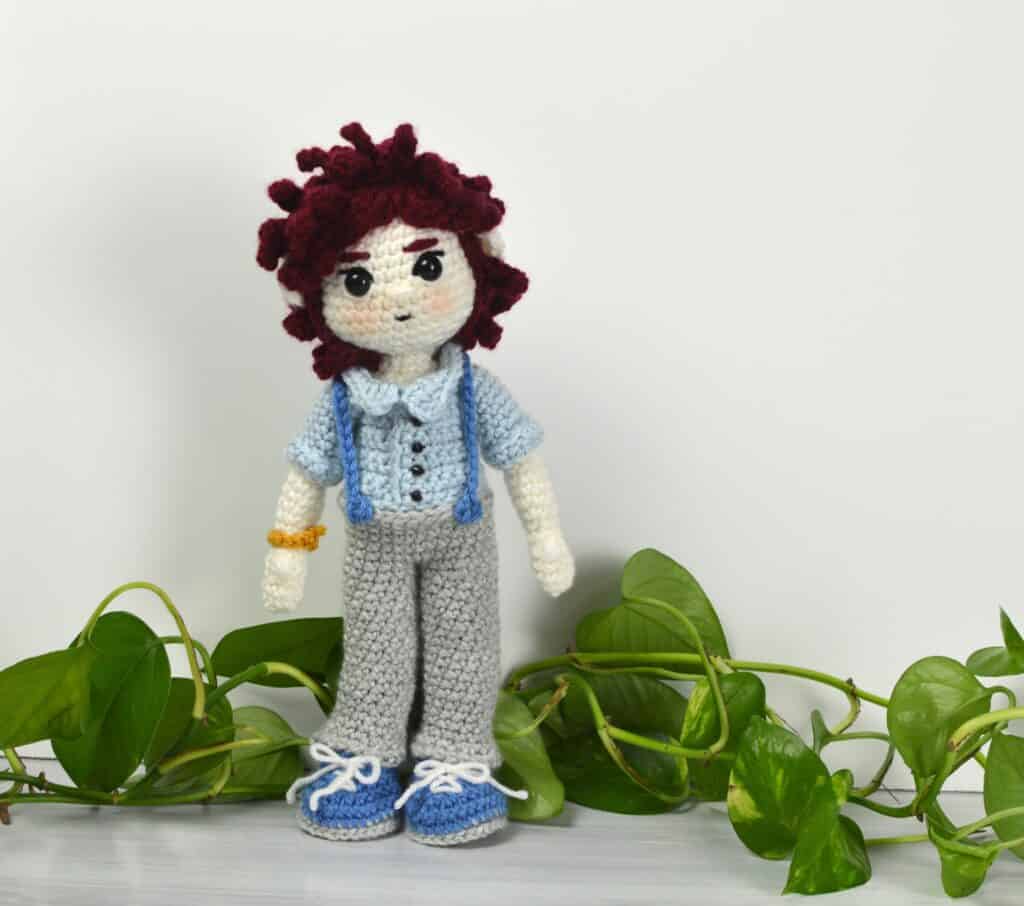
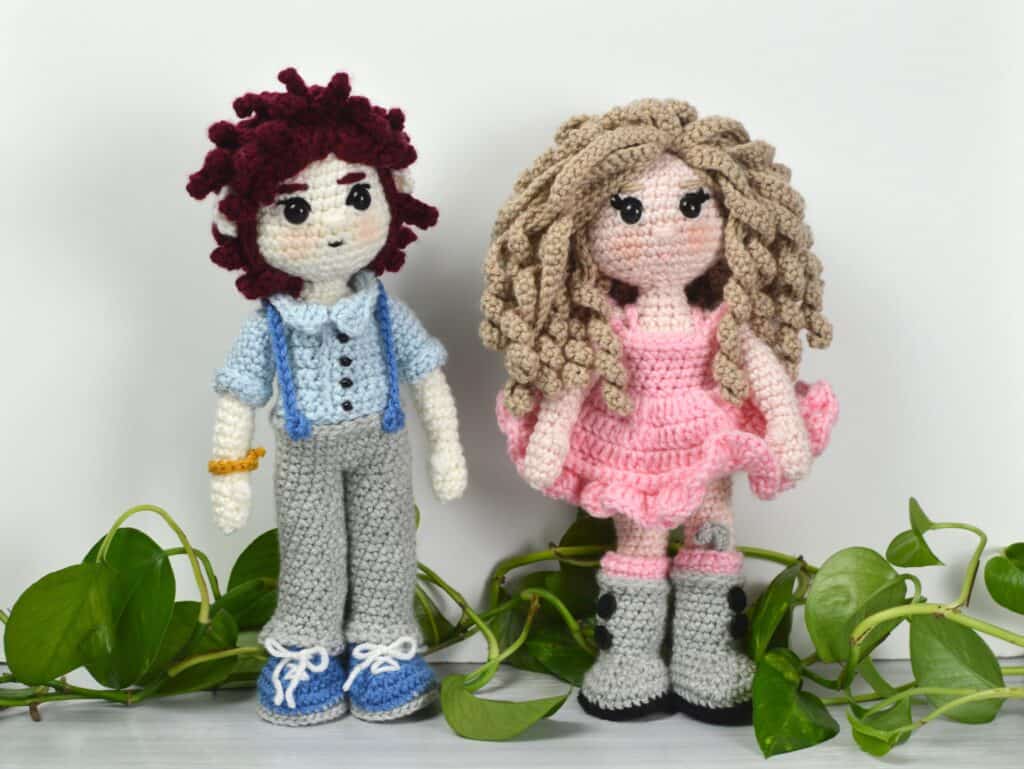
Meet Blue, the man in the moon. Blue is the first person to see Alex when she enters Yarnder Land and he can not get her off of his mind. His job is to watch over Yarnder Land and help the lost find their way home. Blue also has a secret!
Find out more about the Alex In Yarnder Land Series, here and find out more about Blue’s first meeting with Alex from his point of view in his short story on my blog, here.

And get the free crochet pattern for Alex In Yarnder Land on the Clover Blog, here!
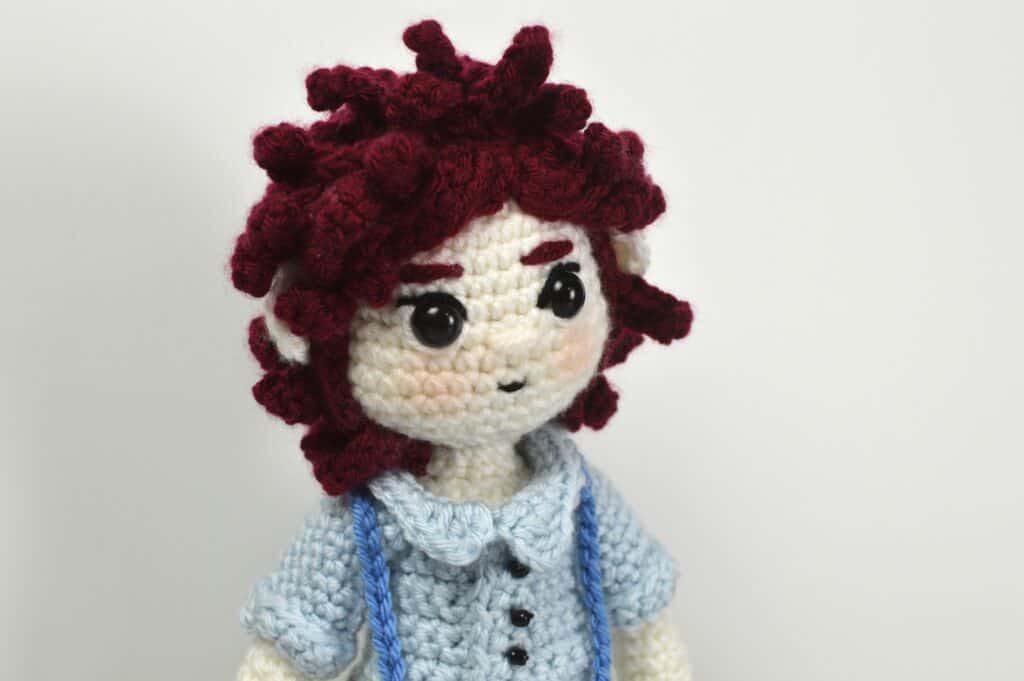
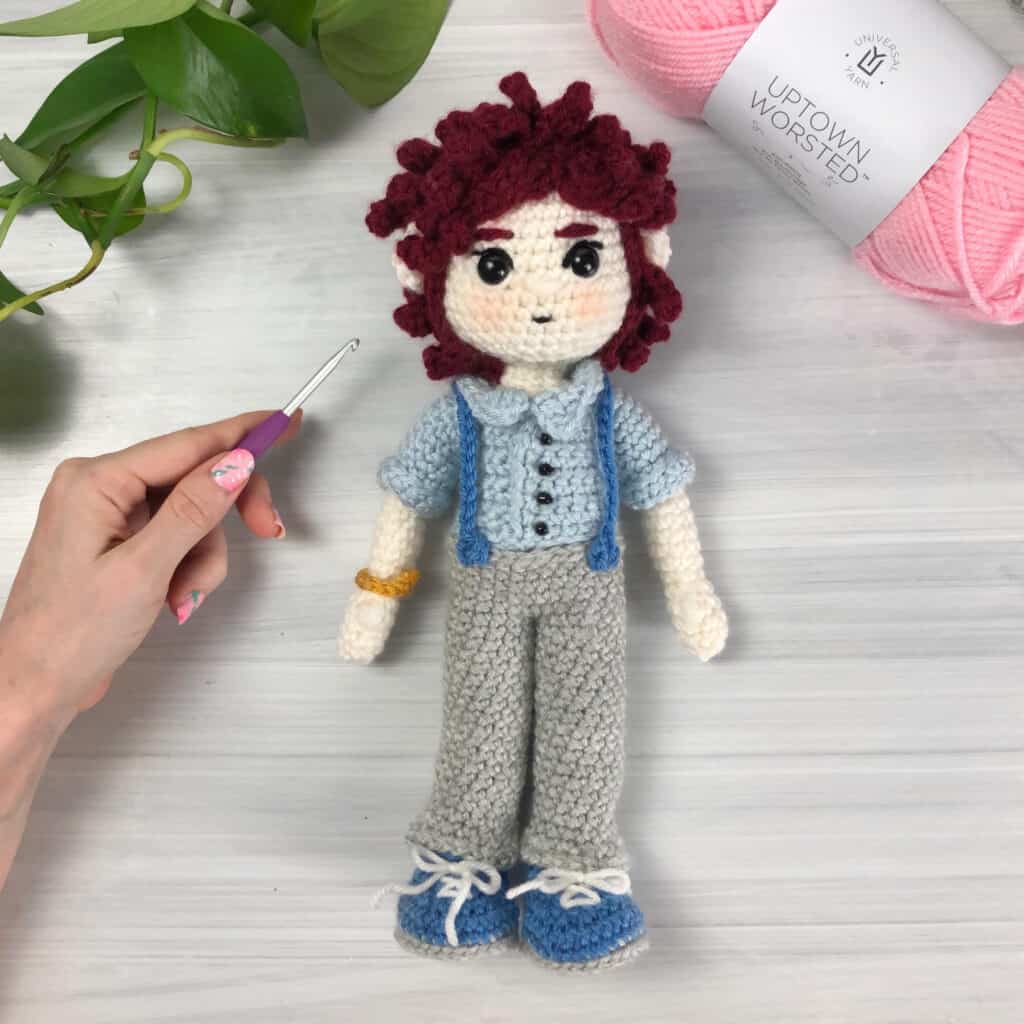
Blue has red, spiky hair that is crocheted onto a circle and then glued with fabric glue. I love this method of crochet hair, no millions of ends to sew and weave in!
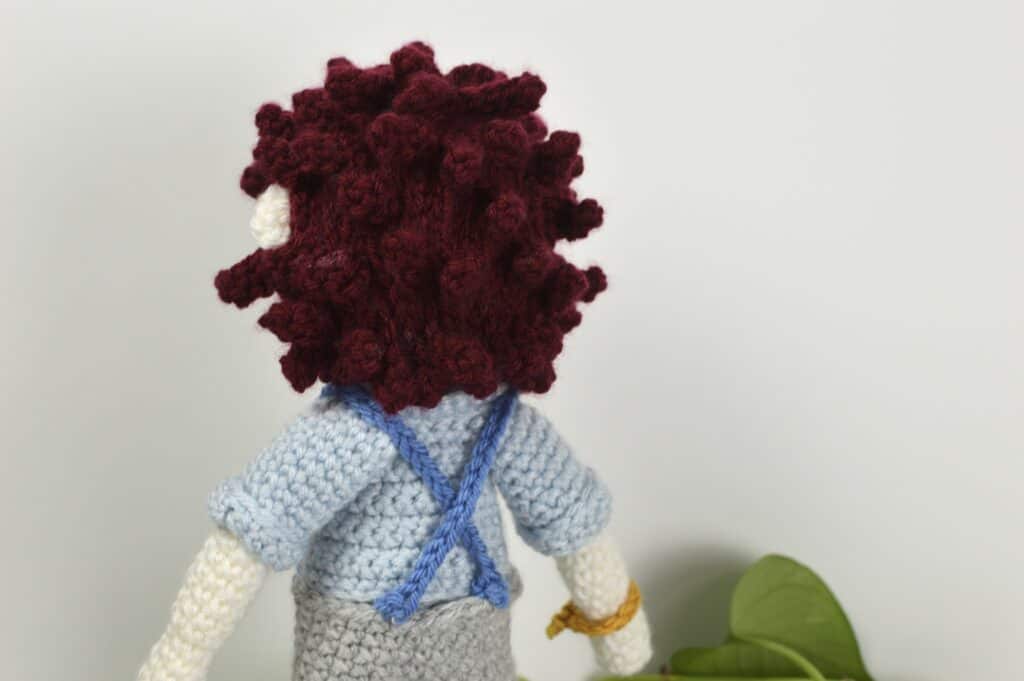
Blue is wearing gray pants, a light blue button up collar shirt, suspenders, blue shoes and a bracelet.
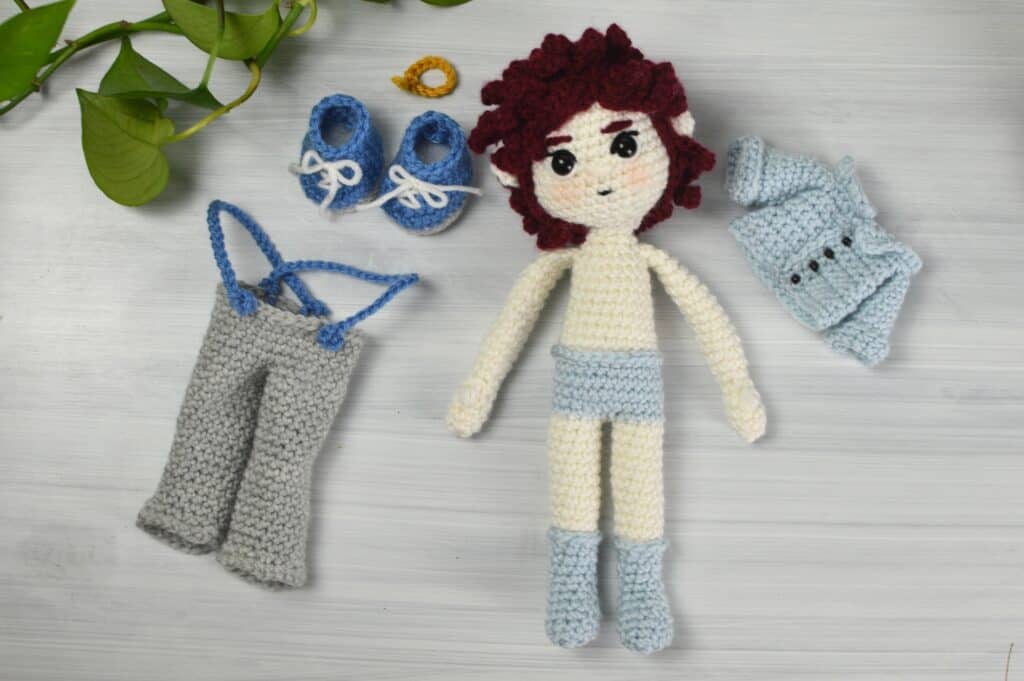
Underneath, Blue has on light blue underwear and socks so he never gets cold!
![]()
The details around his eyes, eyebrows, nose, mouth and blush are the final touches!

![]()
![]()

I love using my Clover Amour crochet hook for amigurumi, it’s my favorite! And Uptown Worsted in awesome to work with for amigurumii because of all of the beautiful colors and the feel!
For these new amigurumi designs I have used a special single crochet. It’s not my favorite for every project but it is now for amigurumi! A yarn under is used instead of the first yarn over. This makes the top of the stitches smaller, creating closer stitches with less gaps and spaces between. I love the look of this single crochet for amigurumi!
Let’s get started!
Difficulty
Advanced/Intermediate
Size
12″ tall
Materials
- Size G 4.00 mm Clover Amour crochet hook
- Universal Yarn Uptown Worsted in Beet (1), Black (1), Donahue (gray) (1), Little Boy Blue (1), Pale Blue (1), Glow White (1), Dijon (gold) (1)
- Polyester Fiberfill
- Stitch markers
- Scissors
- Darning needle
- Beads or small buttons
- Safety eyes (size 12 mm)
- Fabric glue
- Pins
Abbreviations
- sc: single crochet
- 2sc: single crochet increase
- inv sc dec: invisible single crochet decrease
- sc2tog: single crochet decrease
- st(s): stitch(es)
- sl st: slip stitch
- ch: chain
- sk: skip
- yo: yarn over
- yu: yarn under
- FLO: front loop only
- BLO: back loop only
- hdc: half double crochet
- dc: double crochet
- 2dc: double crochet increase of 1
- 3dc: double crochet increase of 2
Gauge
Gauge is not important. See notes section for more information.
Notes, Tips And Tutorials
Some photo tutorials in this pattern are a different color to be seen better and some photo tutorials in this pattern are from Alex In Yarnder Land Amigurumi but they teach the same things.
Special Stitches:
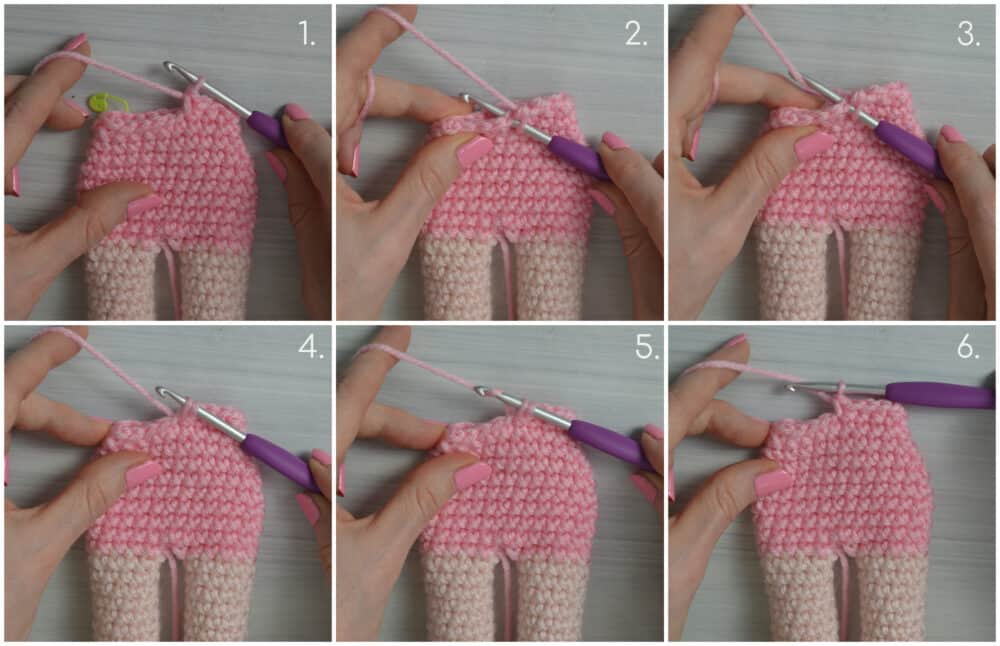
Invisible single crochet decrease (inv sc dec): insert the hook into the front loop only of the next 2 stitches (image 2), yarn under (image 3) and pull up a loop (image 4), yarn over (image 5) and pull through all of the loops on the hook. (image 6)

single crochet decrease (sc2tog): Insert the hook into the next stitch, yarn over and pull up a loop, insert the hook into the next stitch, yarn over and pull up a loop, yarn over and pull through the loops on the hook.
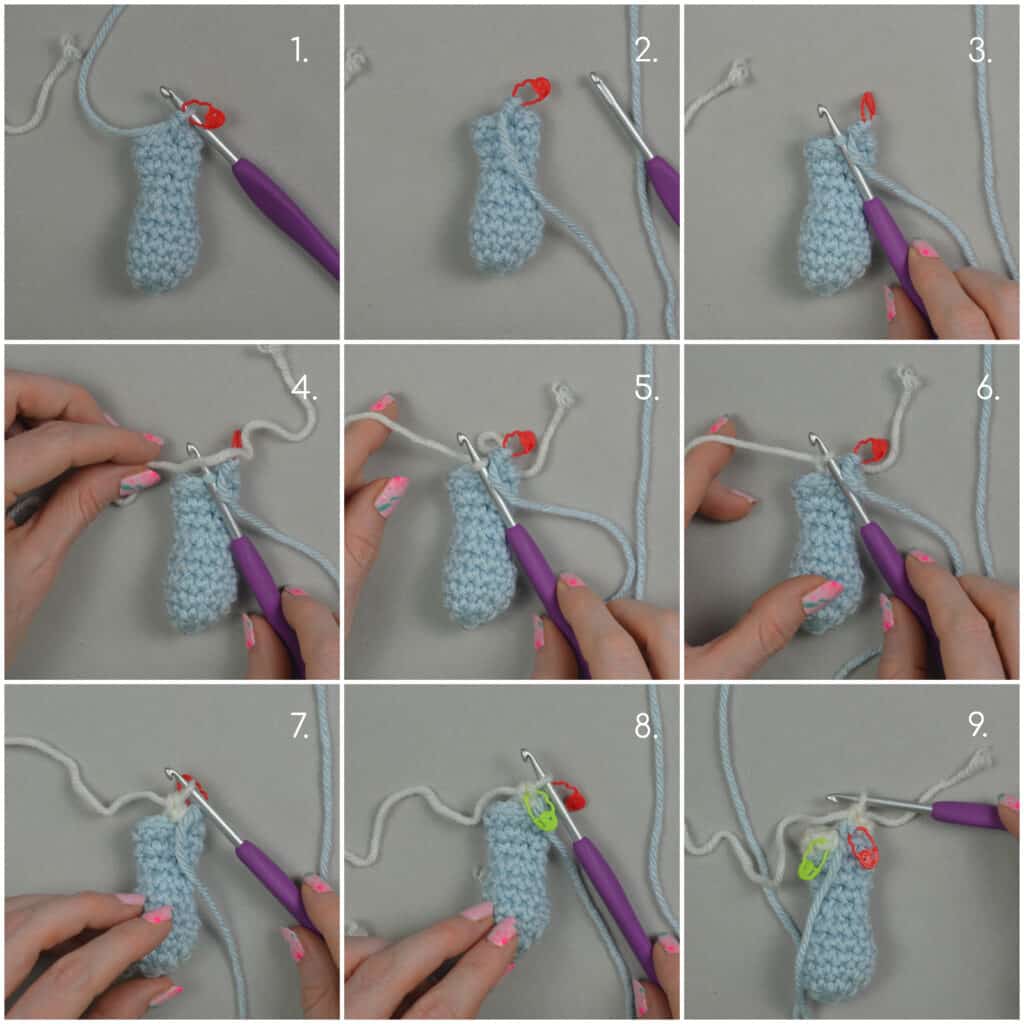
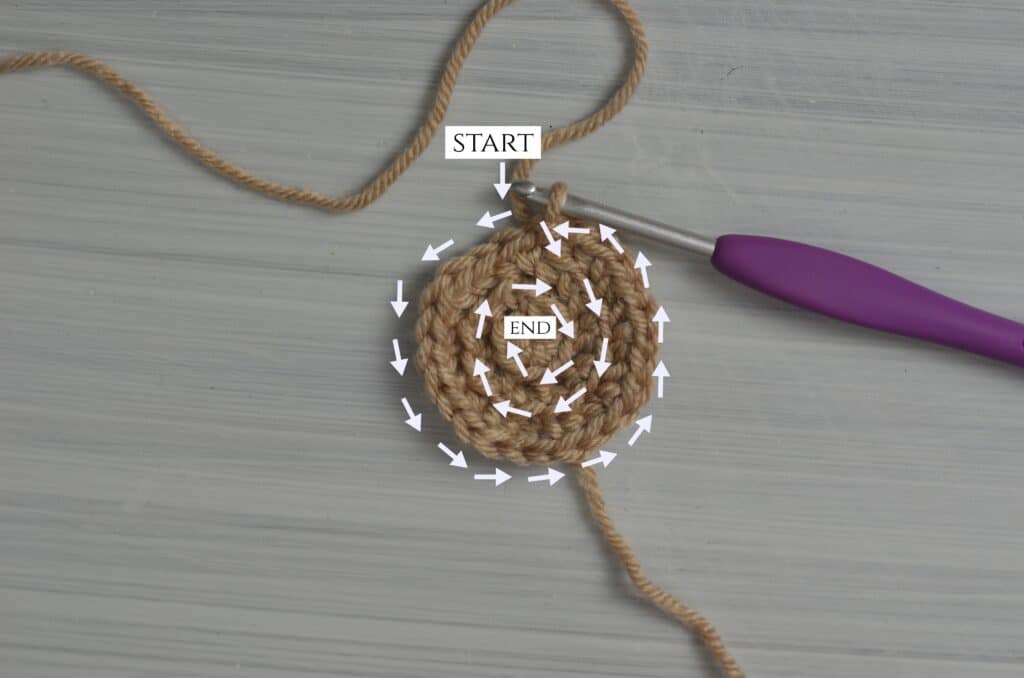
single crochet (sc): insert the hook into the next stitch (image 2), yarn under (image 3) and pull up a loop (image 4), yarn over (image 5) and pull through all of the loops on the hook. (image 6)
invisible join: Skip the stitch next to the last stitch made and insert the needle through the next stitch (image 2), pull through and insert the needle into the back loop only of the last stitch made (image 3) and pull through.
cluster: *Yarn over and insert the hook into the stitch, yarn over and pull up a loop. Repeat from the * 2 more times, yarn over and pull through all of the loops on the hook.
Video Tutorials:
Tips:
- This pattern is worked in a continuous round (in a spiral) unless otherwise noted. Mark the beginning of each round with a stitch marker.
- No gauge for this pattern but make sure to stay consistent with your stitches.
- I did use a single crochet with a yarn under. See the section above for more information.
- You will need more than one stitch marker.
- Do not overstuff the foot or it will not fit in the shoe.
- Make the shoes first and then as you stuff the foot and leg, check periodically to make sure it fits in the shoe. You can also stretch the shoe slightly.
- To put the shoes on: Turn the foot sideways, slide in and then turn the foot back.
- Use the handle of the crochet hook or a chopstick to help with stuffing the doll with fiberfill.
The Pattern
- Please read all of the notes before beginning this pattern.
- This pattern is worked in a continuous round (in a spiral) unless otherwise noted. Mark the beginning of each round with a stitch marker.
- Some photo tutorials in this pattern are a different color to be seen better and some photo tutorials in this pattern are from Alex In Yarnder Land Amigurumi but they teach the same things.
Shoe: (Make 2)
with gray yarn:
R1: Make a magic ring or a loose slip knot, ch 1 and put 10 sc into the magic ring or loose slip knot. =10
Pull on the tail end to close the hole.
R2: 2sc into each st around. =20
R3: 2sc into the next st, *sc into the next st, 2sc into the next st. Repeat from the * around until 1 st remains. Insert the hook into the last st, yu and pull up a loop, yo with little boy blue yarn (drop the gray yarn but bring it to the front of the work) and pull through the two loops to complete the sc. =30
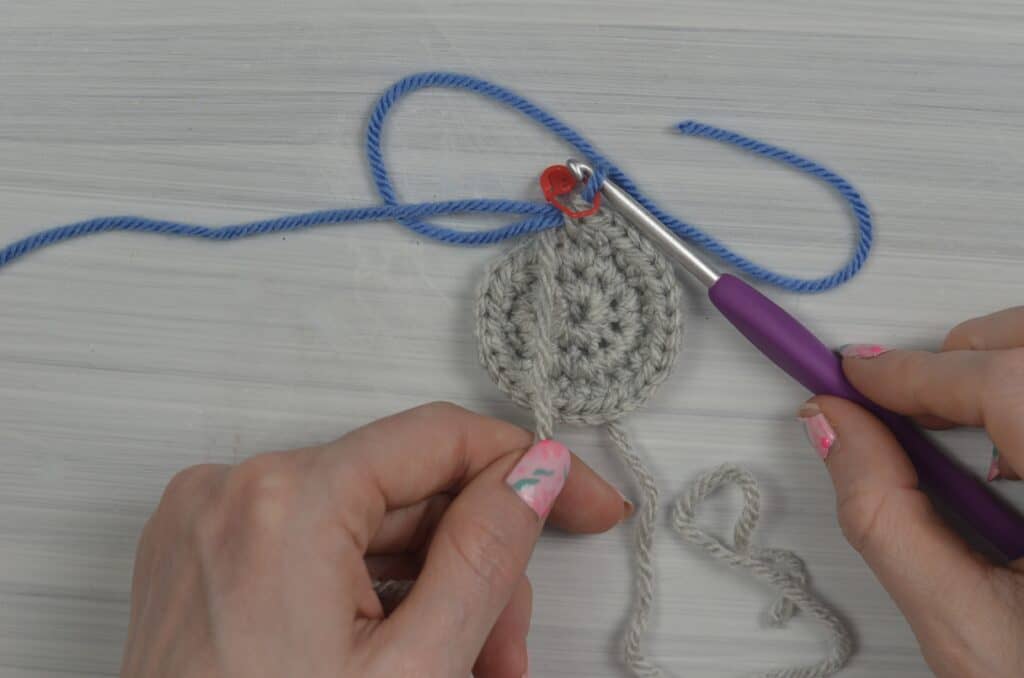
with the little boy blue yarn:
R4: sc BLO into each st around. =30
R5: inv sc dec, sc into the next 11 sts, (inv sc dec) x2, sc into the next 11 sts, inv sc dec. =26
Weave in the two ends and flip right side out.
R6: sc into the next 9 sts, (inv sc dec) x4, sc into the next 9 sts. =22
R7: sc into the next 7 sts, (inv sc dec) x4, sc into the next 7 sts. =18
R8: sc into the next 5 sts, (inv sc dec) x4, sc into the next 5 sts. =14
R9: sc into each st around. =14
Cut the little boy blue yarn, pull it through the last stitch and make an invisible join before weaving in the end.
Pick up the gray yarn and continue with R4 below.
with the gray yarn:
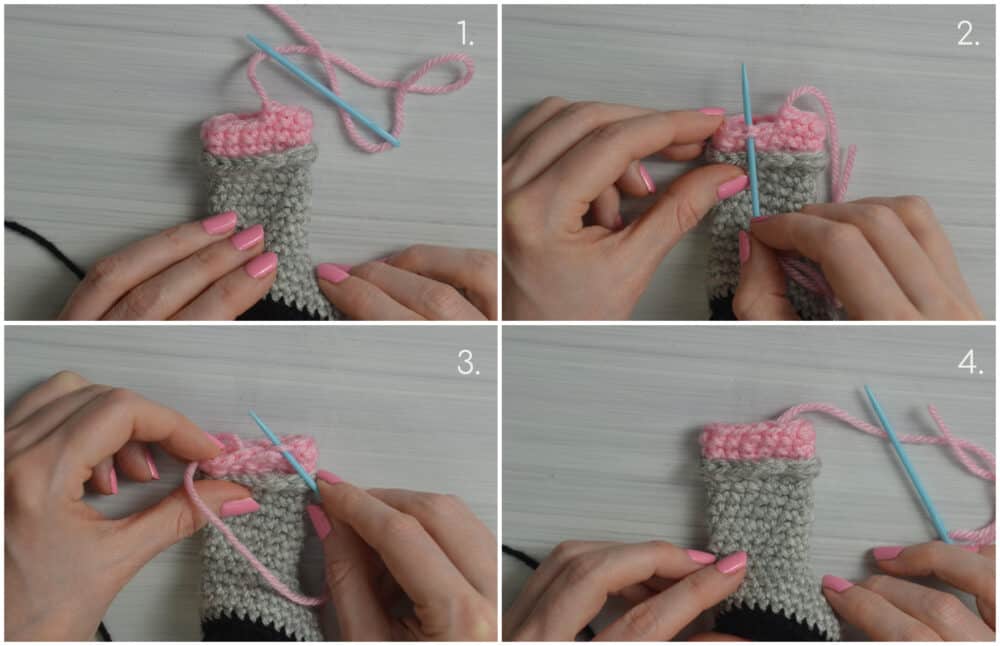
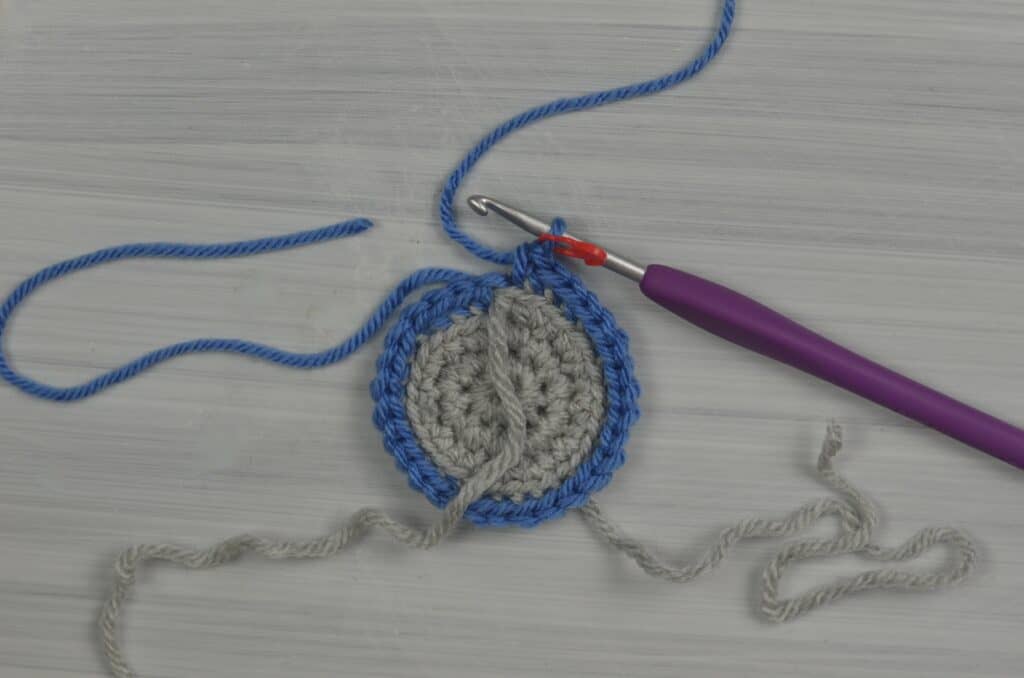
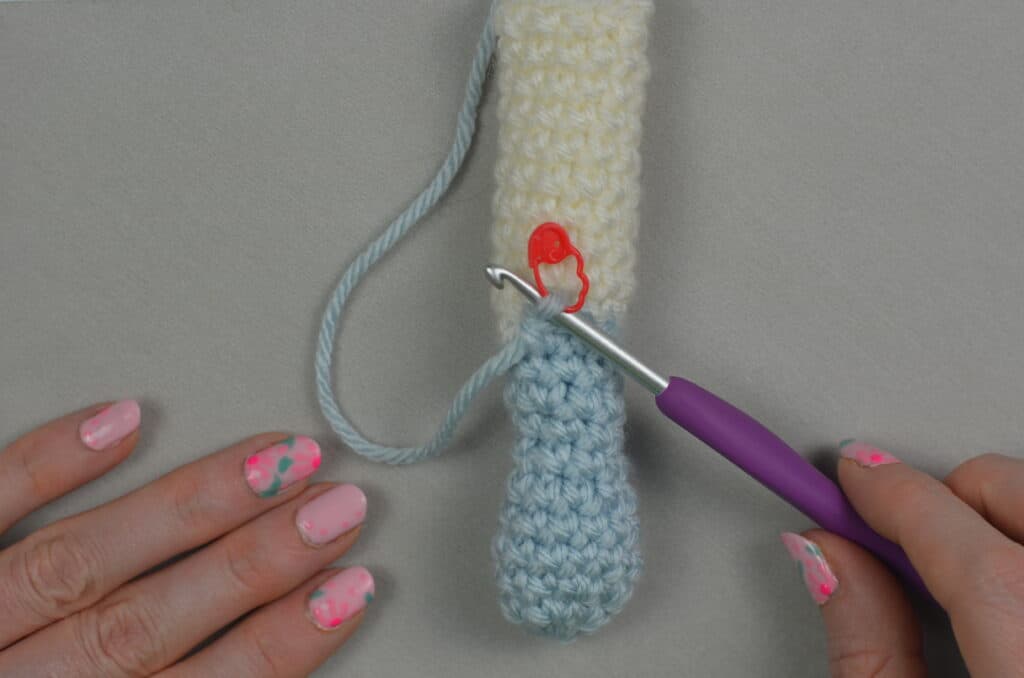
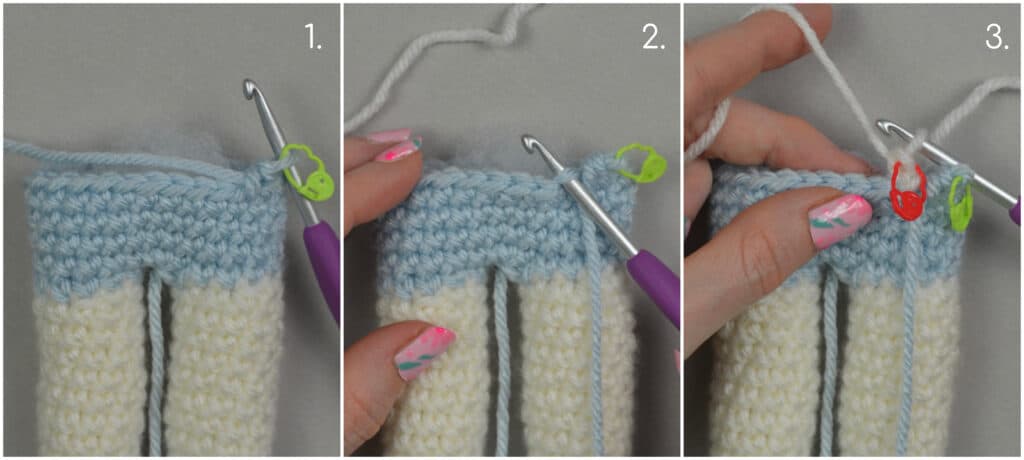
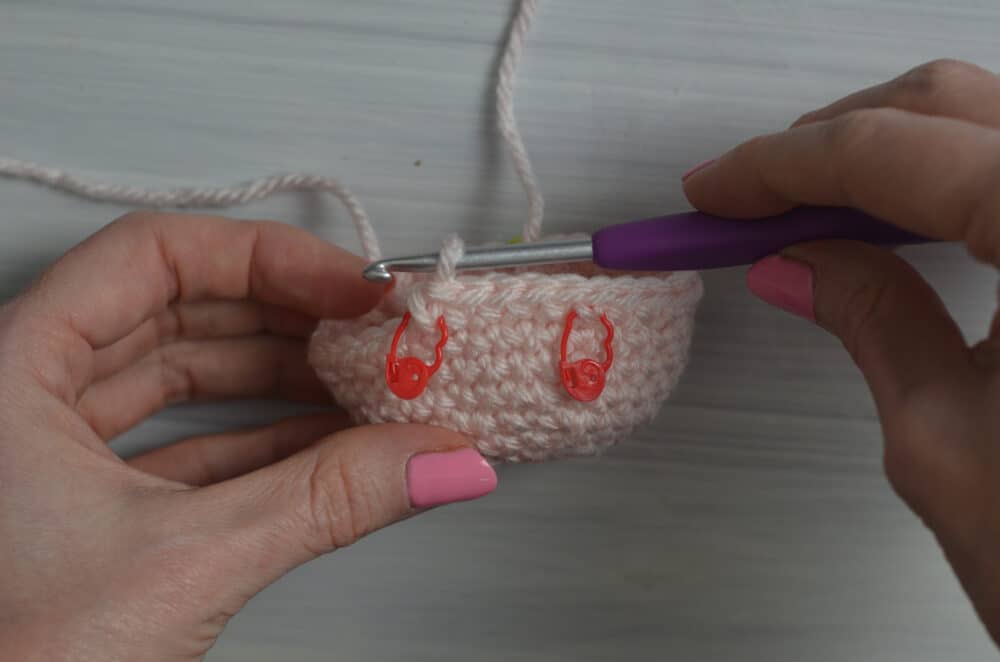
R4: Flip the shoe upside down, insert the hook into the FLO of the next st to the left of the working yarn (image 1), yo (image 2) and pull up a loop (image 3),
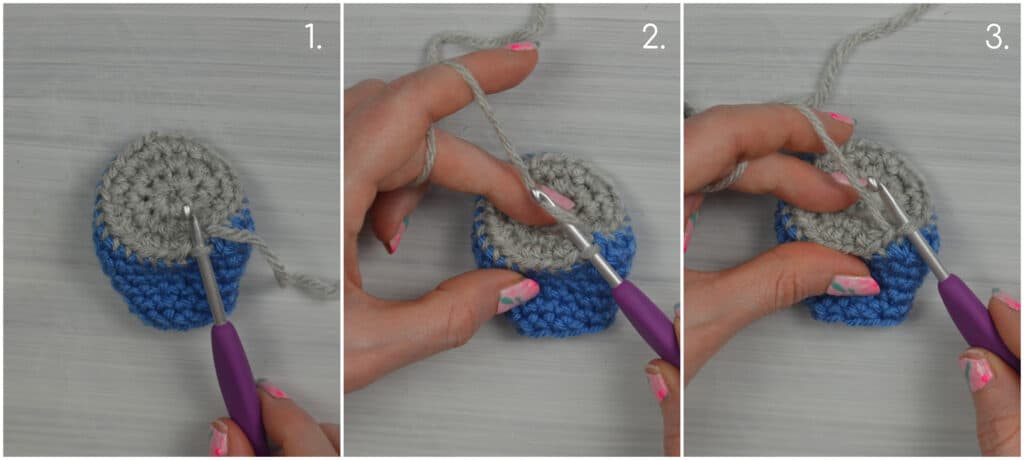
sl st FLO into each st around, sl st to the 1st sl st of the round. =30
Cut the gray yarn, pull it through the last stitch and weave in the ends.
Lightly stuff the toe of the shoe and shape it.
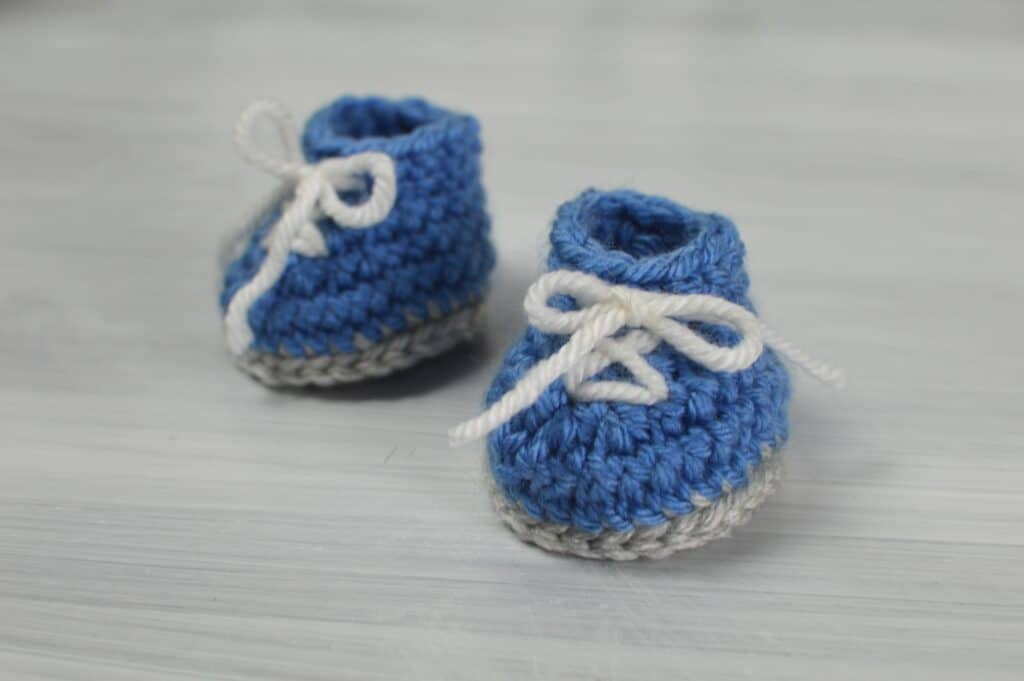
Add laces.![]()
![]()
![]()
![]()
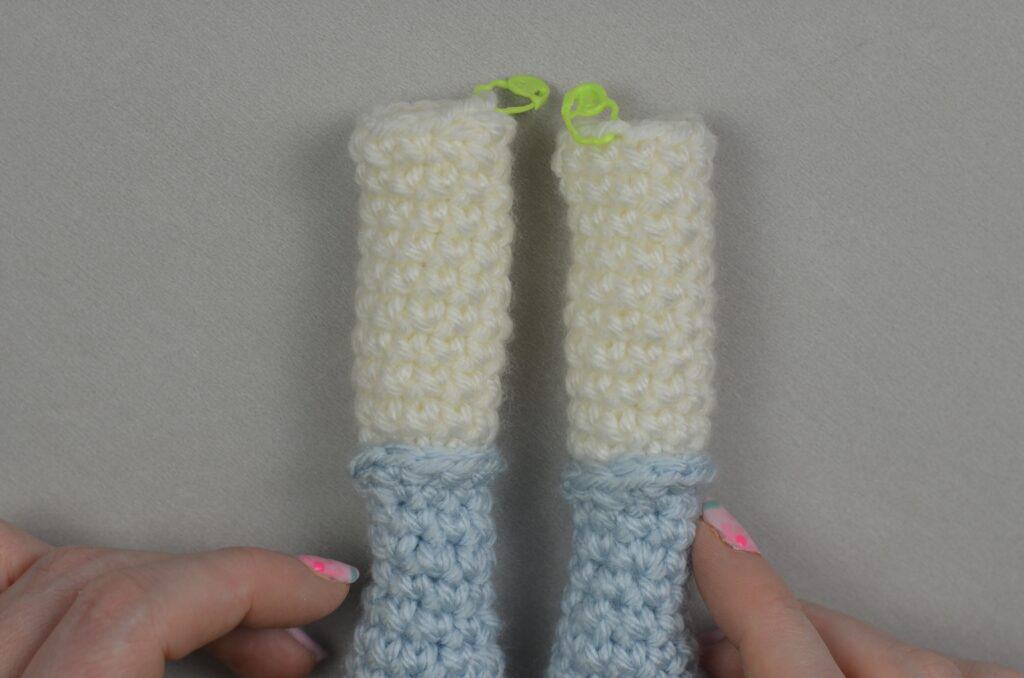
Foot and Leg: (Make 2)
with pale blue yarn:
R1: Make a magic ring or a loose slip knot, ch 1 and put 8 sc into the magic ring or loose slip knot. =8
Pull on the tail end to close the hole.
R2: sc into the next 3 sts, 2sc into the next 2 sts, sc into the next 3 sts. =10
R3: sc into the next 4 sts, 2sc into the next 2 sts, sc into the next 4 sts. =12
R4: 2sc into the next st, sc into the next 10 sts, 2sc into the last st. =14
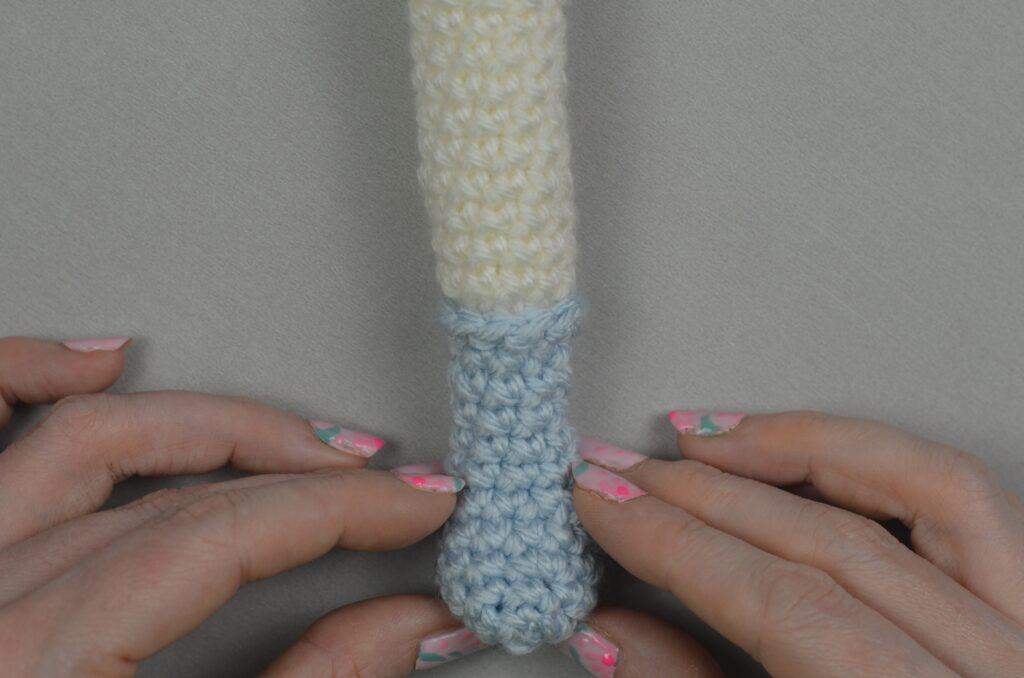
Weave in the end and flip right side out.
R5: sc into the next 5 sts, inv sc dec, sc into the next 5 sts, inv sc dec. =12
R6: inv sc dec, sc into the next 4 sts, inv sc dec, sc into the next 4 sts. =10
R7: sc into the next 3 sts, inv sc dec, sc into the next 3 sts, inv sc dec. =8
R8: sc into each st around. =8
Start stuffing the foot with polyester fiberfill and continue stuffing as you continue with the pattern.
R9: sc into the next 7 sts, 2sc into the last st. =9
R10: 2sc into the next st, sc into the next 8 sts. =10
R11: sc into the next 9 sts, 2sc into the last st. =11
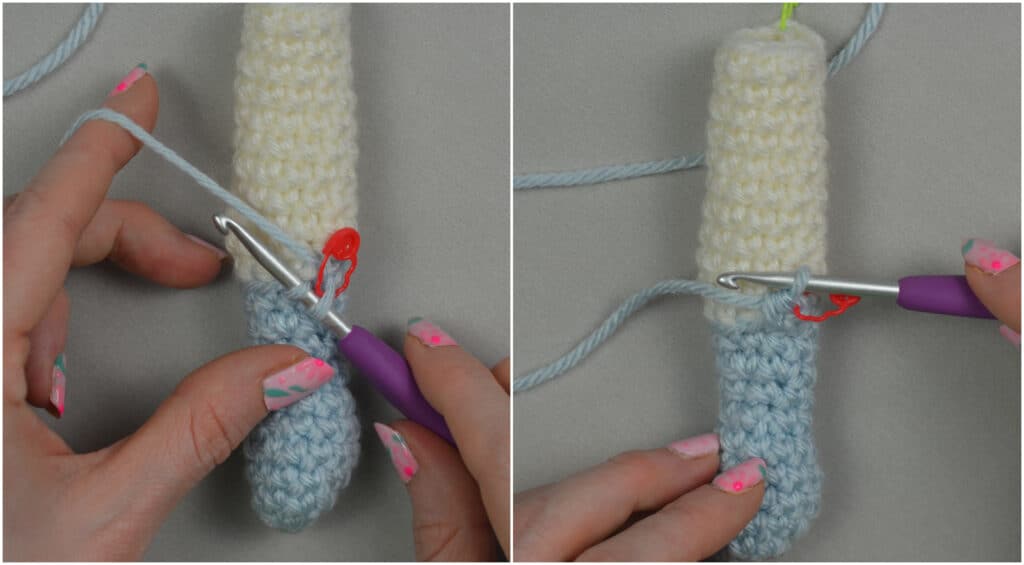
R12: Take the hook out of the working yarn and drop the pale blue yarn but keep it at the front of the work. (image 2) Insert the hook into the BLO of the next st (image 3), yo with the white yarn (image 4) and pull up a loop (image 5), ch 1 (does not count as a st) (image 6), sc BLO into the same st (image 7), mark this st with a new st marker (image 8), and sc BLO into the next 10 sts. (image 9) =11
Weave in the tail end of the white yarn.
with the white yarn:
R13-R21: sc into each st around. =11
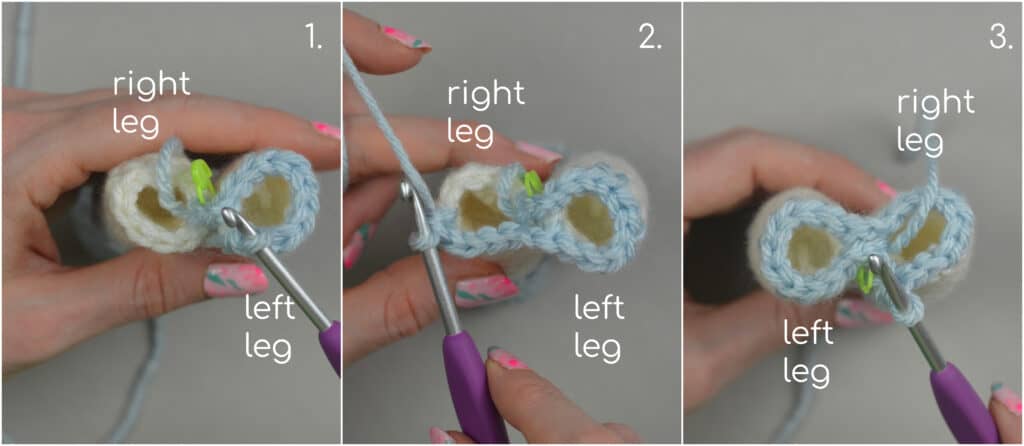
Left Leg: R22: sc into the next 10 sts, mark the 10th st with the st marker, sc into the next st. Keep the st marker where it is. =11
Cut the white yarn, pull it through the last stitch and make an invisible join before weaving in the end. Do not remove the stitch marker.
Go back to R12 and put the pale blue working loop back on the hook. Continue with R12 below.
with the pale blue yarn:
R12: sc FLO into each st around. =11
Cut the yarn, pull it through the last stitch and make an invisible join before weaving in the end.
Right Leg: R22: sc into the next 4 sts, mark the 4th st with the st marker, sc into the next 7 sts. Keep the st marker where it is. =11
Cut the yarn, pull it through the last stitch and make an invisible join before weaving in the end. Do not remove the stitch marker.
Go back to R12 and put the pale blue working loop back on the hook. Continue with R12 below.
with the pale blue yarn:
R12: sc FLO into each st around. =11
Cut the yarn, pull through the last stitch and make an invisible join before weaving in the end.
Body And Neck:
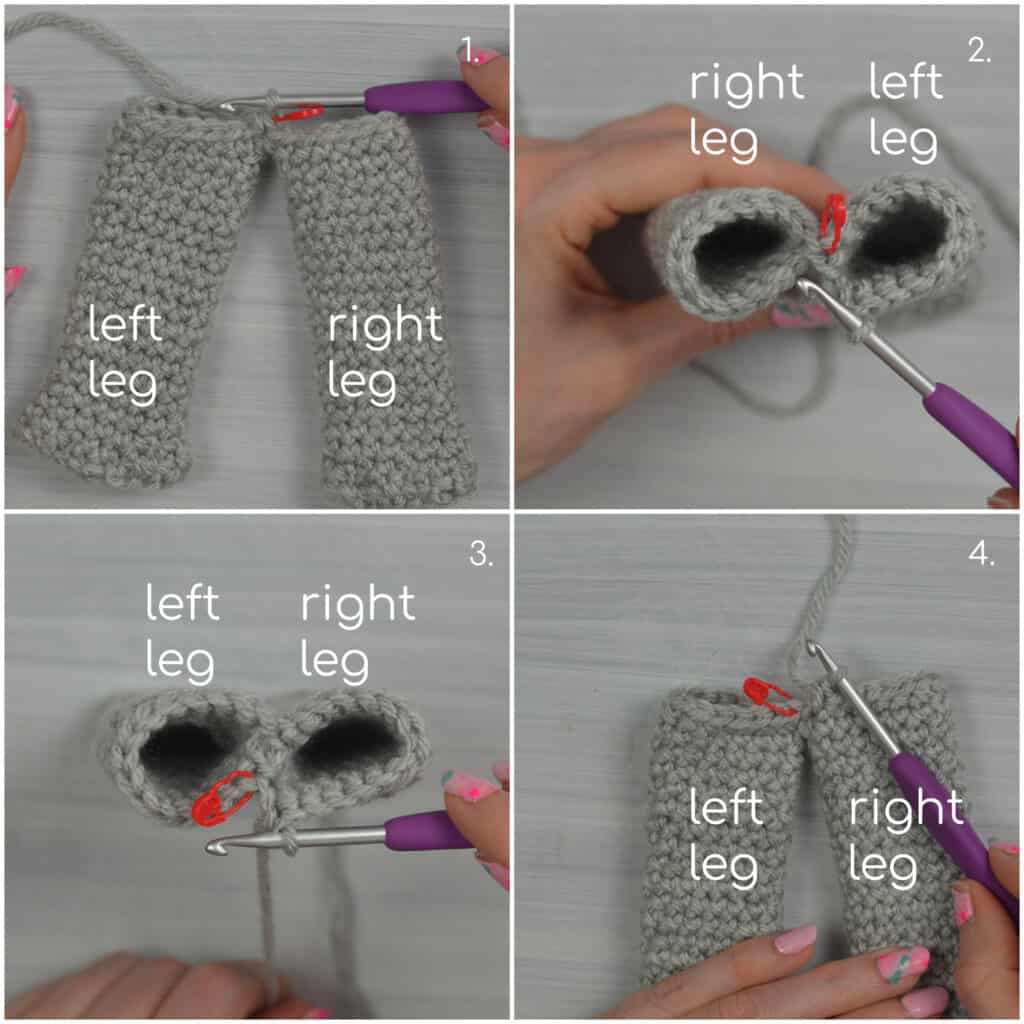
Hold the left leg next to the right leg with the feet facing away from you.
with pale blue yarn:
(Leave the tail end long enough to sew the gap between the legs closed.)
R23: Starting on the right leg, insert the hook into the marked st (image 1), yo with the pale blue yarn (image 2) and pull up a loop (image 3), ch 1 (does not count as a st) (image 4), sc into the same st (image 5) and mark this st with the st marker (it is the new beginning of the round) (image 6), ch 1 (image 7), sc into the marked st on the left leg (image 8), remove this st marker (image 9),
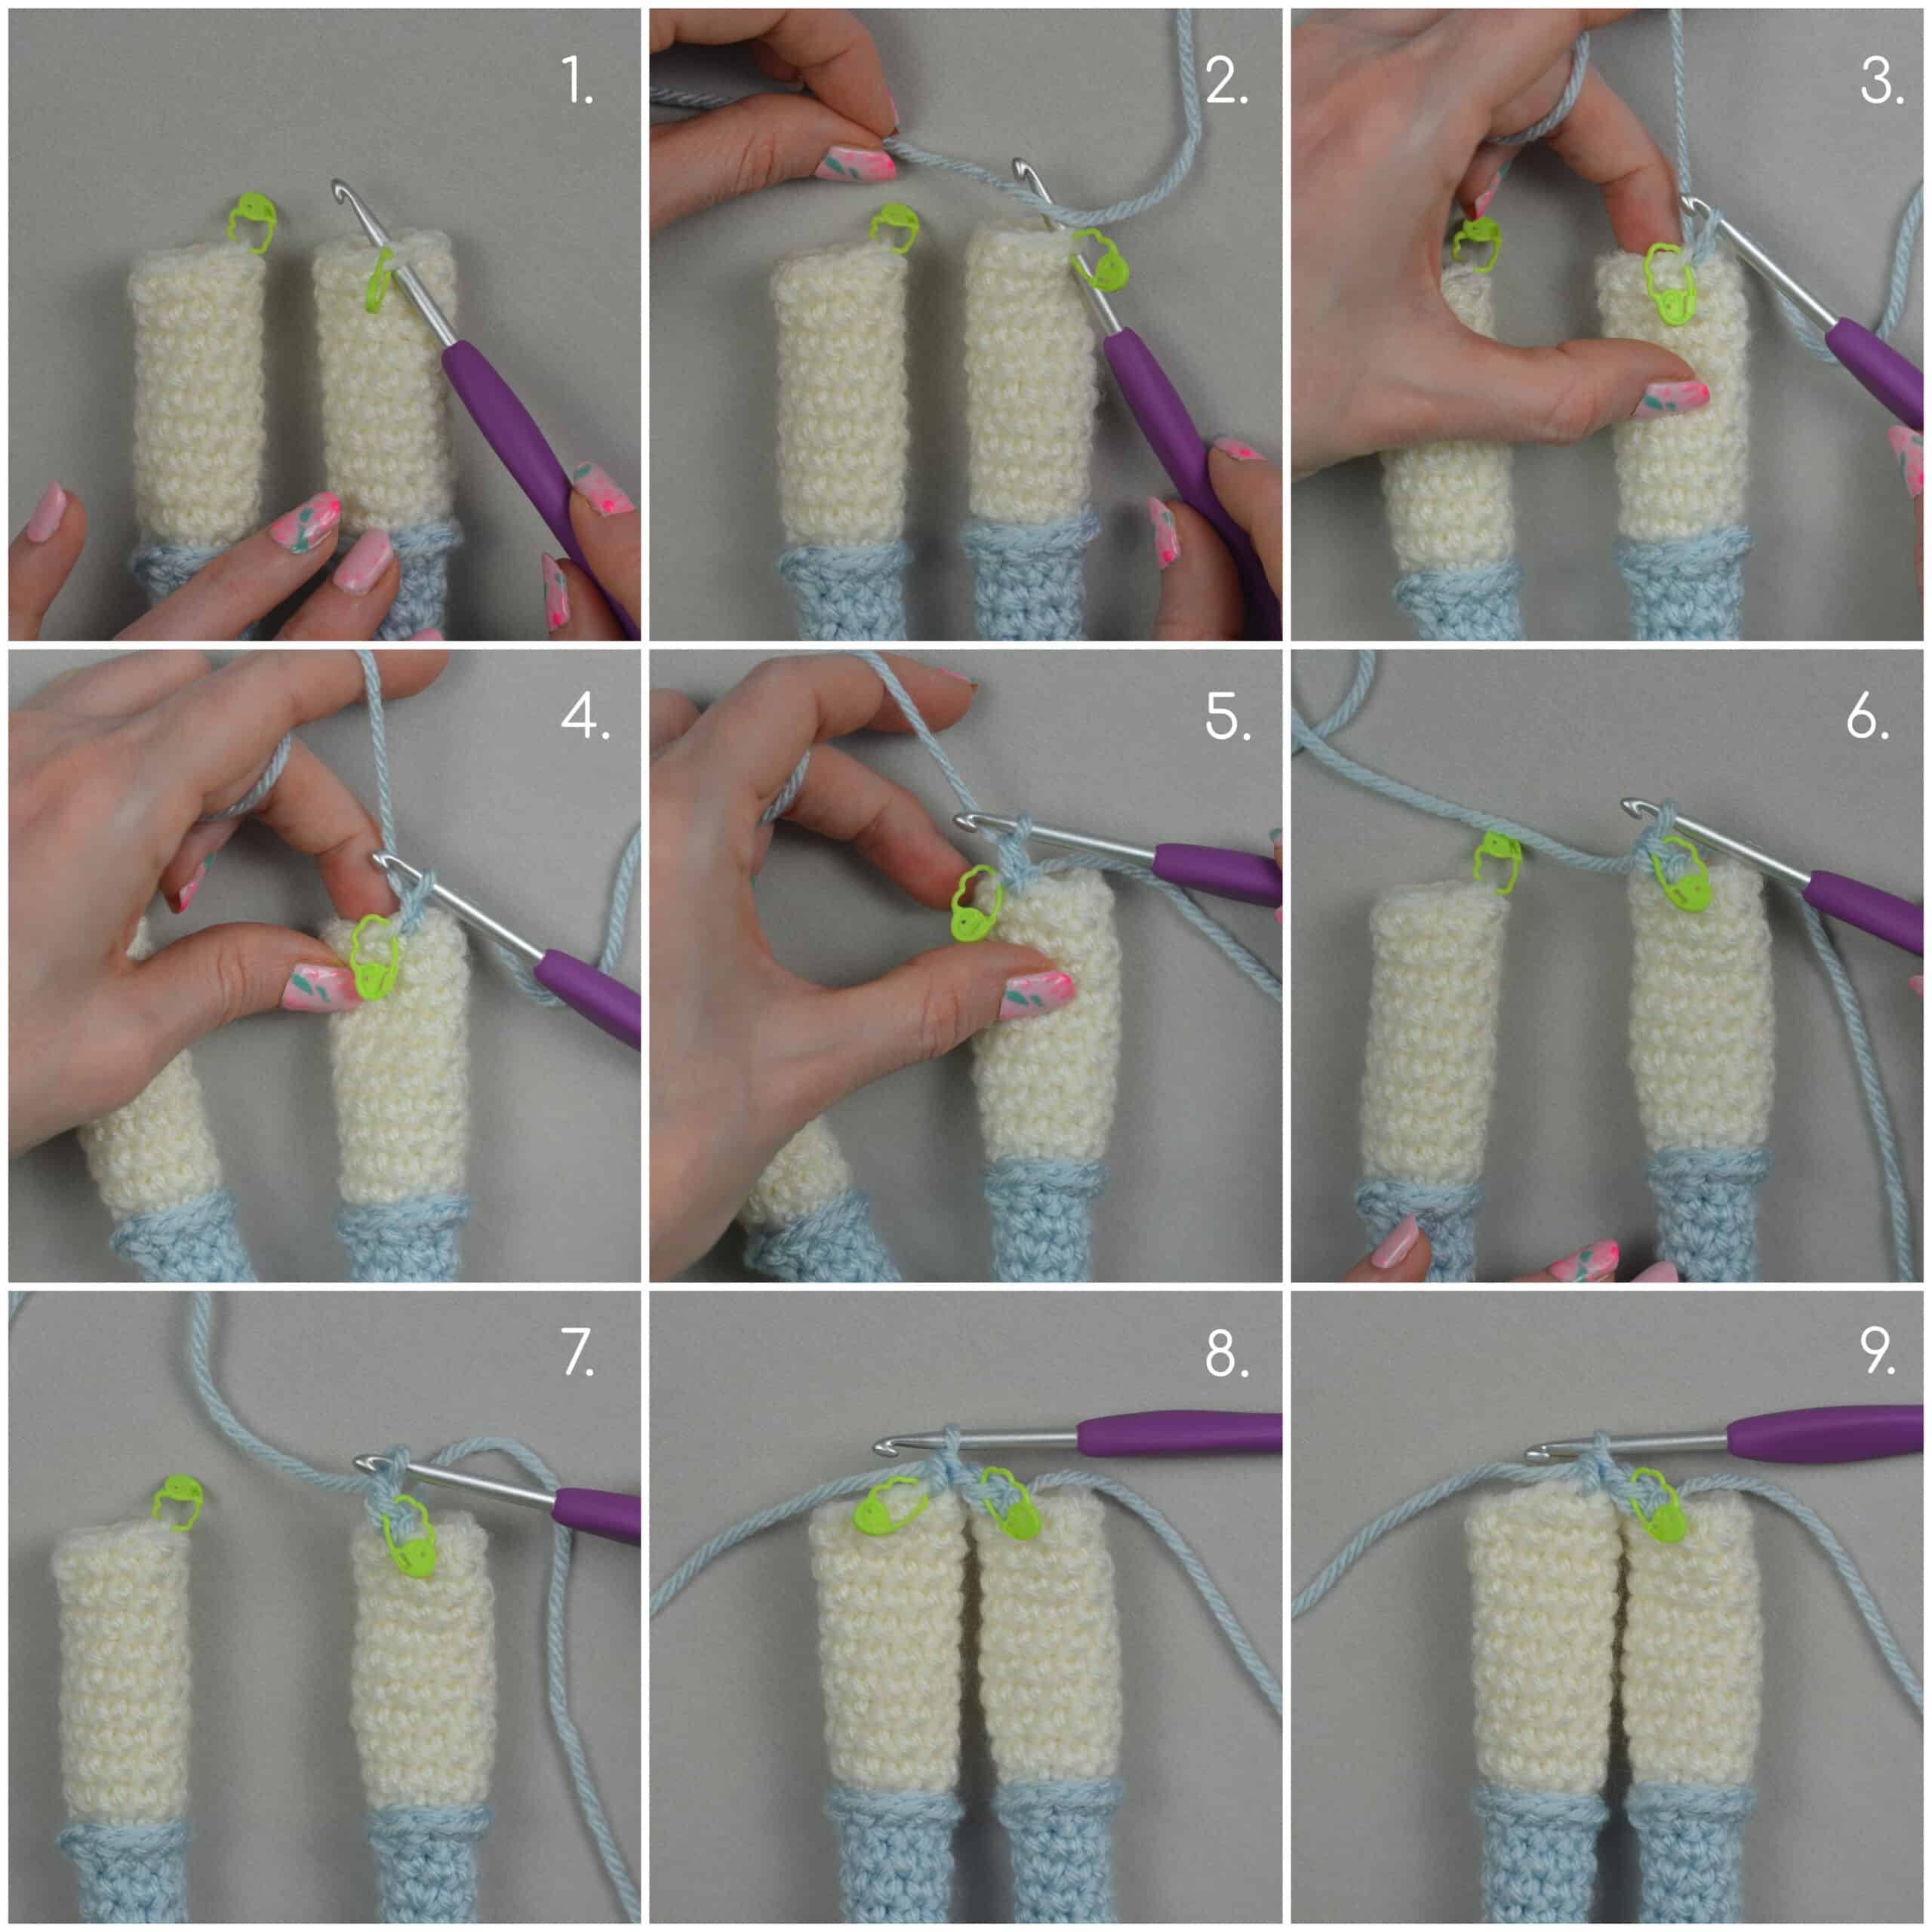
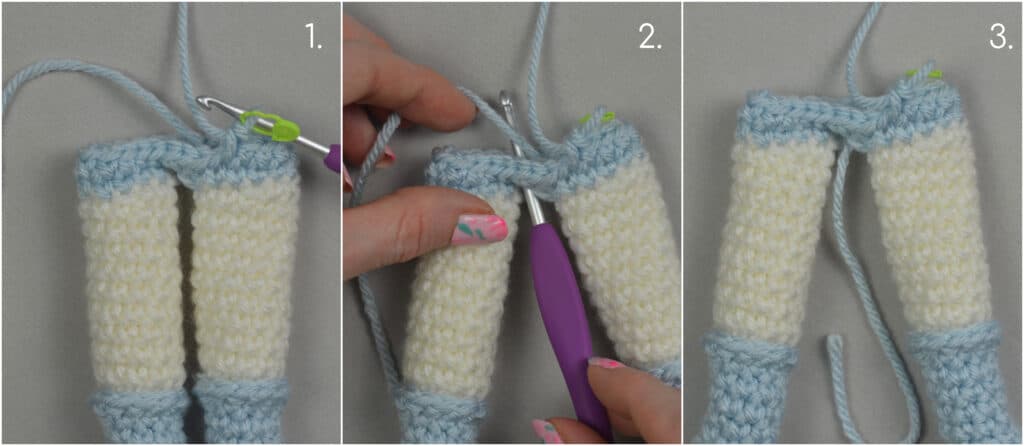
sc into the next 10 sts on the left leg (image 1), ch 1, sc into the next 10 sts on the right leg. (image 2 and 3) =24
R24: sk the ch 1, sc into the next st, 2sc into the ch 1, sc into the next 11 sts, 2sc into the ch 1, sc into the next 10 sts. =26
Pull the tail end through the gap between the legs.
R25-R27: sc into each st around. =26
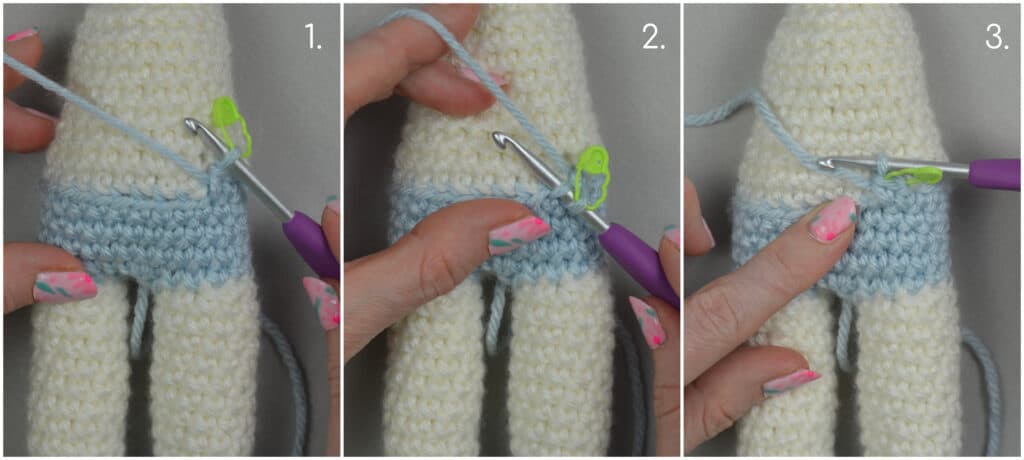
R28: Take the hook out of the working yarn and drop the pale blue yarn but keep it at the front of the work. Insert the hook into the BLO of the next st, yo with the white yarn and pull up a loop, ch 1 (does not count as a st), sc BLO into the same st (mark this st with a new st marker) and sc BLO into the next 25 sts. =26
with the white yarn:
R29: sc into the next 8 sts, inv sc dec, sc into the next 11 sts, inv sc dec, sc into the next 3 sts. =24
R30: sc into the next 8 sts, inv sc dec, sc into the next 10 sts, inv sc dec, sc into the next 2 sts. =22
R31: sc into the next 7 sts, inv sc dec, sc into the next 9 sts, inv sc dec, sc into the next 2 sts. =20
R32-R35: sc into each st around. =20
R36: sc into the next 7 sts, (inv sc dec) x2, sc into the next 5 sts, (inv sc dec) x2. =16
Weave in the tail end of the white yarn and start stuffing the body with polyester fiberfill. Continue stuffing the body while continuing with the pattern.
R37: sc into the next 7 sts, (inv sc dec) x2, sc into the next st, (inv sc dec) x2. =12
R38: inv sc dec, sc into the next 3 sts, inv sc dec, sc into the next 5 sts. =10
R39: sc into each st around. =10
Cut the white yarn, pull it through the last stitch and make an invisible join before weaving in the end.
Go back to R28 and put the pale blue working loop back on the hook. (Image 1) Continue with R28 below.
with the pale blue yarn:
R28: Insert the hook into the exposed FLO of R28 (image 2) and make a sc (image 3), sc FLO into each st around. =26
Cut the yarn, pull through the last stitch and make an invisible join before weaving in the end.
Hand and Arm: (Make 2)
with white yarn:
R1: Make a magic ring or a loose slip knot, ch 1 and put 8 sc into the magic ring or loose slip knot. =8
Pull on the tail end to close the hole.
R2-R4: sc into each st around. =8
Weave in the end and flip right side out.
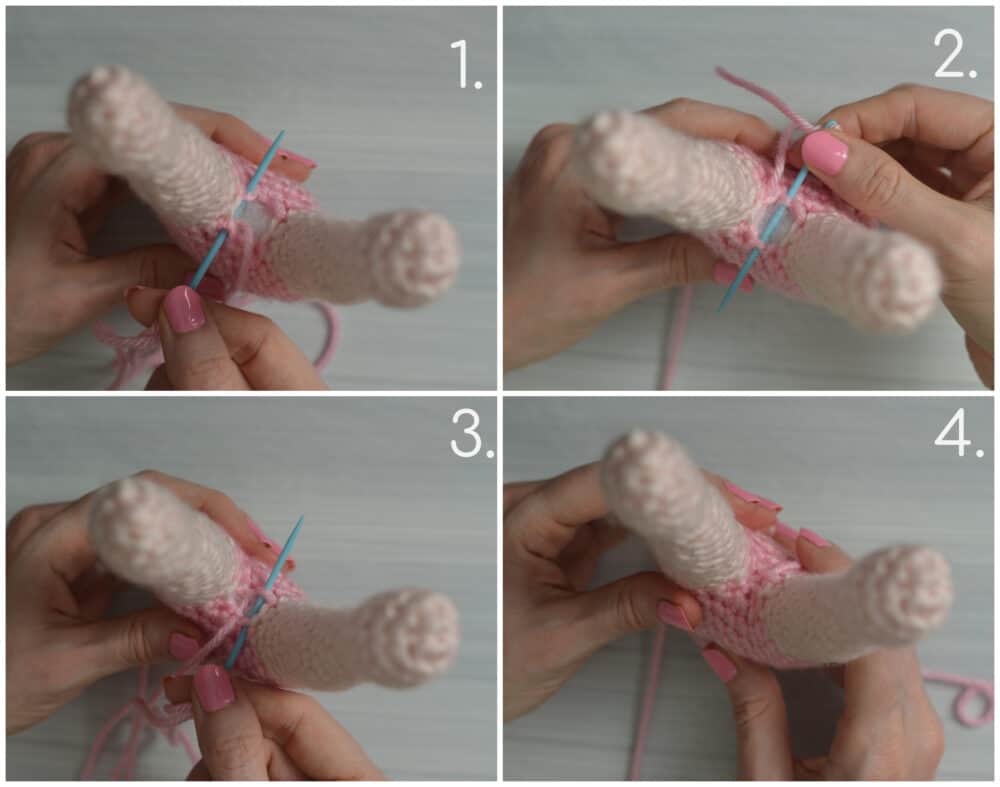
R5: Cluster into the next st, sc into the next st, pop the cluster out to the right side to make the thumb, sc into the next 6 sts. =8
R6: inv sc dec, sc into the next 2 sts, inv sc dec, sc into the next 2 sts. =6
R7: 2sc into the next st, sc into the next 2 sts, 2sc into the next st, sc into the next 2 sts. =8
R8: sc into the next 2 sts, 2sc into the next st, sc into the next 5 sts. =9
Start stuffing the hand and arm with polyester fiberfill and continue stuffing as you continue with the pattern.
R9-R14: sc into each st around. =9
R15: sc into the next 2 sts, inv sc dec, sc into the next 5 sts. =8
R16: sc into each st around. =8
R17: sc into the next 4 sts, inv sc dec, sc into the next 2 sts. =7
R18: sc into each st around. =7
R19: inv sc dec, sc into the next 5 sts. =6
Cut the yarn, pull through the last stitch and sew to the doll three rows down at the neck.
Fixing The Leg Gap:
Use the tail end from the pale blue yarn to sew the gap between the legs closed.
Head:
with white yarn:
R1: Make a magic ring or a loose slip knot, ch 1 and put 8 sc into the magic ring or loose slip knot. =8
Pull on the tail end to close the hole.
R2: 2sc into each st around. =16
R3: *2sc into the next st, sc into the next st. Repeat from the * around. =24
R4: sc into each st around. =24
R5: *2sc into the next st, sc into the next 2 sts. Repeat from the * around. =32
R6-R8: sc into each st around. =32
Weave in the end and flip right side out. Start stuffing the head with polyester fiberfill.
R9: sc into the next 14 sts, mark the middle of the 14th st with a new st marker, sc into the next 5 sts, mark the middle of the 5th st with another new st marker, sc into the next 13 sts. (The two new st markers are marking where the eyes will go later.) =32
R10: sc into each st around. =32
R11: sc into the next 10 sts, 2sc into the next 2 sts, sc into the next 8 sts, 2sc into the next 2 sts, sc into the next 10 sts. =36
R12-R13: sc into each st around. =36
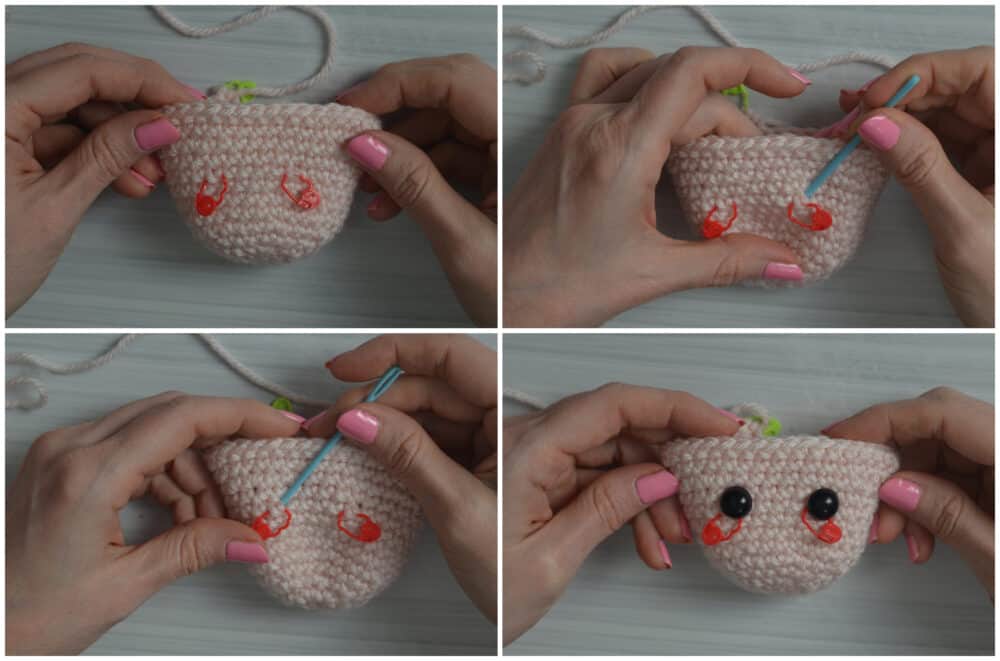
Take the 2 stitch markers out of R9 and replace them with safety eyes.
Continue stuffing the head as you continue the pattern.
R14: sc into the next 10 sts, (inv sc dec) x2, sc into the next 8 sts, (inv sc dec) x2, sc into the next 10 sts. =32
R15: *sc into the next 2 sts, inv sc dec. Repeat from the * around. =24
R16: *sc into the next st, inv sc dec. Repeat from the * around. =16
R17: inv sc dec, *sc into the next st, inv sc dec. Repeat from the * around until 2 sts remain, inv sc dec. =10
Cut the yarn but leave the tail end long enough to sew to the body, pull through the last stitch and make an invisible join. Finish stuffing and shaping the head.
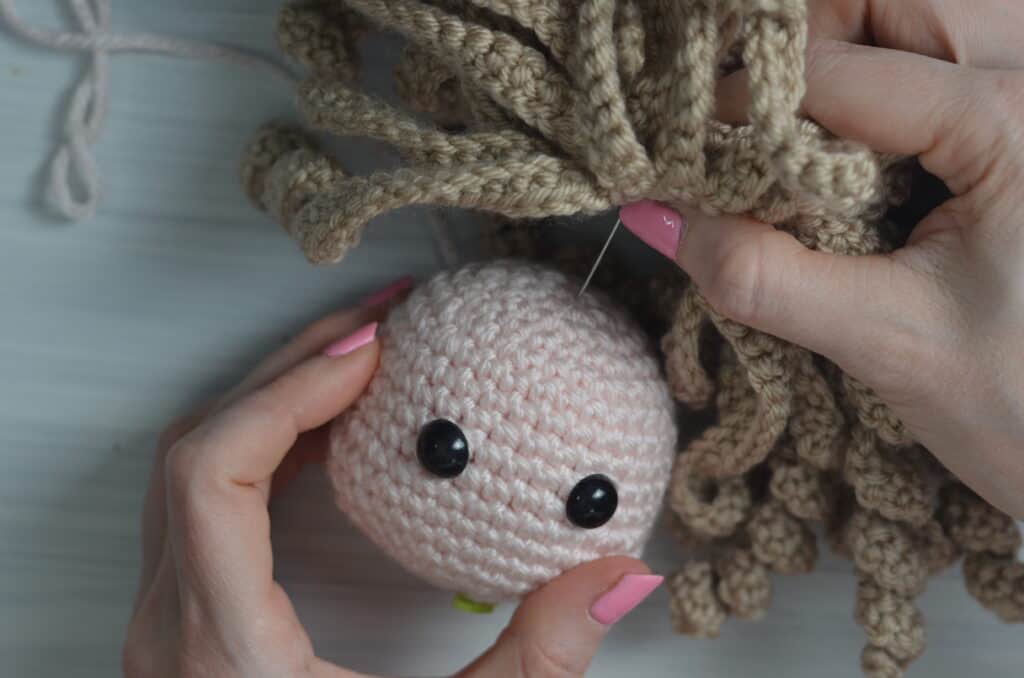
Add eyebrows, a nose, mouth, details to the eyes and blush to the cheeks.
Ear: (Make 2)
with white yarn:
R1: Make a magic ring or a loose slip knot, ch 2 (counts as a st), put 5 dc into the magic ring or loose slip knot, and sl st to the center. =6
Pull on the tail end to close the hole.
Cut the yarn, pull through the last stitch and sew to the head.
Sew to the head in line with the top of the eyes and 4 stitches away from the eyes. Place one longer strand of hair in front of the ear.
Hair/Wig:
with red yarn:
R1: Make a magic ring or a loose slip knot, ch 1 and put 8 sc into the magic ring or loose slip knot. =8
Pull on the tail end to close the hole.
R2: 2sc BLO into each st around. =16
R3: *2sc BLO into the next st, sc BLO into the next st. Repeat from the * around. Sl st to the 1st st of the round. =24
R4: Hair Strand #1: ch 17, sc into the 3rd ch from the hook, sc into the next 4 chs, sl st to the next ch, ch 5, sc into the 2nd ch from the hook, sc into the next 2 chs, hdc into the next ch, sl st to the next ch, sc into the next 4 chs. sl st to the next ch, ch 5, sc into the 2nd ch from the hook, sc into the next 2 chs, hdc into the next ch, sl st to the next ch, sc into the next 2 chs, sl st to the next st on the circle. Continue with the 2nd hair strand below.
Hair Strand #2: ch 17, sc into the 3rd ch from the hook, sc into the next ch, sl st to the next ch, ch 5, sc into the 2nd ch from the hook, sc into the next 2 chs, hdc into the next ch, sl st to the next ch, sc into the next 5 chs, sl st to the next ch, ch 5, sc into the 2nd ch from the hook, sc into the next 2 chs, hdc into the next ch, sl st to the next ch, sc into the next 4 chs, sl st to the next st on the circle. Continue with the 3rd hair strand below.
Hair Strand #3: ch 17, sc into the 3rd ch from the hook, sc into the next 5 chs, sl st to the next ch, ch 5, sc into the 2nd ch from the hook, sc into the next 2 chs, hdc into the next ch, sl st to the next ch, sc into the next 4 chs, sl st to the next ch, ch 5, sc into the 2nd ch from the hook, sc into the next 2 chs, hdc into the next ch, sl st to the next ch, sc into the next ch, sl st to the next st on the circle.
Repeat Hair Strands #1, #2 and #3 until there are 14 hair strands total. Continue with the bangs below.
Bangs: *ch 10, sc into the 3rd ch from the hook and into each ch across. (=8) sl st to the next st on the circle. Repeat from the * 9 more times. =24 hair strands total
After completing the hair strands and bangs, continue working in the exposed front loops on the circle in a spiral until you get to the center.
ch 6, sc into the 2nd ch from the hook, sc into the next 3 chs, hdc into the next ch, sl st to the closest FLO from R3 on the circle, sl st into the next FLO on the circle. *ch 6, sc into the 2nd ch from the hook, sc into the next 3 chs, hdc into the next ch, sl st to the next FLO on the circle, sl st into the next FLO on the circle. Repeat from the * working in a spiral around until all of the remaining exposed FLO sts are worked into.
Cut the yarn and weave in the ends.
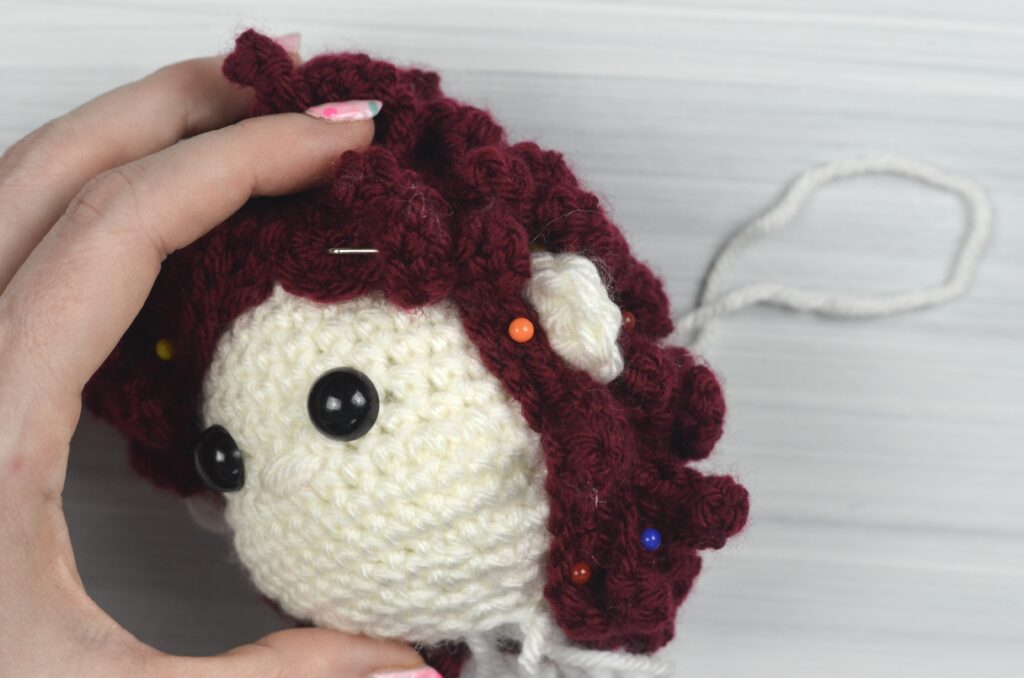
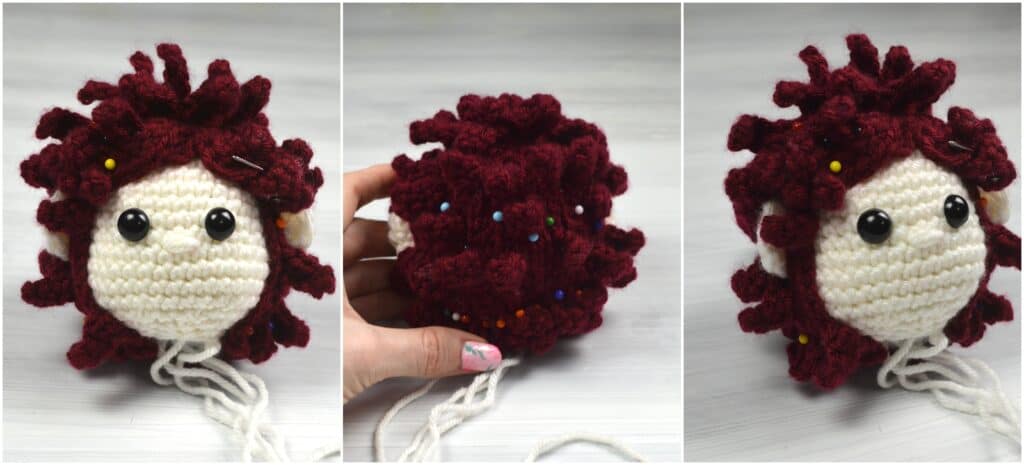
Attach the hair to the head after sewing on the ears.
Start by placing a pin through the top, center of the wig and then through the top, center of the head with the bangs at the front. Continue with the sides and use pins to hold in place. Place one longer hair strand in front of the ear and then continue around the side and the back to the other side and end with a long hair strand on the other side of the ear. Part the front, arrange the bangs and pin. Use fabric glue to secure the hair strands. Pin after gluing and remove the pins after the glue has dried.
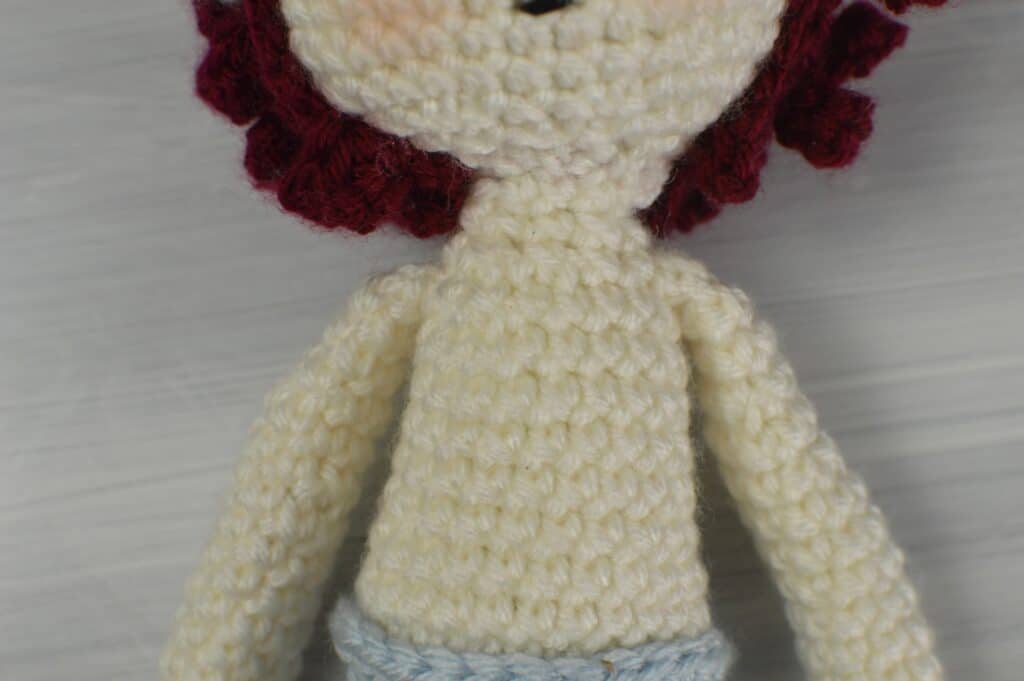
Sew the head to the neck of the body.
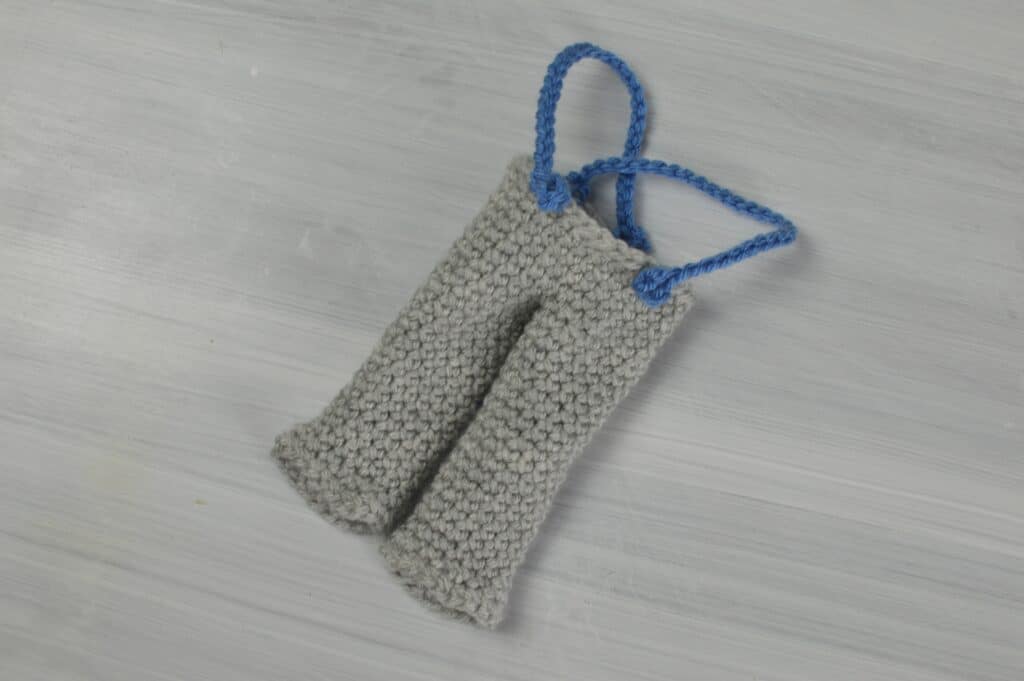
Pants:
with gray yarn:
R1: ch 20, sl st to the 1st ch, ch 1 (does not count as a st), sc into each ch around. =20
R2: *sc into the next 2 sts, inv sc dec. Repeat from the * around. =15
R3-R19: sc into each st around. =15
Cut the yarn, pull through the last stitch and make an invisible join. Weave in the ends. Set this leg to the side.
Make another leg of the pants by repeating R1-R19 and then continue below. Do not cut the yarn and do not remove the hook or the stitch marker.
Hold the first leg of the pants to the left of the second leg of the pants.
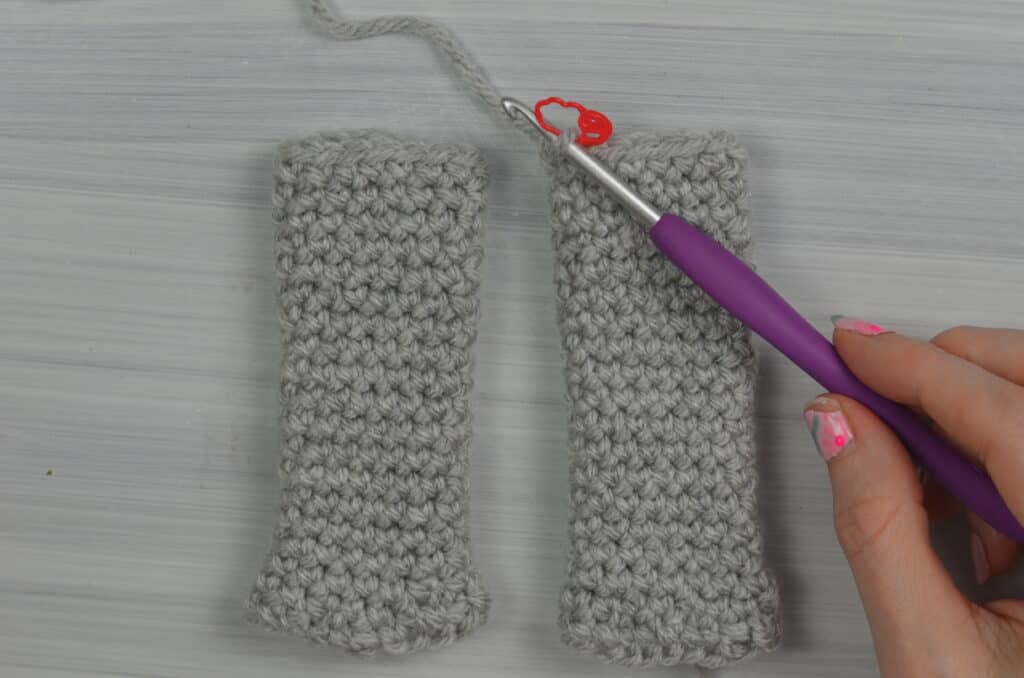
R20: sc into the next 15 sts on the left leg of the pants (images 1 and 2), continue onto the second leg of the pants and sc into the next 15 sts. (images 3 and 4) =30
R21-R25: sc into each st around. =30
Cut the yarn, pull through the last stitch and make an invisible join before weaving in the ends.
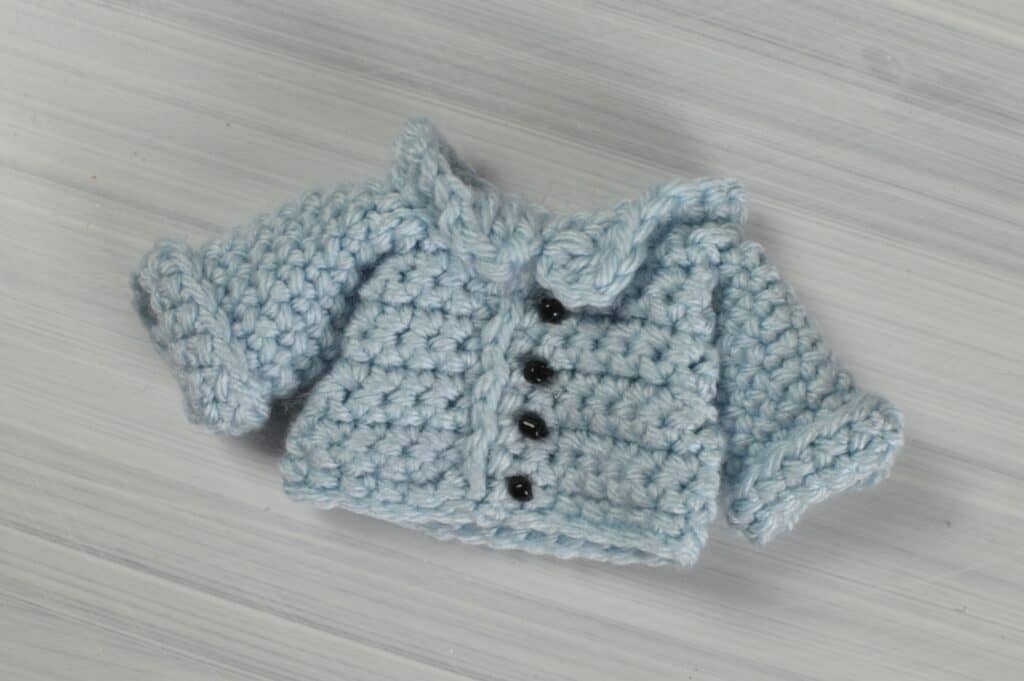
Shirt:
with pale blue yarn, working in rows:
Row 1: ch 29, sc into the 2nd ch from the hook and into each ch across. =28
Row 2-Row 3: ch 1 (does not count as a st), turn the work, sc into the same st and into each st across. =28
Row 4: ch 1, turn the work, sc into the same st and into the next 5 sts, sc2tog, sc into the next 13 sts, sc2tog, sc into the next 5 sts. =26
Row 5: ch 1, turn the work, sc into the same st and into the next 5 sts, sc2tog, sc into the next 11 sts, sc2tog, sc into the next 5 sts. =24
Row 6-Row 7: ch 1, turn the work, sc into the same st and into each st across. =24
Row 8: ch 1, turn the work, sc into the same st and into the next 5 sts, sc2tog, sc into the next 9 sts, sc2tog, sc into the next 5 sts. =22
Row 9: ch 1, turn the work, sc into the same st and into each st across. =22
Row 10: ch 1, turn the work, sc into the same st and into the next 4 sts, ch 6, sk 4, sc into the next 5 sts, ch 6, sk 4, sc into the next 4 sts. =26
Row 11: ch 1, turn the work, sc into the same st and into the next 3 sts, sc into the next 6 chs, sc into the next 5 sts, sc into the next 6 chs, sc into the next 5 sts. =26
Border:
(RS) ch 1 (mark this ch with a st marker for later) (images 1 and 2), sc down the left side 12x. (images 3 and 4) =12
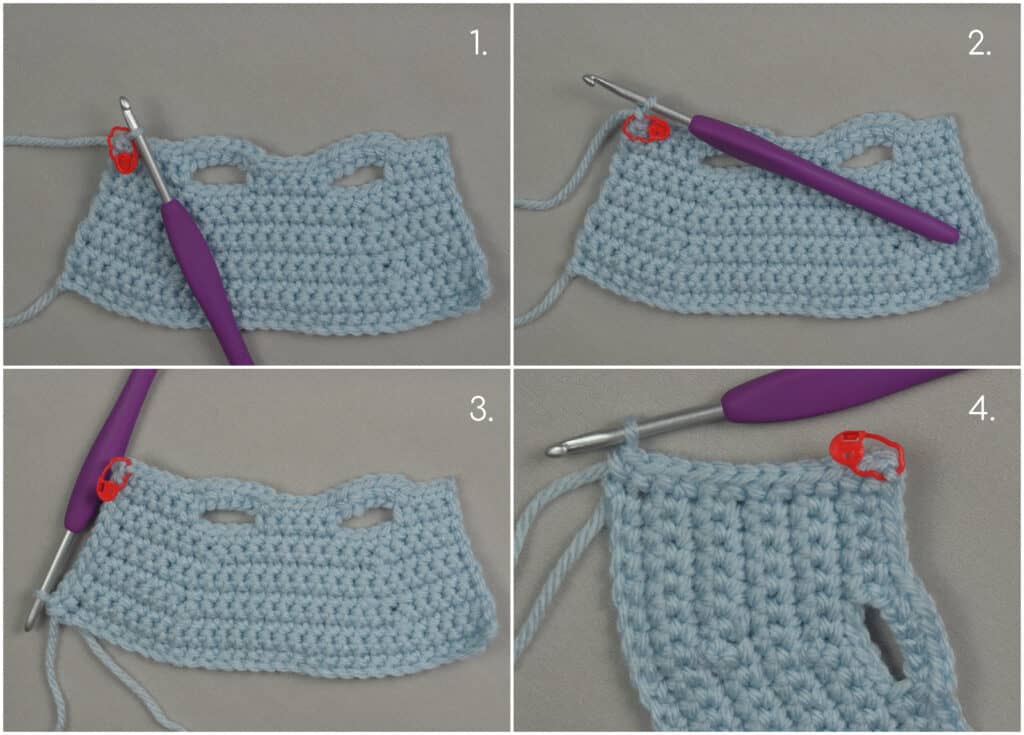
Cut the yarn, pull through the last stitch and weave in the ends. Do not remove the stitch marker.
Sleeve:
with pale blue yarn, working in a spiral:
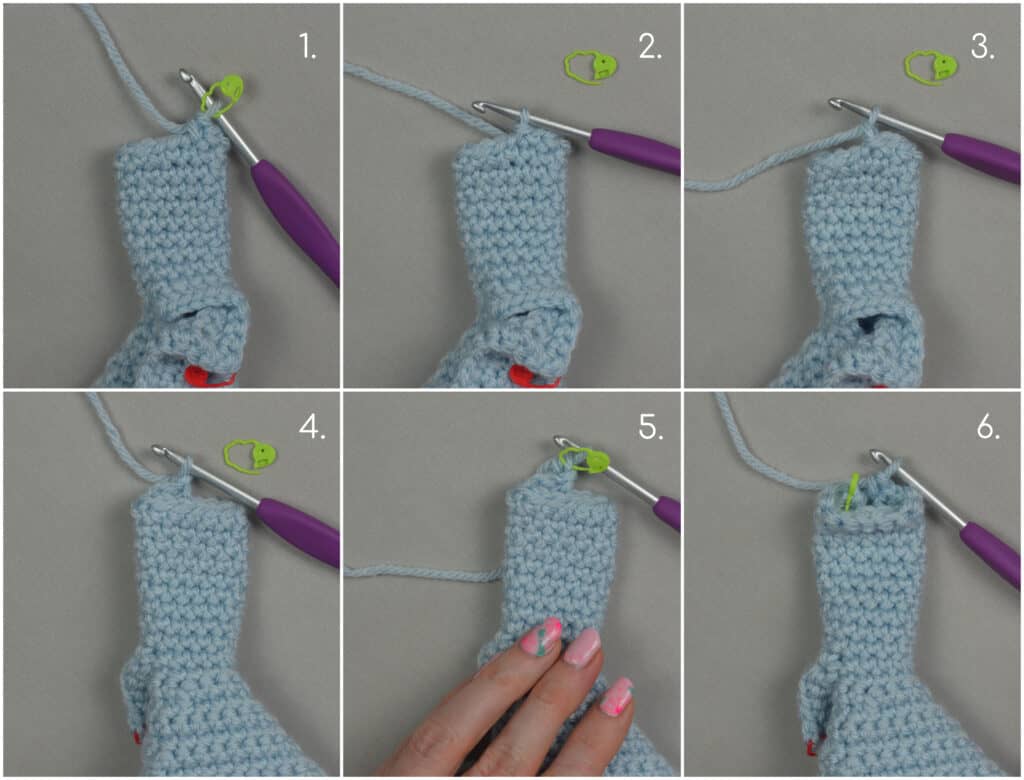
R1: Insert the hook into a corner of the arm hole, yo (image 1) and pull up a loop (image 2), ch 1 (does not count as a st), sc into the same st and into each st around. (images 3, 4, 5 and 6) =13
R2-R10: sc into each st around. =13
R11: sl st to the 1st st of the last round (image 2), ch 1 (image 3), turn the work (image 4), sc BLO into the same st (image 5) and sc BLO into each st around. (image 6) =13
R12: sc into each st around. =13
Cut the yarn, pull through the last stitch and make an invisible join. Flip the cuff down.
Follow R1-R12 for the second sleeve.
Cut the yarn, pull through the last stitch and make an invisible join. Flip the cuff down.
Collar:
with pale blue yarn:
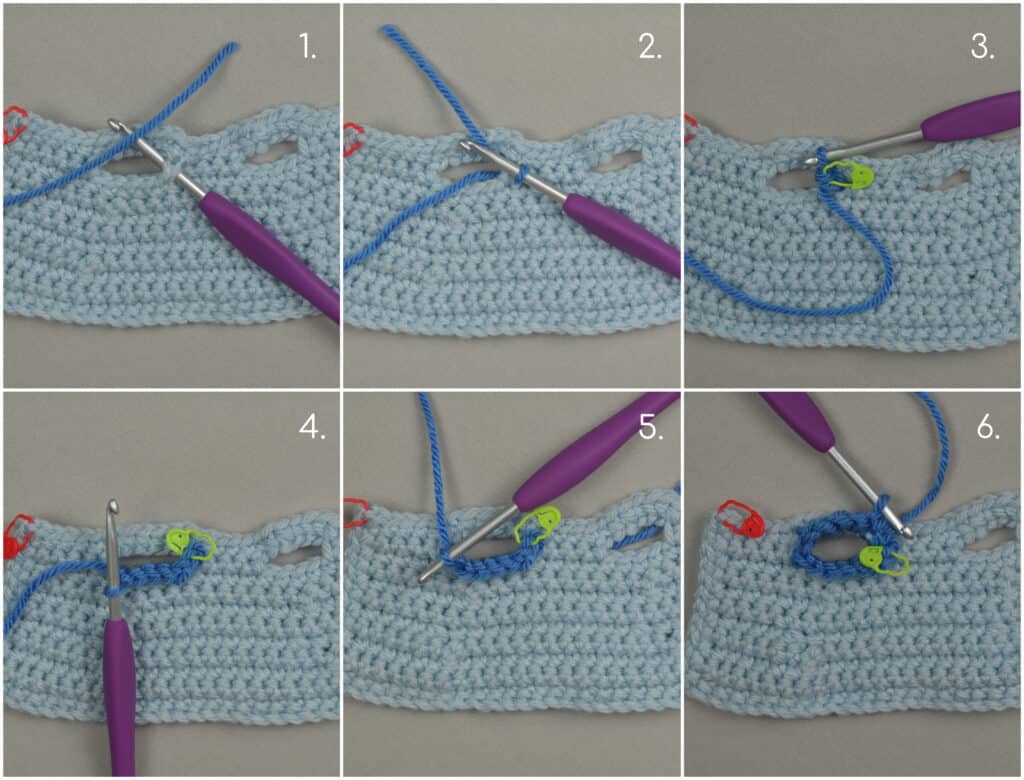
Row 1: Insert the hook into the marked st on the shirt (image 2), yo and pull up a loop (image 3), ch 3 (image 4), dc into the same st, hdc into the next st, sc across until 2 sts remain, hdc into the next st, 2dc into the last st. =29
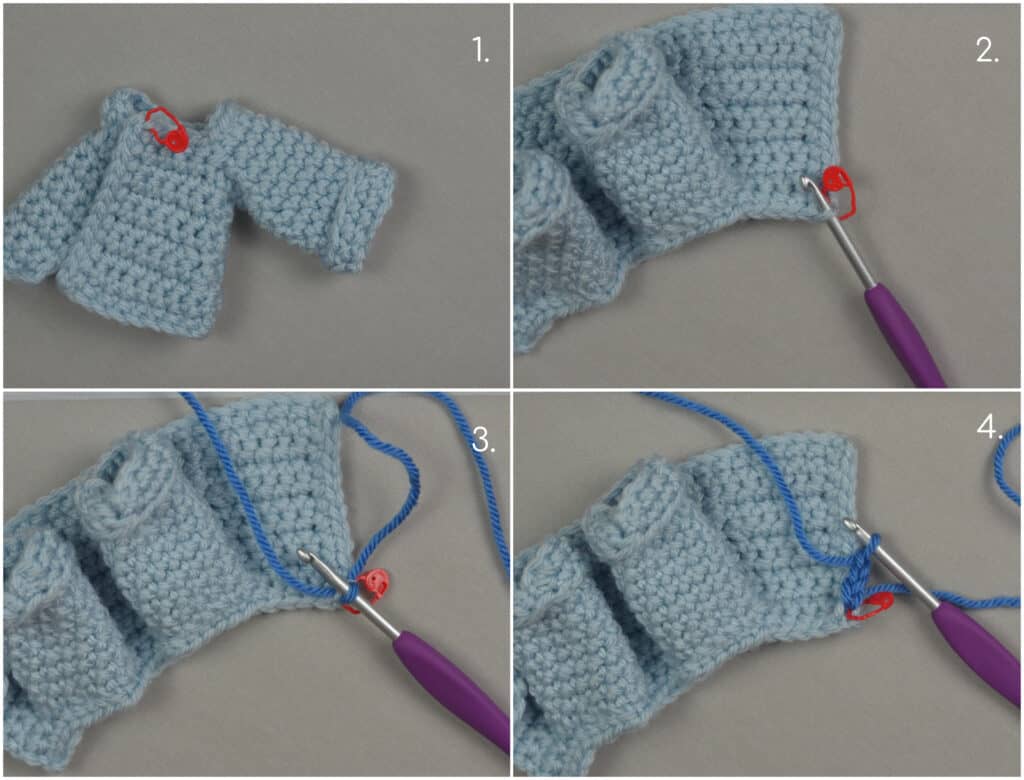
Cut the yarn, pull through the last stitch and weave in the ends.
Add beads or small buttons to the shirt. Sew the shirt closed if using beads or buttons that are too small to hold the shirt closed.
Suspenders:
with little boy blue yarn:
Row 1: ch 5, sl st to the 1st ch, ch 30, sl st to the 4th ch from the hook.
Cut the yarn, pull through the last stitch and sew the suspenders to the pants with the ch 5 at the front.
Bracelet/Invisible String:
with dijon yarn:
R1: ch 12, sl st to the 1st ch.
Cut the yarn, pull through the last st, tie a knot with the two ends and trim the ends.
The end!
I would love to see your Alex In Yarnder Land Dolls! Tag @_with_alex and use #crochetingwithalex on Instagram so I can see and share your projects.
And check back on the With Alex Blog for more crochet and tunisian crochet patterns and tutorials.
Read Blue’s Introduction Short Story on the With Alex Blog.
Favorite the pattern on ravelry.
Pin the pattern for later on pinterest.
Find With Alex on her Blog | Instagram | Facebook | YouTube | Pinterest | Ravelry
Stay connected with Clover on Facebook | Twitter | Instagram | Pinterest | YouTube | Ravelry