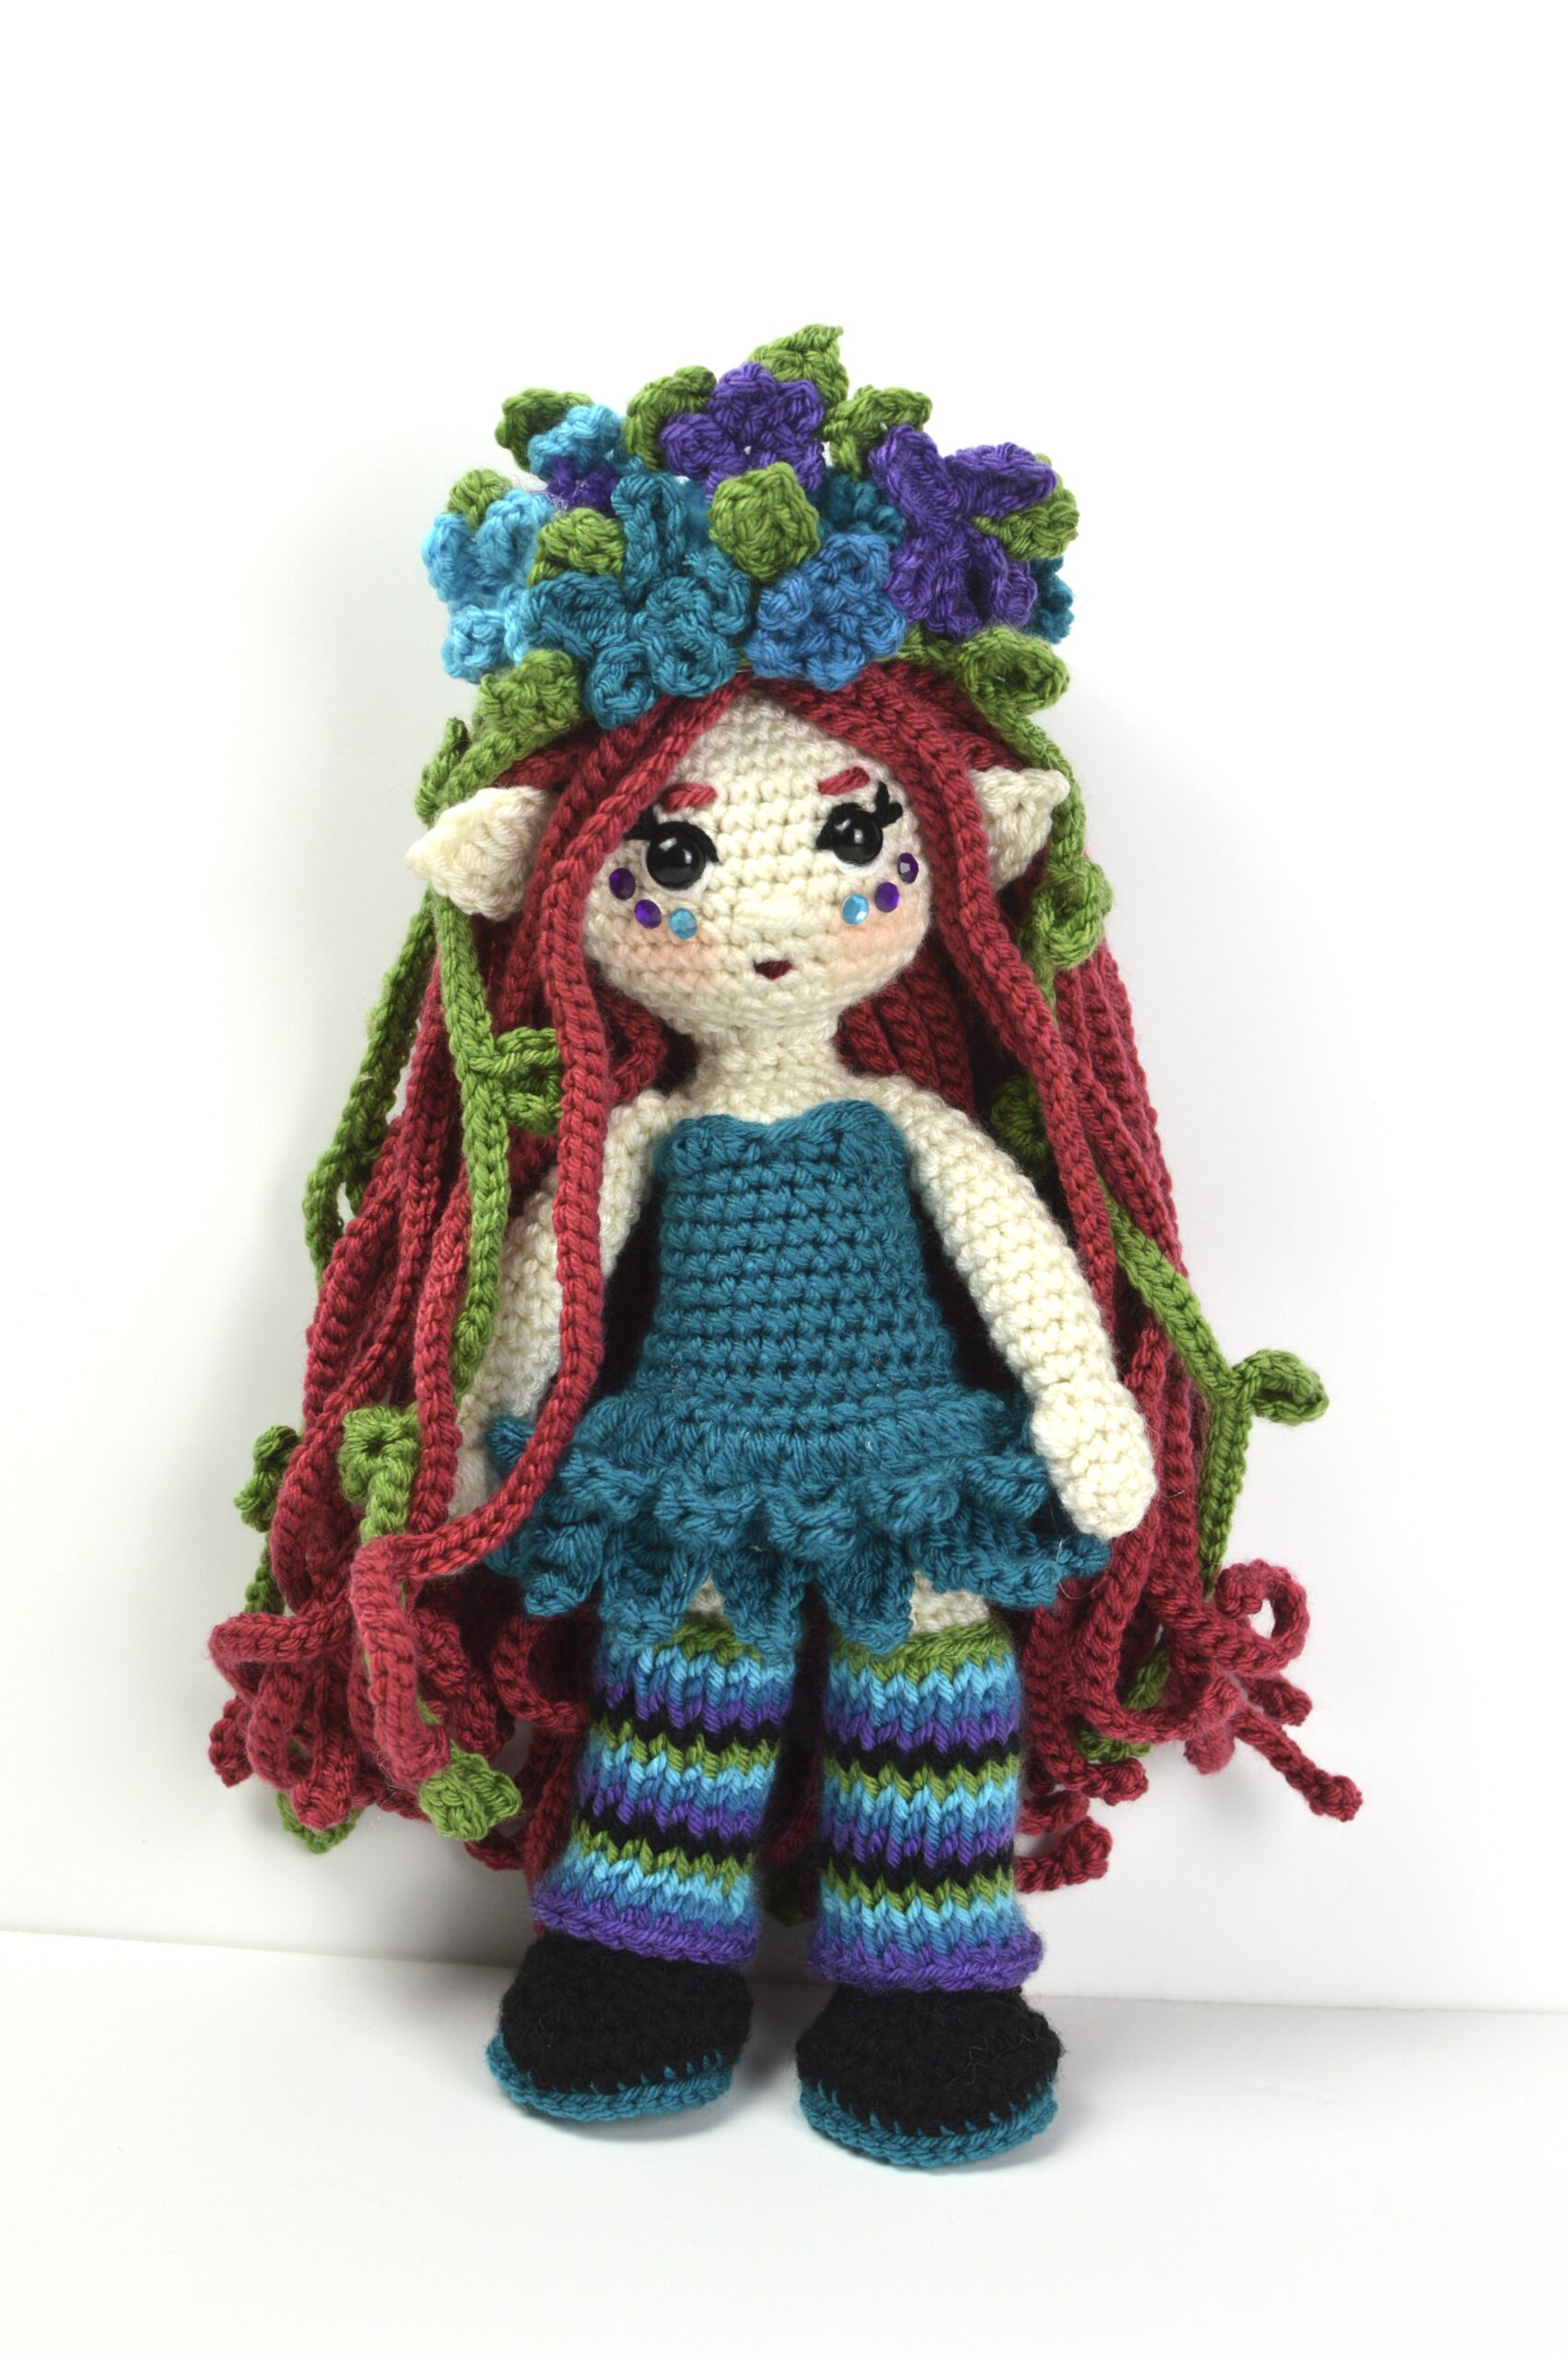
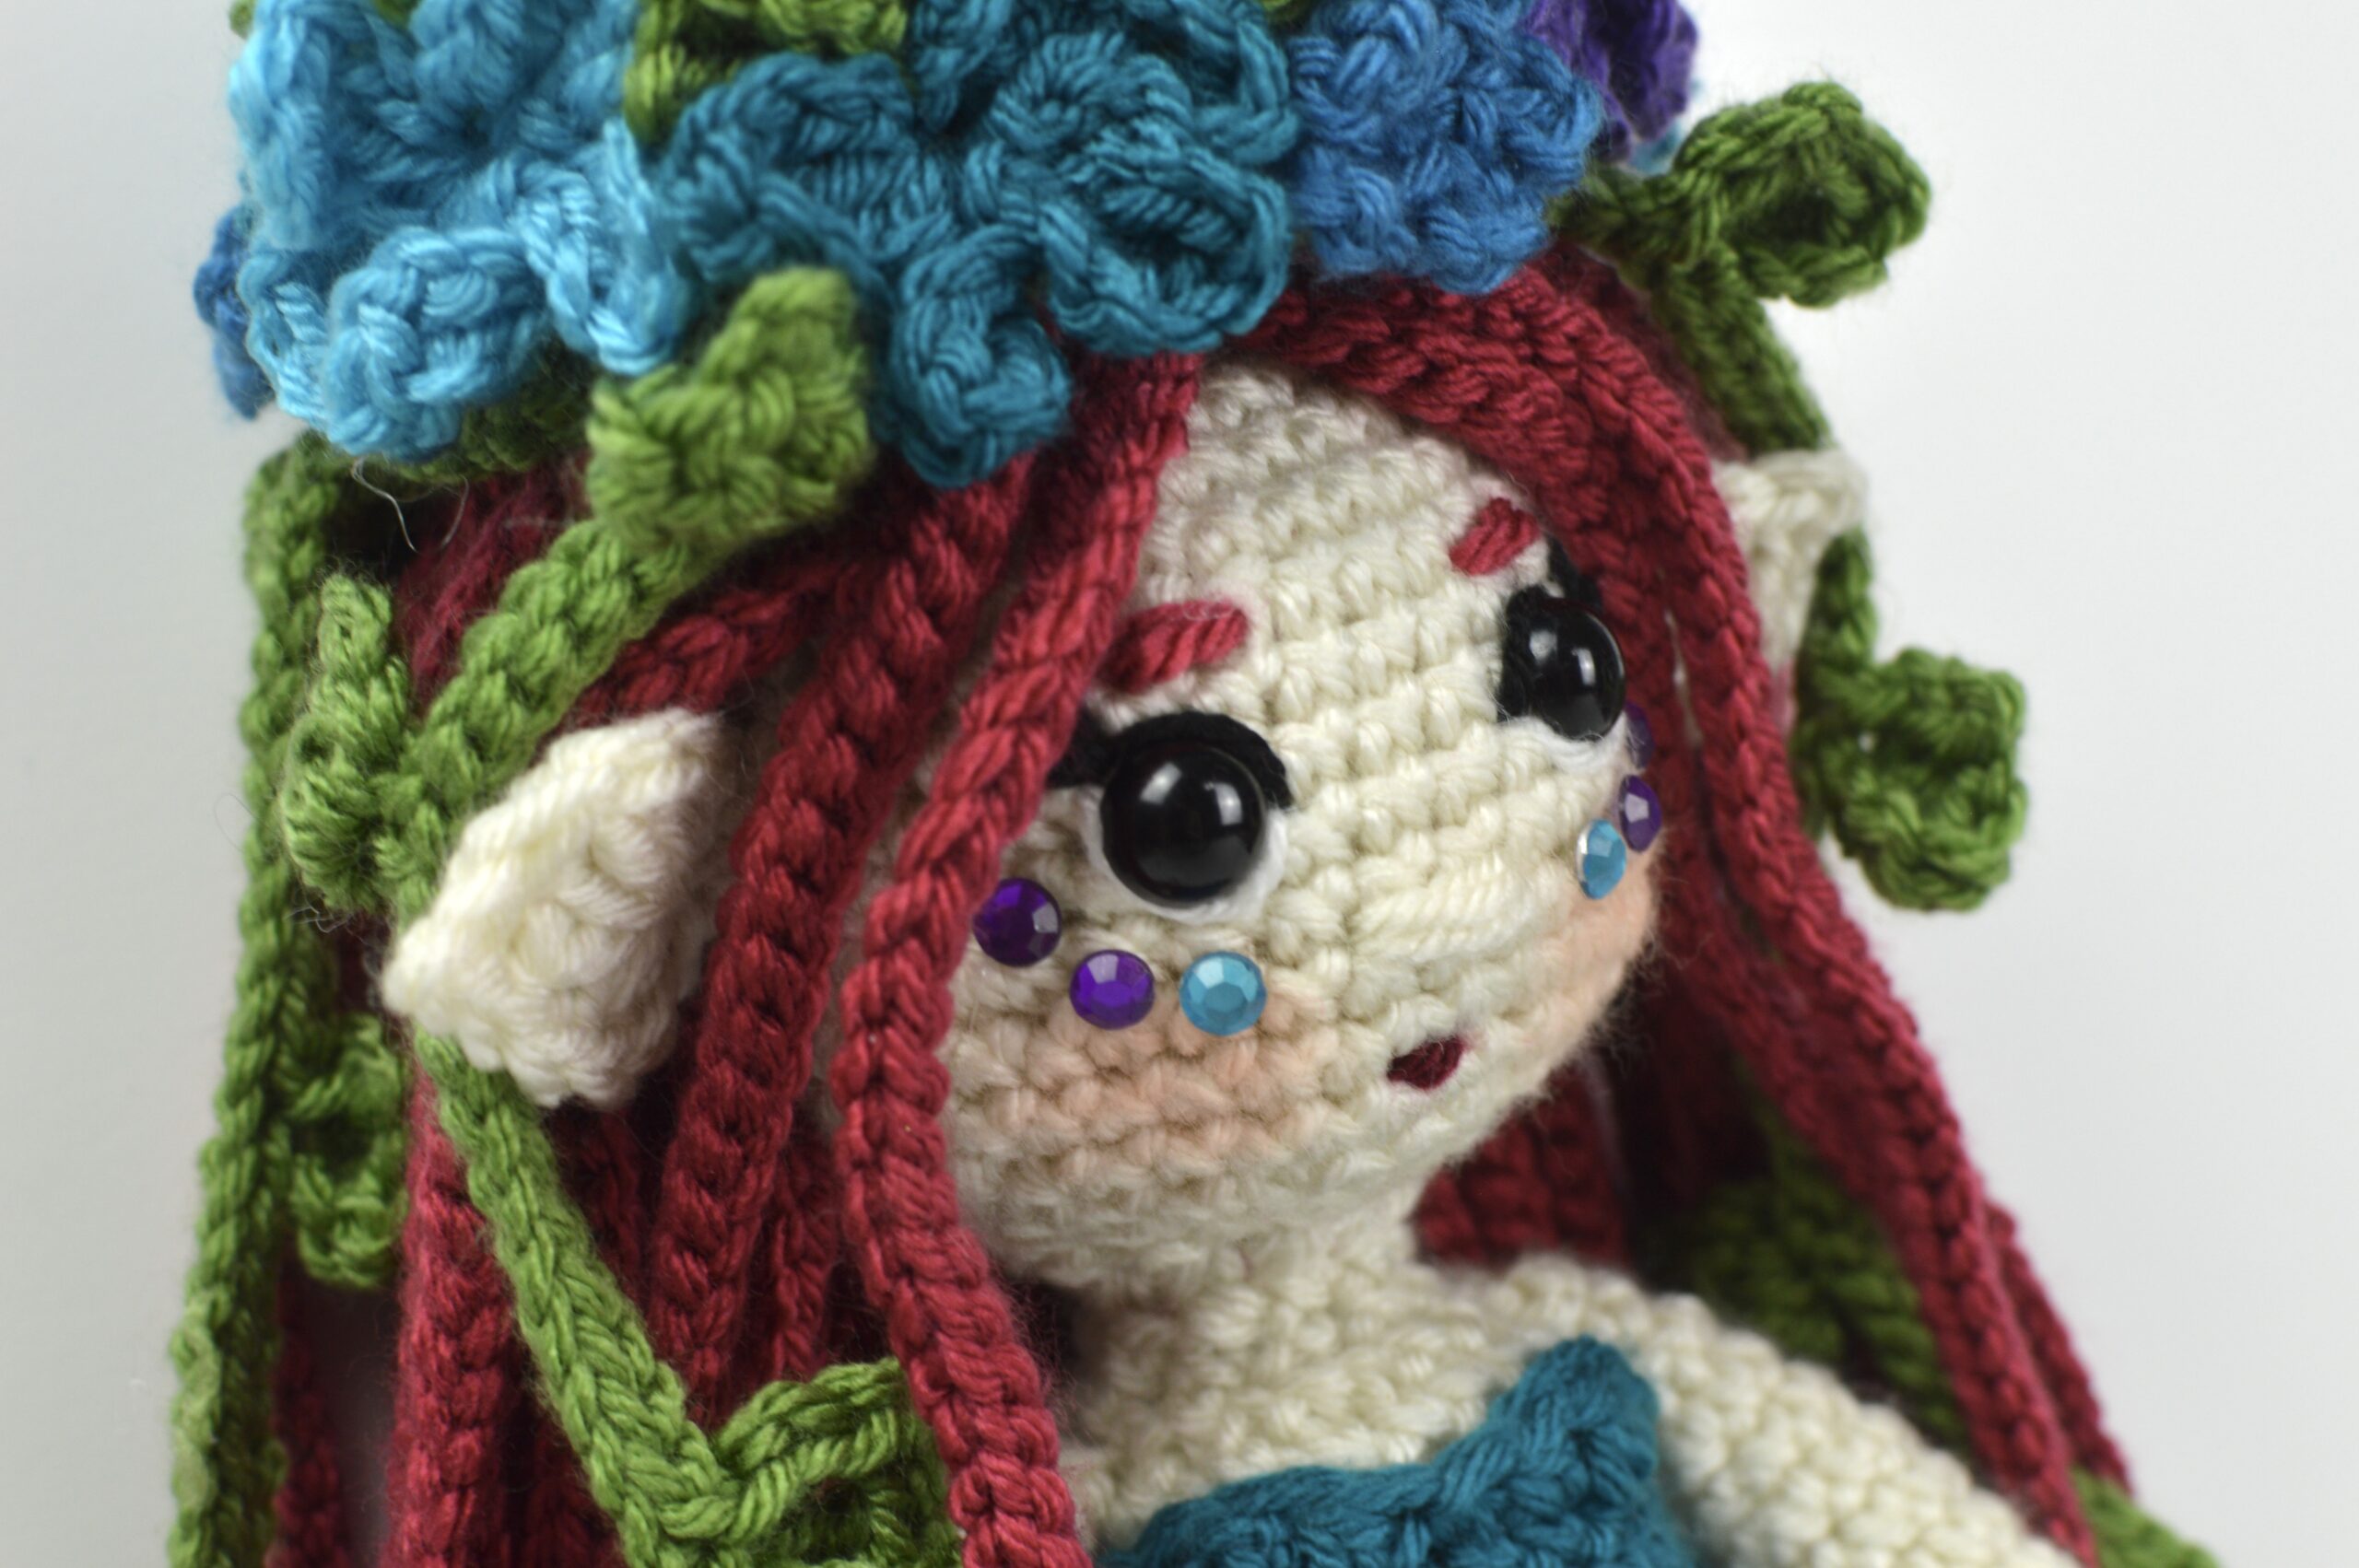
Aurora Lights: Amigurumi Crochet Pattern
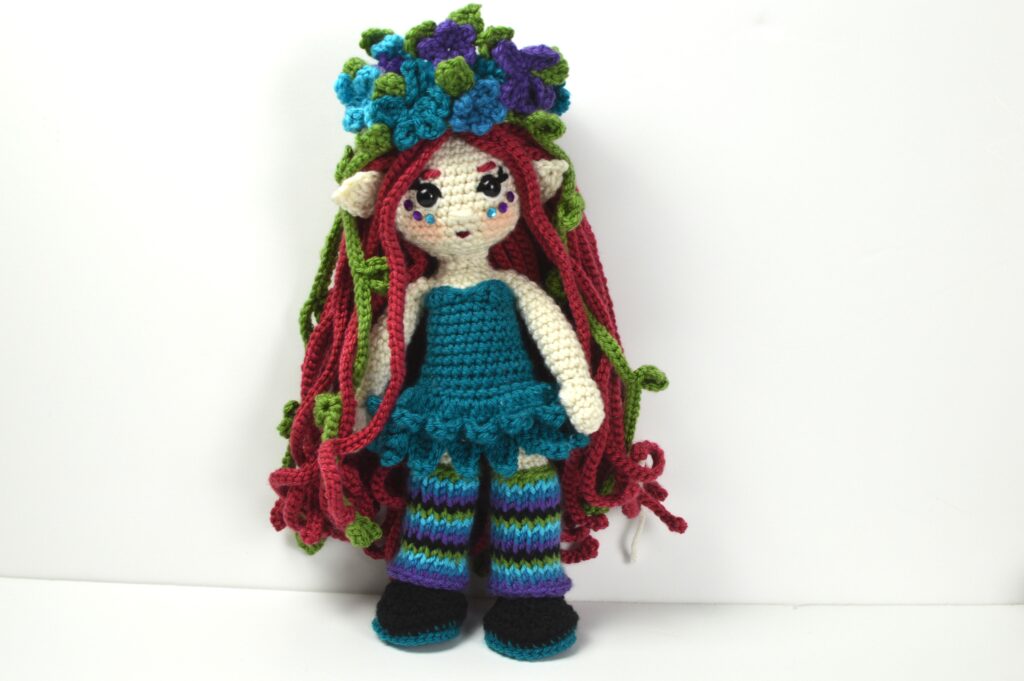
Hello to you all! I’m Alex from With Alex and I’m a crochet and tunisian crochet designer. Today I am so excited to be back on the Clover Blog with a brand new crochet pattern! I am sharing my third character pattern from the Alex In Yarnder Land Series! Meet Aurora Lights, the water and air nymph!
Aurora paints yarn in the river by day and on special nights she swims from her colorful water and up into the sky, swimming through the air and clouds to paint what we know as the Northern Lights.
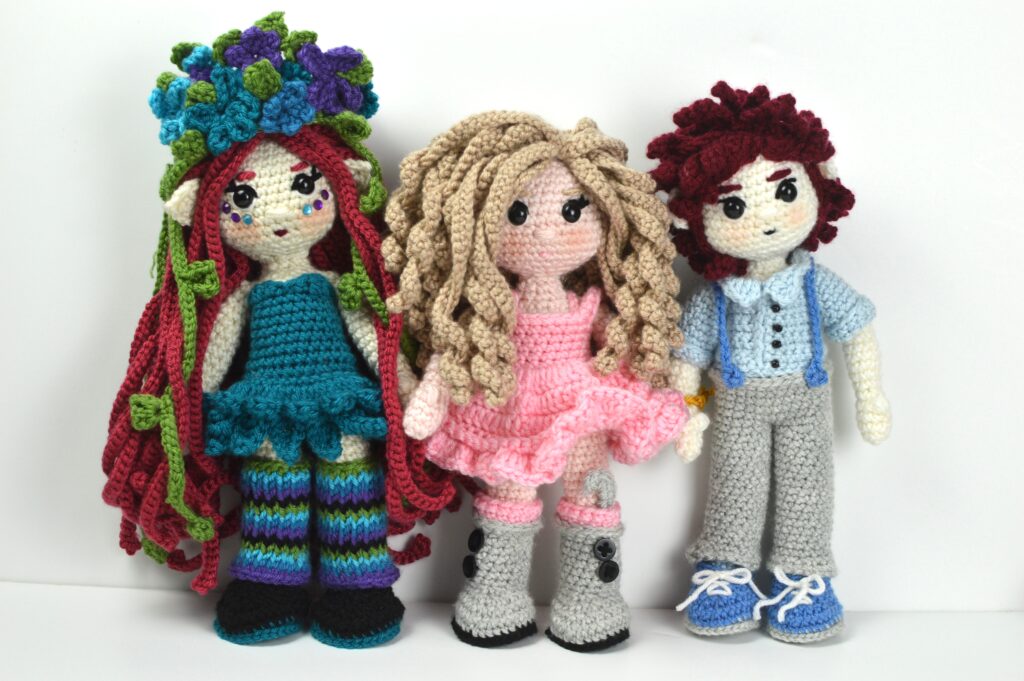
She is the third character crochet pattern to be released from the Alex In Yarnder Land Series. The short story series is about Alex, who is a crochet designer and just a normal girl until she finds the world of Yarnder Land. After Alex enters Yarnder Land, she finds adventure, magic and Blue, the man in the moon. Find out more about Alex In Yarnder Land on Alex’s blog, here, and find the free crochet pattern on the Clover blog, here.

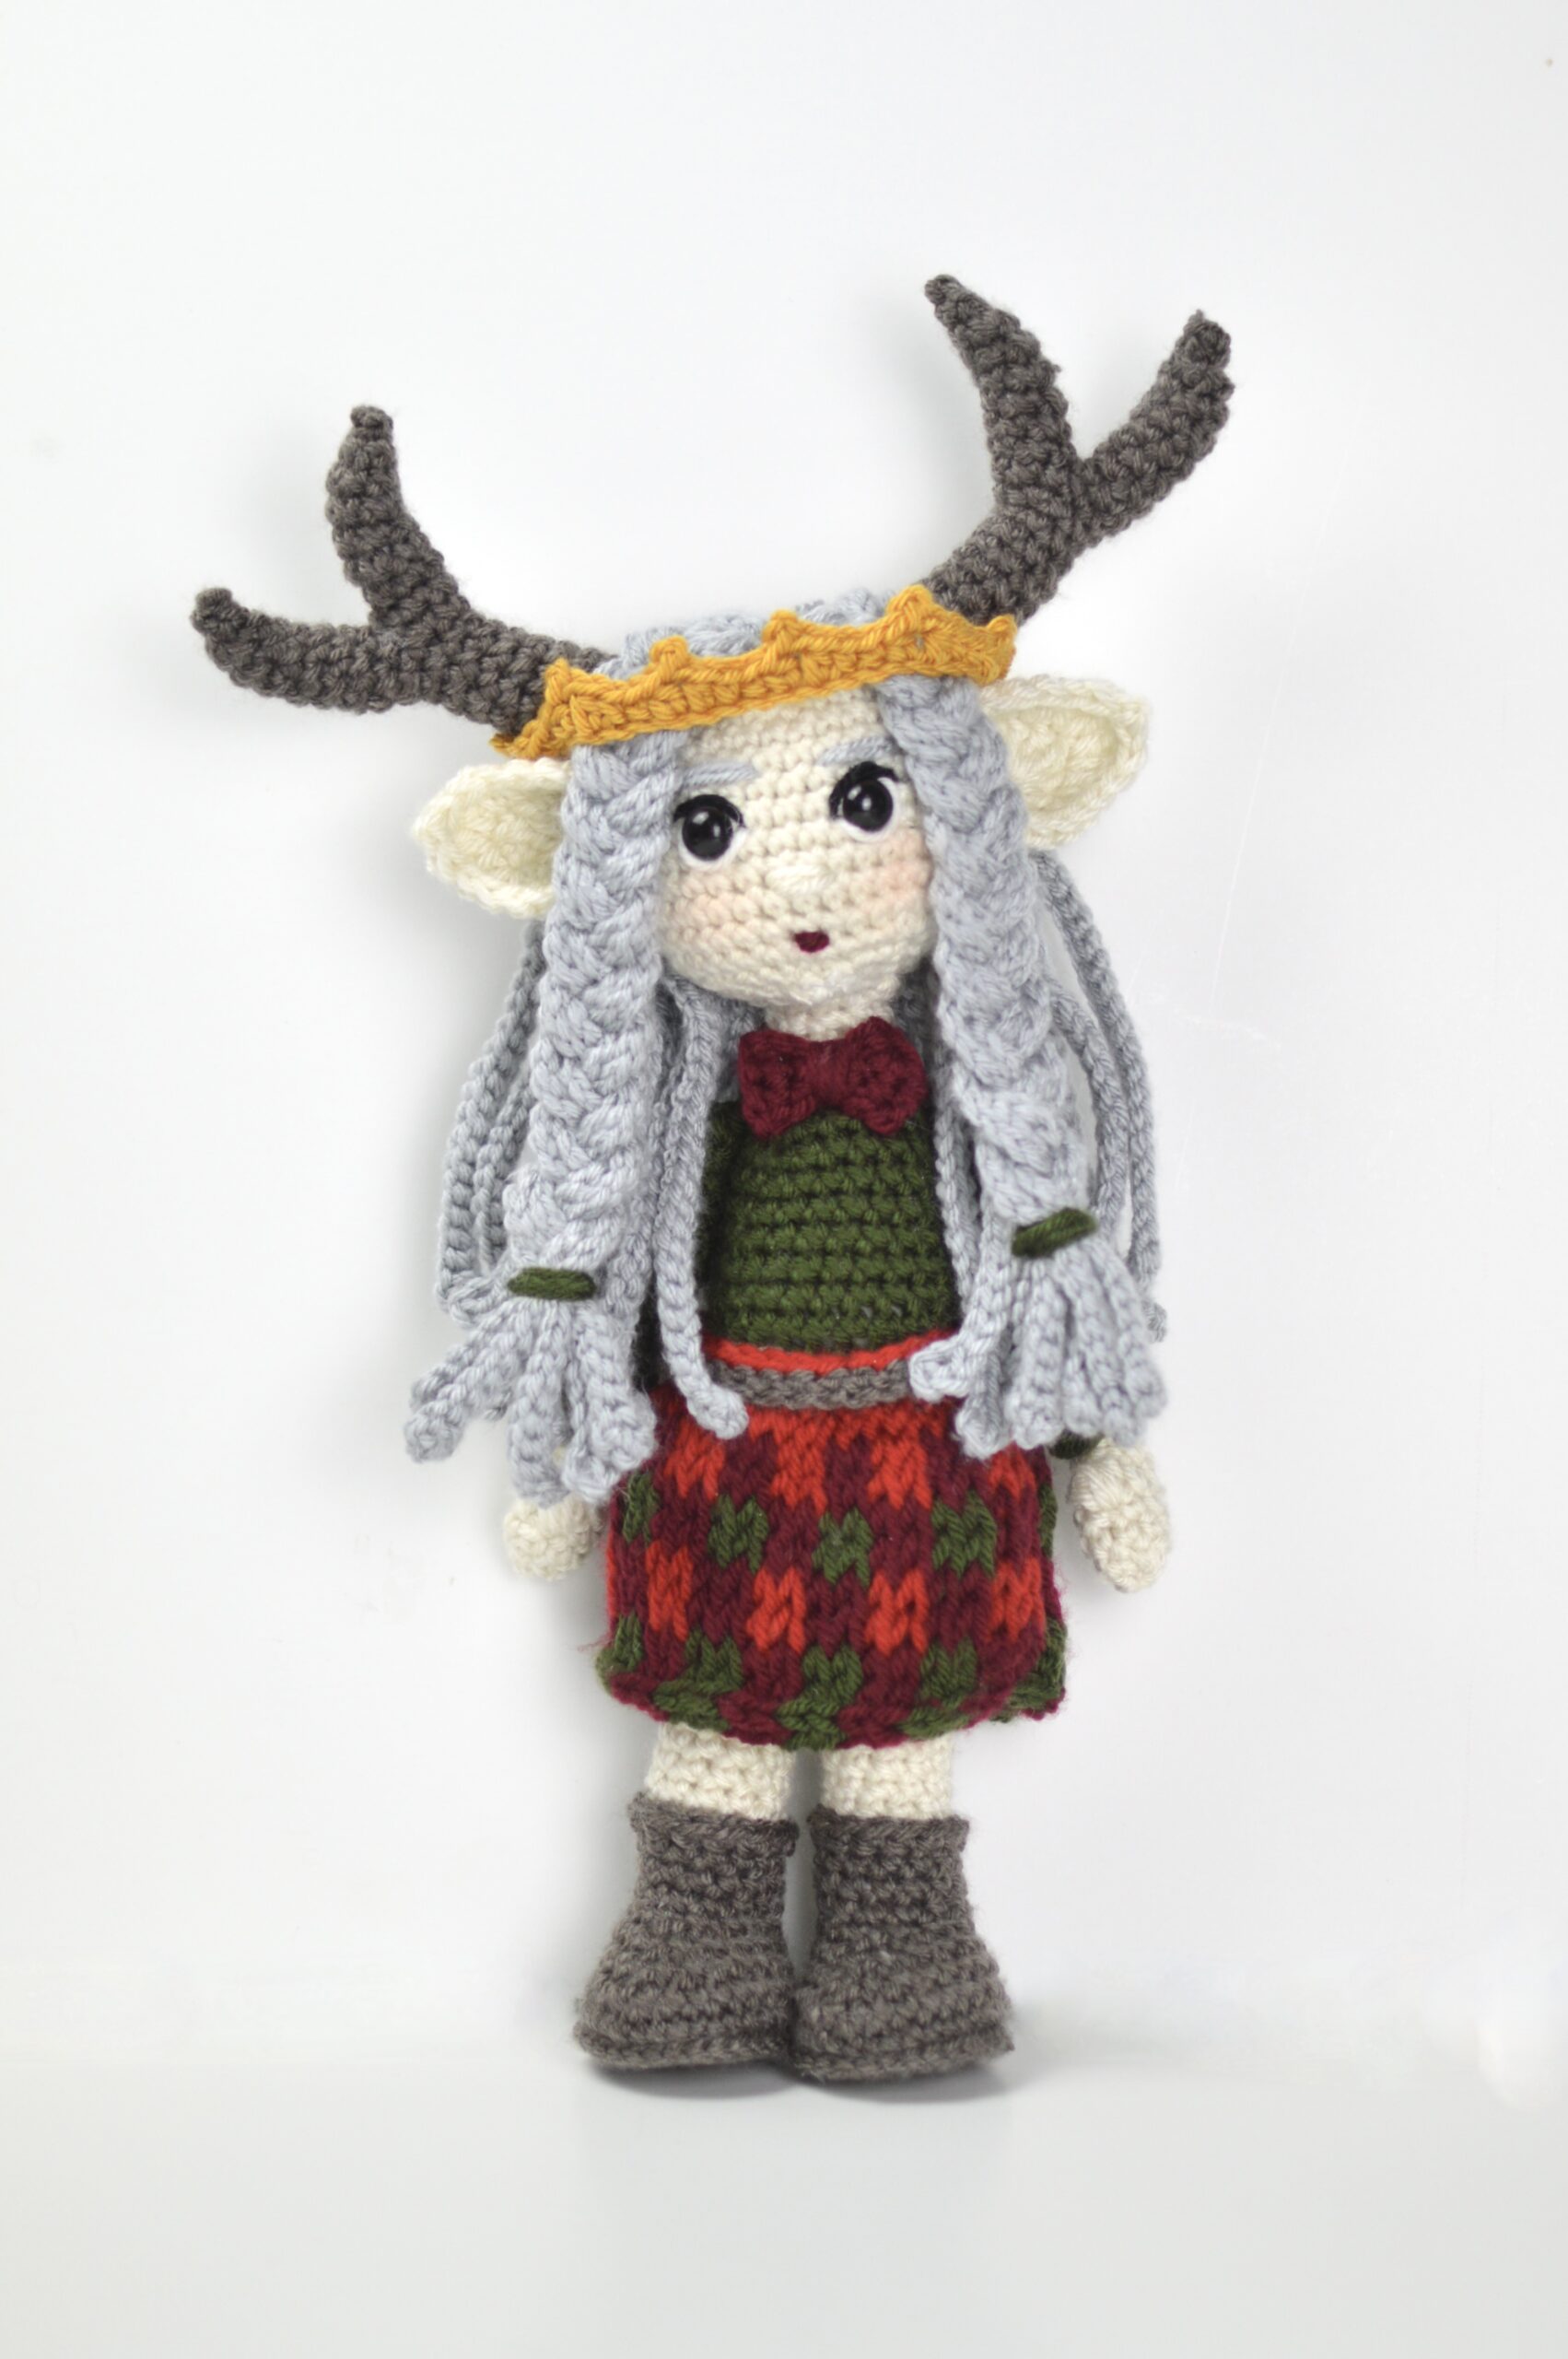
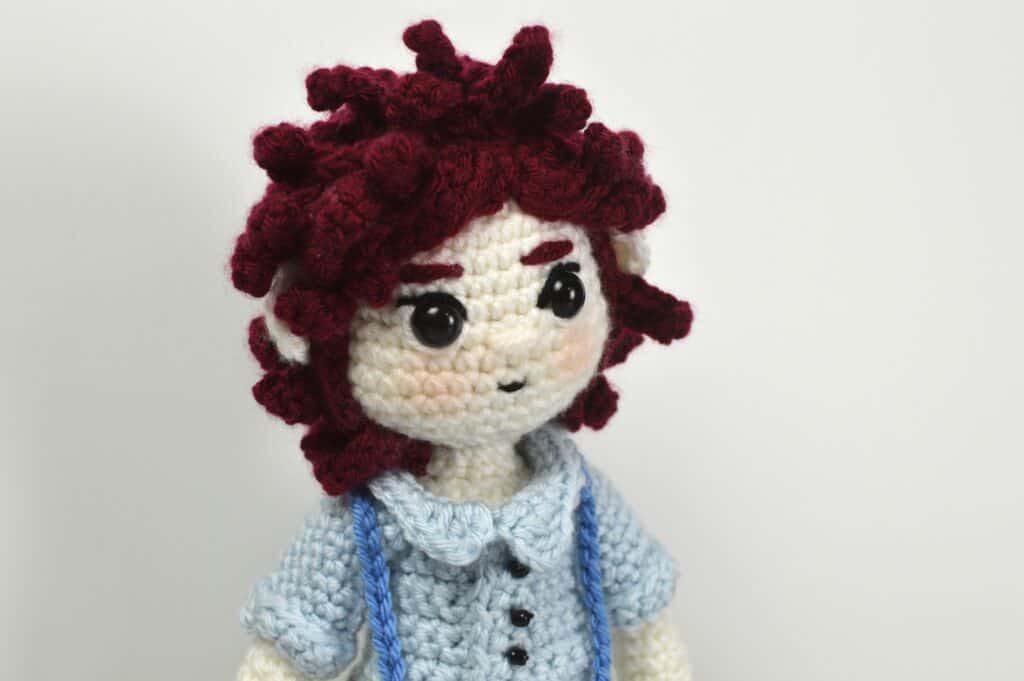
Blue, the second character crochet pattern release, is the man in the moon and his job is to help the lost find their way home. He lives a lonely life until he meets Alex and his whole life is changed forever. Will he give up his world for her? Find out more about Blue with his Introduction Story on Alex’s blog, here and find the free crochet pattern on the Clover blog, here.
![]()
Aurora is Blue’s sister and she becomes Alex’s best friend! Read Aurora’s Introductions Story on Alex’s blog, here.
I am having so much fun designing these characters while bringing them to life from my imagination and stories. Aurora is made with a Clover Amour Size G 4.00 mm crochet hook. I love using this hook especially for amigurumi. The handle is soft, the hook is lightweight and the yarn glides smoothly over it.

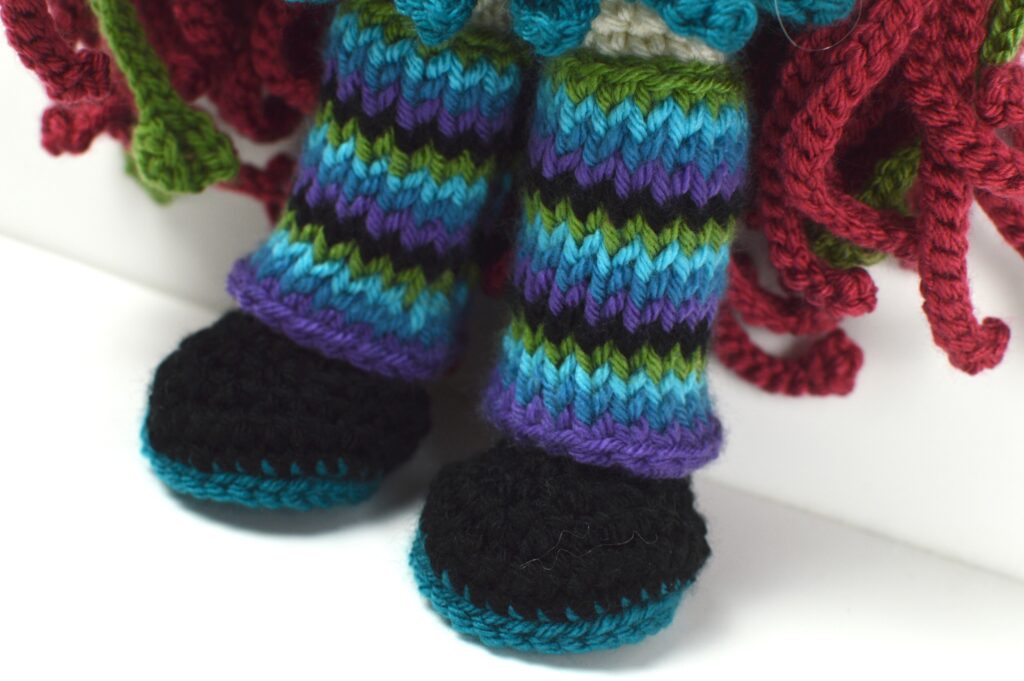
Aurora is a yarn dyer so she needed a pair of beautiful, leg warmers in the colors of her northern lights. They are made in tunisian crochet so that they look knitted but don’t worry, the same hook is used as for the rest of the pattern. No special hook required!
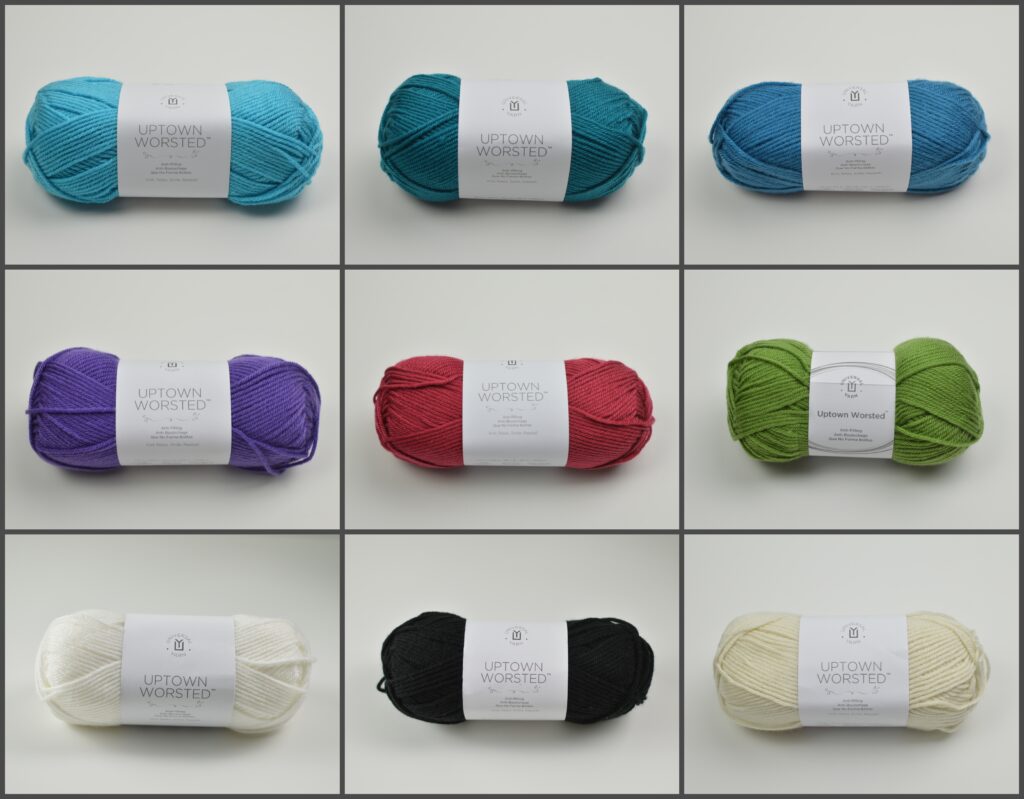
The yarn that I am using for this series is Universal Yarn Uptown Worsted. It is a medium weight yarn and it is 100% anti pilling acrylic so it is soft and frogs extremely well too! Plus the colors are perfect for the Alex In Yarnder Land designs.
Aurora’s hair is crocheted by first making a circle while working in the back loops and then the hair strands are crocheted around the circle and then in a spiral using the unworked front loops of the stitches.
Let’s get started!

Aurora Lights Amigurumi Pattern
Difficulty:
Advanced/Intermediate
Size:
12″ tall (not including her crown)
Materials:
- Size G 4.00 mm Clover Amour crochet hook
- Universal Yarn Uptown Worsted in Cranberry (1), Sapphire (1), Cream (1), Black (1), White (1), Ink Blue (1), Purple Iris (1), Olive (1), Turquoise (1)
- Polyester Fiberfill
- Stitch markers
- Scissors
- Darning needle
- Safety eyes (size 12 mm)
- Fabric glue
- Pins
- Hot glue
- 1 Sheet of plastic canvas
- Flatback rhinestones
Abbreviations:
- sc: single crochet
- 2sc: single crochet increase
- inv sc dec: invisible single crochet decrease
- st(s): stitch(es)
- sl st: slip stitch
- sl st 2tog: slip stitch decrease
- ch: chain
- sk: skip
- yo: yarn over
- yu: yarn under
- FLO: front loop only
- BLO: back loop only
- dc: double crochet
- 3dc: double crochet increase of 2
- tks: tunisian knit stitch
- tfs: tunisian full stitch
Gauge:
Gauge is not important. See note section for more information.
Notes, Tips, And Tutorials:
Some photo tutorials in this pattern are a different color to be seen better and some photo tutorials in this pattern are from Alex In Yarnder Land Amigurumi or Blue: Man In The Moon Amigurumi, but they teach the same things.
Special Stitches:
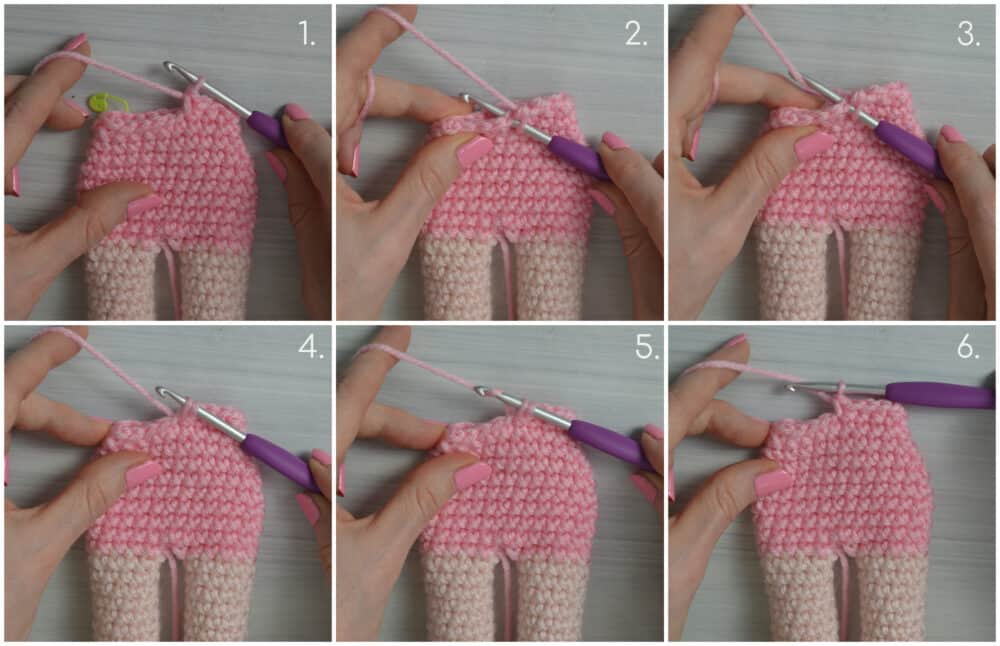
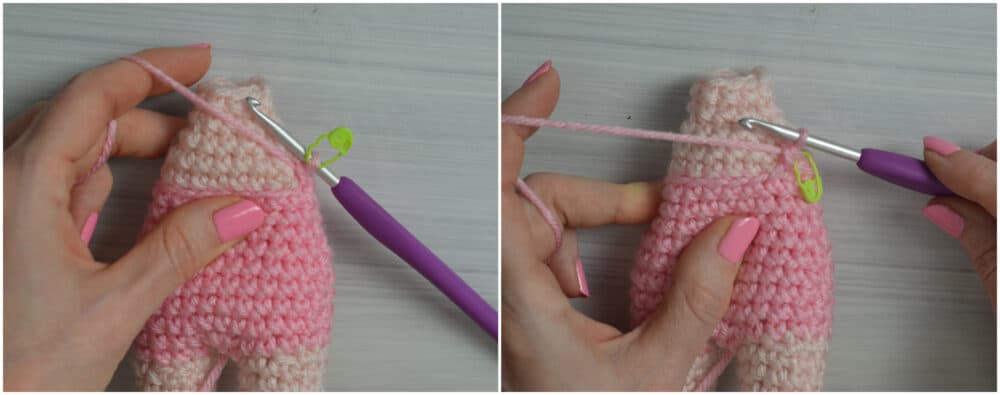
Invisible single crochet decrease (inv sc dec): insert the hook into the front loop only of the next 2 stitches (image 2), yarn under (image 3) and pull up a loop (image 4), yarn over (image 5) and pull through all of the loops on the hook. (image 6)

single crochet (sc): insert the hook into the next stitch (image 2), yarn under (image 3) and pull up a loop (image 4), yarn over (image 5) and pull through all of the loops on the hook. (image 6)
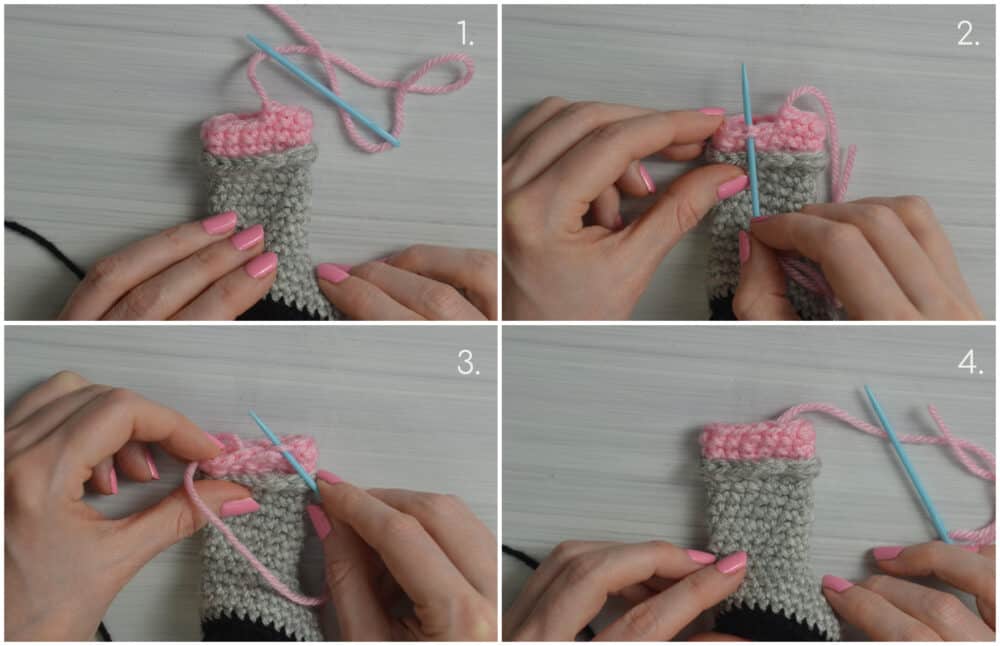
invisible join: Skip the stitch next to the last stitch made and insert the needle through the next stitch (image 2), pull through and insert the needle into the back loop only of the last stitch made (image 3) and pull through.
cluster: *Yarn over and insert the hook into the stitch, yarn over and pull up a loop. Repeat from the * 2 more times, yarn over and pull through all of the loops on the hook.
sl st 2tog: Insert the hook into the FLO of the next st, insert the hook into the FLO of the next st, yarn over and pull through the loops on the hook
Video Tutorials:
Tips:
- This pattern is worked in a continuous round (in a spiral) unless otherwise noted. Mark the beginning of each round with a stitch marker.
- No gauge for this pattern but make sure to stay consistent with your stitches.
- You will need more than one stitch marker.
- Do not overstuff the foot or it will not fit in the boot.
- A great tip is to make the boots first and then as you stuff the foot and leg, check periodically to make sure it fits in the boot. You can also stretch the boot slightly.
- To put the boots on: Turn the foot sideways, slide in and then turn the foot back.
- Use the handle of the crochet hook or a chopstick to help with stuffing the doll with fiberfill.
Tunisian Crochet Tips and Tutorials:
The leg warmers are made in tunisian crochet.
Video Tutorials:
Tips:
- The leg warmers can be made with a regular crochet hook.
- The pattern is worked flat with the right side of the work facing.
- At the beginning of each row, the first stitch is on the hook and counts as a Tunisian knit stitch.
- Do not turn your work at the beginning of each row. Each row is worked from right to left (forward pass) and then from left to right (return pass).
How To Work Into The Last Stitch Of The Tunisian Crochet Rows:
Counts as a tunisian knit stitch or tks.
- Tilt the work toward you and look for the last 2 vertical bars at the end of the row. (image 1)
- Insert the hook under these last 2 vertical bars. (image 2)
- Yarn over, (image 3)
- and pull up a loop. (image 4)
The Pattern
- Please read all of the notes before beginning this pattern.
- This pattern is worked in a continuous round (in a spiral) unless otherwise noted. Mark the beginning of each round with a stitch marker.
- Some photo tutorials in this pattern are a different color to be seen better and some photo tutorials in this pattern are from Alex In Yarnder Land Amigurumi or Blue: Man In The Moon Amigurumi, but they teach the same things.
Shoe: (Make 2)
with sapphire yarn:
R1: Make a magic ring or a loose slip knot, ch 1 and put 10 sc into the magic ring or loose slip knot. =10
Pull on the tail end to close the hole.
R2: 2sc into each st around. =20
R3: 2sc into the next st, *sc into the next st, 2sc into the next st. Repeat from the * around until 1 st remains. Insert the hook into the last st, yu and pull up a loop, yo with black yarn (drop the sapphire yarn but bring it to the front of the work) and pull through the two loops to complete the sc. =30
with the black yarn:
R4: sc BLO into each st around. =30
R5: inv sc dec, sc into the next 11 sts, (inv sc dec) x2, sc into the next 11 sts, inv sc dec. =26
Weave in the two ends and flip right side out.
R6: sc into the next 9 sts, (inv sc dec) x4, sc into the next 9 sts. =22
R7: sc into the next 7 sts, (inv sc dec) x4, sc into the next 7 sts. =18
R8: sc into the next 5 sts, (inv sc dec) x4, sc into the next 5 sts. =14
Cut the black yarn, pull it through the last stitch and make an invisible join before weaving in the end.
Pick up the sapphire yarn and continue with R4 below.
with the sapphire yarn:
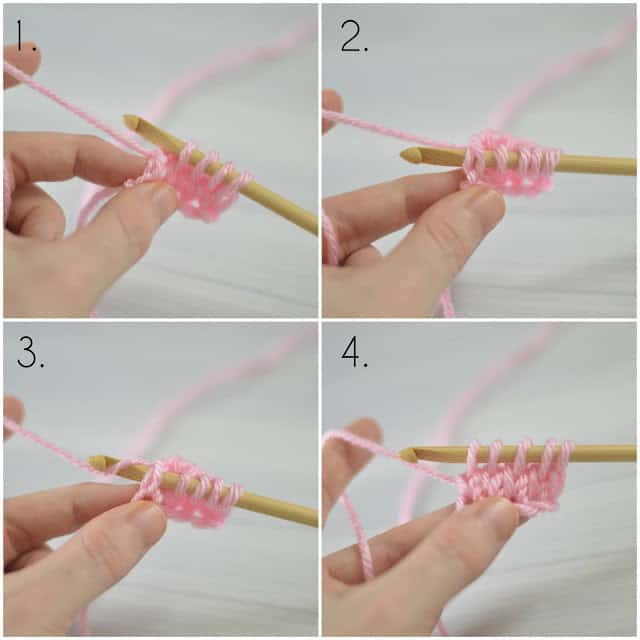
R4: Flip the shoe upside down, insert the hook into the FLO of the next st to the left of the working yarn (image 1), yo (image 2) and pull up a loop (image 3),
sl st FLO into each st around, sl st to the 1st sl st of the round. =30
Cut the sapphire yarn, pull it through the last stitch and weave in the ends.
Lightly stuff the toe of the shoe and shape it.
Foot and Leg: (Make 2)
with cream yarn:
R1: Make a magic ring or a loose slip knot, ch 1 and put 8 sc into the magic ring or loose slip knot. =8
Pull on the tail end to close the hole.
R2: sc into the next 3 sts, 2sc into the next 2 sts, sc into the next 3 sts. =10
R3: sc into the next 4 sts, 2sc into the next 2 sts, sc into the next 4 sts. =12
R4: 2sc into the next st, sc into the next 10 sts, 2sc into the last st. =14
Weave in the end and flip right side out.
R5: sc into the next 5 sts, inv sc dec, sc into the next 5 sts, inv sc dec. =12
R6: inv sc dec, sc into the next 4 sts, inv sc dec, sc into the next 4 sts. =10
R7: sc into the next 3 sts, inv sc dec, sc into the next 3 sts, inv sc dec. =8
R8: sc into each st around. =8
Start stuffing the foot with polyester fiberfill and continue stuffing as you continue with the pattern.
R9: sc into the next 7 sts, 2sc into the last st. =9
R10: 2sc into the next st, sc into the next 8 sts. =10
R11: sc into the next 9 sts, 2sc into the last st. =11
R12-R21: sc into each st around. =11
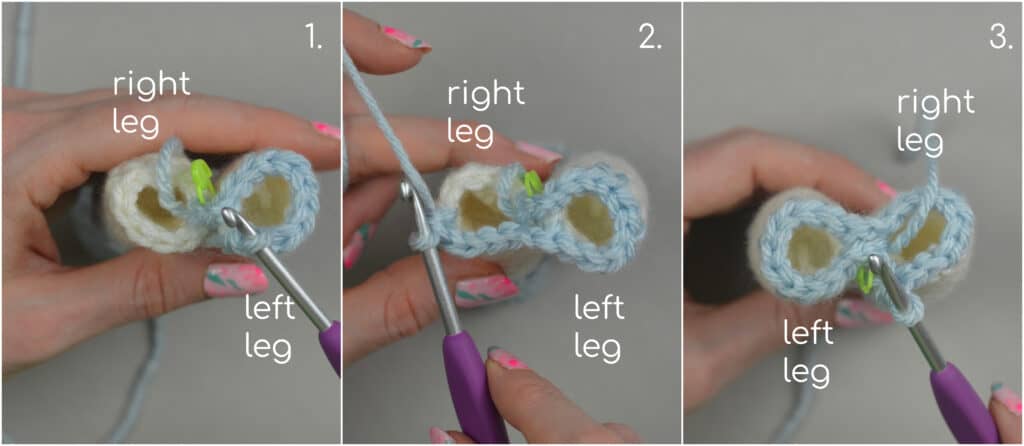
Left Leg: R22: sc into the next 10 sts, mark the 10th st with the st marker, sc into the next st. =11
Right Leg: R22: sc into the next 4 sts, mark the 4th st with the st marker, sc into the next 7 sts. =11
Cut the yarn, pull through the last stitch and make an invisible join on both legs. Do not take out the stitch markers.
Body And Neck:
Hold the left leg next to the right leg with the feet facing away from you.
with sapphire yarn:
(Leave the tail end long enough to sew the gap between the legs closed.)
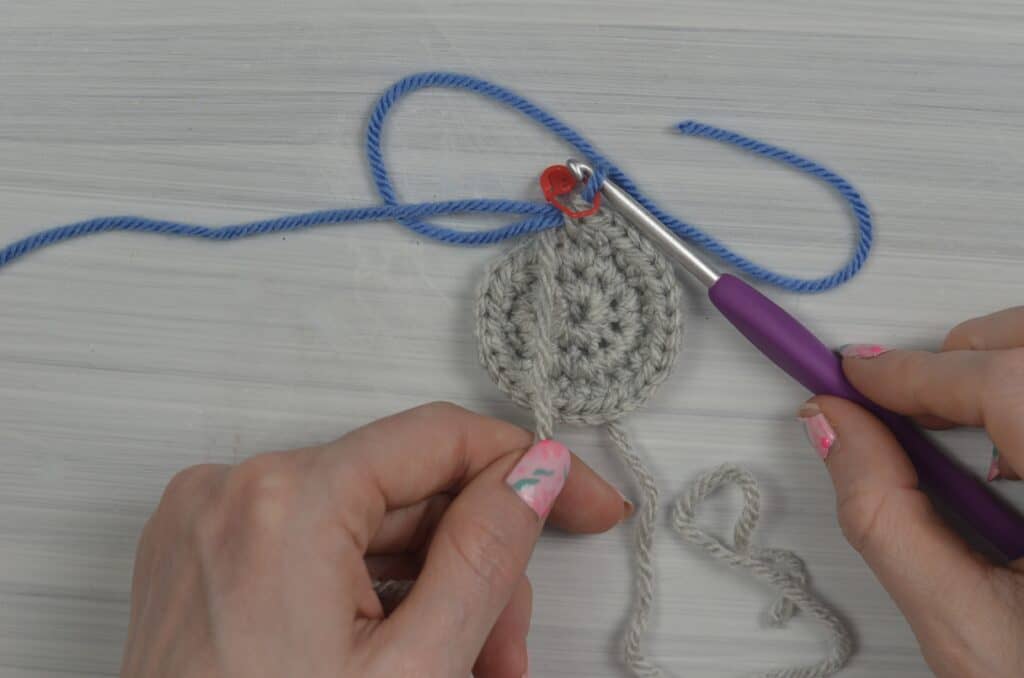
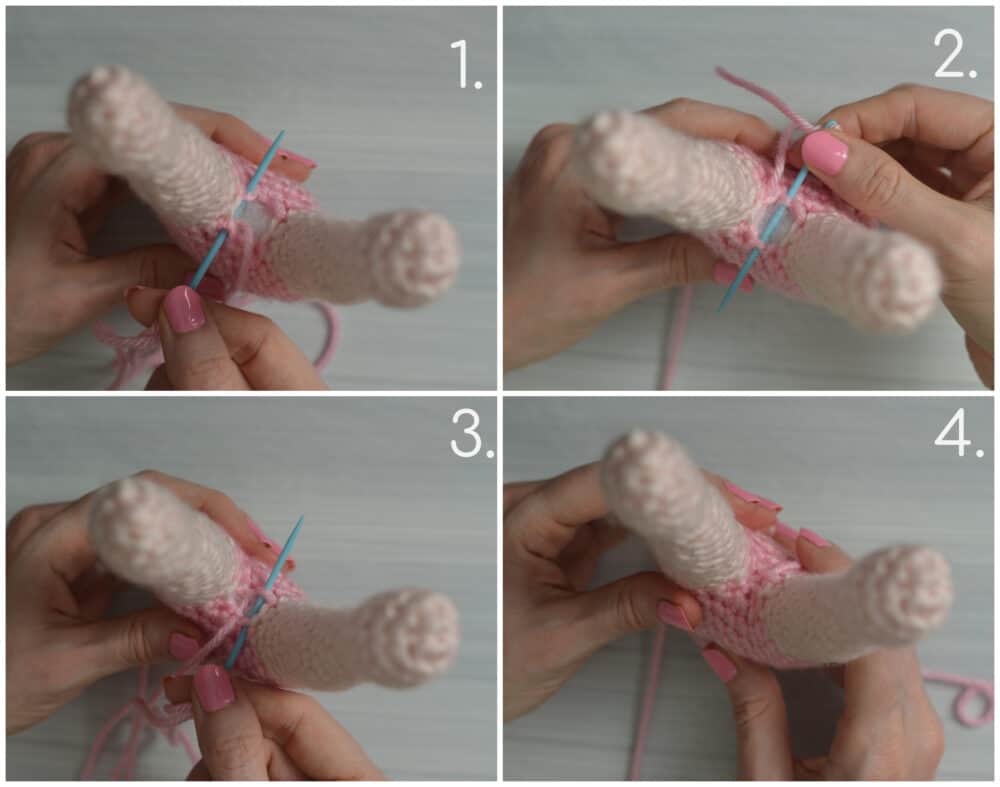
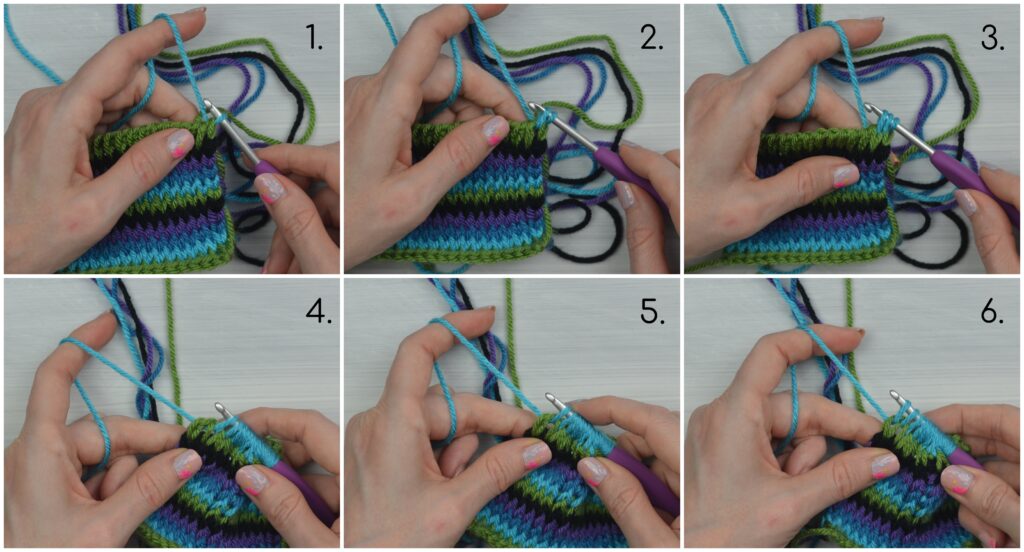
R23: Starting on the right leg, insert the hook into the marked st (image 1), yo with the sapphire yarn (image 2) and pull up a loop (image 3), ch 1 (does not count as a st) (image 4), sc into the same st (image 5) and mark this st with the st marker (it is the new beginning of the round) (image 6), ch 1 (image 7), sc into the marked st on the left leg (image 8), remove this st marker (image 9),
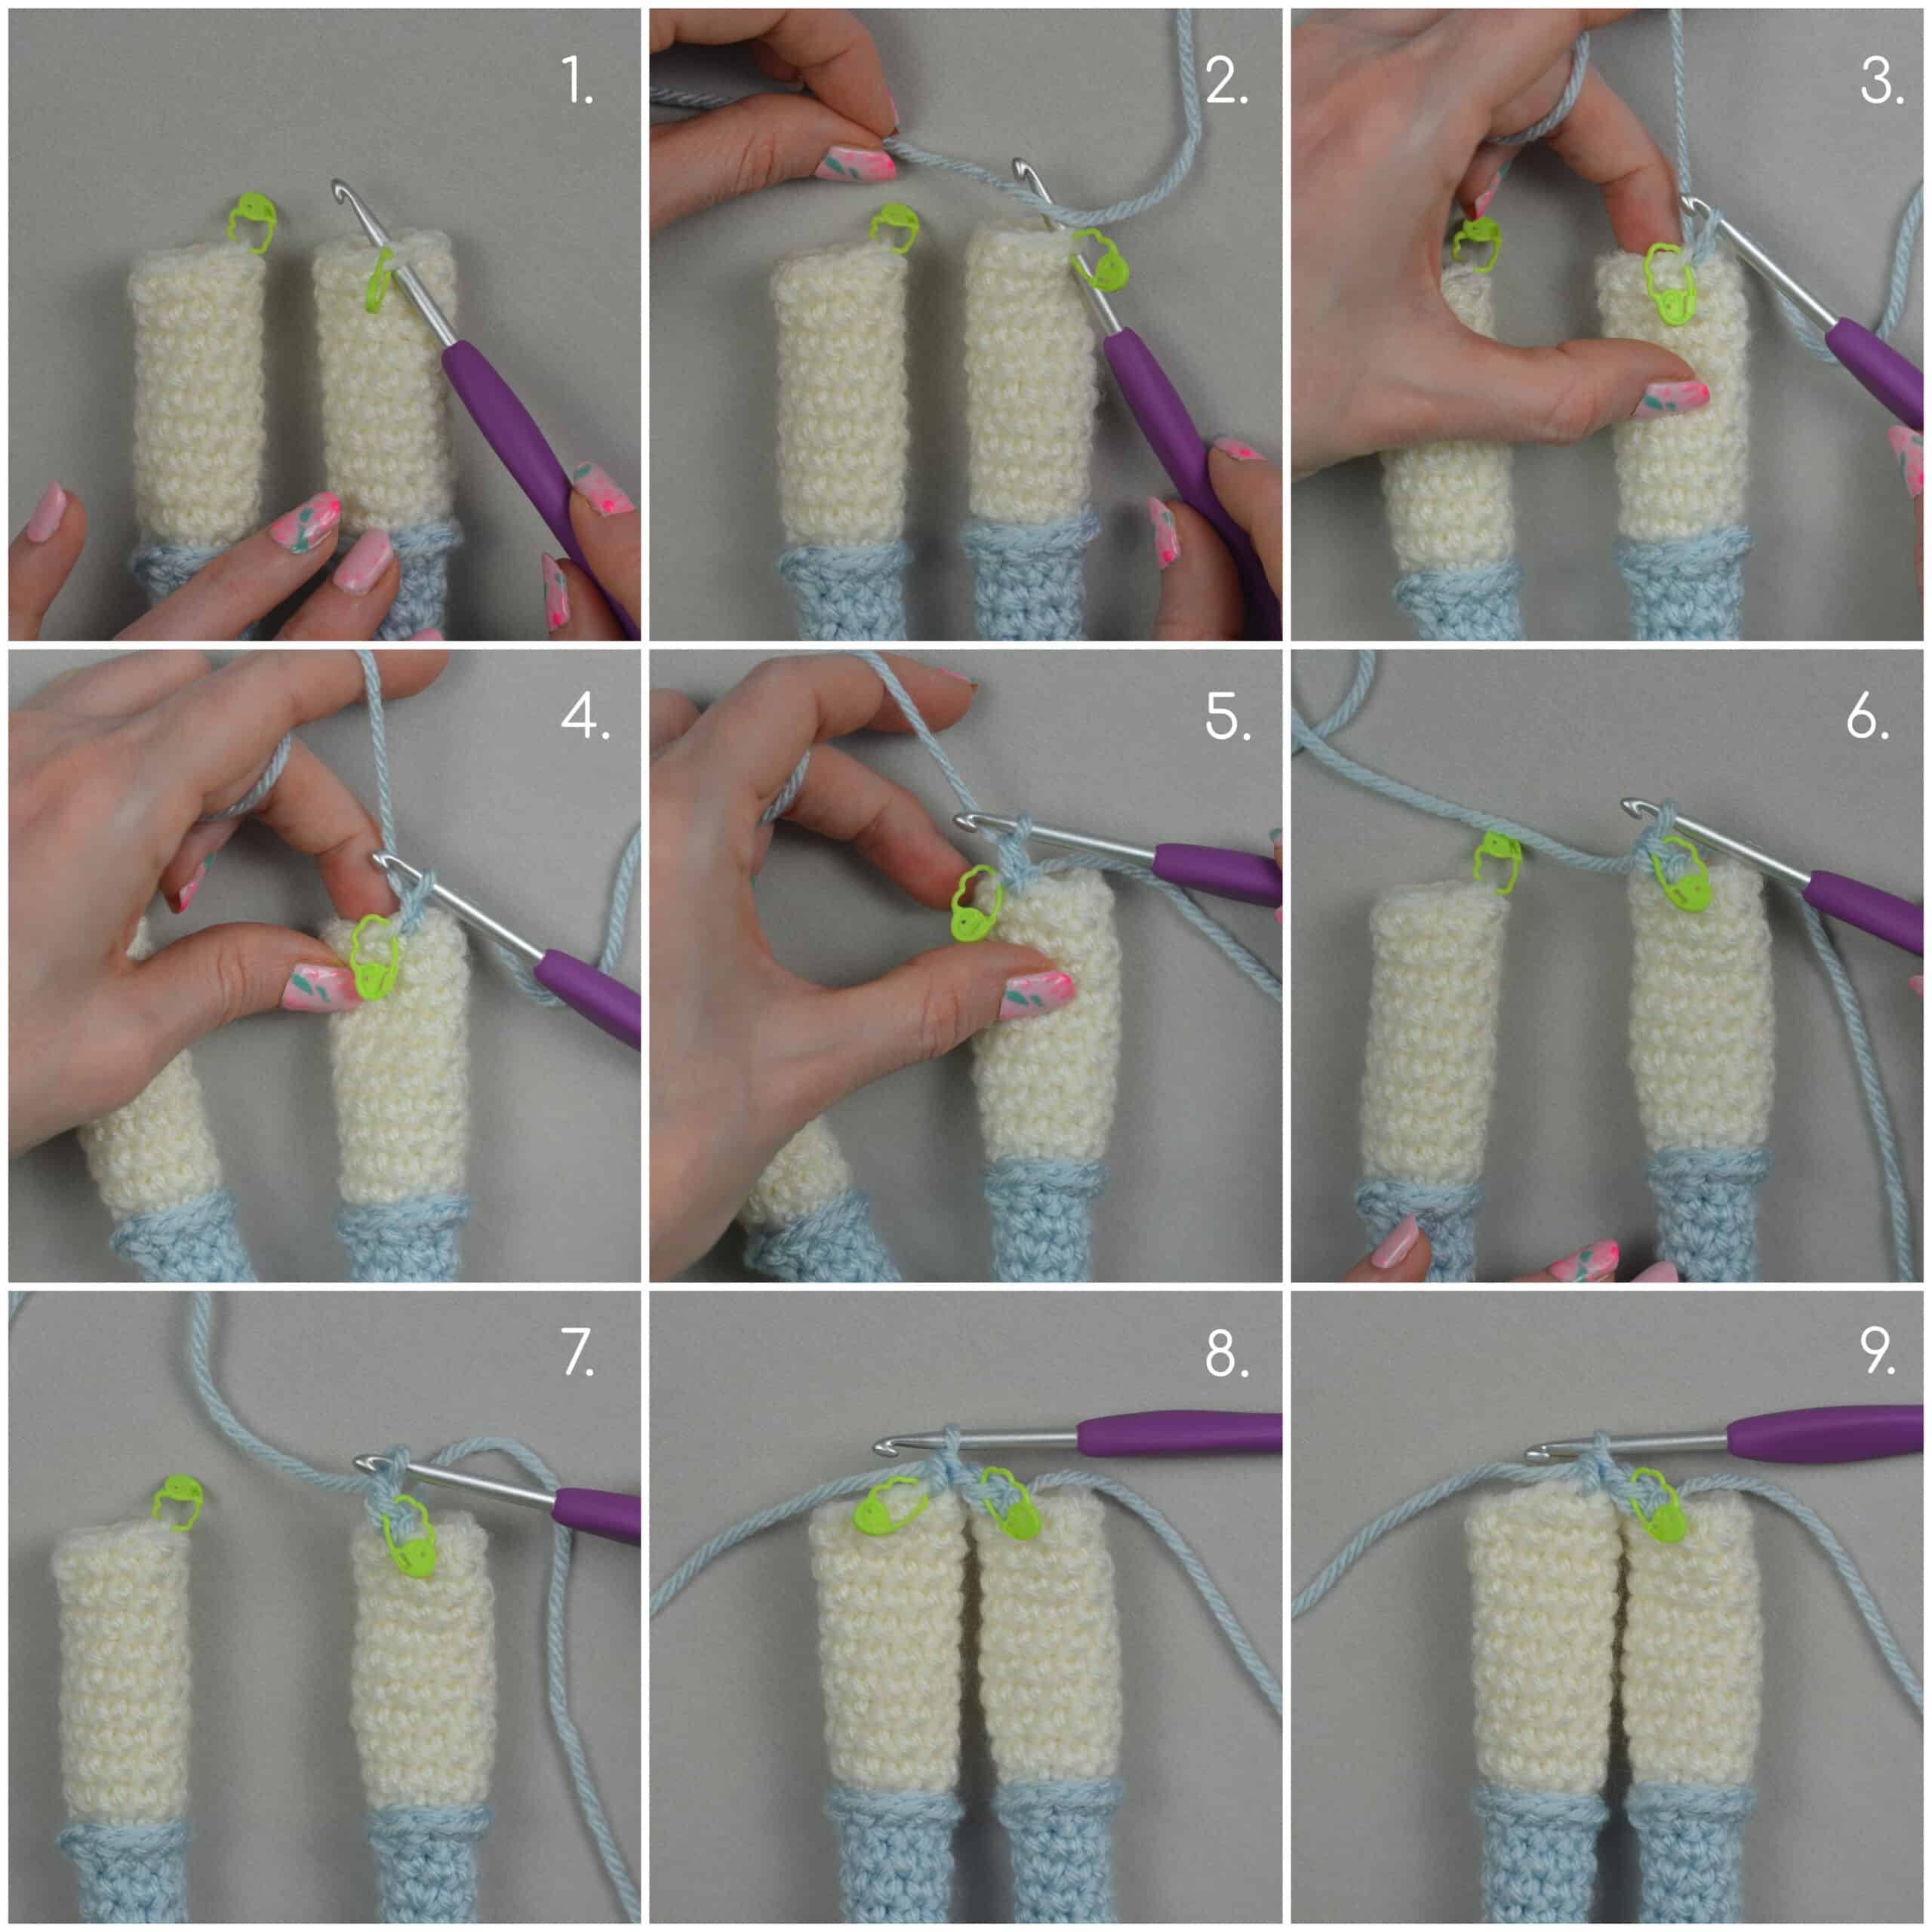
sc into the next 10 sts on the left leg (image 1), ch 1, sc into the next 10 sts on the right leg. (image 2 and 3) =24
R24: sk the ch 1, sc into the next st, 2sc into the ch 1, sc into the next 11 sts, 2sc into the ch 1, sc into the next 10 sts. =26
Pull the tail end through the gap between the legs.
R25-R26: sc into each st around. =26
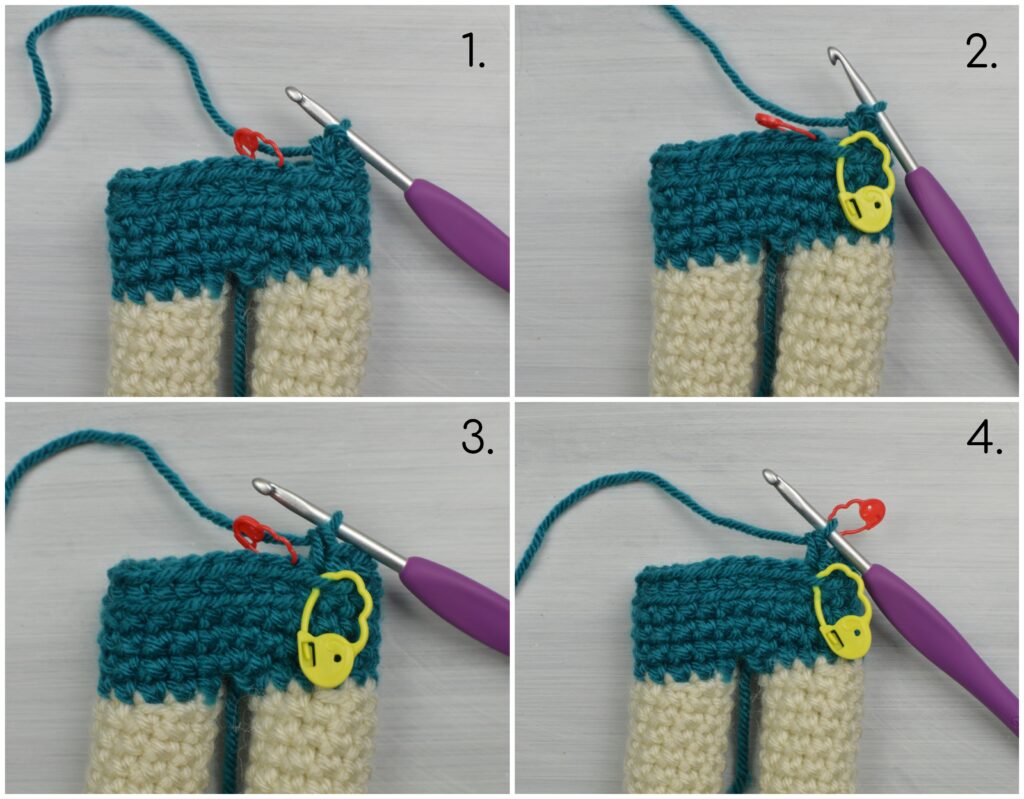
R27: sc BLO into each st around until 1 st remains, mark the next FLO with a new st marker (image 2) and sc BLO into that same st. (image 3) =26
R28: sc into the next 8 sts, inv sc dec, sc into the next 11 sts, inv sc dec, sc into the next 3 sts. =24
R29: sc into the next 8 sts, inv sc dec, sc into the next 10 sts, inv sc dec, sc into the next 2 sts. =22
R30: sc into the next 7 sts, inv sc dec, sc into the next 9 sts, inv sc dec, sc into the next 2 sts. =20
R31-R34: sc into each st around. =20
R35: Take the hook out of the working yarn and drop the sapphire yarn but keep it at the front of the work. Insert the hook into the BLO of the next st, yo with the cream yarn and pull up a loop, ch 1 (does not count as a st), sc BLO into the same st (mark this st with a new st marker) and sc BLO into each st around. =20
with the cream yarn:
R36: sc into the next 7 sts, (inv sc dec) x2, sc into the next 5 sts, (inv sc dec) x2. =16
Weave in the tail end of the cream yarn and start stuffing the body with polyester fiberfill. Continue stuffing the body while continuing with the pattern.
R37: sc into the next 7 sts, (inv sc dec) x2, sc into the next st, (inv sc dec) x2. =12
R38: inv sc dec, sc into the next 3 sts, inv sc dec, sc into the next 5 sts. =10
R39: sc into each st around. =10
Cut the linen yarn, pull it through the last stitch and make an invisible join before weaving in the end.
Go back to R35 and put the sapphire working loop back on the hook. Continue with R35 below.
with the sapphire yarn:
R35: sl st FLO into the next 11 sts, hdc into the next st, dc into the next st, hdc into the next st, sl st 2tog, hdc into the next st, dc into the next st, hdc into the next st, sl st into the last st, sl st to the 1st st of the round. =19
Cut the yarn, pull through the last stitch and weave in the end.
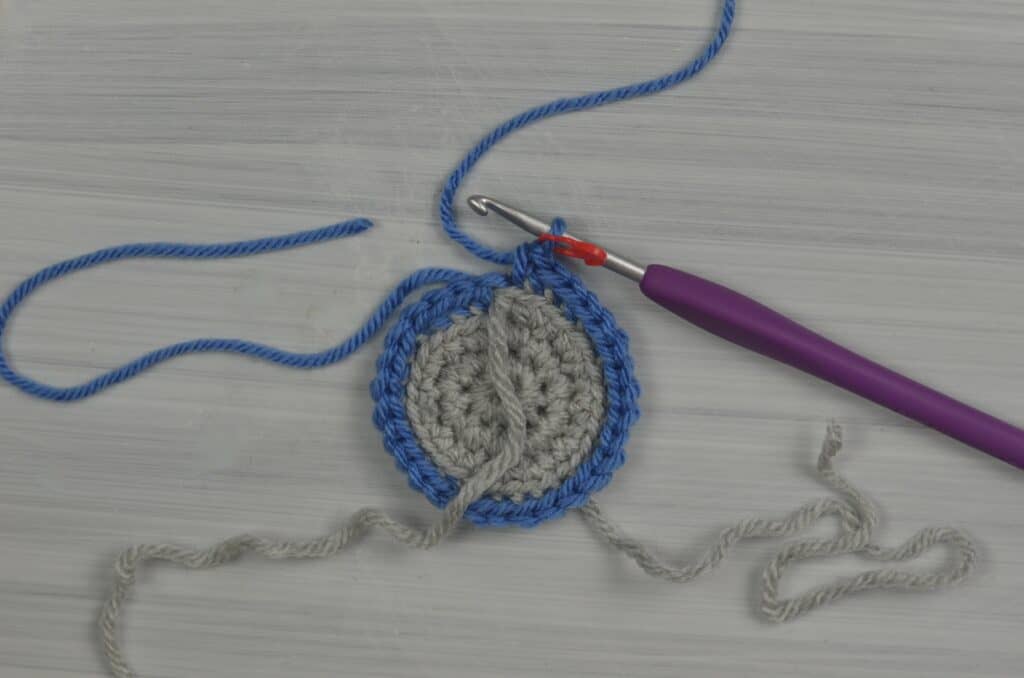
Skirt
with sapphire yarn:
Hold the doll upside down and go back to the marked stitch in R27.
![]()
R27: Insert the hook into the marked st, yo with sapphire yarn and pull up a loop, ch 1 (does not count as a st), sc FLO into the same st, sc FLO into each st around, sl st to the 1st st of the round. =26
R28: ch 2 (does not count as a st), 2dc into the same st, 2dc into each st around, sl st FLO to the 1st st of the round. =52
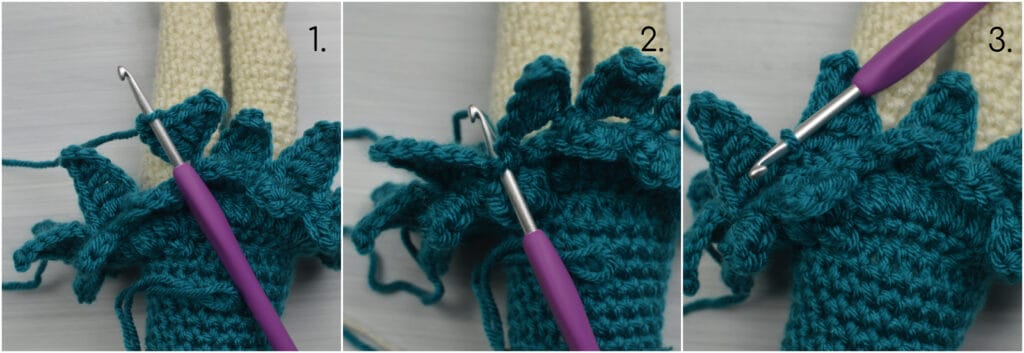
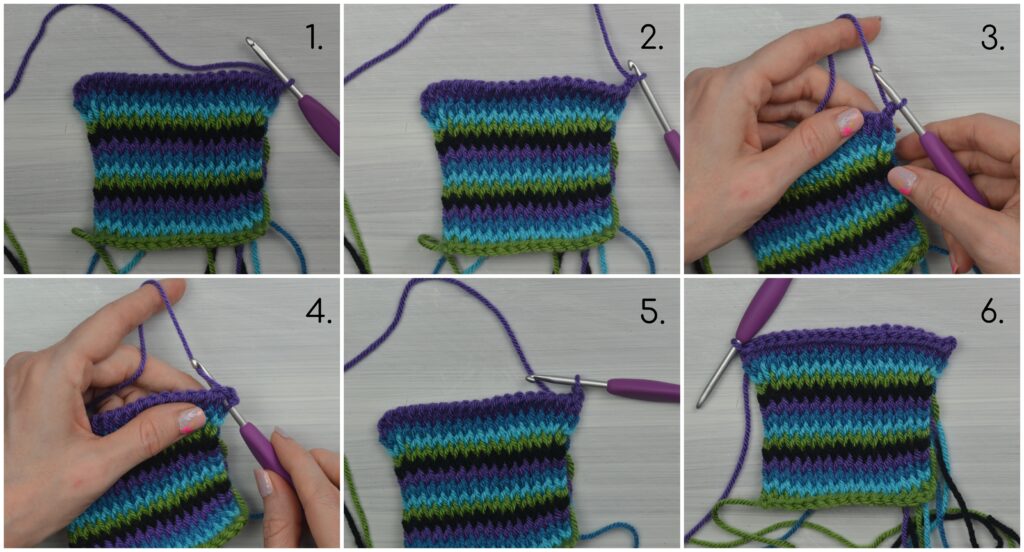
R29: working into the FLO of each st in this round: ch 1 (does not count as a st), sl st into the same st, *(sc, hdc, dc, hdc, sc) into the next st, sl st 2tog, sl st into the next st. Repeat from the * around until 2 sts remain, sl st 2tog, sl st BLO to the 1st st of the round. = 13 points
R29 BLO: sl st into the next 3 sts, *ch 6, sc into the 2nd ch from the hook, hdc into the next ch, dc into the next ch, tc into the next 2 chs, sk the next 2 sts, sl st into the next 2 sts. Repeat from the * around until 13 points have been made, sl st to the first point. (image 1, 2, and 3) = 13 points
Cut the yarn, pull through the last stitch and weave in the ends.
Hand and Arm: (Make 2)
with cream yarn:
R1: Make a magic ring or a loose slip knot, ch 1 and put 8 sc into the magic ring or loose slip knot. =8
Pull on the tail end to close the hole.
R2-R4: sc into each st around. =8
Weave in the end and flip right side out.
R5: Cluster into the next st, sc into the next st, pop the cluster out to the right side to make the thumb, sc into the next 6 sts. =8
R6: inv sc dec, sc into the next 2 sts, inv sc dec, sc into the next 2 sts. =6
R7: 2sc into the next st, sc into the next 2 sts, 2sc into the next st, sc into the next 2 sts. =8
R8: sc into the next 2 sts, 2sc into the next st, sc into the next 5 sts. =9
Start stuffing the hand and arm with polyester fiberfill and continue stuffing as you continue with the pattern.
R9-R14: sc into each st around. =9
R15: sc into the next 2 sts, inv sc dec, sc into the next 5 sts. =8
R16: sc into each st around. =8
R17: sc into the next 4 sts, inv sc dec, sc into the next 2 sts. =7
R18: sc into each st around. =7
R19: inv sc dec, sc into the next 5 sts. =6
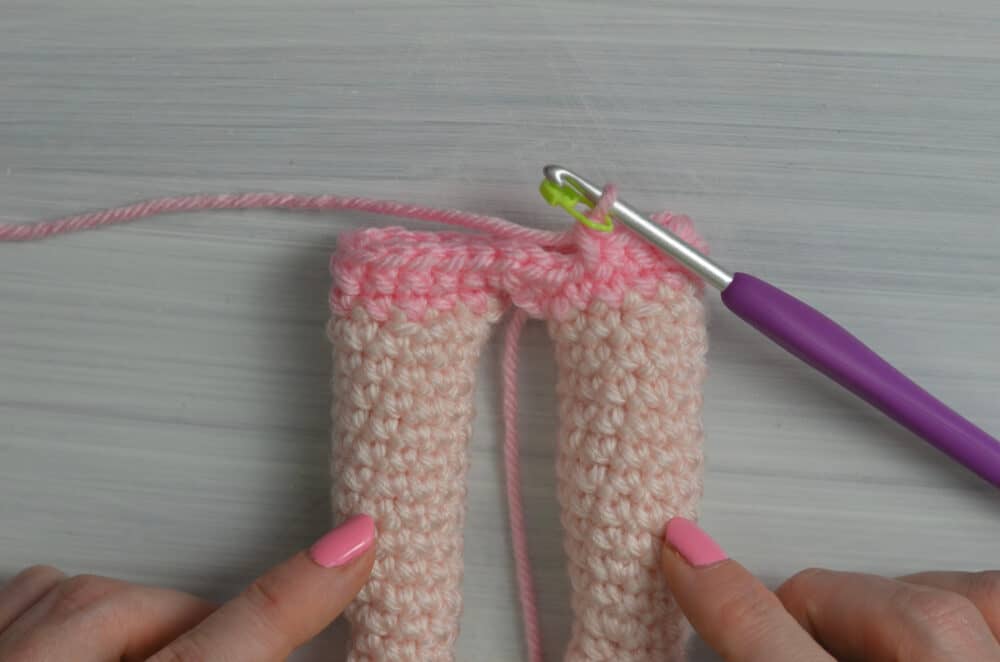
Cut the yarn, pull through the last stitch made and sew to the doll one row above the sapphire neckline of the tank top.
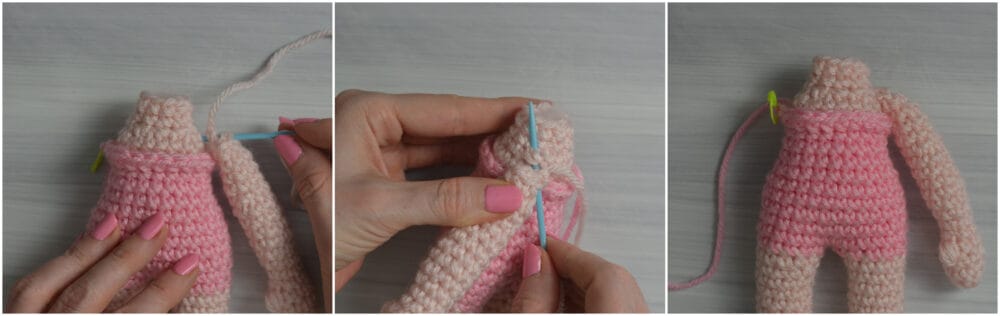
Fixing The Leg Gap:
Use the tail end from the sapphire yarn to sew the gap between the legs closed.
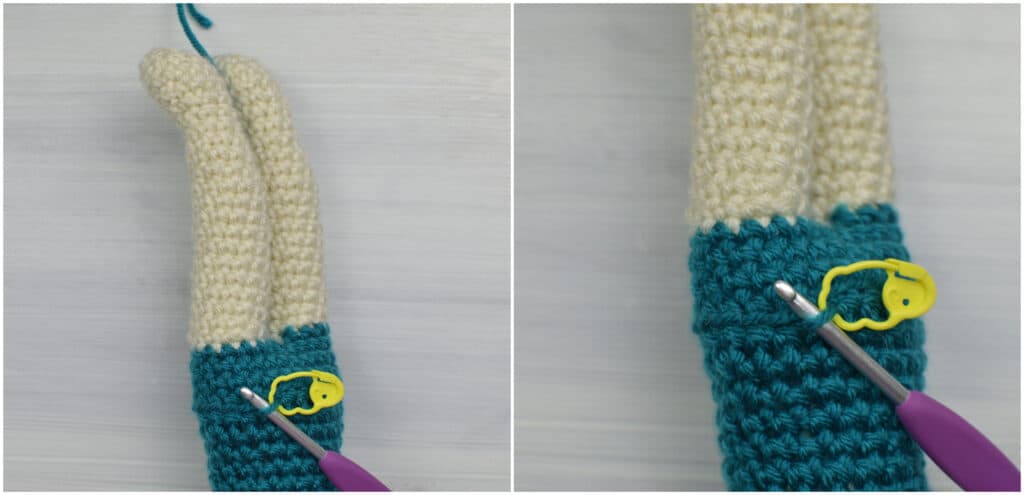
Leg Warmers: (Make 2)
The leg warmers are made in tunisian crochet but with the same hook. Look under the tips section for helpful tips and tutorials.
with olive yarn:
Row 1: Forward Pass: ch 16 (image 1), starting in the 2nd ch from the hook, pull up a loop in the back bump of each ch across. =16 loops
Return Pass: yo (image 1) and pull through 1 loop (image 2), *yo (image 3) and pull through 2 loops. (image 4) Repeat from the * across until 2 loops remain on the hook (image 5), yo with turquoise yarn (image 6) and pull through the 2 loops on the hook. (image 7)
with turquoise yarn:
Row 2: Forward Pass: tks into each st across. =16 loops
Return Pass: yo and pull through 1 loop, *yo and pull through 2 loops. Repeat from the * across until 2 loops remain on the hook, yo with ink blue yarn and pull through the 2 loops on the hook.
with ink blue yarn:
Row 3: Forward Pass: tks into each st across. =16 loops
Return Pass: yo and pull through 1 loop, *yo and pull through 2 loops. Repeat from the * across until 2 loops remain on the hook, yo with purple iris yarn and pull through the 2 loops on the hook.
with purple iris yarn:
Row 4: Forward Pass: tks into each st across. =16 loops
Return Pass: yo and pull through 1 loop, *yo and pull through 2 loops. Repeat from the * across until 2 loops remain on the hook, yo with black yarn and pull through the 2 loops on the hook.
with black yarn:
Row 5: Forward Pass: tks into each st across. =16 loops
Return Pass: yo and pull through 1 loop, *yo and pull through 2 loops. Repeat from the * across until 2 loops remain on the hook, yo with olive yarn and pull through the 2 loops on the hook.
When pulling up a color to use, keep it loose.

with olive yarn:
Row 6: Forward Pass: tks into each st across. =16 loops
Return Pass: yo and pull through 1 loop, *yo and pull through 2 loops. Repeat from the * across until 2 loops remain on the hook, yo with turquoise yarn and pull through the 2 loops on the hook.
Row 7: Repeat Row 2.
Row 8: Repeat Row 3.
Row 9: Repeat Row 4.
Row 10: Repeat Row 5.
Row 11: Repeat Row 6.
with turquoise yarn:
Row 12: Forward Pass: tks (loop on the hook), tfs and tks into the next st, tks across until 1 st remains, tfs and tks into the last st. =18 loops
Return Pass: yo and pull through 1 loop, *yo and pull through 2 loops. Repeat from the * across until 2 loops remain on the hook, yo with ink blue yarn and pull through the 2 loops on the hook.
with ink blue yarn:
Row 13: Forward Pass: tks (loop on the hook) (image 1), tfs (image 2) and tks (image 3) into the next st, tks across until 1 st remains (image 4), tfs (image 5) and tks into the last st. (image 6) =20 loops
Return Pass: yo and pull through 1 loop, *yo and pull through 2 loops. Repeat from the * across until 2 loops remain on the hook, yo with purple iris yarn and pull through the 2 loops on the hook.
with purple iris yarn:
R14: Forward Pass: tks into each st across. =20 loops
Return Pass: yo and pull through 1 loop, *yo and pull through 2 loops. Repeat from the * across until 2 loops remain on the hook, yo with the purple iris yarn and pull through the 2 loops on the hook.
Bind Off:
with purple iris yarn:
Row 21: ch 1 (image 2 and 3),*insert the hook into the next st (just like for a tks), yo (image 4) and pull through the loops on the hook. (image 5) Repeat from the * across until 1 st remains, insert the hook behind the last 2 vertical bars, yo and pull through the loops on the hook. (image 6) =20
Cut the yarn, pull through the last stitch and weave in the ends before using the mattress seam or preferred method to seam up the back of the leg warmers. Weave in the ends.
Head:
with cream yarn:
R1: Make a magic ring or a loose slip knot, ch 1 and put 8 sc into the magic ring or loose slip knot. =8
Pull on the tail end to close the hole.
R2: 2sc into each st around. =16
R3: *2sc into the next st, sc into the next st. Repeat from the * around. =24
R4: sc into each st around. =24
R5: *2sc into the next st, sc into the next 2 sts. Repeat from the * around. =32
R6-R8: sc into each st around. =32
Weave in the end and flip right side out. Start stuffing the head with polyester fiberfill.
R9: sc into the next 14 sts, mark the middle of the 14th st with a new st marker, sc into the next 5 sts, mark the middle of the 5th st with another st marker, sc into the next 13 sts. =32
R10: sc into each st around. =32
R11: sc into the next 10 sts, 2sc into the next 2 sts, sc into the next 8 sts, 2sc into the next 2 sts, sc into the next 10 sts. =36
R12-R13: sc into each st around. =36
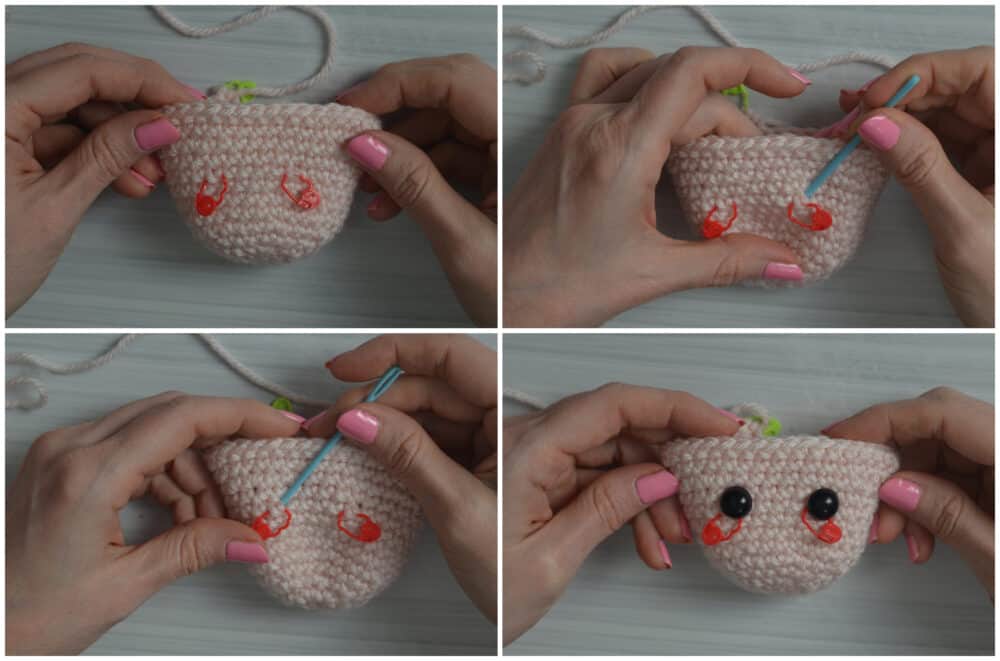
Take the 2 stitch markers out of R9 and replace them with safety eyes.
Continue stuffing the head as you continue the pattern.
R14: sc into the next 10 sts, (inv sc dec) x2, sc into the next 8 sts, (inv sc dec) x2, sc into the next 10 sts. =32
R15: *sc into the next 2 sts, inv sc dec. Repeat from the * around. =24
R16: *sc into the next st, inv sc dec. Repeat from the * around. =16
R17: inv sc dec, *sc into the next st, inv sc dec. Repeat from the * around until 2 sts remain, inv sc dec. =10
Cut the yarn but leave the tail end long enough to sew to the body, pull through the last stitch made and make an invisible join. Finish stuffing and shaping the head.
Add eyebrows, a nose, mouth, details to the eyes and blush to the cheeks.
Ear: (Make 2)
with cream yarn:
R1: Make a loose slip knot or a magic ring, ch 1, (sc, hdc, 2dc, tc) into the loose slip knot or magic ring, ch 2, sl st into the 2nd ch from the hook, (tc, 2dc, hdc, sc, sl st) into the loose slip knot or magic ring. =11
Pull on the tail end to close the hole. Cut the yarn and pull through the last stitch before sewing to the head. Sew to the head 5 stitches away from the eyes.
Hair/Wig:
with cranberry yarn:
R1: Make a magic ring or a loose slip knot, ch 1 and put 8 sc into the magic ring or loose slip knot. =8
Pull on the tail end to close the hole.
R2: 2sc BLO into each st around. =16
R3: *2sc BLO into the next st, sc BLO into the next st. Repeat from the * around. Sl st to the first st of the round. =24
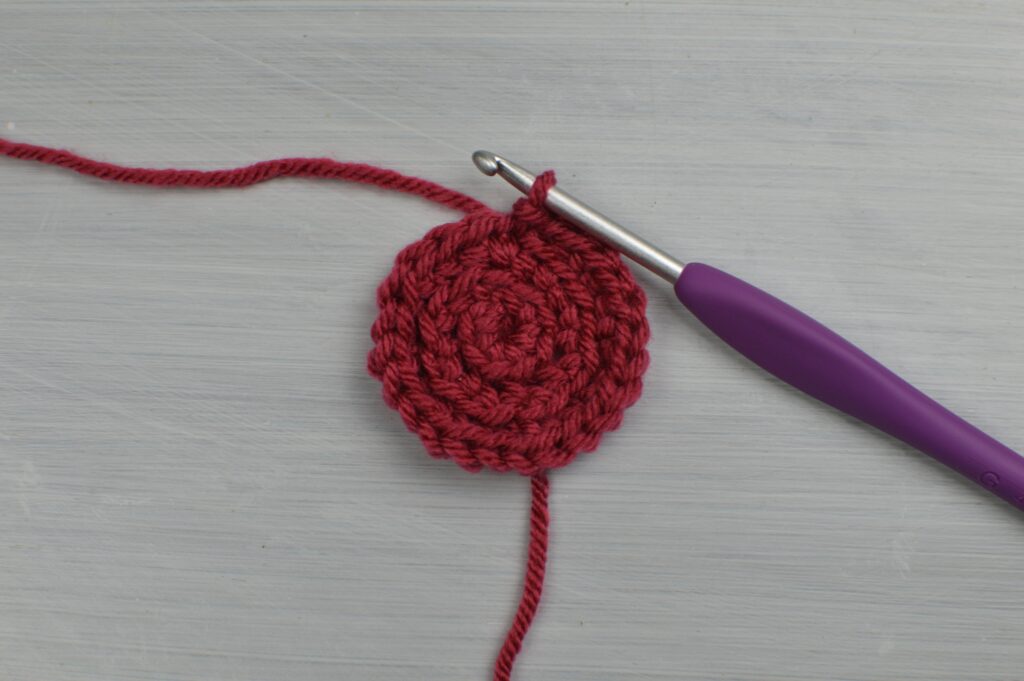
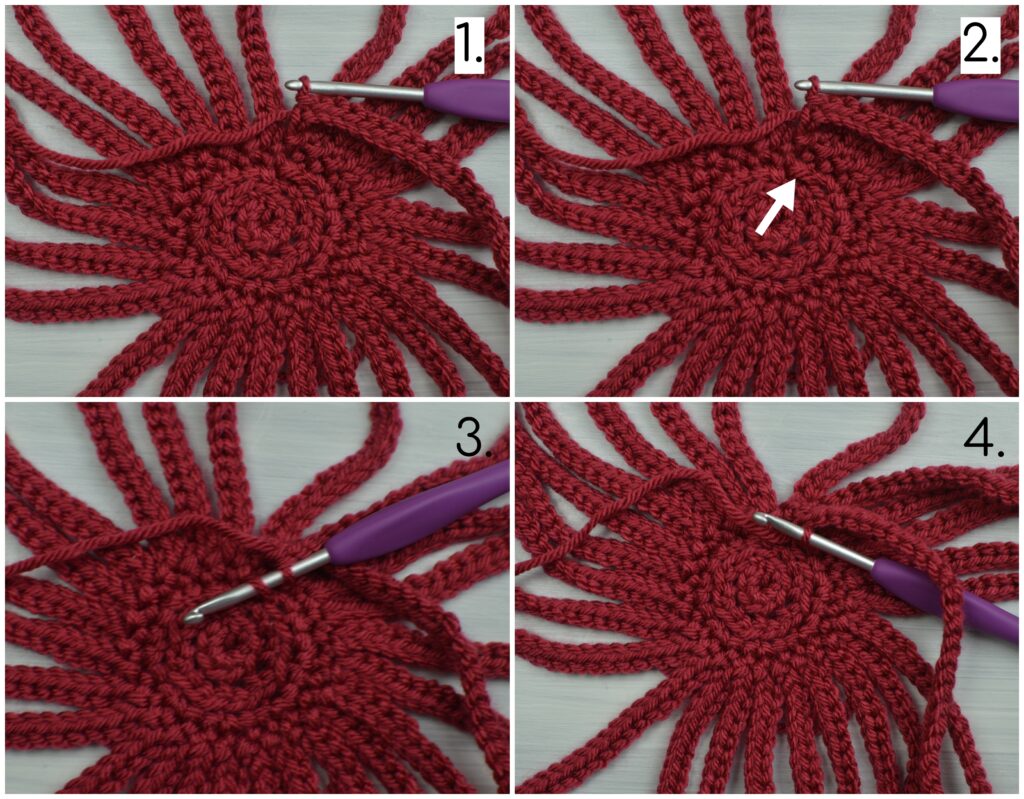
R4: *ch 60 (image 1), 2sc into the 2nd ch from the hook, sl st into each ch across (image 2 and 3), sl st to the next st of the round on the circle. (image 4) (= 60 sts)
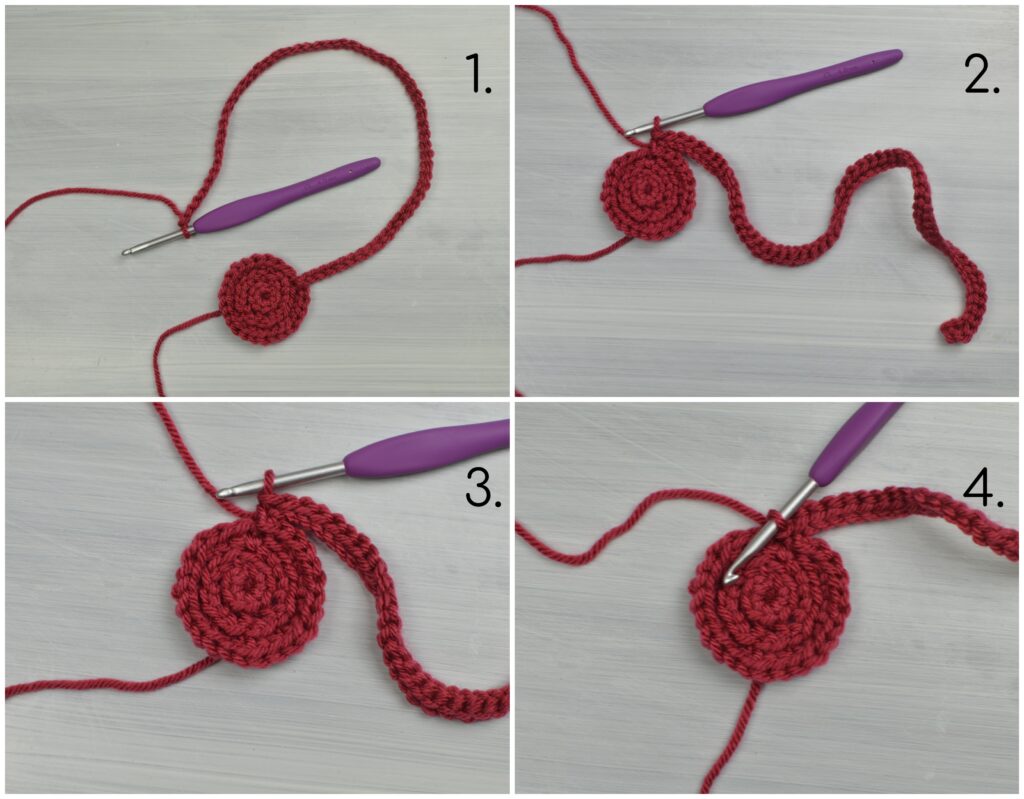
Repeat from the * around. = 24 hair strands
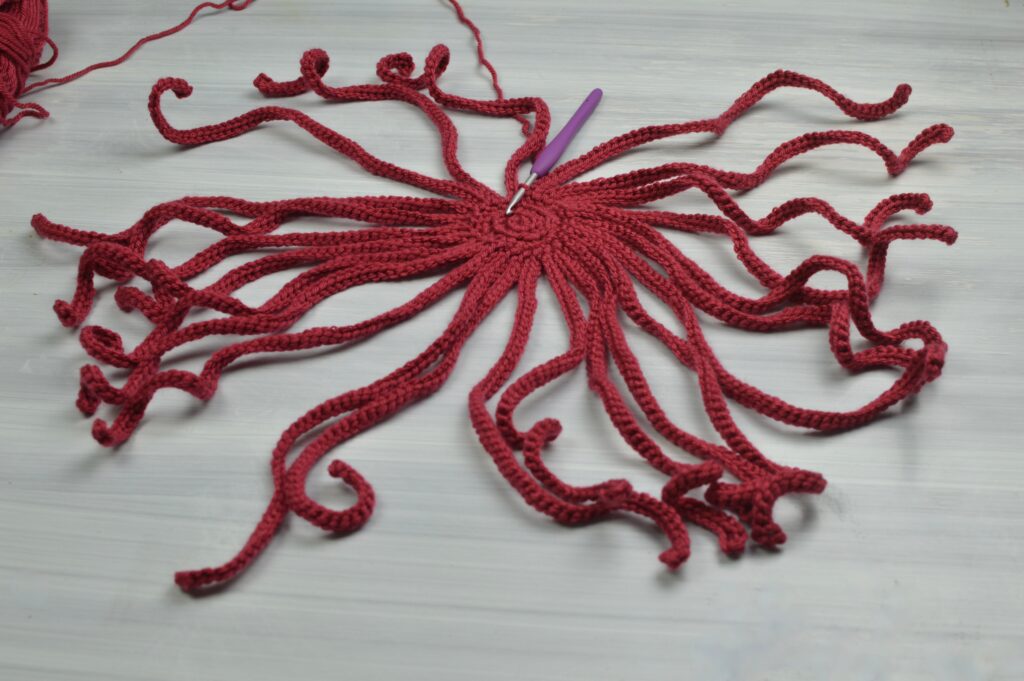
Continue working in the exposed front loops on the circle in a spiral until you get to the center.
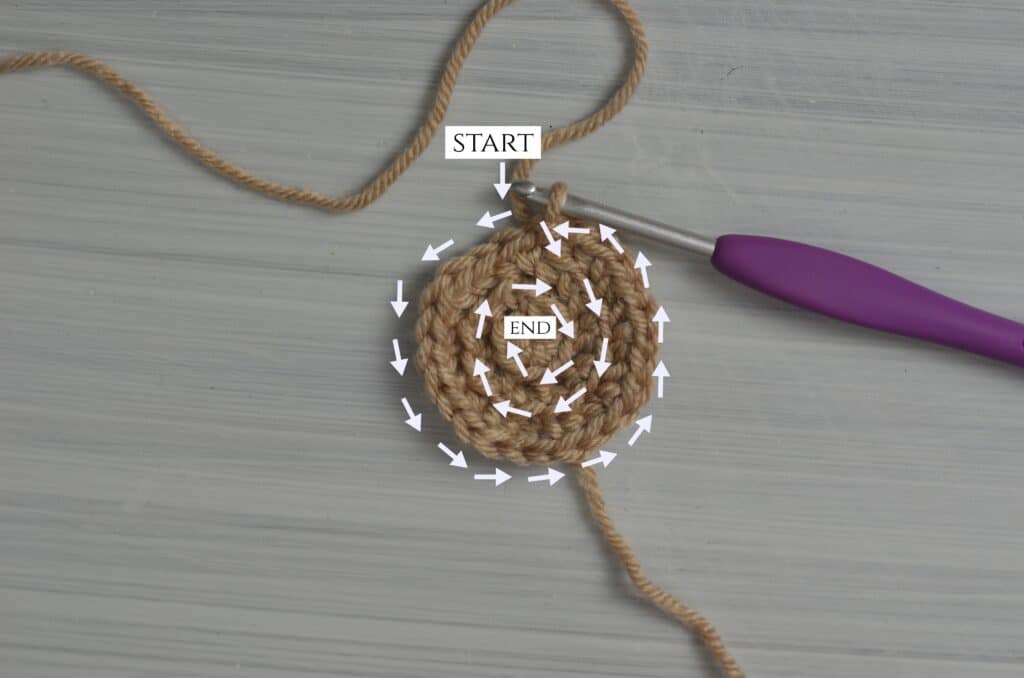
*ch 60, 2sc into the 2nd ch from the hook, sl st into each ch across, sl st to the next FLO from R3. (image 2, 3 and 4) Repeat from the * working in a spiral around until all of the remaining exposed FLO sts are worked into. = 48 hair strands total
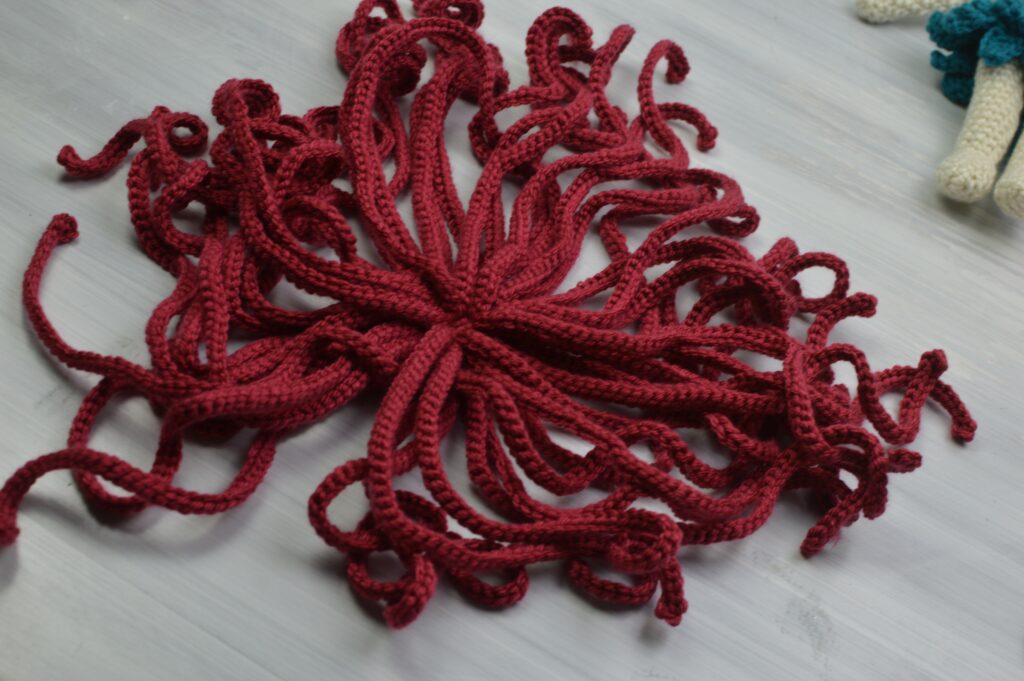
Cut the yarn and weave in the ends.
Attach the hair to the head:
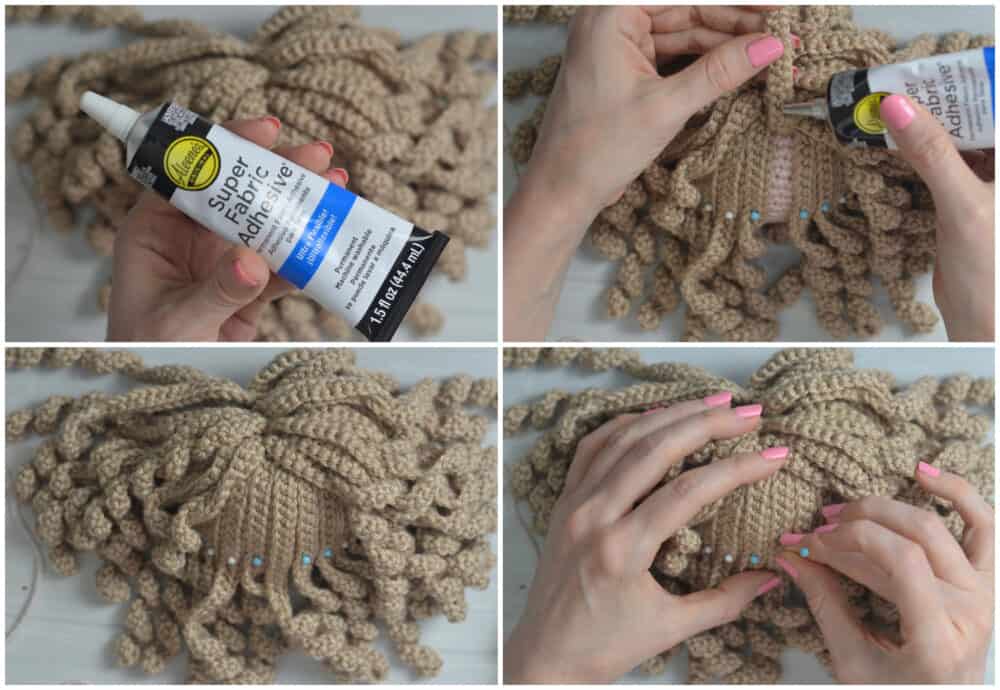
Start by placing a pin through the top, center of the wig and then through the top, center of the head. (image 1) Continue with the back and use pins to hold in place. Continue around the sides.
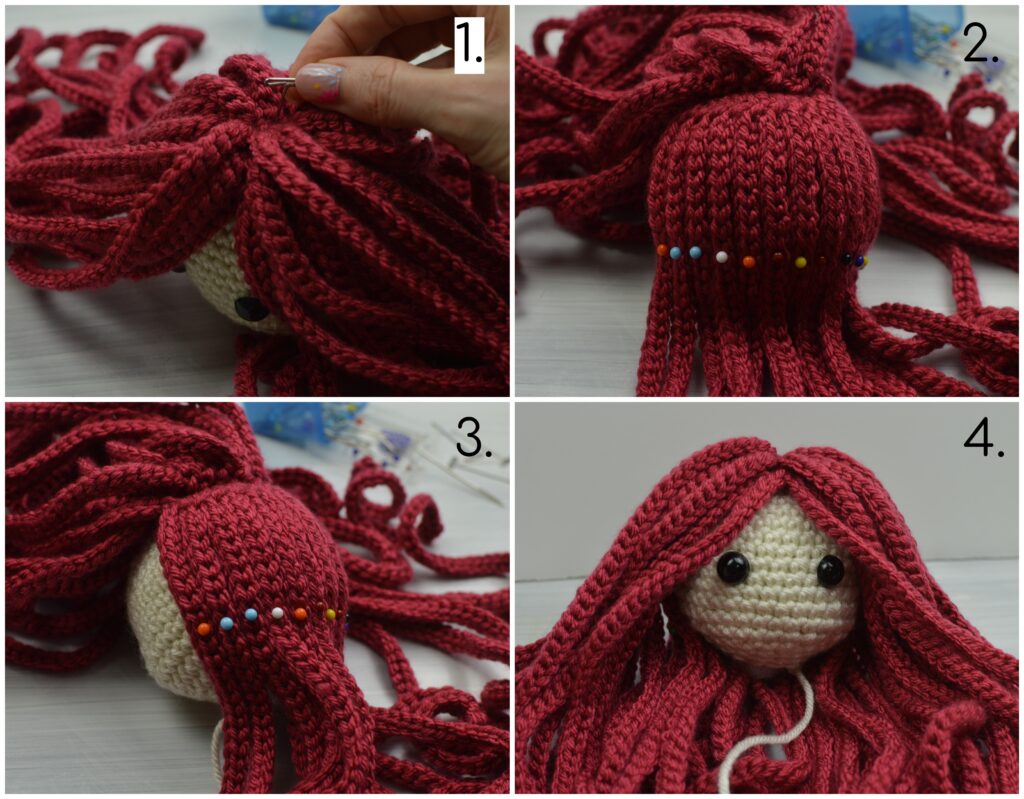
Use fabric glue to secure the hair strands. Pin after gluing and remove the pins after the glue has dried. After attaching the wig, twist each hair strand until wavy/curly.
Sew the head to the neck of the body.
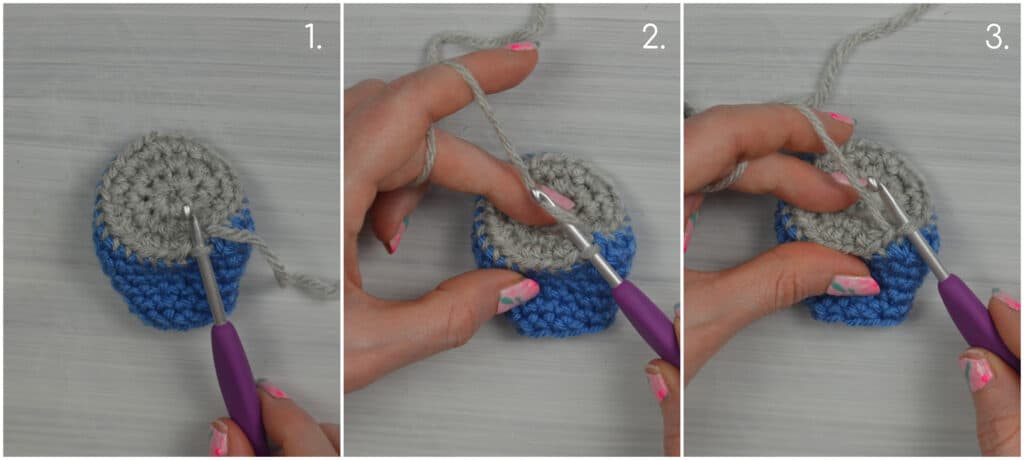
Crown:
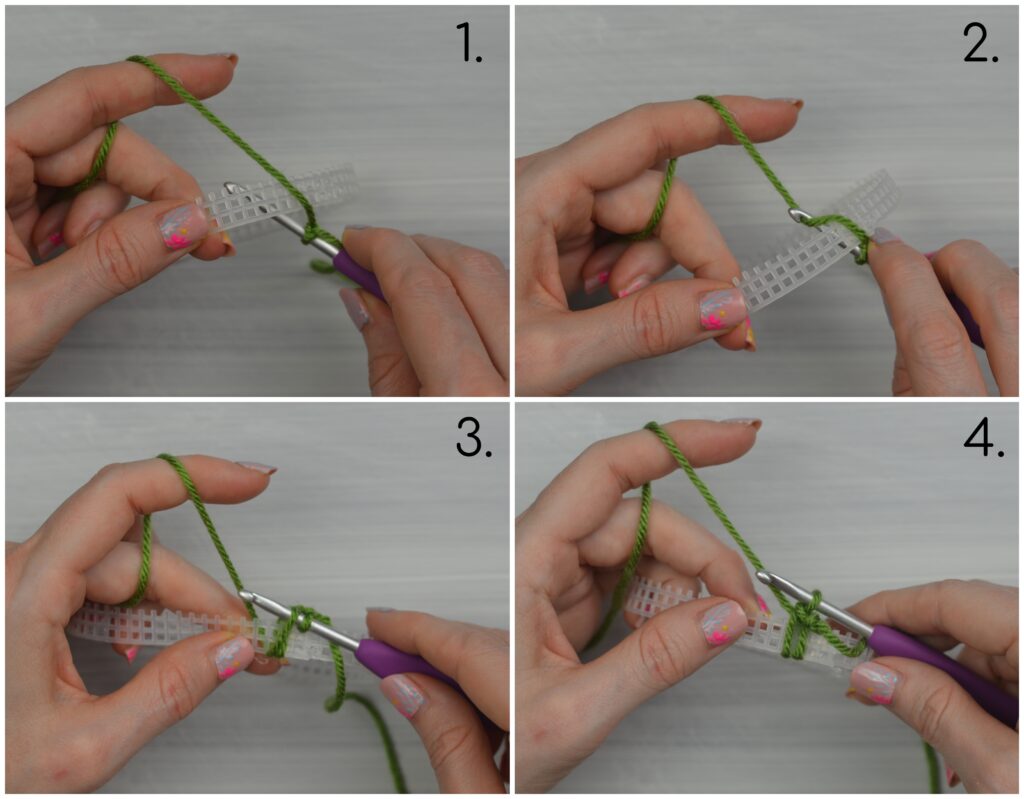
First make the crown base by cutting a piece of plastic canvas to ½” wide and 10” long. (image 1 and 2)
Glue the ends together with hot glue. (image 3 and 4)
![]()
![]()
![]()

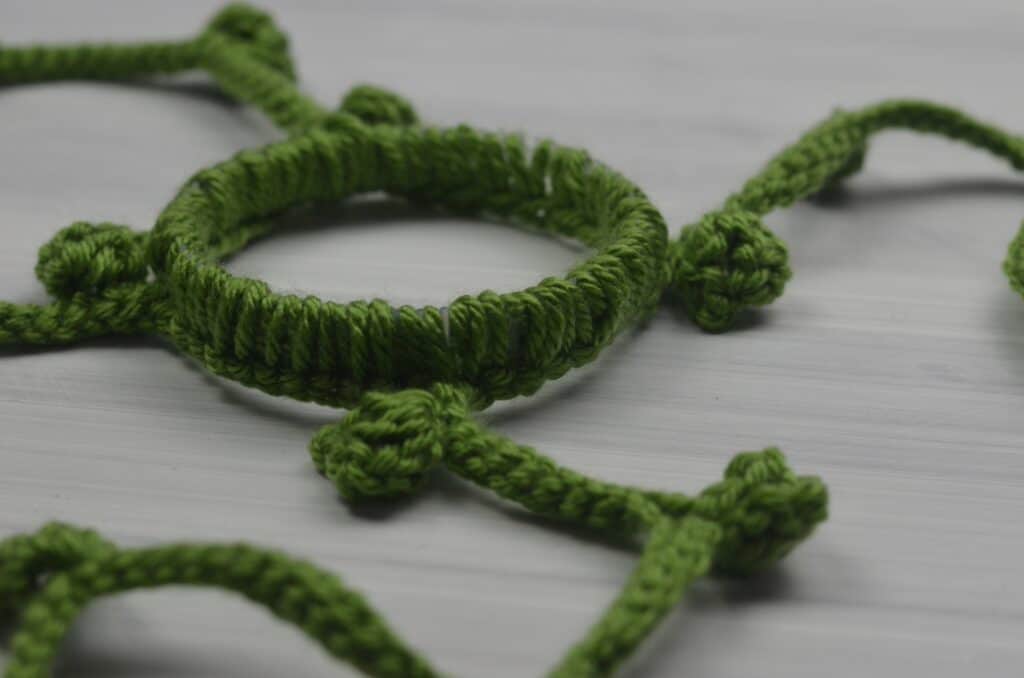
with olive yarn:
Hold the hook under the plastic ring (crown base) (image 1), yo (image 2)and pull up a loop (image 3), yo and pull through the loops on the hook to finish the sc (image 4), sc around until ¼ of the way around. Do not cut the yarn. Continue with the string of leaves below.
Special Stitch:
Leaf Stitch:
R1: 2dc into the 3rd ch from the hook, ch 2, sl st into the 2nd ch from the hook, dc and sl st into the 3rd ch from the hook.
String of Leaves:
Row 1: ch 55, leaf st, sl st into the next 15 chs, ch 3, leaf st, sl st into the next 15 chs, ch 3, leaf st, sl st into the next 10 chs, ch 3, leaf st, sl st into the next 10 chs, ch 3, leaf st, sl st into the next 2 chs. Do not cut the yarn.
Repeat the single crochets and strings of leaves around until you have 4 strings of leaves and the crown base is covered in single crochets.
Flowers And Leaves:

Pom Pom Flower:
Use a ¾” pom pom maker to make 2 pom poms in turquoise, 2 in ink blue and 2 in purple iris.
Large Flower With Leaf:
with purple iris, turquoise or ink blue yarn:
R1: Make a loose slip knot or a magic ring, *ch 4, tc into the loose slip knot or magic ring (center), ch 4, sl st into the center. Repeat from the * 4 times. = 5 petals
Insert the hook into the center, yo with olive yarn and pull through to finish the sl st, ch 3, 2dc into the 3rd ch from the hook, ch 2, sl st into the 2nd ch from the hook, dc and sl st into the 3rd ch from the hook. Pull on the tail end to close the hole in the center.
Cut the yarn, pull through the last stitch and weave in the ends.
Small Flower:
with purple iris, turquoise or ink blue yarn:
ch 6, sl st into the 6th ch from the hook, *ch 5 sl st into the same ch. Repeat from the * 3 times. = 5 petals
Cut the yarn, pull through the last stitch and weave in the ends.
Leaf:
with olive yarn:
ch 3, 2dc into the 3rd ch from the hook, ch 2, sl st into the 2nd ch from the hook, dc and sl st into the 3rd ch from the hook.
Cut the yarn, pull through the last stitch and weave in the ends.
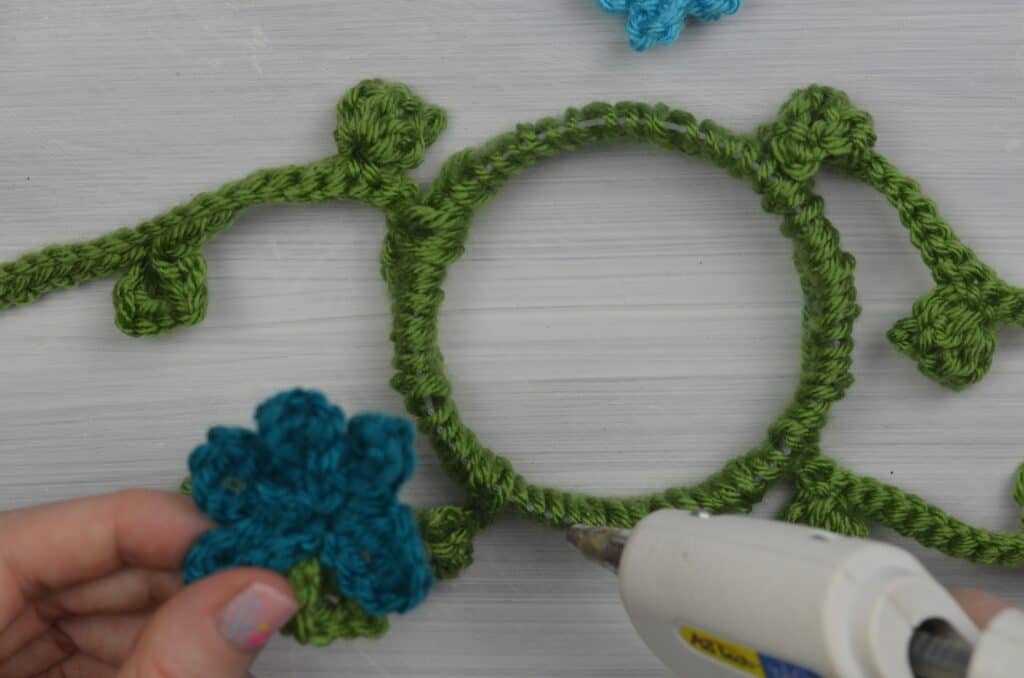
Attach the leaves and flowers to the crown with hot glue.

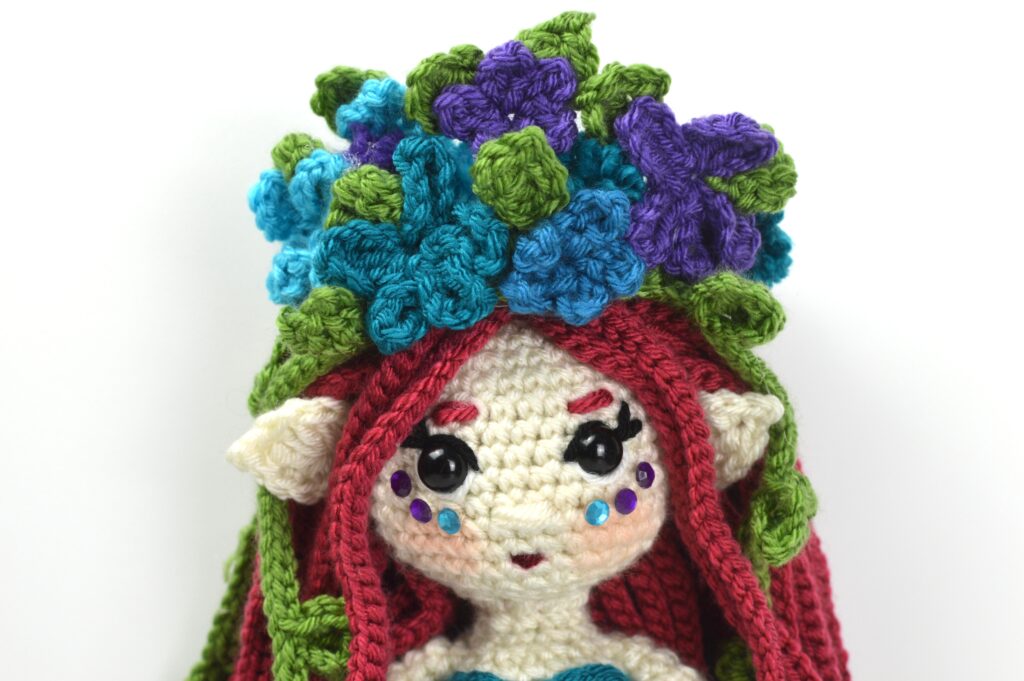
The end!
![]()
I would love to see your Alex In Yarnder Land Dolls! Tag @_with_alex and use #crochetingwithalex on Instagram so I can see and share your projects.
And check back on the With Alex Blog for more crochet and tunisian crochet patterns and tutorials.
Read Aurora’s Introduction Story on the With Alex Blog.
Favorite the pattern on ravelry.
Pin the pattern for later on pinterest.
Find With Alex on her Blog | Instagram | Facebook | YouTube | Pinterest | Ravelry
Stay connected with Clover on Facebook | Twitter | Instagram | Pinterest | YouTube | Ravelry