Traveler Cowl- Knitting Pattern
Hi everyone, it’s Krista Ann from explorewithknitsy and I am bringing this Traveler cowl from the Middle East! Knitters who love to travel probably all have one thing in common. When we are planning a big trip, the first thing to pack is our knitting! Seriously. I have my projects all picked out, needles matched up, notions organized, and yarn wound well before I even think about packing a toothbrush or underwear! One of the best parts about the craft of knitting is its portability. Knitting can go anywhere – planes, trains, automobiles, buses, boats, and everything in between.
Now, not ALL projects can be knit anywhere. There are definitely those I need peace and quiet so I can concentrate projects, but smart knitters know not to bring those on vacation! For me, when an international trip comes up, I bring a variety of projects for any occasion. My biggest fear is running out of yarn. I don’t ever want to run out of projects to work on when I’m far away from home (or a yarn store!). You also never know what kind of knitting downtime you are going to have. I know that when I go to Tanzania – very little knitting gets done because we are up before sunrise and in bed well after sunset. However, there are sometimes long stretches of driving with nothing to see and so having a project within reach is vital to my sanity (and the sanity of anyone else in the vehicle with me!).
There are also great projects for the 11-hour plane ride: complicated enough to keep you awake, but not so complicated that they can’t be worked on after being up for 20+ hours traveling. There are those super easy projects for the days spent touring around getting on and off a bus or traveling a long distance to the next town. There are relaxing projects for the downtime on an adventure – such as evenings cruising down the Nile River in Egypt.
For the Traveler Cowl, I wanted a design that was complex enough to keep me interested, but not so difficult that picking it up and putting it down all day long was going to create an issue with figuring out where I left off. The muted colors were perfect for exploring Egypt and Jordan. There was a lot of dust in the air, so having yarn that wasn’t going to show dirt was a smart choice for sure! No matter where in the world I go, my knitting is always within reach and sometimes it’s right there with me on a camel ride!


Materials
Clover Takumi Bamboo Knitting Needles:
Takumi Bamboo Knitting Needles Circular 29″ No. 7 (4.50 mm)- Art No. 3016/29-07
(The second is used at the end for the three-needle bind off.)
Yarn:
Blue Sky Fibers “Woolstok Worsted”
* Color A (Cast Iron) 1 skein
* Color B (Highland Fleece) 1 skein
* Color C (Morning Frost) 1 ball
* Color D (Pressed Grapes) 1 ball
* Color E (Grey Harbor) 1 ball
* Color F (Storm Cloud) 1 ball
Notions:
Clover Darning Needle Set Art No. 339
Clover Locking Stitch Markers (Optional) Art No. 353
Scissors
Scrap Yarn (for provisional cast on)
Gauge
18 sts and 30 rnds = 4 inches in stockinette stitch on larger needles
Finished Measurements
Cowl measures approximately 18 inches wide and 42 inches in circumference
Abbreviations
* * – repeat between the asterisks
bor – beginning of rnd
CO – Cast On
K – Knit
P – Purl
K2tog – Knit 2 sts together (1 st dec)
M1 – make one (Lift bar between needles from back to front and knit into the front of the lifted bar to create a new knit stitch. Be sure the stitch twists so that a hole is not created.)
M1P – make one purl (Lift bar between needles from back to front and purl into the front of the lifted bar to create a new purl stitch. Be sure the stitch twists so that a hole is not created.)
P2tog – purl two stitches together (1 dec)
rnd/rnds – round/rounds
SL2K1P2SSO – slip next two stitches knitwise, K1, pass two slipped stitches over the K1 (2 st dec)
st/sts – stitch/stitches
SSK – slip, slip, knit (1 st dec)
wyib sl1 – with yarn in back slip 1 stitch
YO – yarn over
Notes
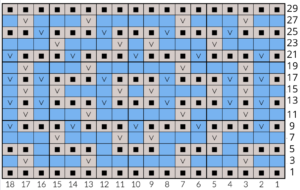
When working the mosaic garter charts (Chart A and Chart B), each row represents one color and two rows of knitting – a RS and a WS in that same color.
Slip the stitches when you see a “V” on the chart. When you are working a RS row, slip them with the yarn held to the back and when you are working a WS row, slip them with the yarn held to the front. You want to be sure the slips always show on the non-public side.
Mosaic garter is always worked using only K stitches (except for the selvedge edge stitch) on both the RS and WS.
The Pattern

Section One
Using Color A and your preferred provisional cast on method, CO 93 sts.
Set Up Row (WS): wyib sl1, K to last st, P1
Join Color B, but do not cut Color A.
You will begin working Chart A on Row 3 for this first repeat. Note that each row on the chart is two rows of knitting. See “Notes” section for full explanation.
Work all RS rows as follows:
Wyib sl1, work the chart 5 times from right to left, end with a K1, P1.
Work all WS rows as follows:
Wyib sl1, K1, work the chart 5 times from left to right, end with a P1
Work Chart A a total of 4 times. Work the chart one more time, but on your last WS row, work as follows:
Increase Row: wyib sl1, (K23, M1) 3 times, K to last st, P1 – 96 sts
Cut Colors A and B leaving tails to weave in later.
Section Two
You are now working on 96 sts.
Join Color C.
Set Up Row 1 (RS): wyib sl1, K to last st, P1
Set Up Row 2: (WS) wyib sl1, K3, P to last 4 sts, K3, P1
Row 1 (RS): wyib sl1, K3, *K3, K2tog, YO, K1, YO, SSK, K3* to last 4 sts, K3, P1
Row 2 (WS): wyib sl1, K3, P to last 4 sts, K3, P1
Row 3: wyib sl1, K3, *K2, K2tog, YO, K3, YO, SSK, K2* to last 4 sts, K3, P1
Row 4: wyib sl1, K3, P to last 4 sts, K3, P1
Row 5: wyib sl1, K3, *K1, (K2tog, YO) twice, K1, (YO, SSK) twice, K1* to last 4 sts, K3, P1
Row 6: wyib sl1, K3, P to last 4 sts, K3, P1
Row 7: wyib sl1, K3, *(K2tog, YO) twice, K3, (YO, SSK) twice* to last 4 sts, K3, P1
Row 8: wyib sl1, K3, P to last 4 sts, K3, P1
Work last 8 rows a total of 8 times.
End by working 2 more rows as follows:
Row 1 (RS): wyib sl1, K to last st, P1
Row 2: (WS) wyib sl1, K3, P28, M1P, P32, M1P, P to last 4 sts, K3, P1 – 98 sts
Cut Color C leaving a tail to weave in later.
Section 3
You are now working on 98 sts.
Join Color D.
Set Up Row 1 (RS): wyib sl1, K to last st, P1
Set Up Row 2 (WS): wyib sl1, K to last st, P1
Join Color E, but do not cut Color D.
You will begin working Chart B on Row 3 for this first repeat.
Work all RS rows as follows:
Wyib sl1, work the chart 8 times from right to left, end with a P1.
Work all WS rows as follows:
Wyib sl1, work the chart 8 times from left to right, end with a P1
Work Chart B a total of 5 times. Work Chart B Rows 1 – 11 one more time.
Cut Color D leaving a tail to weave in later.
Using Color E, work next two rows as follows:
Row 1: wyib sl1, K to last st, P1
Row 2: wyib sl1, K47, K2tog, K to last st, P1 – 97 sts
Cut Color E leaving a tail to weave in later.
Section 4
You are now working on 97 sts.
Join Color F.
Set Up Row 1 (RS): wyib sl1, K to last st, P1
Set Up Row 2: (WS) wyib sl1, K3, P to last 4 sts, K3, P1
Row 1 (RS): wyib sl1, K4, *K1, K2tog, YO, K1, YO, SSK, K2* to last 4 sts, K3, P1
Row 2 (WS): wyib sl1, K3, P to last 4 sts, K3, P1
Row 3: wyib sl1, K4, *K2tog, YO, K3, YO, SSK, K1* to last 4 sts, K3, P1
Row 4: wyib sl1, K3, P to last 4 sts, K3, P1
Row 5: wyib sl1, K3, K2tog, *YO, K5, YO, SL2K1P2SSO* to last 11 sts, YO, K5, YO, SSK, K3, P1
Row 6: wyib sl1, K3, P to last 4 sts, K3, P1
Row 7: wyib sl1, K4, *YO, SSK, K3, K2tog, YO, K1* to last 4 sts, K3, P1
Row 8: wyib sl1, K3, P to last 4 sts, K3, P1
Row 9: wyib sl1, K4, *K1, YO, SSK, K1, K2tog, YO, K2* to last 4 sts, K3, P1
Row 10: wyib sl1, K3, P to last 4 sts, K3, P1
Row 11: wyib sl1, K4, *K2, YO, SL2K1P2SSO, YO, K3* to last 4 sts, K3, P1
Row 12: wyib sl1, K3, P to last 4 sts, K3, P1
Work last 12 rows a total of 5 times.
Work two more rows as follows:
Row 1 (RS): wyib sl1, K to last st, P1
Row 2: (WS) wyib sl1, K3, P14, *P2tog, P18* three times, P2tog, P to last 4 sts, K3, P1 – 93 sts
You should end up with 93 sts as you very first started your provisional cast on with.
Finishing
Pull out provisional cast on and put stitches onto second circular needle.
Turn piece inside out so that the right sides are facing each other and you are looking at the wrong sides.
Work three-needle bind off across all the stitches.
Cut Color F leaving a tail.
Weave in all of your tails.
Lightly block cowl. Be sure you don’t pull the lace sections too much so that they are a different width than the mosaic garter sections.