Spring Tulip Coaster- Crochet Pattern
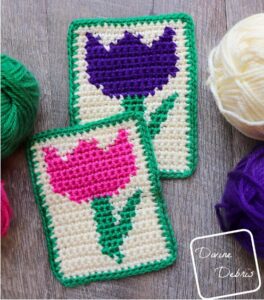
Hi everyone, I’m Amber and I’m the designer for Divine Debris and one of my favorite projects to make are coasters – in fact I’ve made a couple seasonal ones for Clover already that you might like. But today I’m bringing you a new one that’s a little more year-round and fun – the Tulip Coaster.
With Spring already here, I love to see all the flowers bloom and nature brighten and that’s the simple and fun vibe I wanted to bring into this project. Also, it’s a nice and quick stash buster of a pattern, no need to rush out and buy more yarn unless you want to. And you can make tulips in any color you’d like and it’s still accurate, but don’t quote me on that because I don’t know that much about flowers.
Like the other projects I’ve made for Clover this one is all single crochet stitches and that makes it a pretty easy one, because that’s a foundational stitch of crochet. But just remember to keep your tension even, change colors in the last pull through of your sc, and keep all the ends on one side. With the pattern the right side is the odd numbered rows so I like to drop all the yarn that I’m not actively using on the wrong side, and just pick it up as I work across the row. For the cleanest look on the right side, I tried to limit the amount of yarn I carried. I promise it’s not all that complicated and you can absolutely make it if you can make a single crochet, just take your time if you’re new to colorwork like this.
Overall I hope you like this pattern and get creative with your flower colors. It’s a fun little coaster design but you could also make a few and sew them together to make a table runner, a wall hanging, a bag… you name it. Just go where the yarn inspiration takes you.
You can pick up a pdf copy of this pattern in my Ravelry shop here. Check out more of my patterns in my Ravlery shop or visit my website where I post weekly freebies. And find me on Instagram where I’m pretty active or sign up for my newsletter so you don’t miss a new pattern.
Materials
- Clover US G (4.00 mm) crochet hook
- Worsted weight/ size #4 yarn
- 3 colors
- Less than 1 oz/ 62 yds ea
- Notions: scissors, measuring tape, yarn needle
Gauge
- 17 sc x 20 rows = 4” (blocked)
Terms/stitches Used
- RS: Right side
- Ch: Chain
- St: Stitch
- Sc: Single crochet
Notes
- This coaster is worked from the bottom up in rows, with a ch and turn at the beginning of the row.
- The ch 1 at the beginning of the rows does not count as a stitch.
- Blocking is suggested for this pattern.
- This whole pattern is worked in sc, so the instructions will only tell you the number and the color; ie: “A35” means sc 35 times in color A.
- Color A is cream (Basic Stitch by Lion Brand in Ecru), color B is green (Basic Stitch in Grass), and color C is pink or purple (Basic Stitch in Atomic Pink or Purple).
-
Blocked Finished Product Dimensions (approx)
Height 5.25”
Width 4.25”
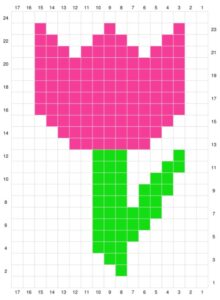
Graph Key: Color A is white, color B is green, and color C is pink.
Pattern Instructions
Begin with a ch 18 in color A, turn, and start in the 2nd ch from the hook. (RS) Row 1: A17 — 17 sc
Please note: each row begins with a “ch 1, turn” and each row st count is 17.
(WS) Row 2: A9, B1, A7
Row 3: A7, B2, A8
Row 4: A7, B3, A7
Row 5: A6, B4, A7
Row 6: A7, B5, A5
Row 7: A4, B6, A7
Row 8: A7, B3, A1, B2, A4
Row 9: A3, B3, A1, B3, A7
Row 10: A7, B3, A2, B2, A3
Row 11: A2, B2, A3, B3, A7
Row 12: A7, B3, A4, B1, A2Fasten off color B.Row 13: A5, C7, A5
Row 14: A4, C9, A4Row 15: A3, C11, A3
RowS 16 – 20: A2, C13, A2
Row 21: A2, C3, A1, C5, A1, C3, A2
Row 22: A2, C2, A3, C3, A3, C2, A2
Row 23: A2, C1, A5, C1, A5, C1, A2
Fasten off colorC.
Row 24: A17
Fasten off, weave in all your ends. Block your coaster if necessary.
Finishing Border
With the RS facing you, create a slipknot on your hook (this will make your first st a standing sc) with color B (or any color you’d like) and start on the other side of Row 1 (the ch row).
Row 1: Sc into the next 17 sts, ch 1 at the corner, rotate your piece, sc into the next 24 row ends, ch 1 at the corner, rotate your piece, sc into the next 17 sts (this will be Row 24), ch 1 at the corner, rotate your piece, sc into the next 24 row ends, ch 1 at the corner, join with a slip st – 82 sc, 4 ch-1 spaces
Fasten off, weave in your ends. Block if you’d like.