All My Hearts Cushion – Crochet Pattern
Hi friends! My name is Elisa from Strings and Cuddles and I’m back again for another crochet pattern!
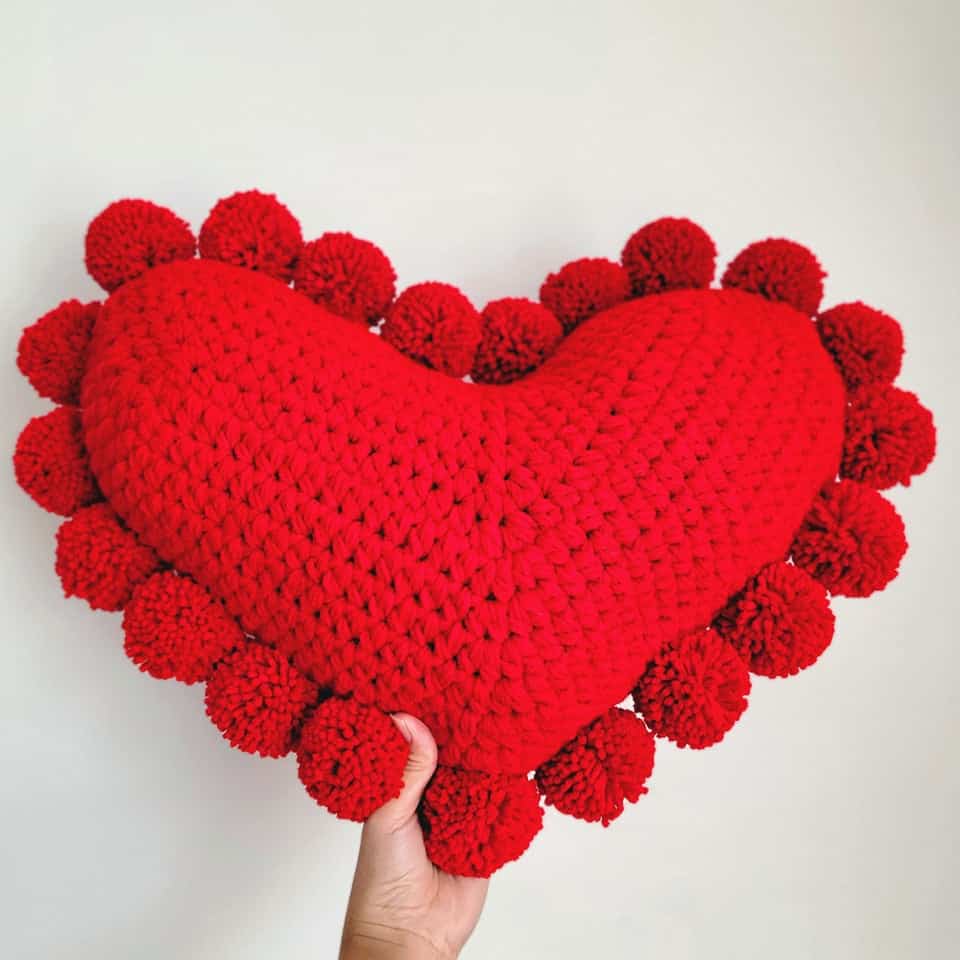
Today, I am so thrilled to share with you my very pattern of this year, the All My Heart Cushion! Since Valentine’s Day is just around the corner, I decided to create a heart-shaped cushion. This quick and easy project is perfect for a last-minute project that you can add to your home decoration.
I have a few skeins of red worsted weight yarns in my stash for years now. I didn’t know what to make with them until it dawned on me that by using them together – 4 strands held together, I can turn these worsted weight yarns into a super bulky or jumbo weight. This way, it would be faster to finish my project. With that being said, different yarn weights will give different dimensions for your project.
So, without any further delay, let’s get started!
ALL MY HEART CUSHION
SKILL LEVEL: Advanced Beginner
MATERIALS
- I used 4 strands of Worsted Weight (#4) Yarn held together – Red Heart Super Saver, 3 skeins
- Amour Crochet Hook Size M/N 9.0 mm – Art. No 1056/MN
- Pompom Maker (optional) – Art. No 3126
- Poly-Fil Fiber Fill
- Mini Patch Scissors – Art. No 493/CW
- Tape Measure
- Jumbo Tapestry Needle Bent Point – Art. No 219
- Quick Locking Stitch Marker Set (optional) – Art. No 3033
GAUGE: 8 HDC sts x 6 rows = 4 inches (Gauge is NOT so important)
FINISHED MEASUREMENT: Approximately 18 (width) x 12 (height) inches excluding pompoms
STITCHES AND ABBREVIATIONS | US Terminology
Ch(s) – Chain(s)
HDC – Half Double Crochet
HDC2tog – Half Double Crochet Two Together
R – Row/Round
RS – Right Side
SC – Single Crochet
SC2tog – Single Crochet Two Together
St(s) – Stitch(es)
Sl st – Slip Stitch
NOTES
- Read the pattern carefully before starting.
- The beginning ch 1 does NOT count as a stitch.
- I recommend using a stitch marker to mark the beginning of the round. Remember to move the stitch marker as you progress. You may also use stitch markers to hold the two panels together when seaming the two pieces.
- When you see something like this 2 HDC, it means you have to work 2 HDC in the same stitch, and when you see something this HDC 13, it means you have to work HDC in the next 13 stitches.
- This Heart cushion pattern can be done with any yarn weight. You may adjust your crochet hook size depending on the yarn weight you decided on using. Remember that the size or dimension of your cushion will be altered when you change your yarn weight and hook size.

PATTERN INSTRUCTIONS
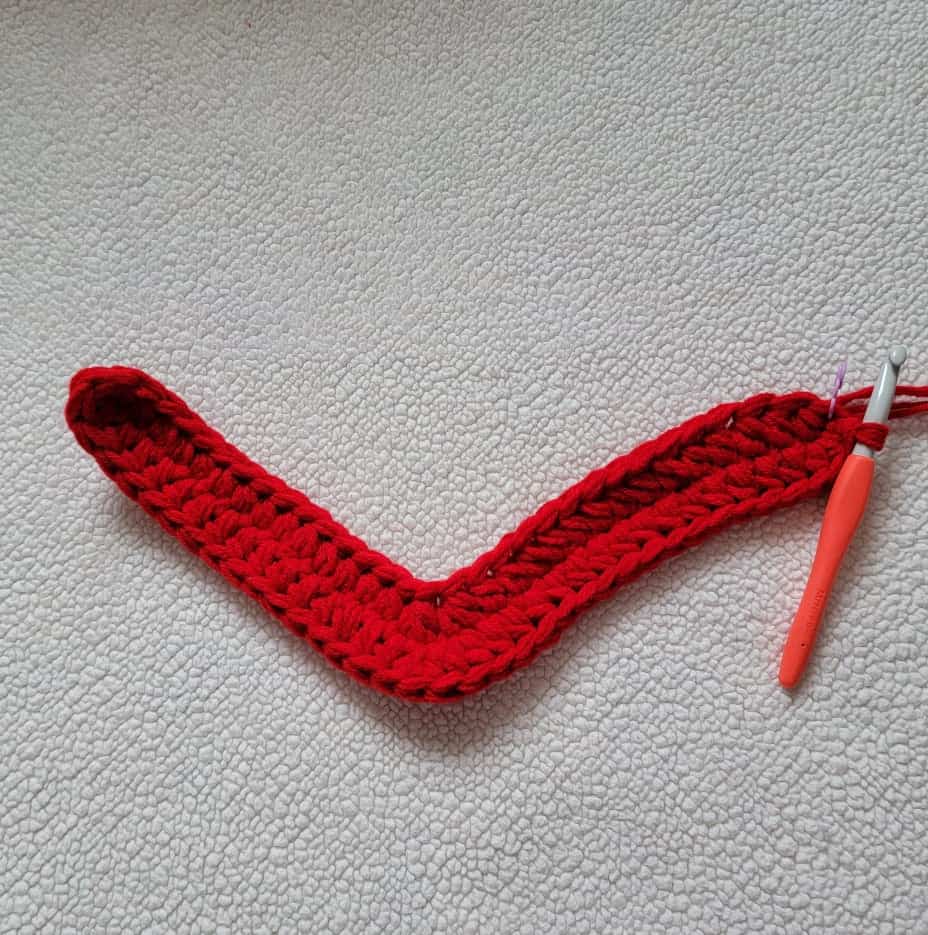
MAKE 2 IDENTICAL PANELS
R1 (RS): Ch 33, working through the back bumps, HDC in the 2nd ch from the hook, HDC 13, HDC2tog – 2 times, HDC 13, 3 HDC in the last st. DO NOT turn, continue working into the opposite side of the chs. HDC 14, 2 HDC in the next 2 sts, HDC 14, 2 HDC in the very 1st ch. Sl st in the 1st st to join. – 66 sts
R2: Ch 1, 3 HDC in the 1st st, HDC 12, HDC2tog – 2 times, HDC 12, 3 HDC, HDC, 3 HDC, HDC 15, 2 HDC in the next 2 sts, HDC 15, 3HDC, HDC. Sl st in the 1st st to join. – 74 sts
R3: Ch 1, 3 HDC in the 1st st, HDC 13, HDC2tog – 2 times, HDC 13, 3 HDC, HDC, 3 HDC, HDC 18, 2 HDC in the next 2 sts, HDC 18, 3HDC, HDC. Sl st in the 1st st to join. – 82 sts
R4: Ch 1, 3 HDC in the 1st st, HDC 14, HDC2tog – 2 times, HDC 14, 3 HDC, HDC, 3 HDC, HDC 21, 2 HDC in the next 2 sts, HDC 21, 3HDC, HDC. Sl st in the 1st st to join. – 90 sts
R5: Ch 1, 3 HDC in the 1st st, HDC 15, HDC2tog – 2 times, HDC 15, 3 HDC, HDC, 3 HDC, HDC 24, 2 HDC in the next 2 sts, HDC 24, 3HDC, HDC. Sl st in the 1st st to join. – 98 sts
R6: Ch 1, 3 HDC in the 1st st, HDC 16, HDC2tog – 2 times, HDC 16, 3 HDC, HDC, 3 HDC, HDC 27, 2 HDC in the next 2 sts, HDC 27, 3HDC, HDC. Sl st in the 1st st to join. – 106 sts
R7: Ch 1, SC in the 1st st, SC 17, SC2tog – 2 times, SC to the last st. Sl st in the 1st st to join. – 104 sts
Fasten off and weave in all ends.

FINISHING
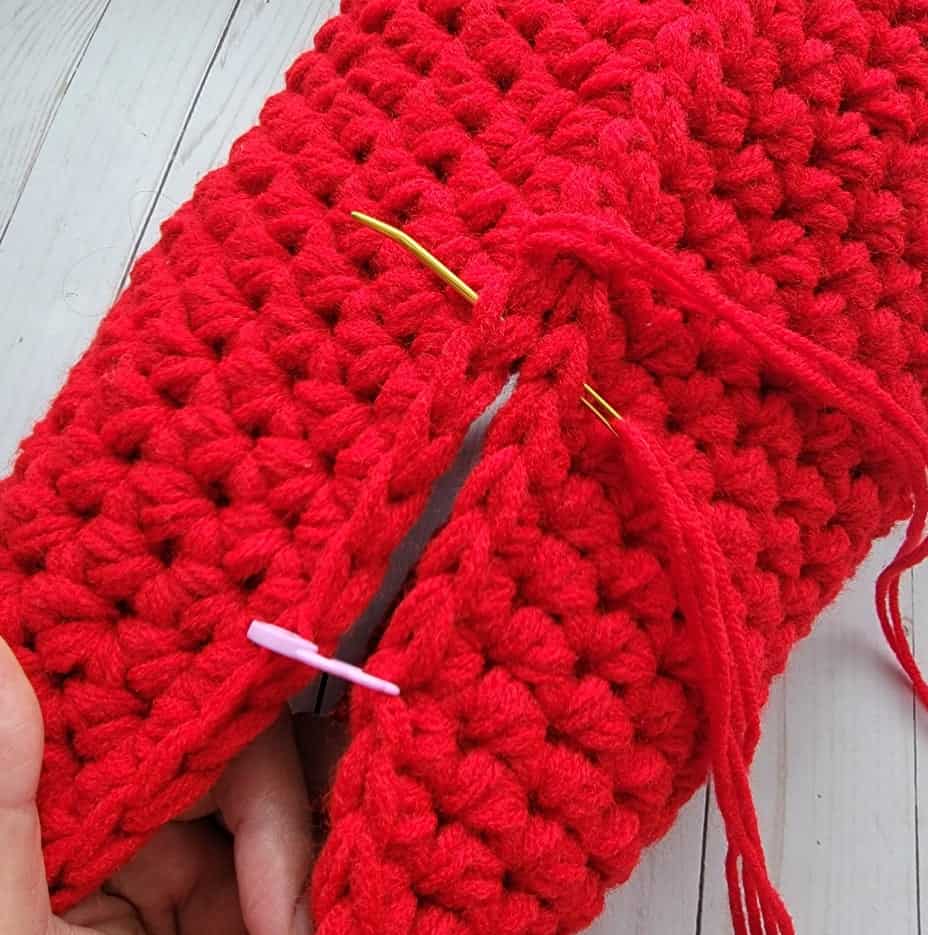
With both RS facing out, assemble the two panels together. You can put stitch markers (space them out around the heart) to hold the panels together as you seam closed your cushion.
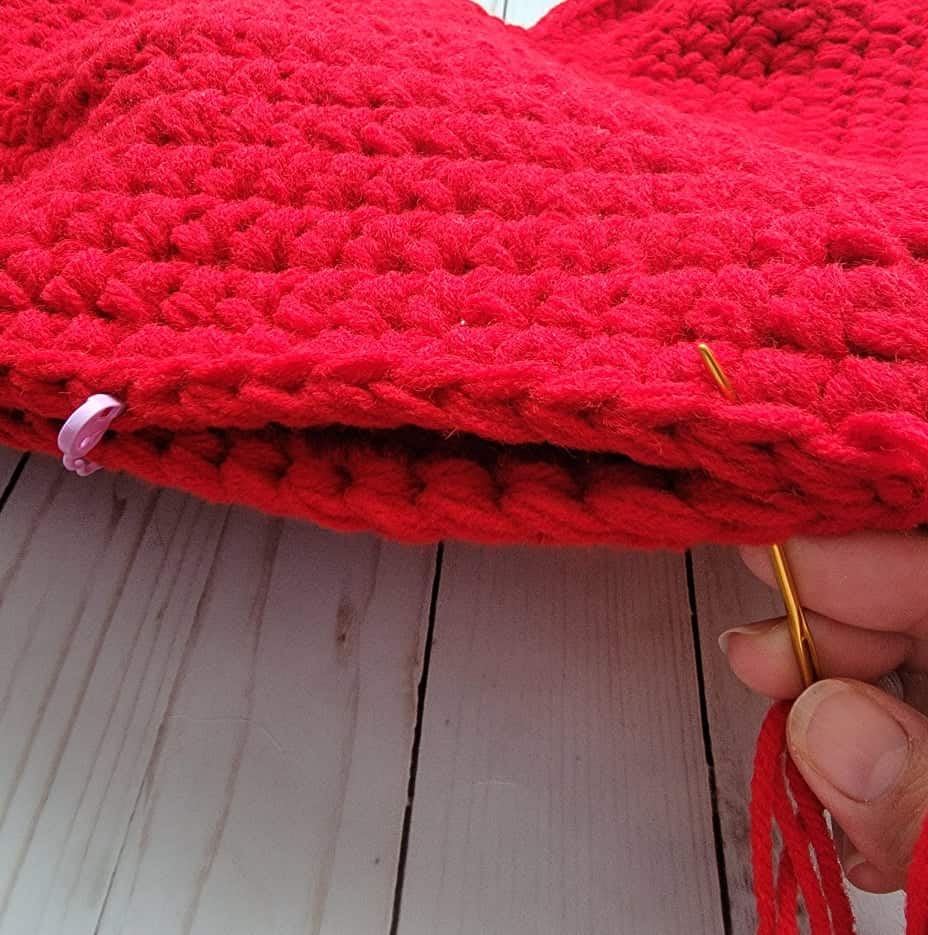
Thread 2 long strands of yarn into your tapestry needle and seam your panels together starting at the bottom (pointy) part of the heart. Whip stitch (or use whatever seaming method you prefer) to join your panels. You may stuff your cushion with Poly-Fil Fiber as you go. Leave about 3 to 4 inches opening, fill your cushion with Poly-Fil Fiber thoroughly and then continue seaming to close the opening. Weave in all ends.

Optional: Make some pompoms and attach them around your heart cushion. I made and attached 20 pompoms around my heart cushion.

All done! Enjoy your new heart cushion!
To download the PDF version of ALL MY HEART CUSION and my other patterns, please visit my RAVELRYshop.
I would love to see your All My Heart Cushion. Please use these hashtags #stringsandcuddles #stringsandcuddlesdesigns and #AllMyHeartCushion to share so I could see it!
Please don’t hesitate to reach out for questions regarding this pattern.
*** *** ***
All images and patterns are copyright of STRINGS AND CUDDLES. You may sell any items that you make from this pattern. You may NOT use my images. Please DO NOT copy, redistribute or claim as your own. If selling items from this pattern, please give credit to STRINGS AND CUDDLES by linking to my shops or on social media @stringsandcuddles.
Connect with me: Instagram | Pinterest | Facebook | Blog | Ravelry
*** *** ***