Saguaro Cactus Mittens – Knitting Pattern
As a kid, I did not like cactus. When I was 8-years old, I had an unfortunate meeting with a prickly pear cactus after we first moved to Arizona. Neither the cactus nor I came out unscathed.
It wasn’t until I began getting into photography (and I learned to give all varieties of cacti their space) that I fell in love with this incredibly adaptive plant.
A saguaro backlit by a colorful Arizona sunset is about as gorgeous as it gets in the Southwestern part of the United States. Their shape is unique and immediately recognizable. Nothing else looks like a saguaro and no two saguaros look alike.


I had the idea for this mitten for a while and so when Clover asked me to create a design inspired by the Arizona landscape, I immediately knew what I wanted to create.
The saguaro can easily live to be over 200 years old and it takes about 100 years to grow its first arm. This incredible cactus is only found in the Sonoran Desert region of Arizona, Mexico, and Southern California.
Enjoy making the Saguaro Cactus Mittens and as you are stitching away, think about just how truly amazing and distinctive this plant is. But keep your distance because much like your knitting needles, a saguaro’s needles hurt like heck if you don’t respect them!
Materials
- Takumi Bamboo Knitting Needles Double Pointed (5″) No. 5 – Art. No 3014-5
- Takumi Bamboo Knitting Needles Double Pointed (5″) No. 6 – Art. No 3014-6
- Stitch Ring Markers – Art. No 329
- Darning Needle Set – Art. No 339
- Locking Stitch Markers – Art. No 353
- Scissors
- Scrap Yarn
Yarn:
- Knit Picks “Swish Worsted”
- * Color A (Dublin) 1 ball
- * Color B (Dove Heather) 2 balls
- * Color C (Honey) 1 ball
Gauge
22 sts and 30 rnds = 4 inches in stockinette stitch on larger needles
Finished Measurements
Mitten measures 4.75” across and 10.75” tall when lying flat
Abbreviations
bor – beginning of rnd
CO – Cast On
dec – decreased
K – Knit
P – Purl
K2tog – Knit 2 sts together (1 st dec)
* * – repeat between the asterisks
rnd/rnds – round/rounds
slm – slip stitch marker
sm – stitch marker
st/sts – stitch/stitches
SSK – slip, slip, knit (1 st dec)
Notes
I recommend having two different colored stitch markers. One to note the beginning of your round and one to mark the halfway point when you get to the top of the mitten. I use blue for my beginning of round because they both start with the letter “b.”
Check the notes about duplicate stitching the design onto the mitten for tips on how to be sure it lines up correctly with the thumb.
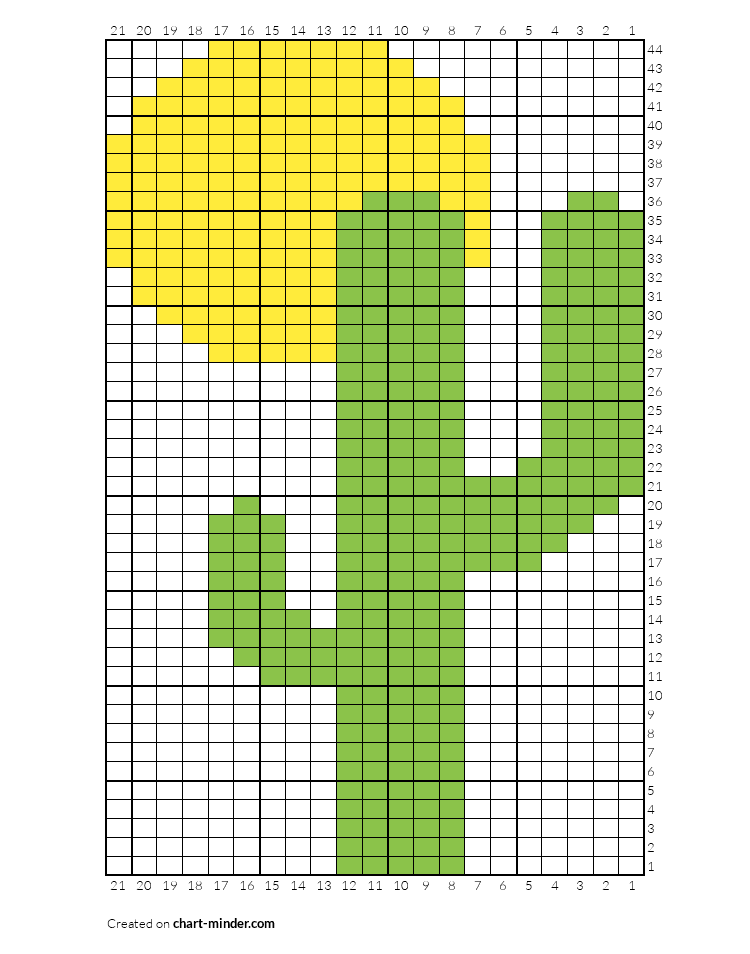
Download charts here
The Pattern
(Make 2)
Using Color A and smaller needles, CO 56 sts.
Join to work in the round being careful not to twist. Place sm to note your bor.
Rnd 1 (Color A): *K1, P1* around
You will now be working with both Color A and Color B for every round of the cuff.
Rnd 2: Using Color A for your K sts and Color B for your P sts, *K1, P1* around
Work rnd 2 a total of 20 times.
Next Rnd: Using Color B only, K9, SSK, *K7, K2tog, K7, SSK* 2 times, K7, K2tog – 50 sts
Change to larger needles and cut Color A. You will be using Color B for the remainder of the knitting.
Knit 25 rnds.
Next Rnd: place first 14 sts onto scrap yarn and knit to the end of the rnd – 36 sts
Knit 15 rnds.
Next Rnd: K18, place second sm, K to end
Next Rnd: *K2tog, K to 2 sts before next sm, SSK, slm* twice
Next Rnd: Knit
Work last 2 rnds a total of 8 times – 12 sts
Cut yarn leaving a tail. Weave tail through 12 remaining live sts several times and cinch tight. Be sure and weave through the 12 sts at least 4 or 5 times. Cut yarn.

Thumb
Put 14 sts on scrap yarn onto DPNs and space them out around 3 needles.
Join Color B and knit one rnd.
Pick up 2 sts along opening – 16 sts
Knit 10 rnds.
Next Rnd: *K2tog* around – 8 sts
Next Rnd: *K2tog* around – 4 sts
Cut yarn leaving a tail. Weave tail through 4 remaining live sts several times and cinch tight. Be sure and weave through the 4 sts at least 4 or 5 times. Cut yarn.
Weave in all your remaining tails.
Duplicate stitch cactus and sun onto the back of each hand using the charts.

Some notes about duplicate stitching:
Use a blunt tip darning needle. The sharper the tip, the easier it is to split stitches, so keep your tip as dull as you have available.
Be VERY careful not to snag the yarn from the other side of the glove while stitching. I kept my hand inside the glove to be sure the needle didn’t accidently grab a couple of fibers from the other side of the glove. Check the inside often to be sure you don’t make this mistake.
Begin the base of the cactus the row just above the last 2 color ribbed rnd.
Count your sts and be sure your cactus arm will go up the thumb and not get caught up in the picked up sts of the thumbhole.
You might want to use some locking stitch markers to mark out where your cactus graphic will be to be sure it all fits into the shape of the mitten as you want it to.
![]()
Instagram: @explorewithknitsy
Blog: www.explorewithknitsy.com
Learn with Knitsy Academy: www.knittingrockstar.com
