The Little Engine That Could Fight Procrastination
Greetings Knitters! Hannah here, the designer, knitwear blogger, and maker behind Bears Den Essentials (@bearsdenessentials). The temps may still be warm, but fall is quickly approaching. As we enter one of the busiest times of year with school back in session and the holidays barreling towards us, it can be easy to feel overwhelmed and tempted to put things off. Well, today is national Fight Procrastination Day, and I’m here with a playful knitting pattern that I hope will inspire you face that urge to push off tasks on your to do list.
Remember The Little Engine That Could by Watty Piper? Well, after my aunt requested an extra special train hat as a present for her grandson, I thought it would be fun to create a knit beanie inspired by one of my favorite books from childhood. Who could forget the classic message of the train who chugs along saying, “I think I can, I think I can” in order to make her way over the hill and bring toys to children on the other side of the hill? The simple moral of that story is to believe in yourself. What better way to fight procrastination?
Once you believe you can, it’s all about taking simple steps– eliminating distractions, setting goals you can reach, holding yourself accountable, taking breaks, and rewarding yourself–perhaps with a little knitting? The Little Engine That Could Beanie Pattern celebrates a beautiful, timeless story that cool kids young and old can enjoy making and wearing.
To celebrate and motivate my fellow crafters on Fight Procrastination Day, I’ve written this pattern in toddler, child, teen, adult, and adult large sizes. The train is created using duplicate stitch. I love duplicate stitch so much. You simply hand sew over your finished knit with a contrasting color, thereby “duplicating” the original stitches. In my humble opinion, it’s easier than fair isle or intarsia because you’re not having to juggle multiple strands of yarn in your hands at once.
You’re welcome to replicate the pattern in other colors, all you need is one main color and four contrasting colors. We’re a little biased towards these colors in particular, but we hope you’ll share your finished knits with us to see what creations you come up with (@bearsdenessentials).
MATERIALS:
Yarn: Hat requires 1 skein of each
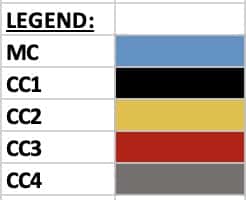
MAIN COLOR (MC) – “Canal” – Caron One Pound Yarn
CONTRAST COLOR 1 (CC1) – “Black” – Impeccable™ Solid Yarn by Loops & Threads®
CONTRAST COLOR 2 (CC2) – “Gold” – Impeccable™ Solid Yarn by Loops & Threads®
CONTRAST COLOR 3 (CC3) – “Red Hot” – Impeccable™ Solid Yarn by Loops & Threads®
CONTRAST COLOR 4 (CC4) – “Pale Grey” – Impeccable™ Solid Yarn by Loops & Threads®
Knitting Needles:
–PRO “Takumi” Bamboo Knitting Needles (4.0mm)
–PRO “Takumi” Bamboo Circular Knitting Needles (4.5mm)
Notions:
–Clover Triangle Stitch Markers, Size Small – 1 unique stitch marker for marking the end-of-the-round
–Clover Knitting Needle Point Protectors (recommended but not required)
–Large Pom Pom Maker by Clover
SIZE INFORMATION:
The Little Engine That Could Beanie is designed to be slouchy. The sizes of the beanie – Toddler (1-3 years) [Child (3-10 years), Teen, Adult, Adult Large]—correspond sequentially to the numbers provided within the pattern.
Recommendation: highlight all the numbers corresponding to the size you plan to knit for quick referencing.
Finished Measurements:
Your Head Circumference: 18-19″ (46-48 cm) [19-20″ (48-51 cm), 20-22” (51-56 cm), 22-24″ (56-61 cm ), 24″+ (61 cm+)]
Folded Brim Length: ~2″ (5 cm) [2.25″ (5.5 cm), 2.3″ (6 cm), 2.5” (6.5 cm), 2.5” (6.5 cm)]
Finished Hat Length ~7″ (18 cm) [8″ (20 cm), 8.5″ (21.5 cm), 9” (23 cm), 9” (23 cm)] – brim folded in half
Gauge:
Approx. 19 sts = 4 inches (10 cm) in stockinette stitch using 4.5mm/US 7 needles. Don’t worry too much about row gauge as you’ll knit to your desired measurement rather than row count.
ABBREVIATIONS AND STITCH GLOSSARY
- Approx: Approximately
- CC1: Contrast Color 1
- CC2: Contrast Color 2
- CC3: Contrast Color 3
- CC4: Contrast Color 4
- CO: Cast on
- Dpn(s): Double-pointed needles
- K: Knit
- K2TOG: Knit two stitches together (a right-slanting decrease stitch)
- MC: Main Color
- P: Purl
- Rem: Remain
- Rnd(s): Round(s)
- Pm: Place marker (place down one stitch marker)
- M: Markers
- SSK: Slip Slip Knit (a left-slanting decrease stitch)
- Sm: Slip the stitch marker over
- Stockinette Stitch created by knitting each stitch of every round
- St(s): Stitch(es)
- WS/ RS: Wrong side of the work / Right side of the work
- “ / cm(s): Inch(es) / Centimeter(s)
- 2×2 Rib(bing): Knit 2, Purl 2
PATTERN:
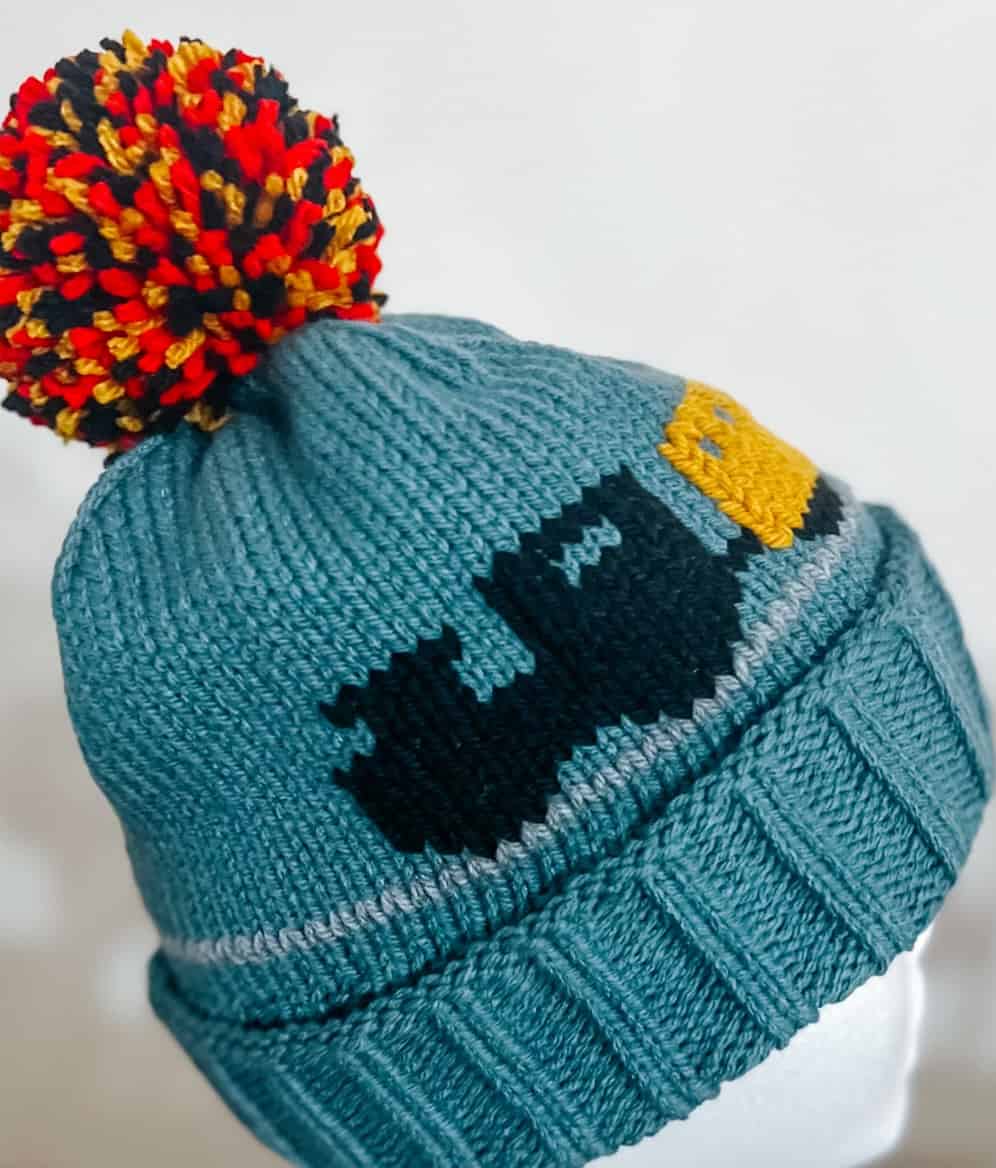
CONSTRUCTION OVERVIEW: This Beanie is worked in the round from the bottom up, starting with a 2×2 ribbing to create a folded-over brim. Body of hat entails stockinette stitch to create the blank canvas where you’ll add the train using the duplicate stitch method. Crown is a 4-corner decrease knit in stockinette stitch. Train is created using duplicate stitch. The hat is worn slightly slouchy with room at the top. You can add a pom pom, or rock it without a topper–your choice! I recommend blocking it before wearing, and then moving forward hand washing it gently with your preferred wool wash.
BRIM:
With size US 6 (4 mm) circular needles using MC yarn, cast on 76 [80, 84, 88, 96] sts. Place stitch marker, then join in the round. Be careful not to twist the yarn.
Round 1: K2, p2 around to end-of-round marker, sm.
Continue working in ribbing (k2, p2) until work measures 4″ (10cm) [4.5″ (11.5 cm), 4.75″ (12 cm), 5″ (13 cm), 5″ (13 cm)] from CO edge.
BODY:
Change to size US 7 (4.5 mm) circular needles.
Round 1: K to end-of-round marker, sm.
Continue in stockinette st until piece measures 8″ (20 cm) [8.5″ (21.5 cm), 9″ (23 cm), 9.5” (24cm), 9.5” (24cm)] from CO edge.
CROWN: 4-corner Decrease
Change to size US 7 (4.5 mm) double-pointed needles when needed.
Round 1: *K2tog, k15 [16, 17, 18, 20], ssk, sm, repeat from * around to end-of-round marker, sm. (68 [72, 76, 80, 88] sts rem)
Round 2 (and all other even-numbered rounds): Knit around to end-of-round marker, sm.
Round 3: *K2tog, k13 [14, 15, 16, 18], ssk, sm, repeat from * around to end-of-round marker, sm. (60 [64, 68, 72, 80] sts rem)
Round 5: *K2tog, k11 [12, 13, 14, 16], ssk, sm, repeat from * around to end-of-round marker, sm. (52 [56, 60, 64, 72] sts rem)
Round 7: *K2tog, k9 [10, 11, 12, 14], ssk, sm, repeat from * around to end-of-round marker, sm. (44 [48, 52, 56, 64] sts rem)
Round 9: *K2tog, k7 [8, 9, 10, 12], ssk, sm, repeat from * around to end-of-round marker, sm. (36 [40, 44, 48, 56] sts rem)
Round 11: *K2tog, k5 [6, 7, 8, 10], ssk, sm, repeat from * around to end-of-round marker, sm. (28 [32, 36, 40, 48] sts rem)
Round 13: *K2tog, k3 [4, 5, 6, 8], ssk, sm, repeat from * around to end-of-round marker, sm. (20 [24, 28, 32, 40] sts rem)
Round 15: *K2tog, k1 [2, 3, 4, 6], ssk, sm, repeat from * around to end-of-round marker, sm. (12 [16, 20, 24, 32] sts rem)
Round 16: *K2tog, k0 [0, 1, 2, 4], ssk, sm, repeat from * around to end-of-round marker, sm. (4 [8, 12, 16, 24 sts rem)
Cut yarn leaving roughly 12” (30 cm), thread yarn through remaining sts, pull tightly, thread through rem sts, and secure on WS.
DUPLICATE STITCH PATTERN CHART: Read the chart from bottom upwards. See legend for reference.
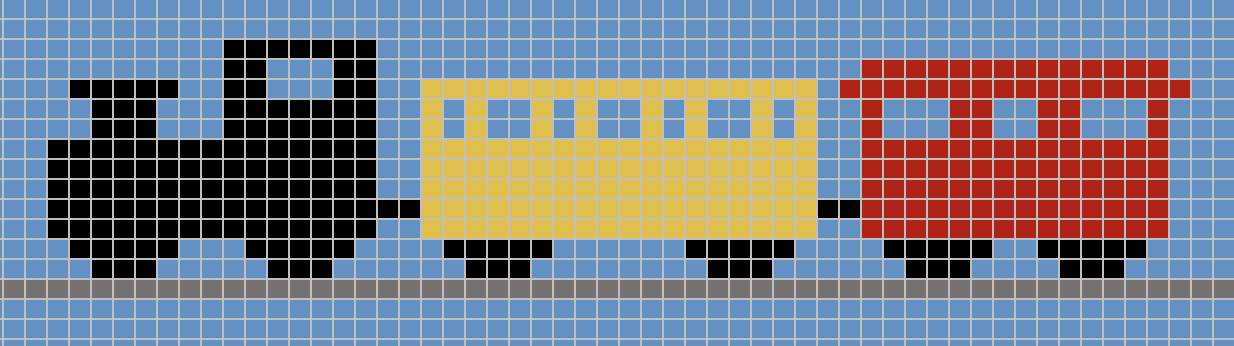
*The gray tracks go all the way around the hat– work duplicate stitch all the way around the body of the hat for the tracks in CC4.
Tips for Duplicate Stitch:
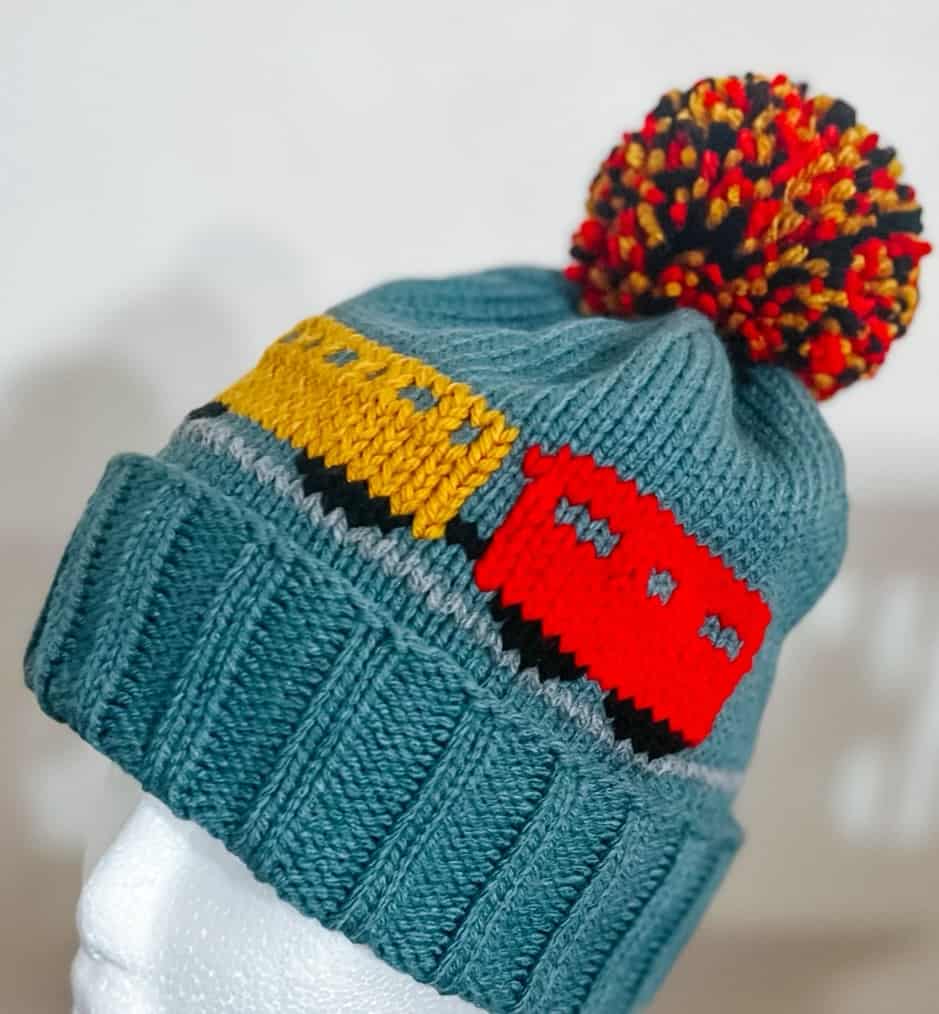
First, pick where you want to get started on the body of the hat. I try to center the train so that it evenly spans three of the four quarters of the hat. Start with the gray train tracks so you have an even line to work off of for the rest of the stitches. I recommend placing the tracks a few rows up from the ribbing edge, but you can center the duplicate stitch however works best for you. After that, continue by duplicate stitching the wheels, connectors, and locomotive of the train. After that, work the red carriage. Finally, go back to the back of the train (the caboose!) and complete the red portion of the duplicate stitching.
Stockinette st is a series of Vs. Look for upright Vs. Duplicate stitch is just creating a V on top of that V. With your embroidery needle, working from right to left, pull the needle bottom of the first st you want to cover (the base of the V). Then insert it right to left through both loops of the stitch above and pull gently. The right side of the V stitch will now be covered. Bring the needle down and through the same hole as your where you began (the base of the V). You now have one stitch covered.
Be careful not to pull too tightly or leave to loose– keep your tension even with the tension of the knitted hat.
You can work rows of duplicate stitch in any direction. I prefer working in rows from the bottom up — starting right to left. To work horizontally, insert the needle through the stitch to the left of the original stitch and repeat. To work vertically, insert the needle through the stitch above the original stitch and repeat. Whatever direction you work, make sure you keep your tension even. If you have to skip over more than three sts, weave the yarn through the back of a stitch so it doesn’t create a long float.
When you finish duplicate stitching, secure the end of the yarn on the back just like weaving in the ends as usual.
FINISHING:
Block.
POM POM:
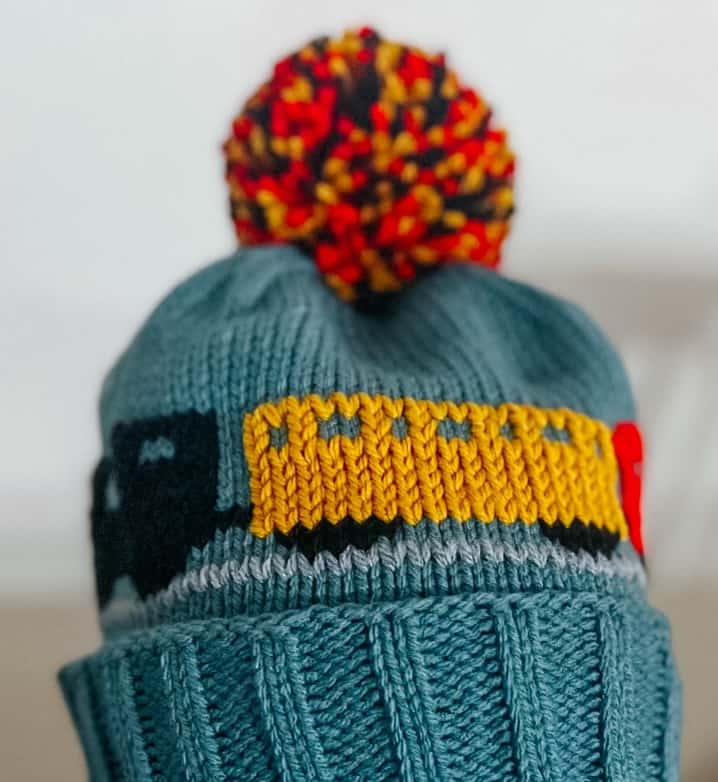
Pom poms are completely optional, but I love them so much. We made this pom pom using the Large Pom Pom Maker by Clover and three strands of impeccable yarn: one in black, one in gold, and one in red hot. For a tutorial on how to create a pom pom and tie it onto your hat securely, check out our POM POM TUTORIAL.
I hope you had as much fun making this beanie as much as I did designing it for you! Don’t forget to follow Bears Den Essentials on social media and to share your finished projects tagging @BearsDenEssentials and with the hashtag #BearsDenInTheWild!
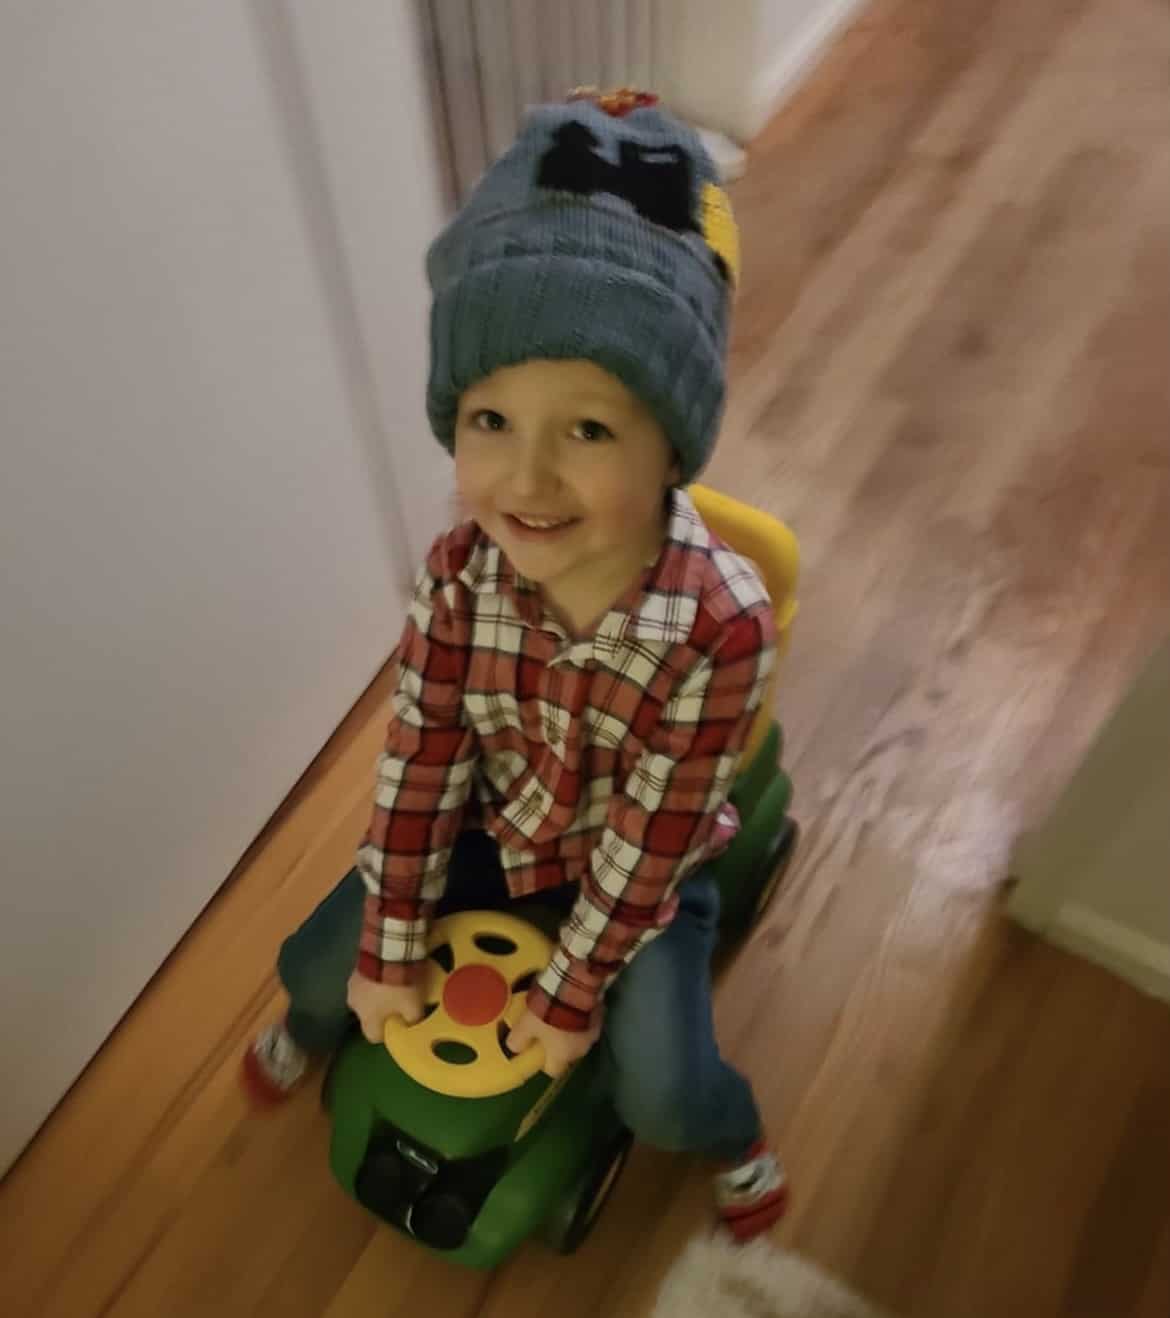
The happy hat recipient chugging along on his train:
Follow our blog (bearsdenessentials.com) to stay up-to-date. For beginners, be sure to head to our YouTube Page (@bearsdenessentials) to get the full series of knitting tutorials we offer! For questions about this pattern and extra tips, email us at bearsdenessentials@gmail.com.
Find Bears Den Essentials on Instagram | Pinterest | Etsy | Ravelry | Facebook | Youtube
DESIGNER AND PATTERN INFORMATION: All patterns, text, products, and photos are property of Hannah Ollenburger and Bears Den Essentials. Patterns and photographs cannot be distributed, copied in part or in whole, re-written, or re-sold without permission—electronically or physically. You may sell your finished products made using Bears Den Essentials patterns as long as you provide a direct link to this pattern in your listing and tag us on social media: @bearsdenessentials. For any other use, please contact us directly (Hannah: bearsdenessentials@gmail.com). Thank you for supporting artists by using and sharing our content ethically and legally.