Giant Panda – Amigurumi Crochet Pattern
Cuddle-sized giant panda?! Yes, please!

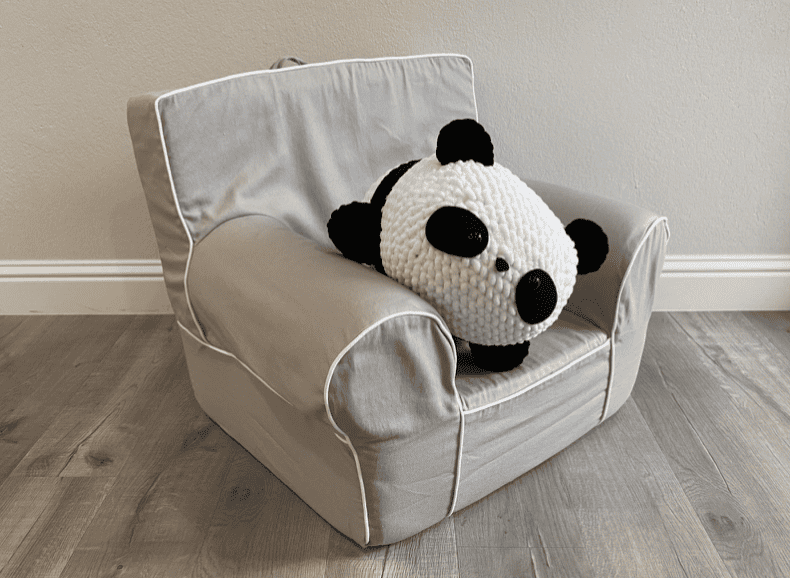
Hey everyone, it’s Amy from curiouspapaya. Meet Ginger the Giant Panda! She was inspired by my favorite character as a kid, a flat panda called Tare Panda. She measures 14 in. x 13 in. [35.56 cm x 33.02 cm]. Here’s what you’ll need for this project:
*You can find the premium printable PDF of this pattern here. Thanks for supporting my designs!
——————–——————–——————–——————–——————–——————–——-
MATERIALS:
- Clover Amour Crochet (10 mm) – Art. No 1057/NP
- Jumbo size 7 chenille yarn in black (170 g) and white (267 g) (here, I’m using Sweet Snuggles yarn by Loops & Threads). Note that you will need a little over 1 skein of white (unless your tension is extra tight).
- Mini Patchworks Scissors – Art. No 493/CW
- Quick Locking Stitch Marker (Large) – Art. No 3032
- Jumbo darning needle – Art. No 340
- Fiberfill stuffing (~680 g)
- Size 24 mm safety eyes
- Black felt for the eyes and nose
- Hot Glue
TERMS:
- Ch – chain
- Blo – back loops only
- Dec – (invisible) decrease
- Inc – increase
- Sc – single crochet
- St(s) – stitch
- Slst – slip stitch
- Rnd(s) – round(s)
- [#] – stitch count
- (…) x # – repeat the instructions within the parentheses # of times
NOTES/TIPS:
*Please note that when you cut this specific type of chenille yarn, experiencing some loose fibers is normal.
*If you are experiencing breakage when trying to pull your magic circle closed, create the starting ring with the alternative method of: ch 2, make 6 sc into the second ch from the hook.
*Use stitch markers to keep track of the beginning of each round (especially important since this fuzzy chenille yarn can make it difficult to see!)
*When using hot glue, apply in a zigzag motion and not in globs. Avoid the edges. Less is more!
*When working in a spiral, it’s normal for each rnd to stagger (and for your start of the rnd to slightly rotate). To avoid having a lopsided butt, pull the hook away from you after each stitch to make the sts align on top of each other more neatly.
*Important: I secure safety eyes after closing the piece using hot glue for placement purposes – however, if you are giving this plush to a young child, feel free to make the modifications you need to in order to secure the eyes on beforehand.
*This pattern involves color changing. Because we are working in a spiral, we will have jogs between each round. To make the striped color changes more subtle, we will use the method of making a slst into the last st of the rnd right before the color change. Then, insert hook into the first st of the next rnd and begin working with the new color. This will help alleviate the jog.
——————–——————–——————–——————–——————–——————–——-
Head/Body (starting in white yarn):
Rnd 1: Ch 13. Sc into the second st from the hook. Sc into the next 10 sts. Make 3 sc into the next st. Continue onto the underside of the chain. Sc into the next 10 sts. Inc into the next st and slst into the first st of the rnd. [26]
*The new rnd starts after the slst.
Rnd 2: (10 sc, inc into the next 3 sts) x 2. [32]
Rnd 3: (10 sc, [sc into the next st, inc] x 3) x 2 [38]
Rnd 4: (10 sc, [2 sc, inc) x 3]) x 2 [44]
Rnd 5: (10 sc, [3 sc, inc) x 3]) x 2 [50]
Rnd 6: (10 sc, [4 sc, inc) x 3]) x 2 [56]
Rnd 7-11 (5 rnds total): sc all around [56]
Change to black yarn.
Rnd 12: (blo) – sc all around [56]
Rnd 13-16 (4 rnds total): sc all around [56]
Change to white yarn.
Rnd 17: (blo) – sc all around [56]
Rnd 18-23: (6 rnds total): sc all around [56]
Begin decreasing.
Rnd 24: (10 sc, [4 sc, dec) x 3]) x 2 [50]
Rnd 25: (10 sc, [3 sc, dec) x 3]) x 2 [44]
Rnd 26: (10 sc, [2 sc, dec) x 3]) x 2 [38]
Rnd 27: (10 sc, [sc into the next st, dec] x 3) x 2 [32]
Rnd 28: (10 SC, dec into the next 3 sts) x 2. [26]
Fasten off and leave a long tail for sewing. Stuff well.
Pinching the two longer edges together, whip stitch the hole closed. Bury the excess yarn tail.
Arms/Legs (make 4 in black yarn):
Rnd 1: Make a magic circle and (sc) x 6 [6]
Rnd 2: (inc) x 6 [12]
Rnd 3: (2 sc, inc) x 4 [16]
Rnd 4-5 (2 rnds total): sc all around [16]
Fasten off and leave a long tail for sewing. Stuff well.
Ears (make 2 in black yarn):
Step 1: Make a magic circle and (sc) x 6 [6]
Step 2: Ch 1 and turn. (sc, inc) x 3 [9]
Fasten off and leave a tail for sewing.
Assembly:
Ears: Sew each ear on between rnds 7-8, 10 sts apart.
*Note: For the placement limbs, it is super important to lay the body on a flat surface like a table. Check to make sure they aren’t floating!
Arms: Sew each arm along the black stripe between rnds 12-16, 14 sts apart from each other on the bellyside. (The stripe on one side of the body will be a bit lower because of the minor jog – you can easily cover this up with the arm).
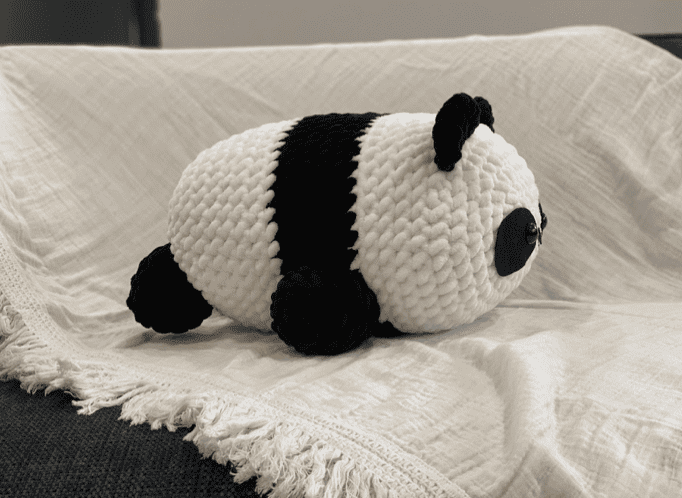
Legs: Sew each leg towards the back of the body between rnds 24-27, 7 sts apart from each other on the bellyside. [img below]

Eyes: Cut two ovals out of black felt (3 in. x 2.25 in. [7.62 cm x 5.72 cm]). Cut a small slit where the eyes will push through. Position the eyes along the starting ch from rnd 1 of the head. Secure the eyes in place with hot glue. [img below]
Nose: Cut a triangle (with rounded edges) out of black felt (0.75 in. x 0.5 in. [1.91 cm x 1.27 cm]) and glue it slightly lower than the eyes.
Eyebrows (optional): Cut two small ovals out of black felt (0.75 in. x 0.5 in. [1.91 cm x 1.27 cm]) and glue them at an angle above the eyes to create the “cute-angry” look.
That’s all there is to our giant furry friend! You can even make him in fun color combinations. Tag #curiouspapaya for your work to be featured and please say hi :).