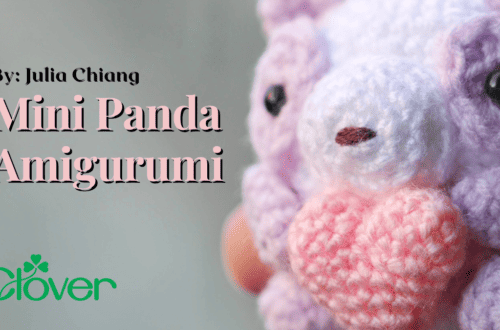
Panda Crochet Pattern
Say hello to ‘Chief’. He’s the coolest bamboo-eating panda around! I have always liked pandas and I guess it started when I was little.

Growing up, my sister’s favorite animal was (and still is) the panda. She had posters, stuffed animals and figurines of the rolly animals in her room. Even as our twins were born, she bought them matching onesies with pandas on them! One thing she didn’t have was an amigurumi panda, but I’ll fix that by giving one to my niece!
When thinking of making this animal, I wanted to learn a few fun facts to help draw out a personality. Let me share a few of the ones that I found funny and interesting.
- Pandas spend a lot of their day eating…. 10-16 hours actually! And they mainly eat bamboo.
- To keep it real (and make you giggle), they poo 40x a day on average. Our twins are 13 and this would make them giggle so, mom points for saying ‘poo’.
- The momma panda keeps constant contact with their cub during the first month, keeping the baby on her front and covering it with her paw, arm or head. But by the 5th month the baby is wild and is climbing on everything–-including mom!
- The panda has vertical slits for pupils like cats. Regular bear eyes are different.
- Did you know that the panda can swim? Yep.
- Although baby pandas are active…pandas are lazy. Think Kung Fu Panda. They don’t move a lot and when they do it’s very slow!
Okay, now let’s talk about this crochet panda! The one in the pattern is made in different sections. You’ll start by making each leg, join those together and then the body will be made right on top. After the body is made it’ll work right into the head. The ears, eyes, nose arms, bamboo and bag are all made separately and then sewn on the panda to finish. Only basic stitches are used: chain, slip stitch, single crochet, single crochet decrease (also known as single crochet 2 together) and only in the bamboo leaves you’ll use double crochet and half double crochet.
When designing this pattern, I used a medium weight cotton yarn and a tight gauge. Your gauge does not have to match mine, but make sure the stitches are tight. This will keep the stuffing from peeking through. You can use any yarn and it should work up really cute!
One quick note on stuffing. Stuff the amigurumi and then stuff some more. Do not leave it loose (except in the arms). Once it’s played with a bit the stuffing will compact and you’ll have a skinny bear not super stuffed and chubby. For the arms, stuff the ends and leave the top unstuffed so that it’s arms don’t stick straight out and will lay closer to the body.
Well, now that you know the basic layout…grab your yarn and get busy!
Materials:
- Willow Yarns, Meadow [1.75oz/50g/115yd/105m per ball];
100% cotton, weight #4 - 1 ball of each:
- Black (0020) (A)
- White (871) (B)
- Leaf (0008) (C)
- Maroon (855) (D)
- Amour Crochet Hook C (2.75 mm) – Art No. 141/C
- Darning Needle Set – Art No. 339
- 10 mm Safety eyes – 2
- Polyester fiberfill
- Stitch markers
MEASUREMENTS
About 9” (23 cm) tall
GAUGE INFORMATION
24 sc and 24 rows/rounds = 4” (10 cm)
SPECIAL STITCHES
Single Crochet 2 Together (abbreviated sc2tog) — pull up a loop in each of next 2 sc, YO and draw through all 3 loops on hook (counts as one sc).
When working within the pattern use the Invisible Single Crochet 2 Together when sc2tog is used to create a less visible decrease: insert hook in the flo of next 2 sts, YO, and draw through both sts, YO and draw through 2 loops on hook (counts as one sc).
Arms (make 2)
Rnd 1 (Right Side): With A, create magic ring, 6 sc in ring; do not join – 6 sc. Place marker to indicate beginning of rnd.
Note: Loop a short piece of yarn around any stitch to mark Rnd 1 as right side. Stuff lightly as you make Arm, leaving top ½” unstuffed. Move stitch marker up with each Rnd.
Rnd 2: 2 Sc in each sc around – 12 sc.
Rnd 3: (Sc in next 3 sc, 2 sc in next sc) around – 15 sc.
Rnds 4-15: Sc in each sc around.
Rnd 16: (Sc in next 3 sts, sc2tog) around – 12 sc
Rnds 17-18: Sc in each sc around; join with slip st to first sc. Fasten off.
LEGS (make 2)
Rnd 1 (Right Side): With A, create magic ring, 6 sc in ring; do not join – 6 sc. Place marker to indicate beginning of rnd.
Note: Loop a short piece of yarn around any stitch to mark Rnd 1 as right side. Stuff firmly as you make Leg.
Rnd 2: 2 Sc in each st around – 12 sc.
Rnd 3: (Sc in next 3 sc, 2 sc in next sc) around – 15 sc.
Rnds 4–5: Sc in each st around. Fasten off.
Join B.
Rnds 6-8: Sc in each sc around.
Rnd 9: (Sc in next 4 sc, 2 sc in next sc) around – 18 sc.
Rnds 10-13: Sc in each sc around.
Stuff Leg with fiberfill.
Rnd 14: (Sc in next 5, 2 sc in next sc) around – 21 sc.
Leg 1: Fasten off and make Leg 2.
BODY
Rnd 1: Beginning with Leg 2, sc in next sc, ch 3, join with sc any stitch on Leg 1, sc in next 20 sc, sc in each ch, sc in any st of Leg 1, sc in next 20 sts; join with sl st to first sc – 42 sc.
Note: When working in the 3 chs, mark the 2nd sc as the back middle. Move marker up as Body pattern progresses.
Rnd 2: (Sc in next 6 sts, 2 sc in next st) around – 48 sc.
Rnds 3-10: Sc in each st around.
Rnd 11: Sc in next 14 sts, sc2tog) 3 times – 45 sc.
Rnd 12: Sc in each st around.
Rnd 13: (Sc in next 13 sts, sc2tog) 3 times – 42 sc.
Rnds 14-15: Ch 1, sc in each st around.
Rnd 16: (Sc in next 5 sts, sc2tog) – 36 sc.
Rnd 17-20: Sc in each st around
Rnd 21: (Sc in next 4 sts, sc2tog) around – 30 sc.
Rnd 22: Sc in each st around.
Rnd 23: (Sc in next 3 sts, sc2tog) around – 24 sc.
Stuff Body with fiberfill.
Rnd 24: (Sc in next 2 sts, sc2tog) around – 18 sc.
Head (Continued from Body)
Rnd 1: 2 Sc in each sc around – 36 sc.
Rnd 2: (Sc in next 5 sc, 2 sc in next sc) around – 42 sc.
Rnd 3: (Sc in next 6 sc, 2 sc in next sc) around – 48 sc.
Rnds 4-13: Sc in each st around.
Rnd 14: (Sc in next 6 sc, sc2tog) around – 42 sc.
Rnd 15: (Sc in next 5 sc, sc2tog) around – 36 sc.
Rnd 16: (Sc in next 4 sc, sc2tog) around – 30 sc.
Rnd 17: (Sc in next 3 sc, sc2tog) around – 24 sc.
Rnd 18: (Sc in next 2 sc, sc2tog) around – 18 sc.
Rnd 19: (Sc in next sc, sc2tog) around, slip st in next sc – 12 sc.
Finish off leaving a long length for sewing.
Thread yarn needle with long end and weave needle through sts on Rnd 19; pull tightly to close how and secure end.
NOSE
Rnd 1 (Right Side): With B, create magic ring, 6 sc in ring; do not join – 6 sc. Place marker to indicate beginning of rnd.
Rnd 2: 2 sc in each st around – 12 sc.
Rnd 3: (Sc in next st, 2 sc in next st) around – 16 sc.
Rnd 4: Sc in each st around; join with sl st to first sc.
Fasten off leaving a long length for sewing.
EYE PATCH (make 2)
Rnd 1 (Right Side): With A, create magic ring, 4 sc in ring; do not join – 4 sc. Place marker to indicate beginning of rnd.
Rnd 2: 2 sc in each st around – 8 sc.
Rnd 3: (Sc in next st, 2 sc in next st) around; join with sl st to first sc – 12 sc.
Fasten off leaving a long end for sewing.
Use photo as a guide and add safety eyes between rnd 2 and 3.
[PHOTO Panda 2]
EAR (make 2)
Rnd 1 (Right Side): With A, create magic ring, 6 sc in ring; do not join – 6 sc. Place marker to indicate beginning of rnd.
Rnd 2: 2 sc in each st around – 12 sc.
Rnd 3: Sc in each st around
Rnd 4: (Sc in next 3 sts, 2 sc in next st) – 15 sc.
Rnd 5: Sc in each st around.
Rnd 6: (Sc in next 3 sts, sc2tog) – 12 sc.
Fasten off leaving a long end for sewing.
BAMBOO STICK
With C, ch 2.
Rnd 1 (right side): 6 Sc in second ch from hook; do not join – 6 sc. Place a marker to indicate beginning of rnd.
Rnds 2-15: Sc in each st around.
Fasten off leaving a long end.
Stuff Bamboo Stick lightly.
Use yarn needle to close Rnd 15.
BAMBOO LEAVES (make 5)
Leaves 1:
Rnd 1: With C, **ch 8, Sl st in second ch from hook, sc in next ch, hdc in next ch, 2 dc in next ch, hdc in next ch, sc in next ch, sl st in last ch. Without fastening off, repeat from ** two more times.
Fasten off leaving a long end for sewing.
Sew leaves together and on end of Bamboo Stick.
Leaves 2:
Repeat leaves 1 two times.
POUCH
Panels (make 2)
With D, ch 2.
Row 1 (right side): 2 Sc in second ch from hook 2 – 2 sc.
Row 2: Ch 1, turn, 2 sc each st across – 4 sc.
Row 3: Ch 1, turn, 2 sc in first st, sc in next 2 sts, 2 sc in last st – 6 sc.
Rows 4-6: Ch 1, turn, sc in each st across.
Fasten off.
JOINING
With WS together, sew sides together, leaving top (row 6) open.
STRAP
Join D with sl st in seam of joined panels, ch 36, sl st to opposite seam, being careful not to twist chain.
Fasten off.
FRINGE
Cut seven 3” lengths of D.
Fold strip in half, pull folded loop through point of Pouch, pull ends through loop, pull tightly.
Add 3 strips in the same manner on each side of the bottom point.
Trim evenly.
FINISHING
Using photo as a guide, sew Eyes, Nose, and Ears on Head.
Sew Arms on Body.
Slip the Strap over the Head and under one Arm.
Sew Bamboo Stick under one Arm and to Body.
Place last 2 leaves in Pouch.
Weave in ends.
Best stitches–
Kristi