Chonky Purr-maid Plush Pattern
 Hello friends! I’m Sarah, the crochet designer behind Fanatical Fibers.
It is an absolute honor to share my new pattern with you on the Clover blog: The Chonky Purrmaid Plush! This amigurumi plush combines best of both worlds (cats and mermaids) in a way that is super cuddly and squishable.
Materials:
- 187g / 136.4 yards Super Bulky Yarn for the tail (I used Bernat Baby Blanket Sparkle in color “Planetary Purple Sparkle”)
- 187g / 136.4 yards Super Bulky yarn for the body/torso (I used Bernat Blanket in color “Orange Leaf”)
- 10 yards Super Bulky Yarn for shells (I used Bernat Baby Blanket in color Seafoam)
- Amour Crochet Hook M/N (9.0 mm) – Art. No 1056/ MN
- Amour Crochet Hook L (8.0 mm) – Art. No 1055/L
- 12 inches of black worsted weight yarn (for the mouth and nose)
- Tapestry needle
- Black, white and pink felt (or colors of your choice for the eyes, nose and inner ears)
- Hot glue gun, fabric glue or other fabric adhesive
- 2-3 lbs of Polyfil Stuffing
Notes on this pattern:
You can find the Ad Free Version of this pattern here.
You will work this pattern in the round unless otherwise specified.
Abbreviations:
Ch- Chain
St- Stitch
MC- Magic circle
FO- Fasten off
Sc- Single crochet
Inc- Increase
Dec- Decrease
The pattern
Head and Torso:
Round 1: With kitty body color and 9mm hook, sc 6 in MC or use the “Chain 2 Method”. Join to 1st stitch using a slip stitch to form a circle. (6)
Round 2: Round 2: Ch 1. Sc Inc around. Join. (12)
Round 3: Ch 1. Sc 1, Sc Inc around. Join. (18)
Round 4: Ch 1. Sc 2, Sc Inc around. Join. (24)
Round 5: Ch 1. Sc Inc, Sc 3 around. Join. (30)
Round 6: Ch 1. Sc 4, Sc Inc around. Join. (36)
Round 7: Ch 1. Sc Inc, Sc 5 around. Join. (42)
Round 8: Ch 1. Sc in each st around. Join. (42)
Round 9: Ch 1. Sc 6, Sc Inc around. Join. (48)
Round 10-22: Ch 1. Sc in each st around. At the end of Round 22, switch to tail color. Join. (48)
Round 23-26: Ch 1. Sc in each st around. Join. (48)
Round 27: Ch 1. Sc 6, Sc Dec around. Join. (42)
Round 28-29: Ch 1. Sc in each st around. Join. (42)
Round 30: Ch 1. Sc 5, Sc Dec around. Join. (36)
Round 31: Ch 1. Sc in each st around. Join. (36)
Round 32: Ch 1. Sc 4, Sc Dec around. Join. (30) At this point you will want to start stuffing the body.
Round 33: Ch 1. Sc in each st around. Join. (30)
Round 34: Ch 1. Sc 3, Sc Dec around. Join. (24)
Round 35: Ch 1. Sc in each st around. Join. (24)
Round 36: Ch 1. Sc 2, Sc Dec around. Join. (18)
Round 37: Ch 1. Sc in each st around. Join. (18)
Round 38: Ch 1. Sc 1, Sc Dec around. Join. (12) Add more stuffing to the tail so that it will hold the shape before the next Round.
Round 39: Sc Dec around. Join. (6)
FO leaving a tail and sew the bottom shut using the tail you just cut, then weave in the end.
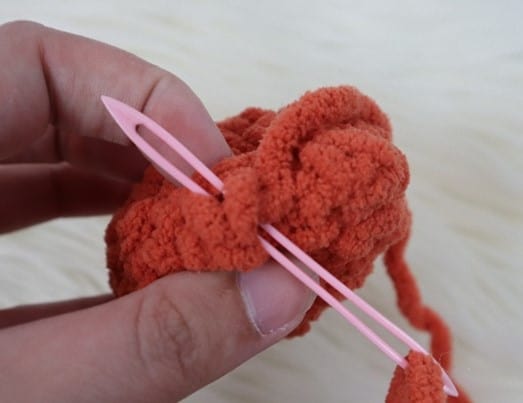
Tail fins – make 2:
Round 1: With tail color and 9mm hook, Sc 4 in MC or use the “Chain 2 Method”. Join to 1st stitch using a slip stitch to form a circle. (4)
Round 2: Ch 1. Sc 1, Sc Inc around. Join. (6)
Round 3: Ch 1. Sc 2, Sc Inc around. Join. (8)
Round 4: Ch 1. Sc 3, Sc Inc around. Join. (10)
Round 5: Ch 1. Sc 4, Sc Inc around. Join. (12)
Round 6: Ch 1. Sc 5, Sc Inc around. Join. (14)
Round 7: Sc 1, Sc Dec around, Sc in remaining st. (10)
FO and leave tail for sewing (about 10 inches long).
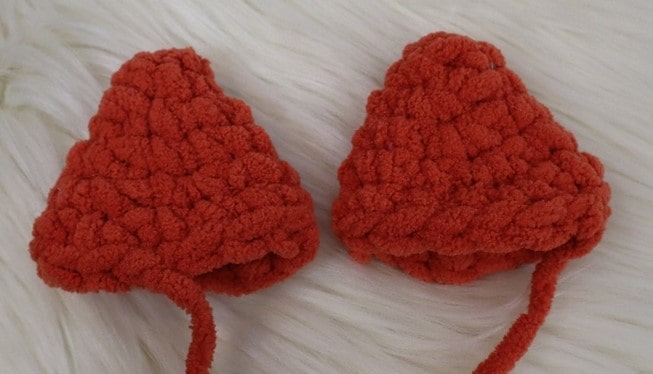
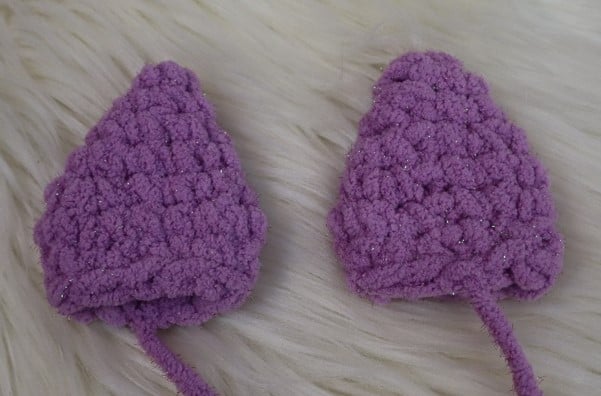
Ears – make 2:
Round 1: With kitty body color and 9 mm hook, Sc 4 in MC or use the “Chain 2 Method”. Join to 1st stitch using a slip stitch to form a circle. (4)
Round 2: Ch 1. Sc 1, Sc Inc around. Join. (6)
Round 3: Ch 1. Sc 2, Sc Inc around. Join. (8)
Round 4: Ch 1. Sc 3, Sc Inc around. Join. (10)
Round 5: Ch 1. Sc 4, Sc Inc around. Join. (12)
Round 6: Ch 1. Sc 5, Sc Inc around. Join. (14)
FO and leave tail for sewing (about 10 inches long).
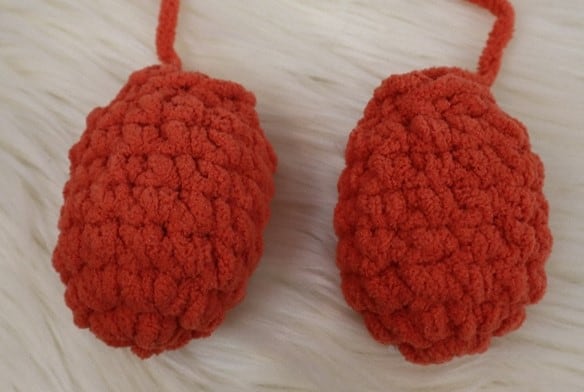
Arms – make 2:
Round 1: With kitty body color and 9 mm hook, Sc 6 in MC or use the “Chain 2 Method”. Join to 1st stitch using a slip stitch to form a circle. (6)
Round 2: Ch 1. Sc Inc in each st around. Join. (12)
Round 3-5: Ch 1. Sc in each st around. Join. (12) You may want to lightly stuff the arms at this point before completing the next Round.
Round 6: Ch 1. Sc Dec around. (6).
FO and leave a tail for sewing (about 10 inches long).
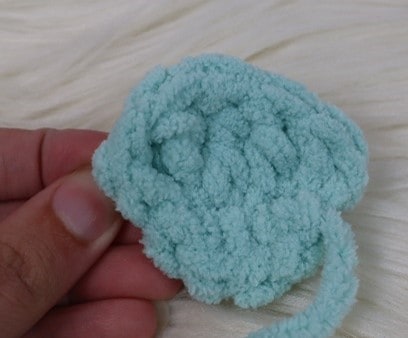
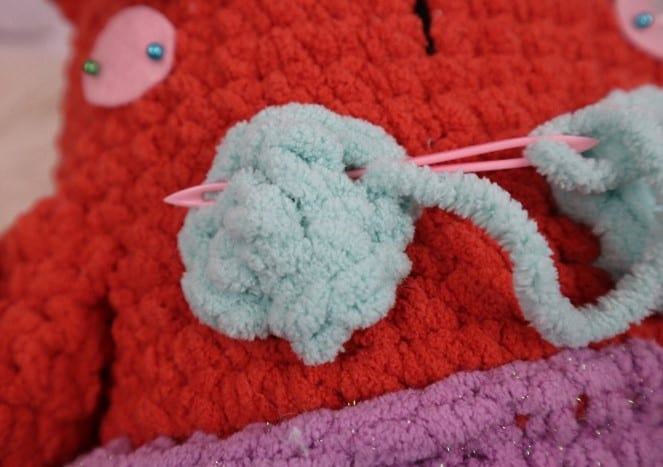
Shells– make 2:
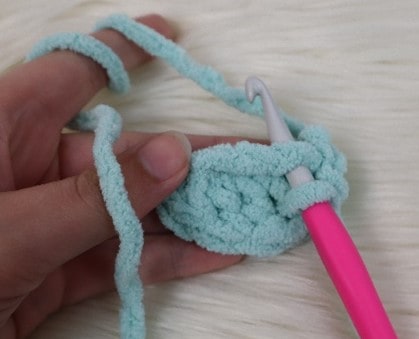
These shells will be worked in the round, but you will begin with an 8mm hook and green yarn (or other color of your choice).
Chain 6.
Sc 1 in 2nd ch from hook, Dc 1, Tc 1, Dc 1, Sc 1. DO NOT TURN.
Instead, turn the piece clockwise and work a sl st on the other side of the chain. Sc 2 into the next 2 sts. Sl st into the same st as your 1st sc and FO, leaving a tail for sewing.
Assembly
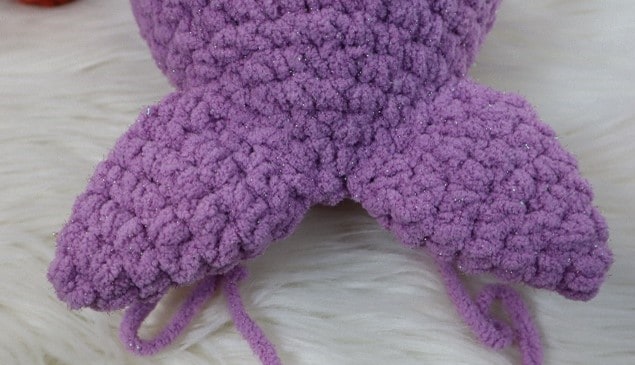
Sew the fins to the bottom of the tail (you will attach them one on each side of the cone that forms the end of the tail). You can stuff them if you want, but I preferred mine flat so I did not add any stuffing to mine.
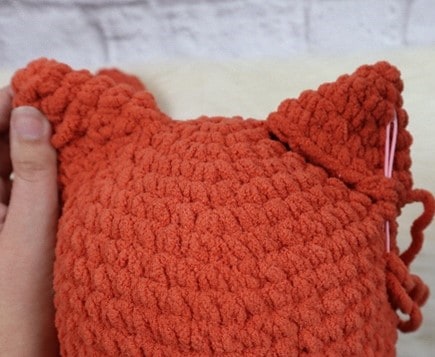
After that, sew the ears to the top of the head (they should fall between Row 2 and Row 10. Make sure you sew them on so that they face the same direction as the fins. (see photo below).
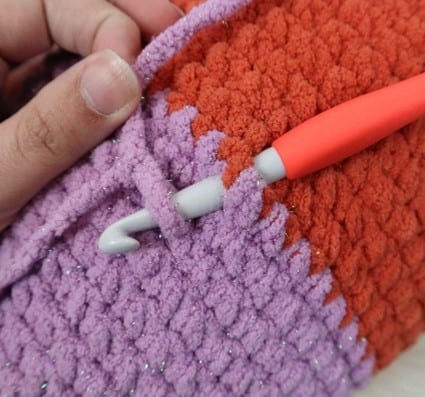
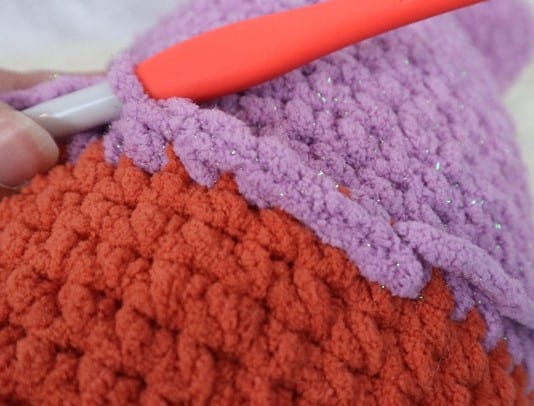
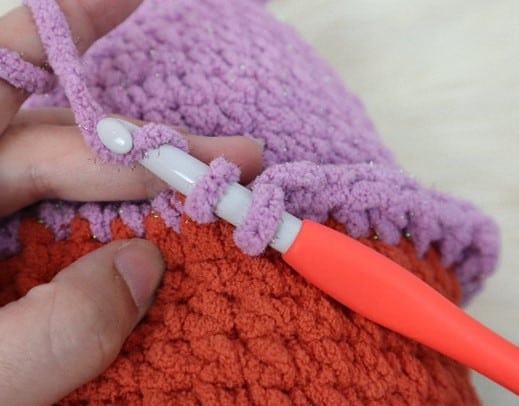
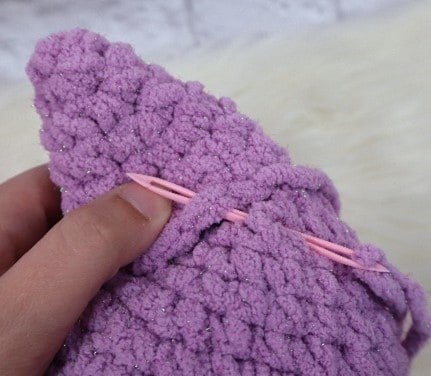
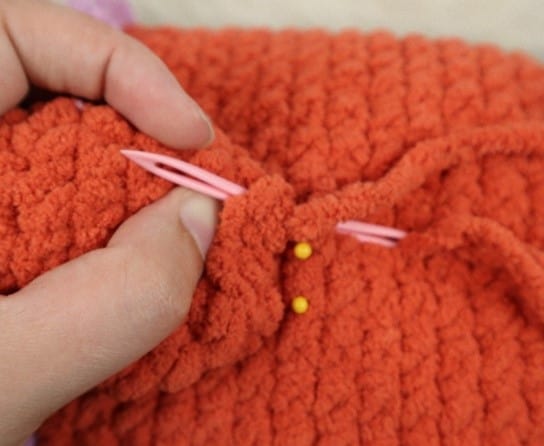
Next you will create the ridge at the top of the tail (this part is totally optional, but it will give the purr-maid a nice clean and polished transition from torso to tail). You will work your stitches around the body on top of the stitches you already did. To do this, you’ll insert your hook into a stitch at the center of the body (around the vertical midpoint between the ears and fins). After you insert your hook and place a slipknot on the end (see photo) and pull it through the stitch. Crochet like you would normally, but keep inserting your hook into the color changing stitches following the pattern below:
2 sl sts, Sc 4, HDC 2, Dc 7, HDC 2, Sc 4, Sl st 3, Sc 4, HDC 3, DC 7, HDC 3, Sc 4, Sl st 3 and join to the 1st slip stitch where you started.
Once that is done, you will sew the tops of the arms shut (through both sides of the stitches. Then sew them to the body approximately 7 Rows below the ears. I marked mine with some pins to make sure they were even before sewing them into place.
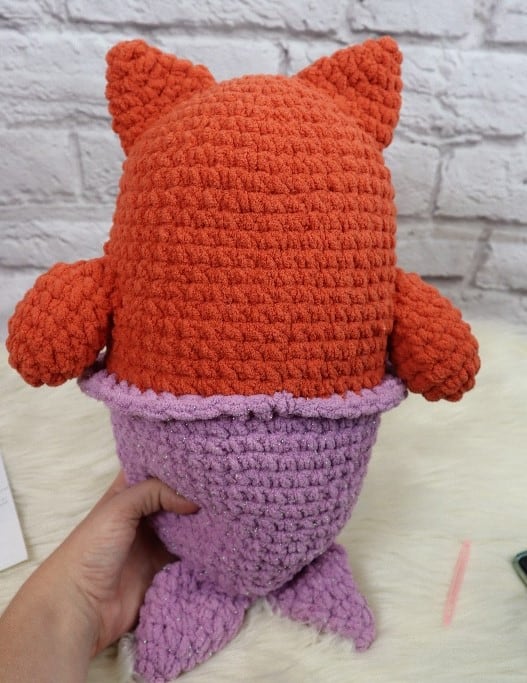
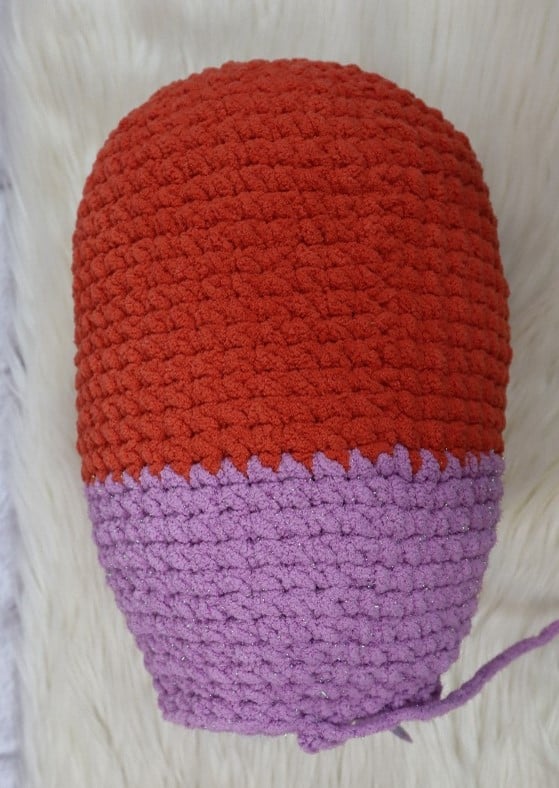
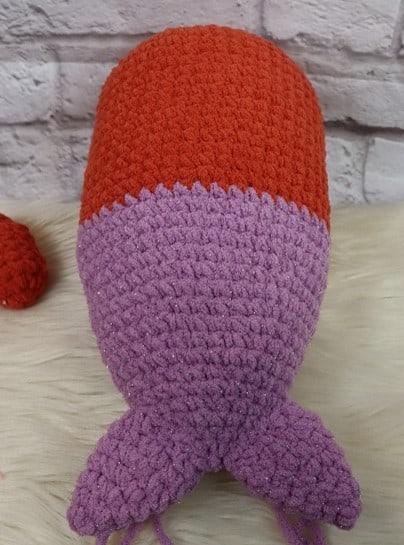
At this point, your Purr-maid body should look like the photo to the right.
Next you will attach the shells to form the shell bra. This part is optional (if you want your Purr-maid to appear more masculine, you don’t have to add the shell bra).
I attached mine under Row 16 and approximately 2 stitches apart.
Facial Features
Eye template: Download Eye Template PDF
Cut out two of each piece and assemble as seen in the cover picture of the Purr-maid.
Using the template above, cut out your felt pieces and assemble them. I use hot glue to attach the pieces to the body, but you can sew them on or use another type of adhesive.
The eyes will fall right under Row 8 and be about 5 stitches apart. The cheeks will go right under the eyes and the inner ear pieces will go smack dab in the middle of the ears.
I like to pin all the facial features into place before I glue them down to make sure nothing is wonky or lopsided.
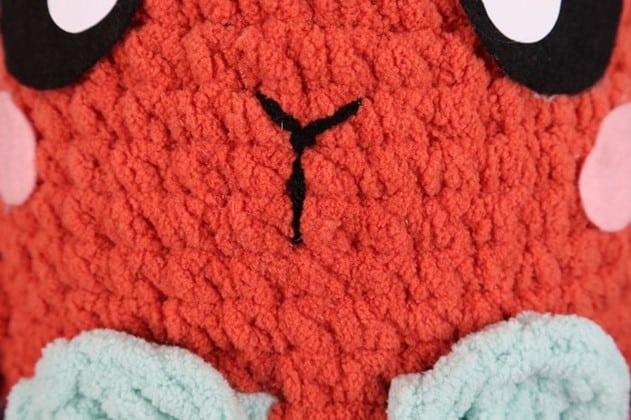
Once your face pieces are secured, you will create the mouth and nose with a strand of black, worsted weight yarn (about 12 inches long).
In between the eyes, and starting at the top of the row where the eyes end, you will embroider a Y shape with the worsted weight yarn. The top of the Y should start around Row 13, but you can absolutely make it lower if you would like.
Once you’ve embroidered the Y, cut and weave in your ends.
Your wonderful, Purr-maid is now ready to make a splash wherever it goes!
You can absolutely sell what you make from this pattern, but please give design credit to Fanatical Fibers. You may not sell or otherwise distribute this pattern.
If you have any questions, please do not hesitate to contact me (fanfibers@gmail.com)
Feel free to tag me on social media with your finished projects- I love seeing people get creative with their pieces!