How to Make a Pom-Pom Crown by A Crafty Concept
Hello yarn enthusiast! My name is Ashley and I am the lady behind the hook at A Crafty Concept. A Crafty Concept is a crochet blog dedicated to providing makers with the free tools and resources they need to start and grow their handmade businesses.
I love designing crochet patterns my fellow mompreneurs can use to create beautiful pieces to sell in their online shops and at markets! My designs have sellers and gifters in mind so they’re usually simple to make, work up quickly and use little materials.
This post may contain affiliate links, meaning I may recieve a small commission from purchases made at no extra cost to you.

For today, I have teamed up with my friends here at Clover to bring you guys a super fun tutorial using Clover’s Pom-Pom Makers.
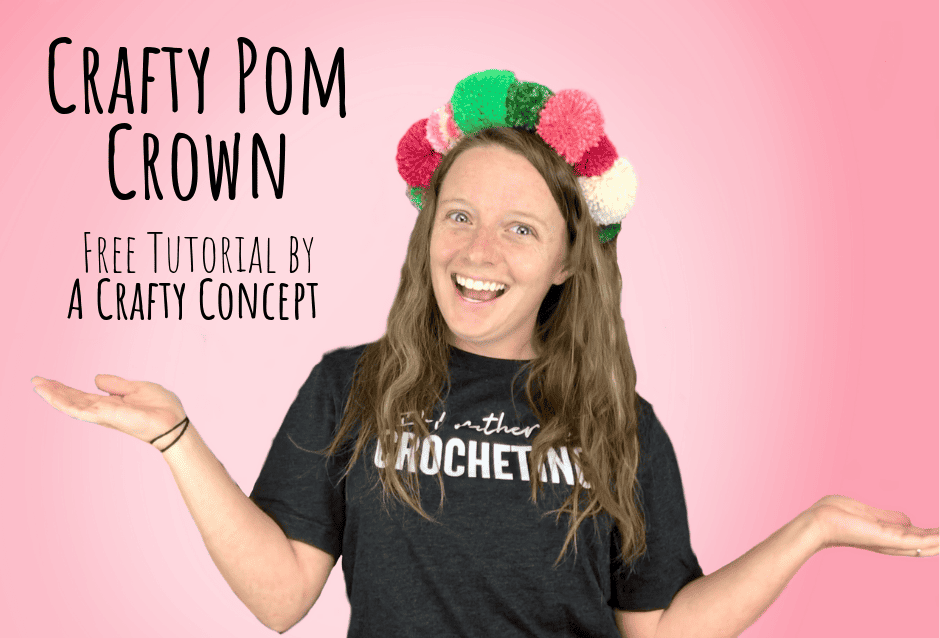
The Crafty Pom Crown is a fun project that is sure to turn heads! I usually wear mine when I go to birthday parties, or when I’m working at a craft festival! It’s a great conversation starter.
Let’s get into the tutorial
Materials
- Yarn- You can use any yarn you’d like! I will be using worsted weight yarn for my crown. If you need help coming up with color combos this post from The Crafty Fox Crochet is excellent!
- Pom-Pom Maker Set (Art. No 3129) – I will be using the 65mm and the 45mm sizes.
- Scissors-the sharper the better
- Tapestry Needle
- Amour Crochet Hook (Art. No 1047/H)– I am using a size H or 5.0mm but you can use any size hook for this tutorial.
You can watch the full video on my YouTube channel
Tutorial
Using your 65mm Clover Pom-Pom Maker and the yarn of your choice, open the pom maker arm and begin wrapping your yarn around the arm.

I like to count how many passes I do on each arm so both sides of the pom will be pretty even.
Once you fill-up the first arm of your pom maker, close that arm back in and start wrapping your yarn around the second arm of the pom maker.

After you’ve completed the same number of passes on the second arm as you did on the first arm. Cut your yarn.
Using your sharp scissors, run your scissors along the pom maker, between the two sections, and cut apart all the yarn you just wrapped. Do this around both arms.


Cut a piece of yarn (10-12 inches) in the same color as your pom-pom.
Wrap the yarn around where you just cut the pom-pom, and pull it into the inside of the pom maker so it is hugging around the yarn.
Tie a knot as secure as you can. I like to knot on one side of the pom, then wrap my yarn to the other side and knot it again.

Pull apart the two body pieces to the pom-pom maker and release your yarn pom.

Hold onto the tails created when you tied your knot, and give your pom-pom a good shake.

Using your extra sharp scissors, trim any straggly bits of your pom. Be careful with this part, it’s easy to get carried away then you will have a bald pom-pom.

Repeat the steps until you have 4 big poms and 5 smaller poms.
After you make all your poms, line them up in the order you would like for them to go on your finished pom-pom crown.

Now let’s make the headband portion.
Using your crochet hook and any color of yarn, chain a length that’s long enough to fit around your head and tie in a bow.
For reference, I chained 125 and my whole chain was about 43 inches long (unstretched). I have a 21.5″ – 22″ head.

After your chain is long enough, cut your yarn and tie off.
Thread the end of your chain onto your tapestry needle.
Grab your first pom, and feel for where all the yarn in clinched together in the middle of your pom.

Push your tapestry needle (attached to your chain) into the center of the clinch, and thread on your pom-pom.
Continue threading the rest of your pom-poms on your chain.

After all your poms are on your chain headband, you can trim off the tails that were made when you tied the poms together.
I like to trim mine so they are about the same size as the yarn around them and blend right in.

That’s all there is to it! Now you have a super festive Crafty Pom Crown to wear to your next party, event or craft fair!
If you want to see how I put my Crafty Pom Crown on, skip to the end of the video at the beginning of this post. I, quite awkwardly, show how I wear them there?
I hope you guys love this tutorial! If you are a crocheter be sure to check out my blog, A Crafty Concept. I have a lot of FREE CROCHET PATTERNS over there and I add more every week! Also, you are welcome to sign up to The Crafty Newsletter! I send out free “handmade with love” wrap labels every Wednesday that you can print off and cut out and use for packaging your handmade goodies!
Last thing before I go, if you want to get a look behind the curtain and see what life is like for a handmade mompreneur, be sure to check out my Instagram page. I post just about every day on my feed and in my stories!
Thank you so much for letting me hang out with yall today! I can’t wait to see your Crafty Pom Crowns all over social media!!

Happy Making
Ashley
Find Ashley on Facebook | Instagram | Pinterest | YouTube | Etsy
Stay connected with us on Facebook | Twitter | Instagram | Pinterest | YouTube
[ctct form=”10190″]