Giant Strawberry Crochet Pattern
Hello! It’s Amy from @curiouspapaya and this month is all about the strawbs. Strawberry ice cream, strawberry pie, strawberry cake… I’m a firm believer that you just can’t go wrong with strawberry. Try to prove me wrong!
Here’s a super easy/fun make for everyone prepping for their upcoming markets. This pattern contains modifications so that you can use any yarn to make it. With thinner yarn, it’ll come out a little shorter and squat-er. And that’s the fun part! Strawberries come in all different shapes and sizes. No matter what you choose to use, it takes up around the same amount of time.
Time: ~2-3 hrs
NOTES:
- We will be working in a continuous rounds (a spiral).
- This pattern is written in US terminology.
- Gauge: Gauge is not particularly important for amigurumi, but please note that if using a slightly different material or hook from what’s prescribed, your creation may come out a different size than what I’ve indicated in the guide below.
- Difficulty: Intermediate-beginner + due to the leaves involving hdc, dc, and trc stitches.
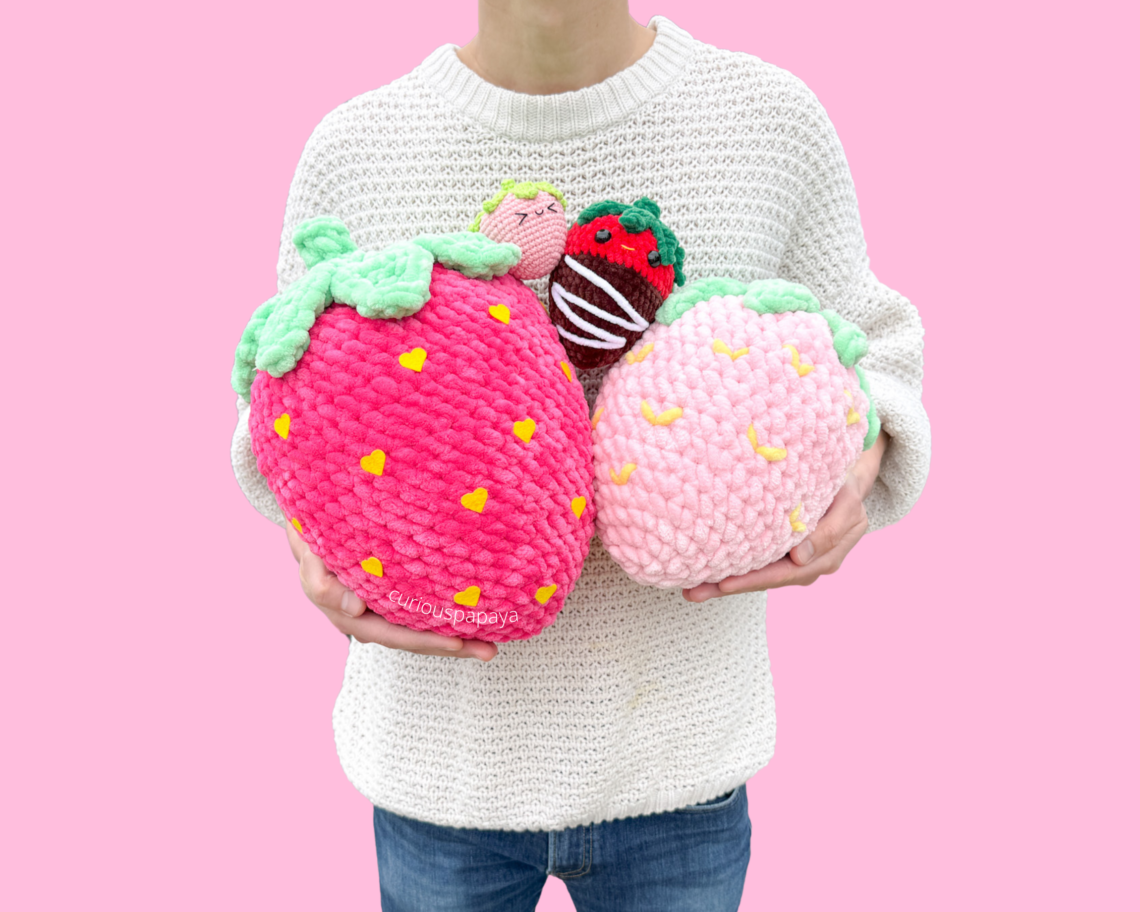
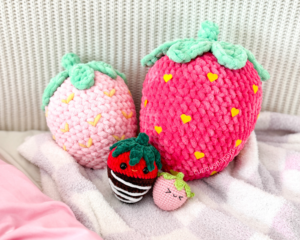
SIZE VARIATIONS/MATERIALS:
*Note: The first three size variations use the “Giant Strawberry“ base pattern and have the modified materials listed. The jumbo (hot pink) strawberry has a modified stitch count to make it extra chunky. It’s interesting to note how the shape becomes shorter/wider when using medium worsted/light worsted yarn with the same pattern. This is due to the stitches being “taller” with chunky yarn.
- GIANT STRAWBERRY (base pattern) – 11 in. x 7 in. [~28 cm x ~18 cm]
- #7 jumbo yarn – Premier Parfait Chunky XL
- 1 skein of Bubblegum – (light pink color) – 5.2 oz [~147 g]
- 1 skein of Key Lime – (light green color) – 1.2 oz [~33 g]
- 1 skein of Sunshine – (yellow color) – 0.2 oz [~6 g]
- 9 mm hook
- Scissors, stitch markers, yarn needle
- Fiber fill stuffing -15 oz [~425 g]
- #7 jumbo yarn – Premier Parfait Chunky XL
- CHOCOLATE-DIPPED STRAWBERRY – 5 in. x 3.5 in. [~13 cm x ~9 cm]
- #6 super bulky yarn – Premier Parfait Chunky
- 1 skein of Cardinal – (red color) – 0.4 oz [~11 g]
- 1 skein of Chocolate – (brown color) – 0.5 oz [~14 g]
- 1 skein of White – 0.04 oz [1 g]
- 1 skein of Emerald – (green color) – 0.35 oz [10 g]
- 4.5 mm hook
- Two 12 mm safety eyes
- Yellow embroidery thread
- Scissors, stitch markers, yarn needle, UHU fabric glue
- Fiber fill stuffing -1 oz [~28g]
- #6 super bulky yarn – Premier Parfait Chunky
- PALM-SIZED STRAWBERRY – 2.25 in. x 2.5 in. [~6 cm x ~6 cm]
- #3 light worsted yarn – Hobbii Rainbow Cotton 8/8
- Pastel Pink (042) – 0.71 oz [20 g]
- Green (084) – 0.28 oz [8 g]
- 2.75 mm hook
- #3 light worsted yarn – Hobbii Rainbow Cotton 8/8
-
- Felt facial features – 6 mm “Kawaii face” by CrochicStyles – OR – two 8 mm safety eyes and Dark Brown embroidery thread for the mouth instead
- Yellow embroidery thread
- Scissors, stitch markers, yarn needle, UHU fabric glue
- Fiber fill stuffing – 0.3 oz [~8.5 g]
- JUMBO STRAWBERRY – 12 in. x 8.5 in. [~30 cm x ~22 cm]
- #7 jumbo yarn – Premier Parfait Chunky XL
- 2 skeins of Hibiscus – (hot pink color) – 8.7 oz [~247 g]
- 1 skein of Key Lime – (light green color) – 2 oz [~57 g]
- #4 medium worsted yarn – Big Twist Value Yarn
- ~2 ft [~61 cm] of Light Green yarn for sewing
- 9 mm hook
- Scissors, stitch markers, yarn needle, UHU fabric glue
- Fiber fill stuffing -16 oz [~455 g]
- Yellow felt for the heart seeds – here, I used my Cricut machine to cut these out. You can also embroider the hearts as the Light Pink Giant Heart has with Sunshine yellow Parfait Chunky XL yarn.
- #7 jumbo yarn – Premier Parfait Chunky XL
ABBREVIATIONS:
- blo – back loops only
- ch – chain
- dc – double crochet
- dec – decrease
- flo – front loops only
- hdc – half double crochet
- inc – increase
- sc – single crochet
- slst: slip stitch
- st(s): stitch(es)
- trc: treble crochet
- rnd(s): round(s)
- [#]: stitch count
- (…) x #: repeat instructions the number of times
TIPS:
- Use stitch markers to keep track of the beginning of each round (especially important since this fuzzy chenille yarn can make it difficult to see).
- Use knitting needles (or chopsticks) when using chunky yarn to position parts on evenly.
- Fluff up your stuffing by pulling it apart and inserting it little by little to make your amigurumi more even. Stuff it some more right before closing using the tips of your scissors for a firmer shape.
- Note that my patterns written in chunky yarn may work up differently in medium or light worsted yarn. This is due to the stitches being “taller” in chunky yarn.
- Experiencing some loose fibers when cutting the yarn is normal. A solution is to carefully singe the ends with a lighter to seal the tails before sewing.
- Sewing with chenille yarn tends to be tricky because it will shed off of the center stem. I recommend using acrylic yarn to attach pieces because it’s stronger and it saves on the more expensive yarn!
- If you are experiencing breakage when trying to pull your magic circle closed, create the starting ring with the “ch 2″ method. Watch my tutorial HERE.
PATTERN:
*If you prefer the printable premium PDF instead, you can find it HERE. Thank you for supporting my designs!
GIANT STRAWBERRY (base pattern):
- Using your Clover Amour 9 mm Hook and Bubblegum yarn
- rnd 1: make a magic circle and (sc) x6 [6]
- rnd 2: (inc) x6 [12]
- rnd 3: (sc, inc) x6 [18]
- rnd 4: (2 sc, inc) x6 [24]
- rnd 5: (3 sc, inc) x6 [30]
- rnd 6: sc all around [30]
- rnd 7: (4 sc, inc) x6 [36]
- rnds 8-9 (2 rnds total): sc all around [36]
- rnd 10: (5 sc, inc) x6 [42]
- rnds 11-14 (4 rnds total): sc all around [42]
- rnd 15: (5 sc, dec) x6 [36]
- rnd 16: (4 sc, dec) x6 [30]
- rnd 17: (3 sc, dec) x6 [24]
- rnd 18: (2 sc, dec) x6 [18]
Stuff.
- rnd 19: (sc, dec) x6 [12]
Fasten off and leave a tail for sewing. Go through the flo with your yarn needle and pull the hole closed.
*Tip: Closing up the piece at larger increments will help us create a flatter surface! Gently tug every 3 loops to ensure the yarn doesn’t break.
*Scroll down for the leaves instructions/assembly!
SEEDS:
- Using your Clover Amour Darning Needle Sunshine yarn
- Step 1: Cut a long strand of Sunshine yarn and embroider ~15 “v” shapes on the strawberry, 2 sts wide, 1 st tall.
- Step 2: Secure the yarn tails into a knot and weave them in. [img]
MODIFICATIONS
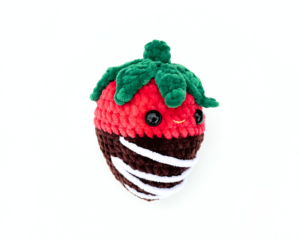
CHOCOLATE-DIPPED STRAWBERRY:
- Using your Clover Amour 4.5 hook and starting in Chocolate yarn
- Follow the base pattern instructions in the corresponding yarn and hook. Pause before rnd 12 and follow the modifications below.
- Change to Cardinal yarn and cut off the Chocolate yarn.
- Work rnd 12 in blo.
- Insert safety eyes between rnds 13-14, 7 sts apart.
- Mouth: Cut a strand of Yellow embroidery thread and create a smile 2 sts wide.
- *Tip: Lightly coat the thread in fabric glue to keep the threads from splitting before using.
- Follow the base pattern instructions for the leaves and assembly.
- Icing: Cut a strand of White yarn and weave it in a zig zag motion. Be organic with it! [img]
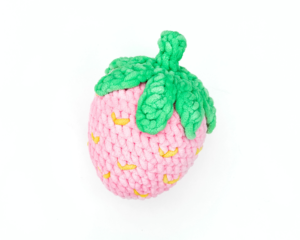
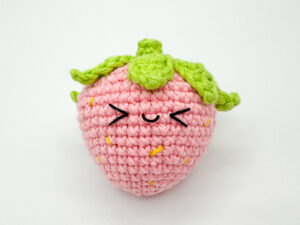
PALM-SIZED STRAWBERRY:
- Using your Clover 2.75 mm hook and Pastel Pink yarn
- Follow the base pattern instructions in the corresponding yarn and hook.
- I used felt facial details (see materials for the exact ones I used) for this variation and glued them on spanning rnds 11-12, 8 sts wide.
- If using safety eyes, insert them between rnds 11-12, 7 sts apart. Embroider the mouth as well.
- Mouth: Cut a strand of Dark Brown embroidery thread and create a smile, 2 sts wide. Do not cut the thread.
- *Tip: Lightly coat the thread in fabric glue to keep the threads from splitting before using.
- Seeds: Cut a strand of Yellow embroidery thread and create the seeds, 1 st wide. Weave in different directions creating diagonal lines as well.
- Follow the base pattern instructions for the leaves and assembly. [img]
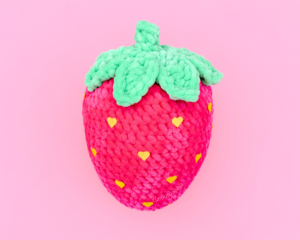
JUMBO STRAWBERRY:
- Using your Clover Amour 9mm Hook and Hibiscus yarn
-
rnd 1: make a magic circle and (sc) x6 [6]
-
rnd 2: (inc) x6 [12]
-
rnd 3: (sc, inc) x6 [18]
-
rnd 4: (2 sc, inc) x6 [24]
-
rnd 5: (3 sc, inc) x6 [30]
-
rnd 6: (4 sc, inc) x6 [36]
-
rnd 7: sc all around [36]
-
rnd 8: (5 sc, inc) x6 [42]
-
rnds 9-10 (2 rnds total): sc all around [42]
-
rnd 11: (6 sc, inc) x6 [48]
-
rnds 12-15 (4 rnds total): sc all around [48]
-
rnd 16: (7 sc, inc) x6 [54]
-
rnds 17-19 (3 rnds total): sc all around [54]
-
rnd 20: (7 sc, dec) x6 [48]
-
rnd 21: (6 sc, dec) x6 [42]
-
rnd 22: (5 sc, dec) x6 [36]
-
rnd 23: (4 sc, dec) x6 [30]
Stuff.
-
rnd 24: (3 sc, dec) x6 [24]
-
rnd 25: (2 sc, dec) x6 [18]
-
rnd 26: (sc, dec) x6 [12]
Fasten off and leave a tail for sewing. Go through the flo with your yarn needle and pull the hole closed.
Seeds: Cut out ~25 hearts [1 cm x 1 cm] with Yellow felt. (A Cricut machine is handy for this job – but don’t sweat it if you don’t have one. You can choose to embroider them following the instructions from the base pattern). [img]
LEAVES
- Using your Clover Amour 9mm Hook and Key Lime yarn
BASE PATTERN:
- rnd 1: make a magic circle and 5 sc, slst into the center of the circle (not into the first st) [6]
- rnd 2: (blo) – sc all around [6]
- rnd 3: (2 sc, inc) x2 [8]
- rnd 4: (flo) – (slst into the next st, ch 7, starting from the second ch from the hook, slst, hdc, dc, trc, dc, hdc) x8, slst into the first st [no st count]
*Note: The leaves may overlap a bit which is what we want!
Lightly stuff the stem. Fasten off and leave a short tail (we will use acrylic yarn for sewing). [img]

JUMBO STRAWBERRY LEAVES MODIFICATION:
- Follow the instructions for the base pattern above but do not fasten off the yarn after rnd 4.
- Continue onto the additional rnd below to make the leaves broader.
- rnd 5: sc a border around each of the leaves. For each of the tips, work a *sc, ch 1, sc* into the same st. [no st count] [img]


ASSEMBLY:
- Step 1: Use sewing pins (or knitting needles if available) to position the leaves onto the top of the strawberry.
- Step 2: Cut ~2 ft [~61 cm] of Light Green medium worsted yarn for sewing.
- Step 3: Sew each leaf down where the dotted line indicates all the way around. Leave the tips unsecured so that they flare out. [img]
- *Tip: Be sure to tug firmly so that the medium worsted yarn isn’t visible.

- Step 4: Secure the yarn tails into a knot and weave them into the strawberry.
You’re finished! We’d love to see your creations over on Instagram. Tag your creations with #cloverusa and #curiouspapaya to be featured.
If you want to keep up with me, Amy, on social media for other fun projects, follow me on: Instagram
If you want to keep up with all things Clover, follow us on: Facebook | Twitter | Instagram | Pinterest | YouTube | Ravelry