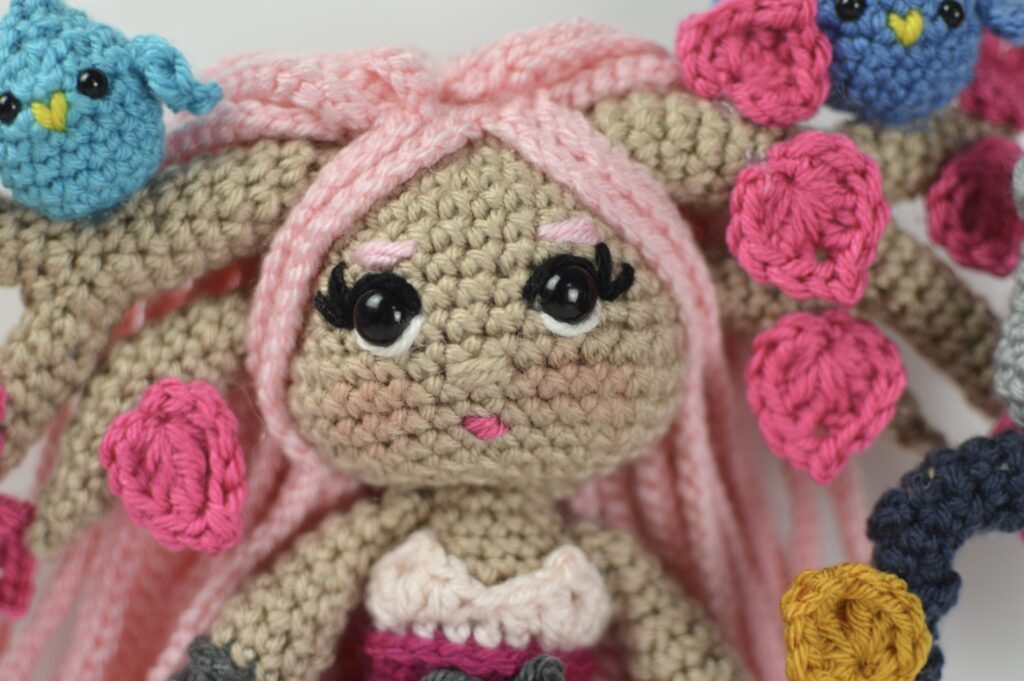
Matilda Migurumi, the Tree Elf *amigurumi crochet*
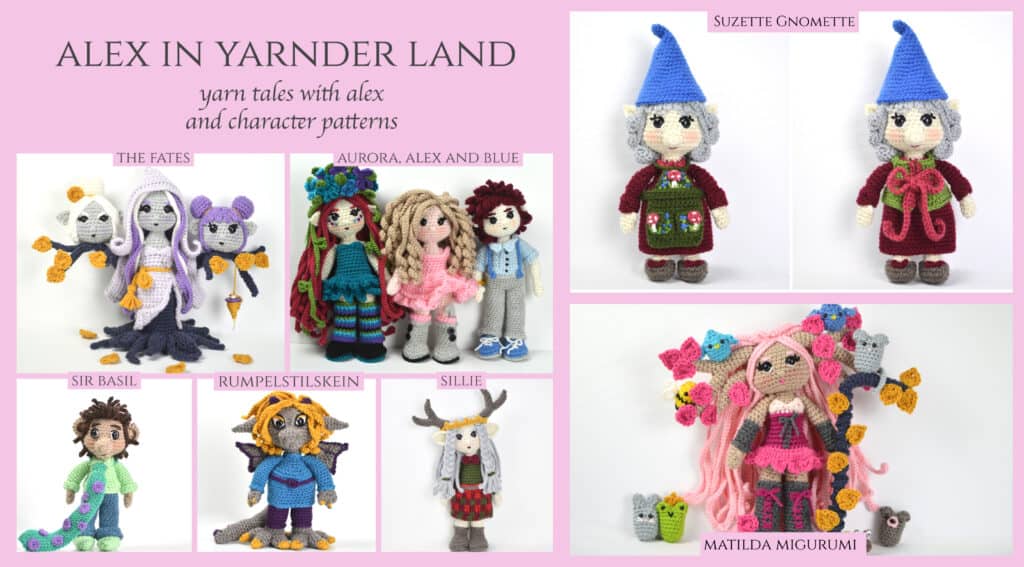
Hello to you all! It’s been a little while but I’m so excited to be back on Clover’s blog today with a new, free amigurumi pattern! I’m Alex, the crochet and tunisian crochet designer, storyteller and tutorial maker behind With Alex. Over the past year, I have collaborated with Clover to release a series of characters from my Alex In Yarnder Land Series and today I’m extremely thrilled to share the newest character, Matilda Migurumi! Matilda Migurumi is a very special character that uses her crochet abilities and magic to create forest animals and then bring them to life. Her fuzzy, furry, and cute friends keep her company but they also help her out whenever they can with secret messages, special deliveries and valuable information.
Amigurumi is a Japanese word that means crocheted or knitted animals and dolls. The pronunciation of amigurumi can be very different depending on what region and language is being spoken. For american english, the pronunciation is ah-mee-guh-ROO-mee but I have heard it spoken several different ways. If you say Matilda Migurumi together, the word amigurumi is heard, which is perfect for her since it is her specialty!
For more information on the Alex In Yarnder Land Series, visit my blog post on the With Alex Blog, here.
I had so much fun designing Matilda and all of her little animal friends with my Clover Amour Size G 4.00 mm crochet hook! Crocheting small animals can be hard on fingers and wrists but the soft handle on my Clover Hook keeps the pain away and keeps the fun coming! Yarn glides over this hook incredibly easily and it’s also very lightweight, which I absolutely love.
The Alex In Yarnder Land Series have been designed with Universal Yarn Uptown Worsted. I chose this yarn because of all of the gorgeous colors to choose from and it’s so soft and fun to work with. I needed a lot of pretty pink yarns for Matilda and Uptown Worsted did not disappoint. The pinks are absolutely beautiful and perfect!

NOTES:
- Difficulty: Advanced/Intermediate
- Size: 13.5″ tall
MATERIALS:
- Amour Crochet Hook (4.0 mm)
- Universal Yarn Uptown Worsted
- black
- glow white
- granite
- acorn
- linen
- baby pink
- blush
- cherry
- dijon
- lime green
- yellow
- turquoise
- electric blue
- river
- silver grey
- umber
- polyester fiberfill
- Stitch Markers
- Patchwork Scissors
- Darning Needle
- eyes:
- Matilda: 12 mm safety eyes
- Bee, Bear, Frog, Bird, Bunny, Mouse: 6 mm safety eyes
- Snail: 6 mm googly eyes
- fabric glue
- Patchwork Pins (Fine)
- hot glue and glue gun
- 9″ chopstick
ABBREVIATIONS:
- sc: single crochet
- 2sc: single crochet increase
- inv sc dec: invisible single crochet decrease
- st(s): stitch(es)
- sl st: slip stitch
- ch: chain
- sk: skip
- yo: yarn over
- yu: yarn under
- FLO: front loop only
- BLO: back loop only
- dc: double crochet
- 3dc: double crochet increase of 2
- 4dc: double crochet increase of 3
SPECIAL STITCHES:
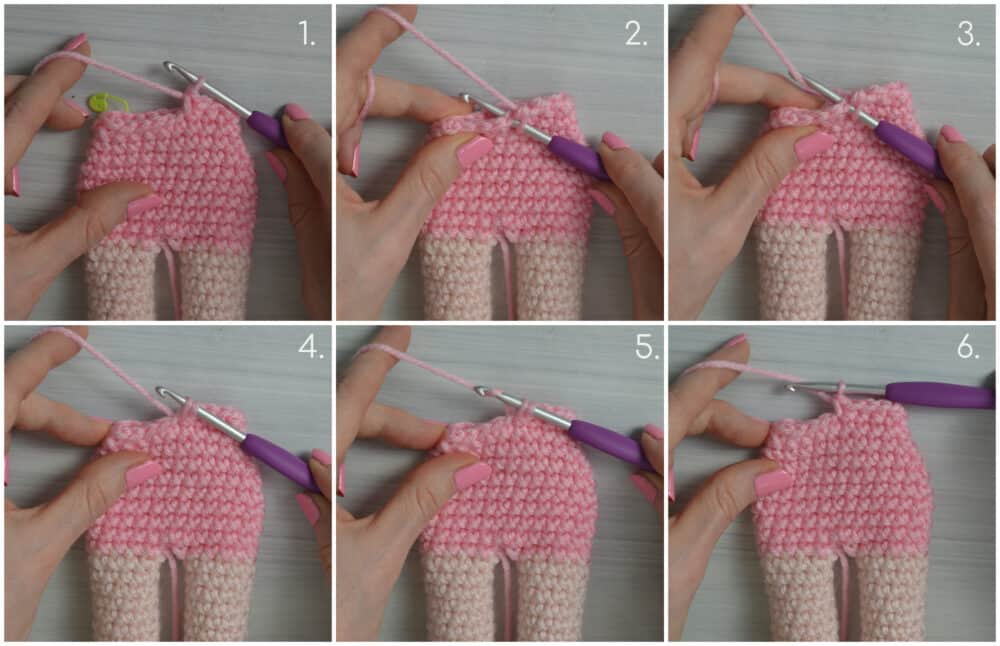
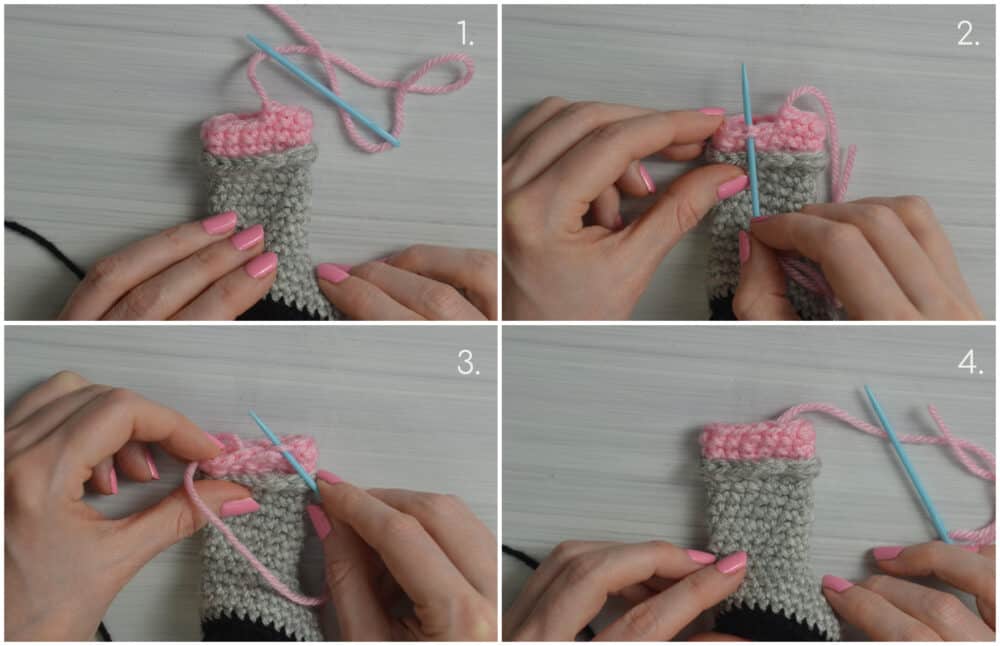
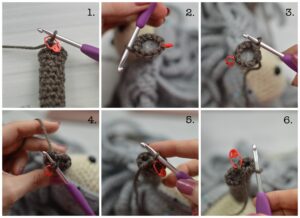
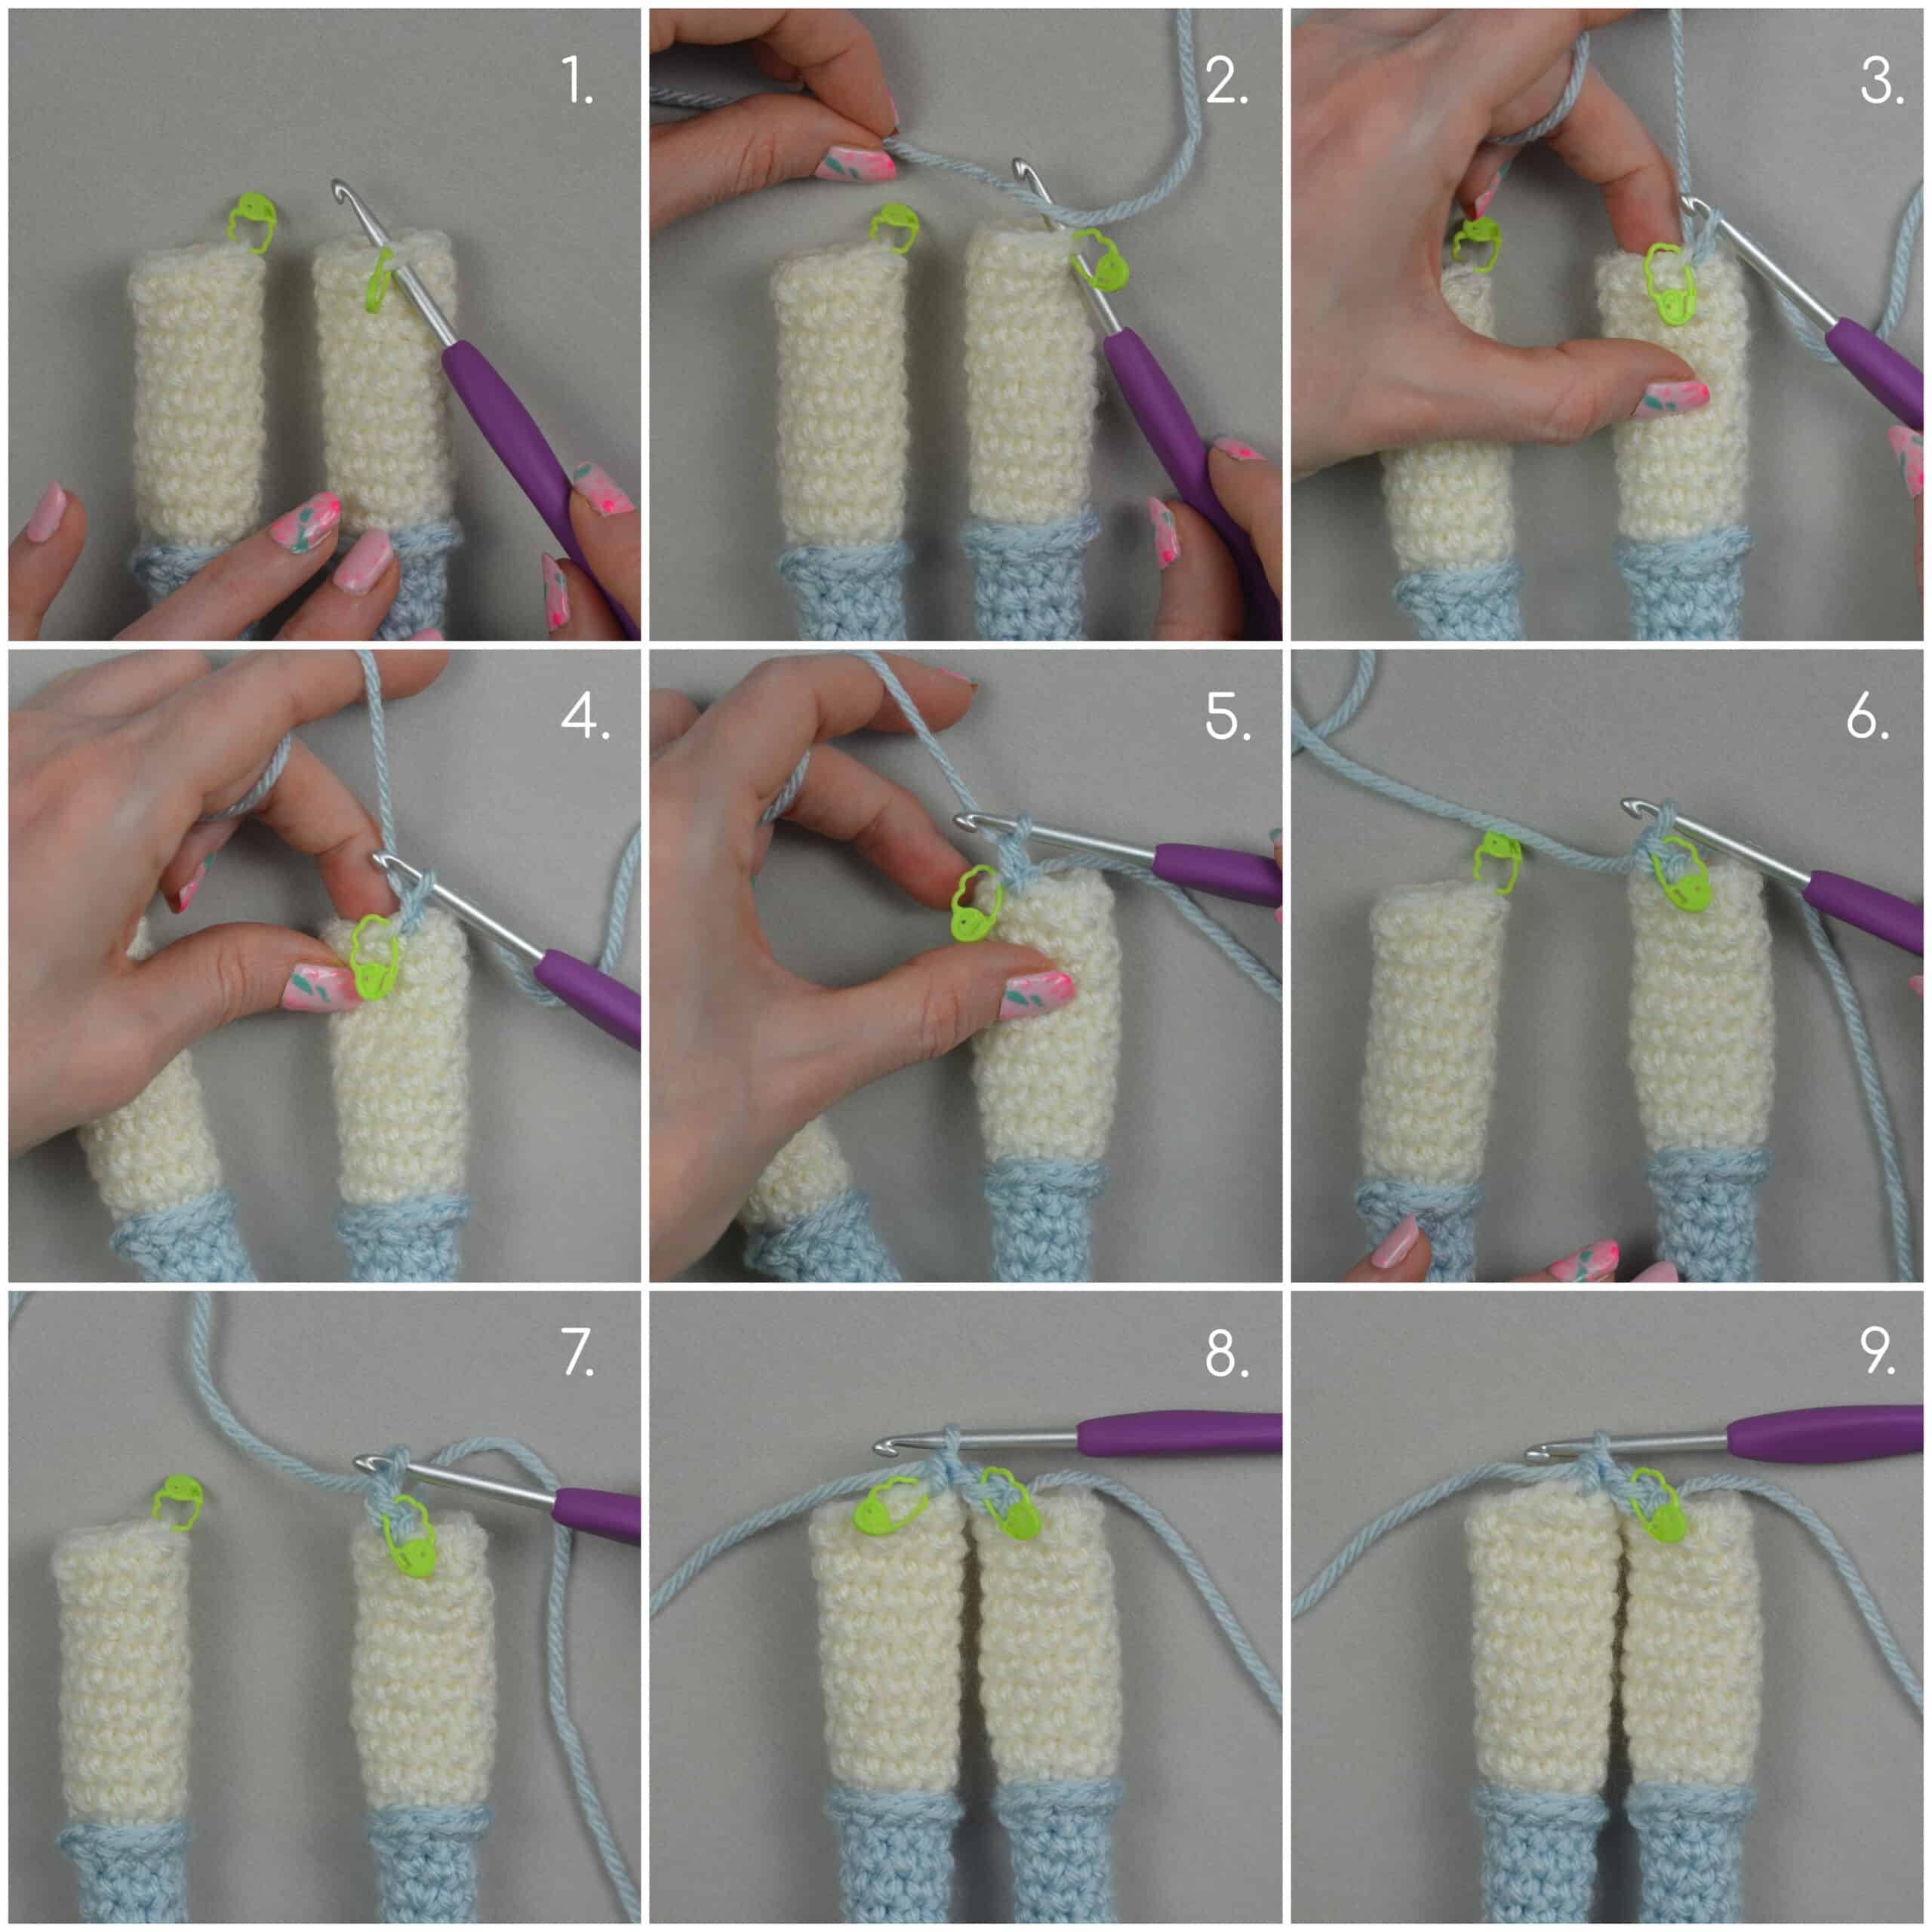
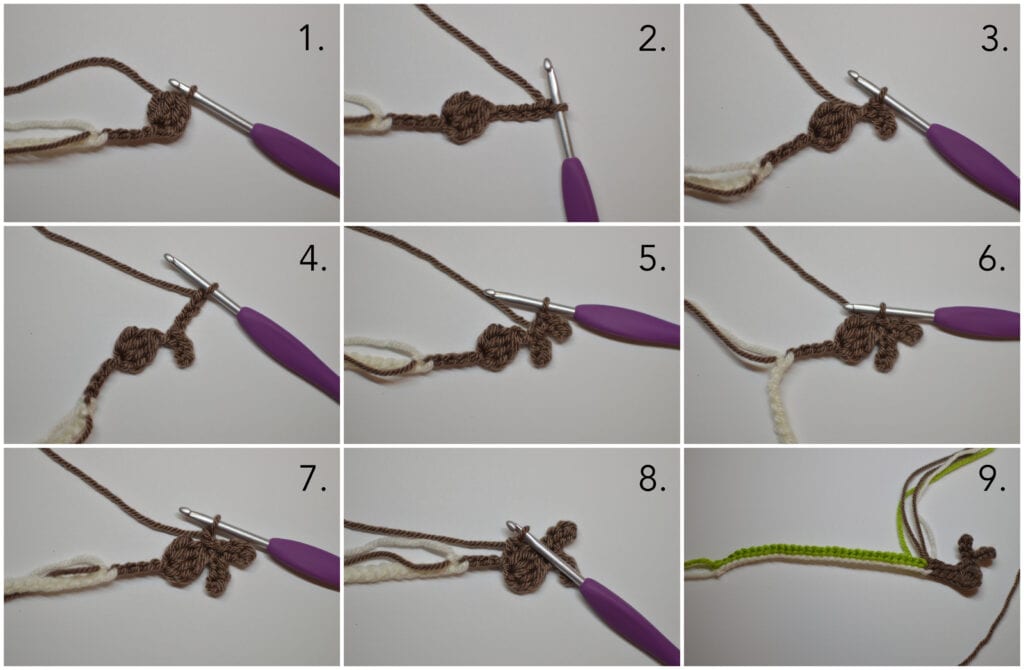
- invisible single crochet decrease (inv sc dec): insert the hook into the front loop only of the next 2 stitches (image 2), yarn under (image 3) and pull up a loop (image 4), yarn over (image 5) and pull through all of the loops on the hook. (image 6)

- single crochet (sc): insert the hook into the next stitch (image 2), yarn under (image 3) and pull up a loop (image 4), yarn over (image 5) and pull through all of the loops on the hook. (image 6)
- invisible join: Skip the stitch next to the last stitch made and insert the needle through the next stitch (image 2), pull through and insert the needle into the back loop only of the last stitch made (image 3) and pull through.
- cluster: *Yarn over and insert the hook into the stitch, yarn over and pull up a loop. Repeat from the * 2 more times, yarn over and pull through all of the loops on the hook.
VIDEO TUTORIALS:
TIPS:
- This pattern is worked in a continuous round (in a spiral) unless otherwise noted. Mark the beginning of each round with a stitch marker.
- No gauge for this pattern but make sure to stay consistent with your stitches.
- You will need more than one stitch marker.
- Use the handle of the crochet hook or a chopstick to help with stuffing the doll with fiberfill.
PATTERN:
- NOTE: Some photo tutorials in this pattern are a different color to be seen better and some photo tutorials in this pattern are from other amigurumi doll patterns I have in the “Alex In Yarnder Land” series, but they teach the same things!
HEAD:
- with acorn yarn:
-
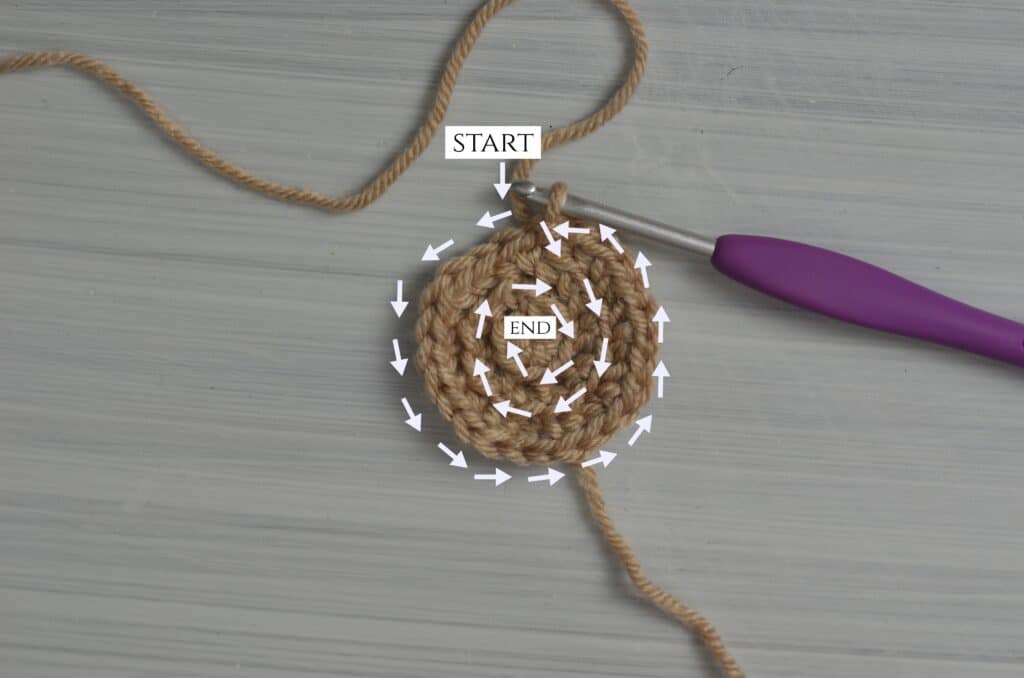
- R1: Make a magic ring or a loose slip knot, ch 1 and put 8 sc into the magic ring or loose slip knot. =8
- Pull on the tail end to close the hole.
- R2: 2sc into each st around. =16
- R3: *2sc into the next st, sc into the next st. Repeat from the * around. =24
- R4: sc into the next 6 sts, ch 2, sk 2, sc into the next 8 sts, ch 2, sk 2, sc into the next 6 sts. =24
- The holes created from the chain spaces will be used later to crochet the tree limbs.
- R5: *2sc into the next st, sc into the next 2 sts. Repeat from the * around, working into the BLO of the chs. =32
- R6-R8: sc into each st around. =32
- Weave in the end and flip right side out. Start stuffing the head with polyester fiberfill.
- R9: sc into the next 9 sts, ch 1, sk 1, sc into the next 6 sts, mark the middle of the 6th st with a new st marker, sc into the next 5 sts, mark the middle of the 5th st with another st marker, sc into the next 5 sts, ch 1, sk 1, sc into the next 5 sts. =32
-
- The two new stitch markers are marking where the eyes will go later and the holes created from the chain spaces will be used later to crochet the ears.
- R10: sc into the next 9 sts, sc BLO into the next ch, sc into the next 16 sts, sc BLO into the next ch, sc into the next 5 sts =32
- R11: sc into the next 12 sts, 2sc into the next 2 sts, sc into the next 8 sts, 2sc into the next 2 sts, sc into the next 8 sts. =36
- R12-R13: sc into each st around. =36
- Take the 2 stitch markers out of R9 and replace them with safety eyes.
-
- Continue stuffing the head as you continue the pattern.
- R14: sc into the next 12 sts, (inv sc dec) x2, sc into the next 8 sts, (inv sc dec) x2, sc into the next 8 sts. =32
- R15: *sc into the next 2 sts, inv sc dec. Repeat from the * around. =24
- R16: *sc into the next st, inv sc dec. Repeat from the * around. =16
- R17: inv sc dec, *sc into the next st, inv sc dec. Repeat from the * around until 2 sts remain, inv sc dec. =10
- Cut the yarn but leave the tail end long enough to sew to the body, pull through the last stitch and make an invisible join. Finish stuffing and shaping the head.
- Add eyebrows, a nose, mouth, details to the eyes and blush to the cheeks.
TREE LIMBS (make 2):
-
- Insert the hook into the bottom right corner of one of the holes left from R4. (image 1)

- with acorn yarn:
-
- R1: Pull up a loop, ch 1 (does not count as a st), sc into the same st and around five more times. =6 (image 2)
-
- R2: 2sc into the next st, sc into the next 2 sts, 2sc into the next st, sc into the next 2 sts. =8
- Weave in the end and stuff the antler with fiberfill as you continue with the pattern.
- R3-R10: sc into each st around. =8
- R11: 2sc into the next st, sc into the next 2 sts, 2sc into the next 2 sts, sc nto the next 2 sts, 2sc into the next st. =12
- R12: sc into the next 6 sts. =6 (image 1, 2, & 3)
- Continue to divide the two parts of the antler by only working into these 6 stitches. (image 4, 5, & 6)
-
- R13-R18: sc into each st around. =6
- R19: *inv sc dec. Repeat from the * around. =3
- Cut the yarn, pull through the last stitch and whip stitch around to close the hole.
- Make the second part to the antler by inserting the hook into an unworked stitch from R12.

-
- R12: Pull up a loop, ch 1 (does not count as.a st), sc into the same st, sc into the remaining 5 unworked sts. =6
- Weave in the end and continue working around in these 6 stitches.
- R13-R22: sc into each st around. =6
- R23: *inv sc dec. Repeat from the * around. =3
- Cut the yarn, pull through the last stitch and whip stitch around to close the hole.
- Weave in the ends.
EARS (make 2):
- with acorn yarn:
- R1: Starting at the bottom of the ear hole, insert the hook and ch 1 (does not count as a st), sc into the same st and 3 more times around. =4
- Weave in the end.
- Round 2: 2sc into each st around. =8
- R3 – R5: sc into each st around. =8
- R6: *2sc into the next st, sc into the next st. Repeat from the * around. =12
- R7: sc into each st around. =12
- R8: *inv sc dec, sc into the next st. Repeat from the * around. =8
- Start lightly stuffing with fiberfill.
- R9: sc into each st around. =8
- R10: inv sc dec, sc into the next 4 sts, inv sc dec. =6
- R11: sc into each st around. =6
- R12: *inv sc dec. Repeat from the * around. =3
- Stuff the ear. Cut the yarn, pull through the last stitch and whip stitch around to close the hole. Weave in the ends.
- Repeat for the second ear.
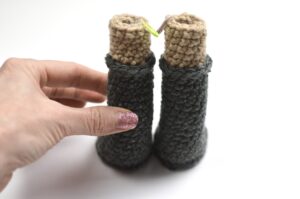
BOOT & LEG (make 2):
- with granite yarn:
- R1: Make a magic ring or a loose slip knot, ch 1 and put 10 sc into the magic ring or loose slip knot. =10
- Pull on the tail end to close the hole.
- R2: 2sc into each st around. =20
- R3: *2sc into the next st, sc into the next st. Repeat from the * around. =30
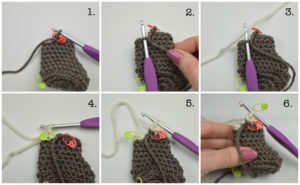
- R4: sc BLO into each st around. Mark the last FLO with a new st marker. =30 (image 1)
-
- R5: inv sc dec, sc into the next 11 sts, (inv sc dec) x2, sc into the next 11 sts, inv sc dec. =26
- Weave in the end and flip right side out.
- R6: sc into the next 9 sts, (inv sc dec) x4, sc into the next 9 sts. =22
- R7: sc into the next 7 sts, (inv sc dec) x4, sc into the next 7 sts. =18
- R8: sc into the next 5 sts, (inv sc dec) x4, sc into the next 5 sts. =14
- Start stuffing the boot with fiberfill and continue stuffing as you continue with the pattern
- R9-R19: sc into each st around. =14
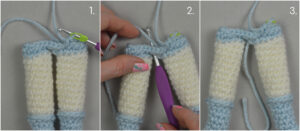
- R20: Take the hook out of the working yarn and drop the granite yarn but keep it at the front of the work. Insert the hook into the BLO of the next st (image 2), yo with the acorn yarn (image 3) and pull up a loop, ch 1 (does not count as a st), sc BLO into the same st (mark this st with a new st marker) (image 4) and sc BLO into the next 13 sts. =14 (image 5 & 6)
-
- Weave in the acorn yarn end.
- with the acorn yarn:
- R21: inv sc dec, sc into the next 3 sts, inv sc dec, sc into the next 3 sts, inv sc dec, sc into the next 2 sts. =11
- R22-R24: sc into each st around. =11
- LEG 1:
- R25: sc into the next 8 sts, mark the 8th st with the st marker, sc into the next 3 sts. Keep the st marker where it is. =11
- Cut the acorn yarn, pull it through the last stitch and make an invisible join before weaving in the end. Do not remove the stitch marker.
- Go back to R20 and put the working loop back on the hook. Continue with R20 below.
TOP OF THE BOOT:
- with the granite yarn:
- R20: sc FLO into each st around. =14
- Cut the granite yarn, pull it through the last stitch and make an invisible join before weaving in the end.
BOTTOM OF THE BOOT:
- with granite yarn:
- Go back to R4.
- R4: Hold the boot upside down, insert the hook into the marked st from R4, yo with granite yarn and pull up a loop, ch 1, sl st FLO into each st around, sl st to the 1st sl st of the round. =30
- Cut the yarn, pull it through the last stitch and weave in the ends.
- Finish stuffing the leg with fiberfill.
LEG 2:
-
- R25: sc into the next 3 sts, mark the 3rd st with the st marker, sc into the next 8 sts. Keep the st marker where it is. =11
- Cut the acorn yarn, pull it through the last stitch and make an invisible join before weaving in the end. Do not remove the stitch marker.
- Go back to R20 and put the working loop back on the hook. Continue with R20 below.
TOP OF THE BOOT:
- with the granite yarn:
- R12: sc FLO into each st around. =14
- Cut the granite yarn, pull it through the last stitch and make an invisible join before weaving in the end.
BOTTOM OF THE BOOT:
- with granite yarn:
- Go back to R4.
- R4: Hold the boot upside down, insert the hook into the marked st from R4, yo with granite yarn and pull up a loop, ch 1, sl st FLO into each st around, sl st to the 1st sl st of the round. =30
- Cut the yarn, pull it through the last stitch and weave in the ends.
- Finish stuffing the leg with fiberfill.
BODY & NECK:
-
- Hold leg 1 next to leg 2 with the feet facing away from you and the stitch markers in the middle.
- with blush yarn:
- (Leave the tail end long enough to sew the gap between the legs closed.)
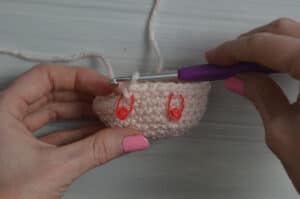
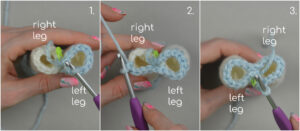
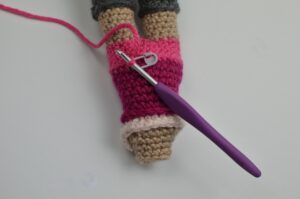
- R26: Starting on leg 1, insert the hook into the marked st (image 1), yo with the blush yarn (image 2) and pull up a loop (image 3), ch 1 (does not count as a st) (image 4), sc into the same st (image 5) and mark this st with the st marker (it is the new beginning of the round) (image 6), ch 1 (image 7), sc into the marked st on leg 2 (image 8), remove this st marker (image 9),
-
- sc into the next 10 sts on leg 2 (left leg) (image 1), ch 1, sc into the next 10 sts on leg 1 (right leg). (image 2 and 3) =24
-
- R27: sk the ch 1, sc into the next st, 2sc into the ch 1, sc into the next 11 sts, 2sc into the ch 1, sc into the next 10 sts. =26
- Pull the tail end through the gap between the legs.
-
- R28-R329: sc into each st around. =26
- R30: Take the hook out of the working yarn and drop the blush yarn but keep it at the front of the work. Insert the hook into the BLO of the next st, yo with the cherry yarn and pull up a loop, ch 1 (does not count as a st), sc BLO into the same st (mark this st with a new st marker) and sc BLO into each st around. =26
- with the cherry yarn:
- R31: sc into the next 8 sts, inv sc dec, sc into the next 11 sts, inv sc dec, sc into the next 3 sts. =24
- R32: sc into the next 8 sts, inv sc dec, sc into the next 10 sts, inv sc dec, sc into the next 2 sts. =22
- R33: sc into the next 7 sts, inv sc dec, sc into the next 9 sts, inv sc dec, sc into the next 2 sts. =20
- R34-R36: sc into each st around. =20
- R37: Take the hook out of the working yarn and drop the cherry yarn but keep it at the front of the work. Insert the hook into the BLO of the next st, yo with the linen yarn and pull up a loop, ch 1 (does not count as a st), sc BLO into the same st (mark this st with a new st marker) and sc BLO into each st around. =20
- R38: Take the hook out of the working yarn and drop the linen yarn but keep it at the front of the work. Insert the hook into the BLO of the next st, yo with the acorn yarn and pull up a loop, ch 1 (does not count as a st), sc BLO into the same st (mark this st with a new st marker) and sc BLO into each st around. =20
- with the acorn yarn:
- R39: sc into the next 7 sts, (inv sc dec) x2, sc into the next 5 sts, (inv sc dec) x2. =16
- Weave in the tail ends of yarn and start stuffing the body with polyester fiberfill. Continue stuffing the body while continuing with the pattern.
- R40: inv sc dec, sc into the next 4 sts, (inv sc dec) x2, sc into the next 4 sts, inv sc dec. =12
- R41: inv sc dec, sc into the next 3 sts, inv sc dec, sc into the next 5 sts. =10
- R42: sc into each st around. =10
- Cut the acorn yarn, pull it through the last stitch and make an invisible join before weaving in the end.
- Go back to R38 and put the linen working loop back on the hook. Continue with R38 below.
![]()
![]()
![]()

- with the linen yarn:
- R38: sc FLO into the next 11 sts, hdc into the next st, (dc, ch 2, sl st into the 2nd ch from the hook, dc) into the next st, hdc into the next st, sl st 2tog, hdc into the next st, (dc, ch 2, sl st into the 2nd ch from the hook, dc) into the next st, hdc into the next st, sc into the last st, sl st to the 1st st of the round. =23
- Cut the yarn, pull through the last stitch and weave in the end.
- Go back to R37 and put the cherry working loop back on the hook. Continue with R37 below.
- with the cherry yarn:
- R37: sl st FLO into each st around. =20
- Cut the yarn, pull through the last stitch and weave in the end.
SKIRT:
- with blush yarn:
- Hold the doll upside down and go back to the marked stitch in R30.
-
- R30: ch 1 (does not count as a st), sc FLO into the same st, sc FLO into each st around, sl st to the 1st st of the round. =26
- R31: ch 2 (does not count as a st), 2dc into the same st, 2dc into each st around, sl st into the 1st st of the round. =52
- R32: ch 1 (does not count as a st), sl st into the same st, *(sc, hdc, dc, ch 2, sl st into the 2nd ch from the hook, hdc, sc) into the next st, sl st 2tog, sl st into the next st. Repeat from the * around until 2 sts remain, sl st 2tog, sl st into the 1st st of the round. = 13 points
- Cut the yarn, pull through the last stitch and weave in the ends.
FIX THE LEG GAP:
-
- Use the tail end from the cherry yarn to sew the gap between the legs closed.

HAND & ARM (make 2):
- with acorn yarn:
- R1: Make a magic ring or a loose slip knot, ch 1 and put 8 sc into the magic ring or loose slip knot. =8
- Pull on the tail end to close the hole.
- R2-R4: sc into each st around. =8
- Weave in the end and flip right side out.
- R5: Cluster into the next st, sc into the next st, pop the cluster out to the right side to make the thumb, sc into the next 6 sts. =8
- R6: 2sc into the next st, sc into the next 6 sts, insert the hook into the next st, yu and pull up a loop, yo with granite, drop the acorn yarn and pull through the loops on the hook. =9
- with the granite yarn:
- R7: Mark the next FLO with a new st marker, sc BLO into the same st. sc BLO into each st around. =9
- Weave in the granite tail end. Start stuffing the hand and arm with polyester fiberfill and continue stuffing as you continue with the pattern.
- R8-R12: sc into each st around. =9
- R13: Take the hook out of the working yarn and drop the granite yarn but keep it at the front of the work. Insert the hook into the BLO of the next st, yo with the acorn yarn and pull up a loop, ch 1 (does not count as a st), sc BLO into the same st (mark this st with a new st marker) and sc BLO into each st around. =9
- R14: sc into each st around. =9
- R15: sc into the next 2 sts, inv sc dec, sc into the next 5 sts. =8
- R16: sc into each st around. =8
- R17: sc into the next 4 sts, inv sc dec, sc into the next 2 sts. =7
- R18: sc into each st around. =7
- R19: inv sc dec, sc into the next 5 sts. =6
- R20: sc into each st around. =6
- Cut the yarn, pull through the last stitch made and leave the tail end long enough to sew to the doll one row above the neckline.
- Go back to R13 and put the granite working loop back on the hook. Continue with R13 below.
- R13: sl st into each st around. =9
- Cut the yarn, pull through the last stitch, make an invisible join and weave in the end.
- Go back to the marked FLO of R7.
- R7: Insert the hook into the marked stitch, yo with granite yarn and pull up a loop, ch 1, sc FLO into the same st and sc FLO into each st around. =9
- Cut the yarn, pull through the last stitch, make an invisible join and weave in the end.
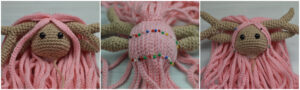
HAIR/WIG:
- with baby pink yarn:
- R1: Make a magic ring or a loose slip knot, ch 1 and put 8 sc into the magic ring or loose slip knot. =8
- Pull on the tail end to close the hole.
- R2: 2sc BLO into each st around. =16
- R3: *2sc BLO into the next st, sc BLO into the next st. Repeat from the * around. Sl st to the first st of the round. =24
-
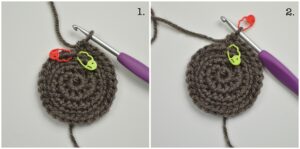
- R4: *ch 60 (image 1), 2sc into the 2nd ch from the hook, sl st into each ch across (image 2 and 3), sl st to the next st of the round on the circle. (image 4) (= 60 sts)
- Repeat from the * around. = 24 hair strands

-
- Continue working in the exposed front loops on the circle in a spiral until you get to the center.
-
- *ch 60, 2sc into the 2nd ch from the hook, sl st into each ch across, sl st to the next FLO from R3. (image 2, 3 and 4) Repeat from the * working in a spiral around until all of the remaining exposed FLO sts are worked into. = 48 hair strands total
- Cut the yarn and weave in the ends.
ATTACHING HAIR TO HEAD:
-
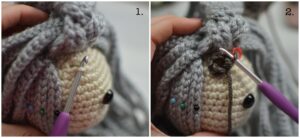
- Start by placing a pin through the top, center of the wig and then through the top, center of the head. (image 1) Continue with the back and use pins to hold in place. Continue around the sides.
- Use fabric glue to secure the hair strands. Pin after gluing and remove the pins after the glue has dried. After attaching the wig, twist each hair strand until wavy/curly.
-
- Sew the head to the neck of the body.
STAFF:
-
- Do not stuff the staff with fiberfill.
- with river yarn:
- R1: Make a magic ring or a loose slip knot, ch 1 and put 6 sc into the magic ring or loose slip knot. =6
- Pull on the tail end to close the hole.
- R2: sc into each st around. =6
- Weave in the end and flip right side out.
- Repeat R2 until the staff measures 9” long.
- Insert the chopstick into the staff and continue.
- Repeat R2 until the staff measures 12” long. Stuff the end with fiberfill. Whip stitch the hole closed. Cut the yarn, pull through the last stitch and weave in the end.
STAFF TEXTURE:
-
- Row 1: ch 150. =150
- Cut the yarn, pull through the last stitch, wrap around the staff and glue in place. Weave in the ends.
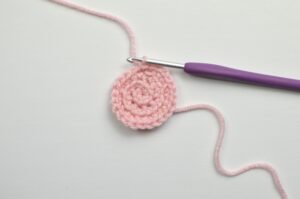
LEAF:
-
- R1: Make a loose slip knot or a magic ring, ch 1, (sc, hdc, 2dc, tc) into the loose slip knot or magic ring, ch 2, sl st into the 2nd ch from the hook, (tc, 2dc, hdc, sc, sl st) into the loose slip knot or magic ring. =11
- Pull on the tail end to close the hole. Cut the yarn and pull through the last stitch.
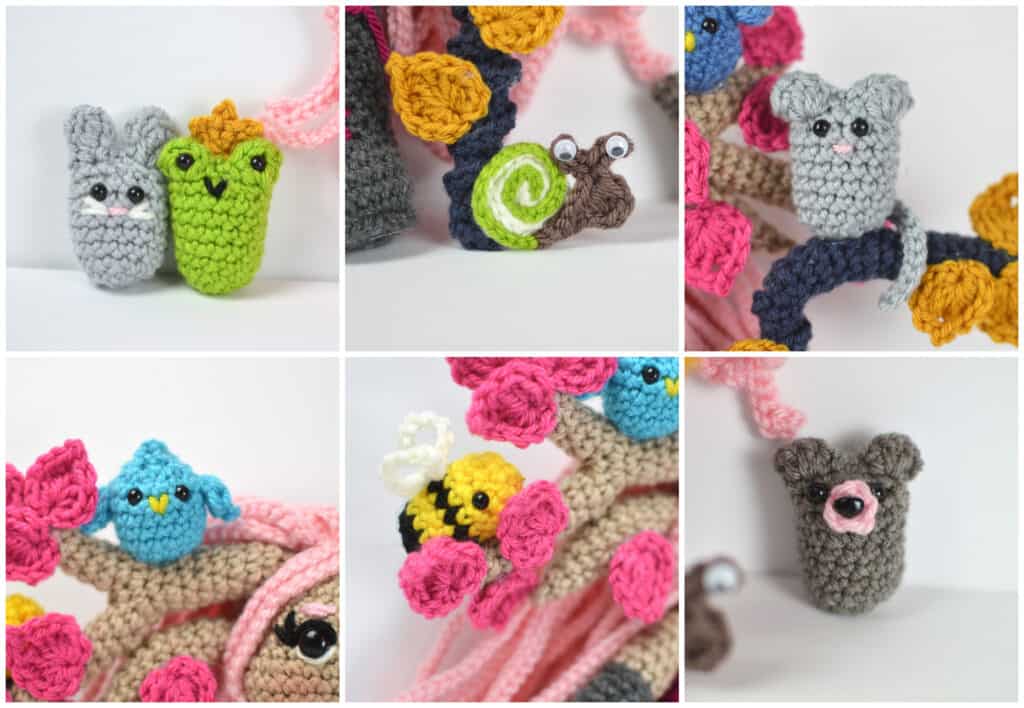
MATILDA’S ANIMALS:
SNAIL:
- with glow white yarn:
- Row 1: ch 30, yo with umber yarn and ch 8, working into the back humps of the chs, put a bobble st into the 3rd ch from the hook (image 1), ch 5 (image 2), sl st into the 2nd ch from the hook, sl st into the next 2 chs (image 3), ch 4 (image 4), sl st into the 2nd ch from the hook, sl st into the next 2 chs (image 5), sl st into the next ch (image 6), ch 1 (image 7), sc into the next 4 chs, insert the hook into the next ch, yo with lime yarn and pull through the loop on the hook, sl st into the remaining 30 chs.
-
- Cut the yarn, pull through the last stitch. Roll the end of the snail until a shell is made. Sew or glue in place, weave in the ends and add eyes.
FROG:
- with lime yarn:
- R1: Make a magic ring or a loose slip knot, ch 1 and put 8 sc into the magic ring or the loose slip knot. =8
- Pull on the tail end to close the hole.
- R2: 2sc into each st around. =16
- Weave in the end.
- R3-R8: sc into each st around. =16
- Flip right side out.
- R9: *sc into the next 2 sts, inv sc dec. Repeat from the * around. =12
- R10: sl st into the next st, 3dc into the next st, sl st into the next 3 sts, 3dc into the next st, sl st into the next st, 3dc into the next st, sl st into the next 3 sts, 3dc into the next st, sl st into the 1st sl st of the round. =24
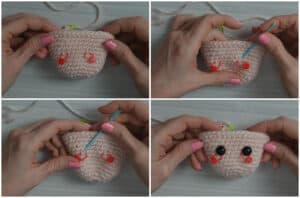
- Stuff the frog with polyester fiberfill. Cut the yarn but leave the tail end long enough to sew the front of the eyes to the back of the eyes, and pull through the last stitch. Add safety eyes to the front of the eyes and line up the fronts and backs of the eyes.. Sew to close and finish the frog body.
FROG CROWN:
- with dijon yarn:
- Row 1: Make a magic ring or a loose slip knot, ch 1 and put 3 sc into the magic ring or the loose slip knot. =8
- Pull on the tail end to close the hole.
- Row 2: ch 2, turn the work, sl st into the 2nd ch from the hook, sl st into the next sc, ch 2, sl st into the 2nd ch from the hook, sl st into the next sc, ch 2, sl st into the 2nd ch from the hook, sl st into the next sc, sl st into the center of the magic ring or loose slip knot. = 3 points
- Cut the yarn, pull through the last stitch and sew to the top of the frog between the eyes. Weave in the ends.
BIRD (make 2):
- with turquoise yarn:
- R1: Make a magic ring or a loose slip knot, ch 1 and put 8 sc into the magic ring or the loose slip knot. =8
- Pull on the tail end to close the hole.
- R2: 2sc into each st around. =16
- Weave in the end.
- R3-R5: sc into each st around. =16
- Flip right side out.
- R6: sc into the next 6 sts, insert the hook into the next st, drop the turquoise, yo with yellow and pull up a loop, drop the yellow, yo with turquoise and pull through the loops on the hook, sc into the next 9 sts. =16
- Cut the yellow yarn and weave in the ends.
- R7: sc into each st around. =16
- Add safety eyes to the round below. Start stuffing the bird with polyester fiberfill.

-
- R8: *inv sc dec. Repeat from the * around. =8
- R9: *inv sc dec. Repeat from the * around. =4
- Finish stuffing with fiberfill, whip stitch around to close the hole and weave in the ends.
BIRD WINGS (make 4):
-
- R1: Make a magic ring or a loose slip knot, ch 1 (does not count as a st), (sc, hdc, ch 2, sl st into the 2nd ch from the hook, hdc, sc, sl st) into the magic ring or loose slip knot.. =6
- Pull on the tail end to close the hole.
- Sew to the body and weave in the ends.
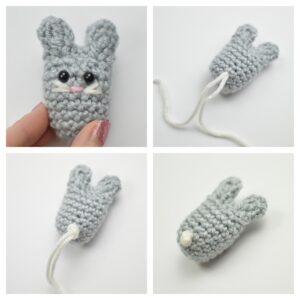
BUNNY:
- with gray yarn:
- R1: Make a magic ring or a loose slip knot, ch 1 and put 8 sc into the magic ring or the loose slip knot. =8
- Pull on the tail end to close the hole.
- R2: 2sc into each st around. =16
- Weave in the end.
- R3-R8: sc into each st around. =16
- Flip right side out.
- R9: *sc into the next 2 sts, inv sc dec. Repeat from the * around. =12
- R10: sl st into the next st, (sl st, ch 3, tc, ch 3, sl st) into the next st, sl st into the next 2 sts, (sl st, ch 3, tc, ch 3, sl st) into the next st, sl st into the next 2 sts, (sl st, ch 3, tc, ch 3, sl st) into the next st, sl st into the next 2 sts, (sl st, ch 3, tc, ch 3, sl st) into the next st, sl st into the 1st sl st of the round. =28
- Stuff the bunny with polyester fiberfill. Cut the yarn but leave the tail end long enough to sew the front of the ears to the back of the ears,, and pull through the last stitch. Add safety eyes. Line up the fronts and backs of the ears and sew together to finish the bunny. Make a tail with white yarn.
HONEY BEE:
- with black yarn:
- R1: Make a magic ring or a loose slip knot, ch 1 and put 6 sc into the magic ring or the loose slip knot. =6
- R2: 2sc into each st around until 1 st remains, sc into the last st, insert the hook into the same st, yu and pull up a loop, yo with yellow, drop the black and pull through the loops on the hook. =12
- with the yellow yarn:
- R3: sc into each st around. =12
- Weave in the ends but do not cut the black yarn and flip right side out.
- R4: sc into each st around until 1 st remains, insert the hook into the last st, yu and pull up a loop, yo with black, drop the yellow and pull through the loops on the hook.
- with the black yarn:
- R5: sc into each st around until 1 st remains, insert the hook into the last st, yu and pull up a loop, yo with yellow, drop the black and pull through the loops on the hook.
- Cut and weave in the black yarn tail.
- with the yellow yarn:
- R6-R8: sc into each st around. =12
- Add safety eyes.

-
- Weave in the ends and start stuffing with fiberfill.
- R9: *inv sc dec. Repeat from the * around. =6
- Cut the yarn, pull through the last stitch and whip stitch around to close the hole.
BEE WINGS:
- with white yarn:
- R1: Make a magic ring or a loose slip knot, ch 10, sl st into the center of the ring, ch 10 and sl st into the center.
- Pull on the tail end to close the hole, cute the yarn and sew to the bee.
BEAR:
- with umber yarn:
- R1: Make a magic ring or a loose slip knot, ch 1 and put 8 sc into the magic ring or the loose slip knot. =8
- Pull on the tail end to close the hole.
- R2: 2sc into each st around. =16
- Weave in the end.
- R3-R8: sc into each st around. =16
- Flip right side out.
- R9: *sc into the next 2 sts, inv sc dec. Repeat from the * around. =12
- R10: sl st into the next st, 3dc into the next st, sl st into the next 3 sts, 3dc into the next st, sl st into the next st, 3dc into the next st, sl st into the next 3 sts, 3dc into the next st, sl st into the 1st sl st of the round. =24
BEAR MUZZLE:
-
- R1: Make a magic ring or a loose slip knot, ch 1 and put 4 sc into the magic ring or loose slip knot, sl st to the 1st st of the round. =4
- Cut the yarn, pull through the last stitch and attach to the bear’s face. Add a nose.
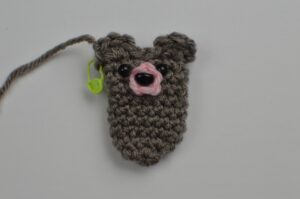
- Stuff the bear with polyester fiberfill. Cut the yarn but leave the tail end long enough to sew the front of the ears to the back of the ears, and pull through the last stitch. Add safety eyes. Line up the front of the ears with the backs of the ears. Sew to close and finish the bear.
MOUSE:
- with gray yarn:
- R1: Make a magic ring or a loose slip knot, ch 1 and put 8 sc into the magic ring or the loose slip knot. =8
- Pull on the tail end to close the hole.
- R2: 2sc into each st around. =16
- Weave in the end.
- R3-R8: sc into each st around. =16
- Flip right side out.
- R9: *sc into the next 2 sts, inv sc dec. Repeat from the * around. =12
- R10: sl st into the next st, 4dc into the next st, sl st into the next 3 sts, 4dc into the next st, sl st into the next st, 4dc into the next st, sl st into the next 3 sts, 4dc into the next st, sl st into the 1st sl st of the round. =28
- Stuff the mouse with polyester fiberfill. Cut the yarn but leave the tail end long enough to sew the front of the ears to the back of the ears, and pull through the last stitch. Add safety eyes. Line up the front of the ears with the backs of the ears. Sew to close and finish the bear.
- Add a nose and whiskers.
MOUSE TAIL:
-
- Row 1: Insert the hook, yarn over and pull up a loop, ch 16, sl st into each ch across. =16
- Cut the yarn, pull through the last stitch and weave in the ends.
- Assemble Matilda by adding laces to her corset and boots, sew and or glue the animals to her.
THE END! I would love to see your Alex In Yarnder Land Dolls! Tag @_with_alex and use #crochetingwithalex on Instagram so I can see and share your projects! Matilda’s Introduction Story will be available next week on my personal blog! Also, join the Alex In Yarnder Land Facebook Group to keep up to date on all things Alex In Yarnder Land!
If you want to keep up with me, Alex, on social media for other fun projects, follow me on: Blog | Instagram | Facebook | YouTube | Pinterest | Ravelry
If you want to keep up with all things Clover, follow us on: Facebook | Twitter | Instagram | Pinterest | YouTube | Ravelry