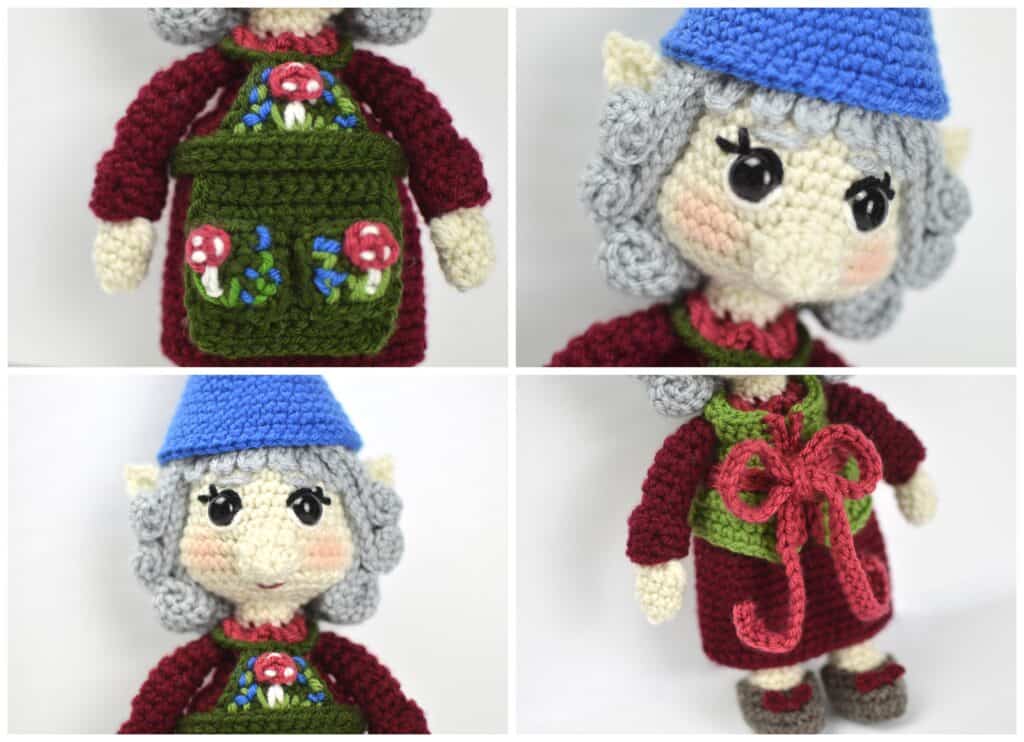
National Ugly Sweater Day: Suzette Gnomette (amigurumi doll)
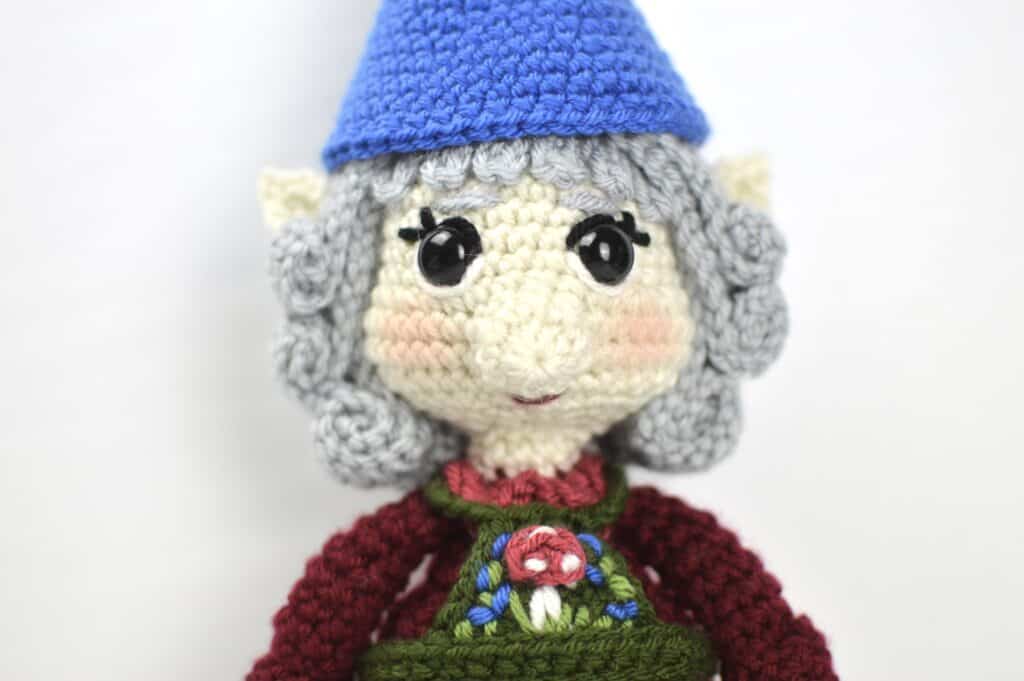
Happy National Ugly Sweater Day! Today I’m releasing a new amigurumi character pattern from the Alex In Yarnder Land Series and she is dressed for the occasion! I’m Alex, the crochet and tunisian crochet designer, video tutorial maker and storyteller behind the With Alex Blog. I’m so happy to be back on the Clover Blog to introduce and share “Suzette Gnomette”, a sweet and wise girl gnome. Suzette, who is known by Suzi to her friends and family, is Alex’s Magical Godmother. Unbeknownst to Alex, when her mother was a baby, Suzette gave her mother a gift and also gave her gifts that would pass down to her daughters, Alex and her sisters. Suzi wears an apron that is covered in her favorite flower (the blue bonnet!) and she also wears a tall, blue hat, or blue bonnet (haha get it?)! Her dress is a beautiful wine color that matches her rosy cheeks and her special ugly Christmas sweater is perfect for the parties that she loves to host.
Suzette was inspired by my sweet cousin Suzi, the wonderful person who encouraged me to start crocheting almost ten years ago. For over 30 years, she crocheted, knitted, weaved, spun, and did anything she could with yarn or fiber. I always called Suzi my OG crocheter (which she loved) and it also inspired the character “Suzi” in my Crochet Song titled “Different Types Of Crocheters.” She became my teacher, confidant, close friend and fellow crocheter. She lived states away but with the help of the internet, that didn’t matter. A couple of years ago, she came to visit me on my birthday and we had the best day, plus to top it off, she gave me her amazing spinning wheel. A few weeks later she died suddenly and she left me her loom. Even though I have not been able to sit down at her spinning wheel yet, (I think I’m almost ready), it did inspire the Rumpelstilskein character and his story plot, from Alex In Yarnder Land series and she will continue to inspire me as I keep her memory safe in my heart.
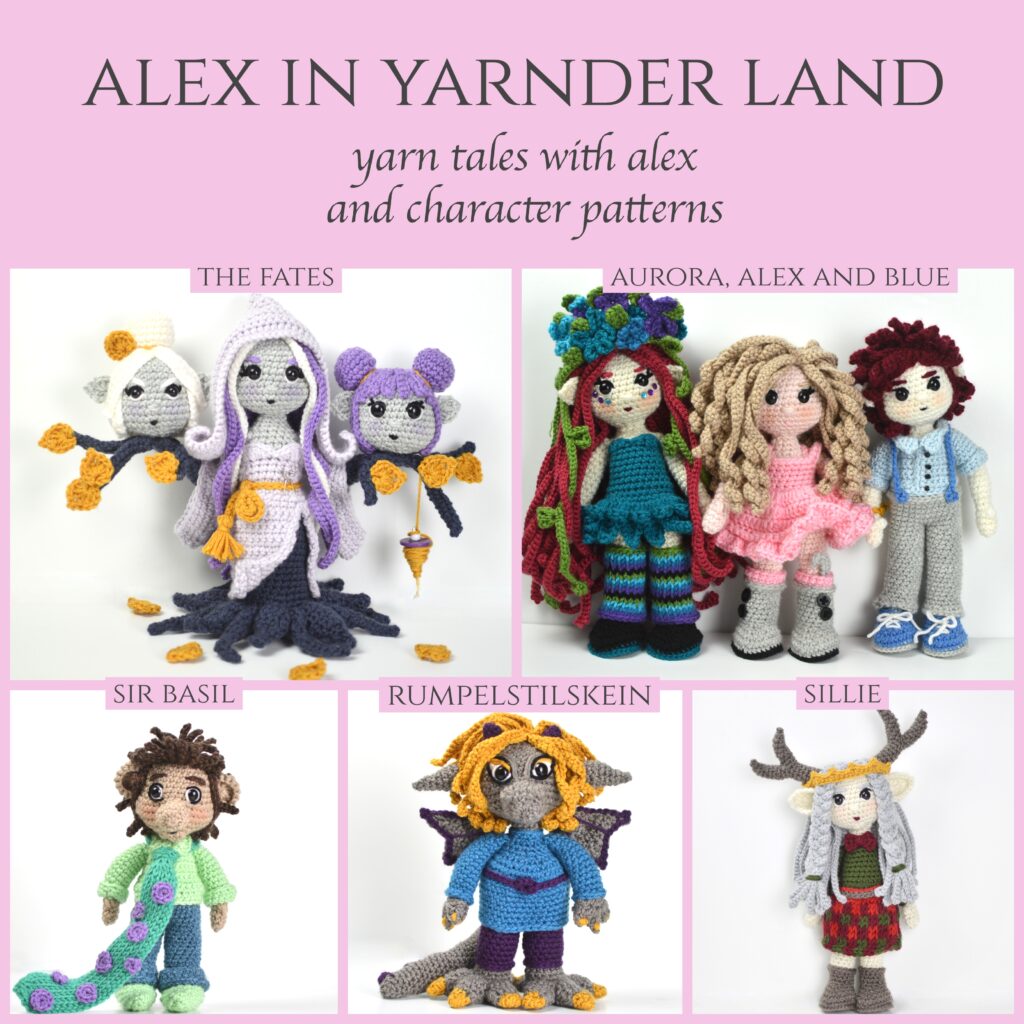
For more information on Alex, Blue, Aurora, The Fates, Sir Basil, Rumpelstilskein, Sillie, Suzette and the Alex In Yarnder Land Series, head on over to the With Alex Blog for all of the character pattern links and each character’s introduction short story.
All of the Alex In Yarnder Land characters have been designed with the yarn under single crochet. I love this version of the single crochet for amigurumi because it creates closer stitches with less gaps in between. This special single crochet is easy to crochet, but it may take some time to get used to. Watch my video tutorial below on how to crochet the yarn under single crochet. My favorite hook to make this stitch with is the Clover Amour Crochet Hook. I love how lightweight it is, the shape of the hook head and the soft handle make the single crochets fly off my hook easily and without catching or splitting the yarn.
The yarn I used to design this pattern is a worsted weight yarn that is made from 100% anti pilling acrylic yarn with 180 yards for every 100 gram ball of yarn. Universal Uptown Worsted Yarn comes in a variety of beautiful colors and I think the colors I chose for Suzi are perfect! The colors for Suzi are glow white, beet, black, silver grey, hunter green, iron, bright blue, cream, cedar, and cranberry. Scroll down to get started!
 NOTES:
- Difficulty: Intermediate/Advanced
- Size: 12.5″ tall counting her hat
- Gauge: Gauge is not important. See note section for more information.
MATERIALS:
- Clover Amour Crochet Hook G (4.00 mm)
- Universal Yarn Uptown Worsted in Black (1), Glow White (1), Cream (1), Cranberry (1), Beet (1), Hunter Green (1), Cedar (1), Bright Blue (1), Iron (1), Silver Grey (1)
- Polyester Fiberfill
- Clover Stitch Markers
- Clover Patchwork Scissors
- Clover Darning Needle
- Buttons (½” or 12mm)
- Safety eyes (size 14 mm)
- Fabric glue
- Pins
- Hot glue and glue gun
ABBREVIATIONS:
- sc: single crochet
- 2sc: single crochet increase
- inv sc dec: invisible single crochet decrease
- st(s): stitch(es)
- sl st: slip stitch
- ch: chain
- sk: skip
- yo: yarn over
- yu: yarn under
- FLO: front loop only
- BLO: back loop only
- dc: double crohet
- sc2tog: single crochet two together (decrease)
TIPS/TUTORIALS:
- special stitches:
- invisible single crochet decrease (inv sc dec): insert the hook into the front loop only of the next 2 stitches (image 2), yarn under (image 3) and pull up a loop (image 4), yarn over (image 5) and pull through all of the loops on the hook (image 6)

-
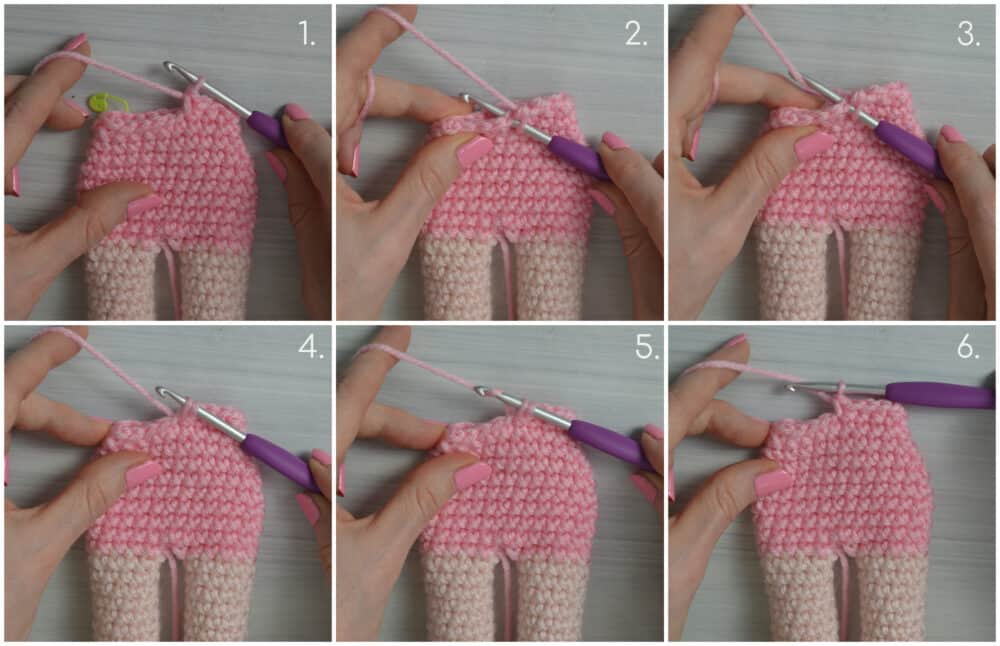
- single crochet (sc): insert the hook into the next stitch (image 2), yarn under (image 3) and pull up a loop (image 4), yarn over (image 5) and pull through all of the loops on the hook (image 6)
-
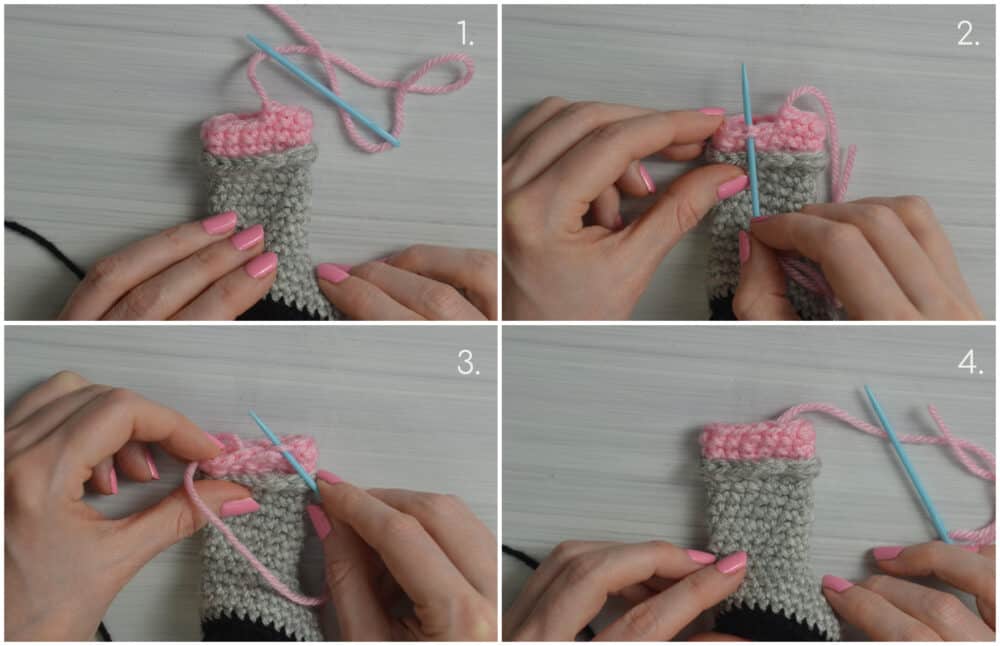
- invisible join: skip the stitch next to the last stitch made and insert the needle through the next stitch (image 2), pull through and insert the needle into the back loop only of the last stitch made (image 3) and pull through
-
- cluster: *yarn over and insert the hook into the stitch, yarn over and pull up a loop. repeat from the * 2 more times, yarn over and pull through all of the loops on the hook.
- video tutorials:
- tips:
- This pattern is worked in a continuous round (in a spiral) unless otherwise noted. Mark the beginning of each round with a stitch marker.
- No gauge for this pattern but make sure to stay consistent with your stitches.
- You will need more than one stitch marker. Multiple colors are optional but helpful.
- Do not overstuff the foot or it will not fit in the shoe.
- A great tip is to make the shoes first and then as you stuff the foot and leg, check periodically to make sure it fits in the shoe.
- Use the handle of the crochet hook or a chopstick to help with stuffing the doll with fiberfill.
PATTERN FOR SUZETTE GNOMETTE:
Some tutorials may be in a different color! I occasionally use pictures from my other tutorials to demonstrate the stitch pattern.
SUZI’S HEAD (use cream yarn):
- Round 1: Make a magic ring or a loose slip knot, ch 1 and put 8 sc into the magic ring or loose slip knot. =8
- Pull on the tail end to close the hole.
- Round 2: 2sc into each st around. =16
- Round 3: *2sc into the next st, sc into the next st. Repeat from the * around. =24
- Round 4: sc into each st around. =24
- Round 5: *2sc into the next st, sc into the next 2 sts. Repeat from the * around. =32
- Round 6 – Round 8: sc into each st around. =32
- Weave in the end and flip right side out. Start stuffing the head with polyester fiberfill.
- Round 9: sc into the next 14 sts, mark the middle of the 14th st with a new st marker, sc into the next 5 sts, mark the middle of the 5th st with another st marker, sc into the next 13 sts. =32
- Round 10: sc into each st around. =32
- Round 11: sc into the next 8 sts, 2sc into the next 4 sts, sc into the next 8 sts, 2sc into the next 4 sts, sc into the next 8 sts. =40
- Round 12: sc into the next 19 sts, ch 3, sk 3, sc into the next 18 sts. =40
- Round 13: sc into the next 19 sts, sc BLO into the next 3 chs, sc into the next 18 sts. =40
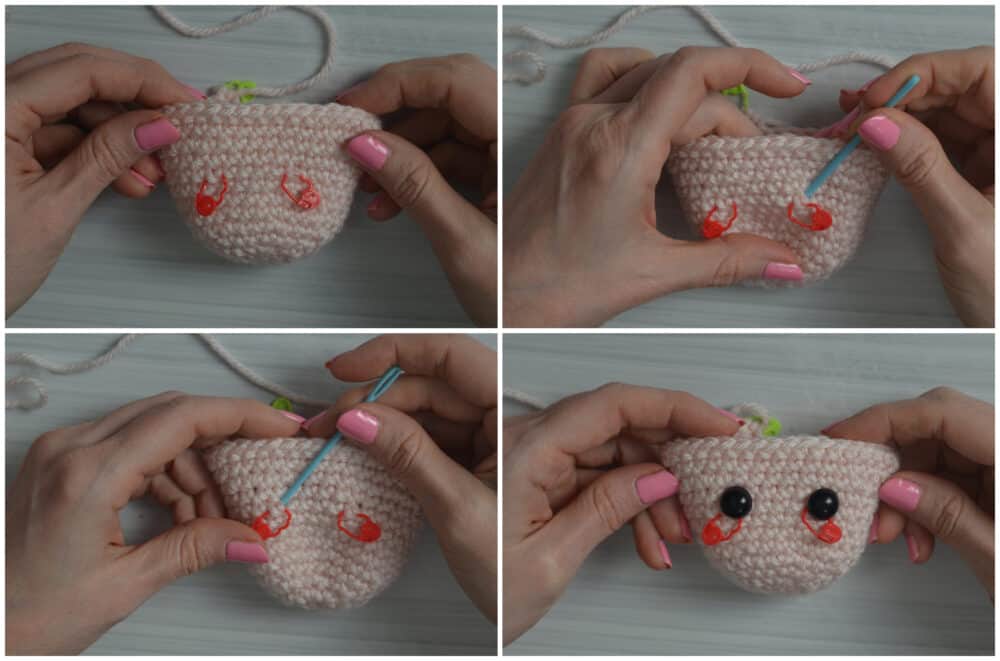
- Take the 2 stitch markers out of R9 and replace them with safety eyes.
- Continue stuffing the head as you continue the pattern.
- Round 14: sc into the next 8 sts, (inv sc dec) x4, sc into the next 8 sts, (inv sc dec) x4, sc into the next 8 sts. =32
- Round 15: *sc into the next 2 sts, inv sc dec. Repeat from the * around. =24
- Round 16: *sc into the next st, inv sc dec. Repeat from the * around. =16
- Round 17: inv sc dec, *sc into the next st, inv sc dec. Repeat from the * around until 2 sts remain, inv sc dec. =10
- Cut the yarn but leave the tail end long enough to sew to the body, pull through the last stitch made and make an invisible join. Finish stuffing and shaping the head.
SUZI’S NOSE (use cream yarn):
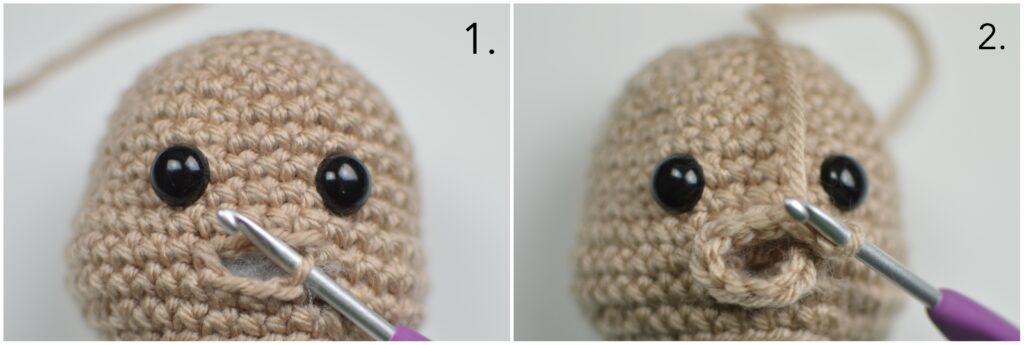
- Round 1: Insert the hook into the bottom right corner of the open hole (image 1), yo and pull up a loop, ch 1 (does not count as a st) and sc into the same space and around 9 more times. (image 2) =10
- Round 2: sc into each st around. =10
- Stuff the nose with fiberfill. Cut the yarn, pull through the last stitch and whip stitch around to close the hole. Weave in the ends.
- Add a mouth, details to the eyes, eyebrows and blush to the cheeks.
SUZI’S EAR (make 2, use cream yarn):
- Round 1: Make a loose slip knot or a magic ring, ch 1, (sc, 2hdc, dc) into the loose slip knot or magic ring, ch 2, sl st into the 2nd ch from the hook, (dc, 2hdc, sc, sl st) into the loose slip knot or magic ring. =8
- Pull on the tail end to close the hole.
- Cut the yarn, pull through the last stitch and weave in the ends. Sew to the head.
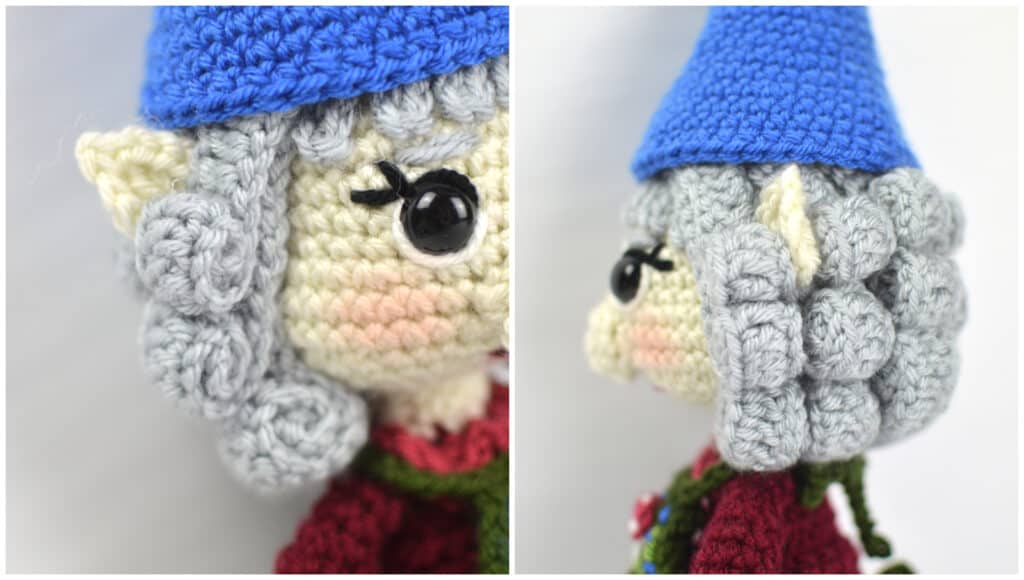
SUZI’S HAIR (use silver grey yarn):
- Round 1: Make a magic ring or a loose slip knot, ch 1 and put 8 sc into the magic ring or loose slip knot. =8
- Pull on the tail end to close the hole.
- Round 2: 2sc BLO into each st around. =16
- Round 3: *2sc BLO into the next st, sc BLO into the next st. Repeat from the * around. Sl st to the first st of the round. =24

- Round 4: *ch 5, sc into the 3rd ch from the hook and into each ch across, sl st into the next st on the circle. Repeat from the * around until a total of 6 hair strands have been made.
- *ch 32, dc into the 4th ch from the hook and dc into each ch across, sk the next st on the circle, sl st into the next st on the circle. Repeat from the * until a total of 14 hair strands have been made.
- Continue working in the exposed front loops on the circle in a spiral until you get to the center.
- Skip the last stitch of the round.
- ch 27, dc into the 4th ch from the hook, dc into each ch across, sl st to the nearest FLO from the previous round. *ch 27, dc into the 4th ch from the hook, dc into each ch across, sk the next FLO from the previous round, sl st FLO into the next st. Repeat from the * until 22 hair strands total.
- *ch 22, dc into the 4th ch from the hook, dc into each ch across, sl st FLO into the next st. Repeat from the * until 30 hair strands total.
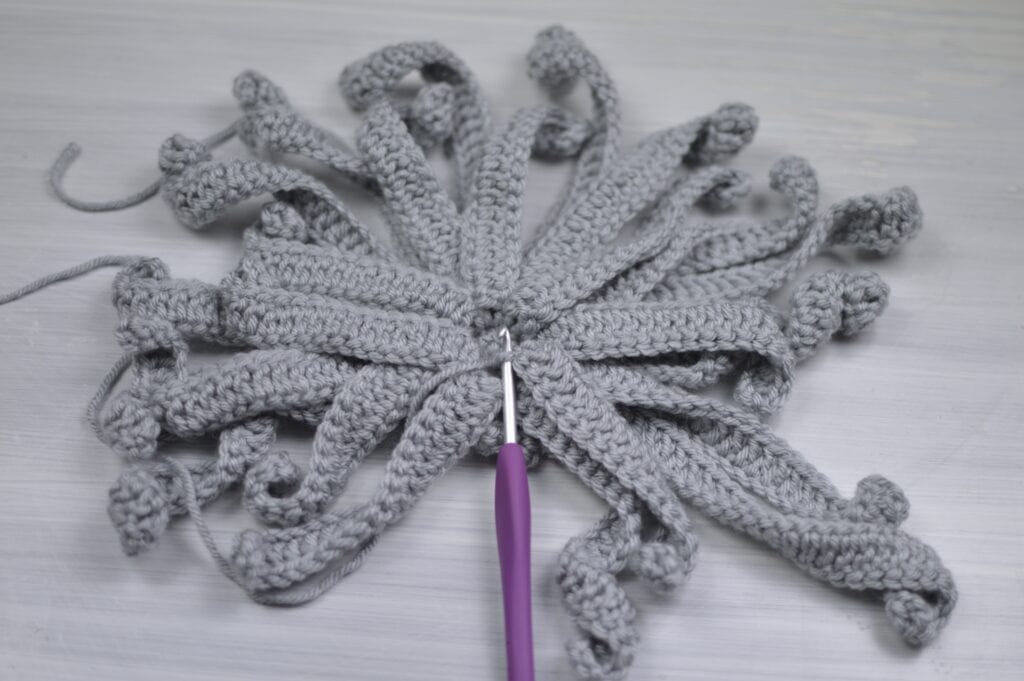
- Cut the yarn and weave in the ends.
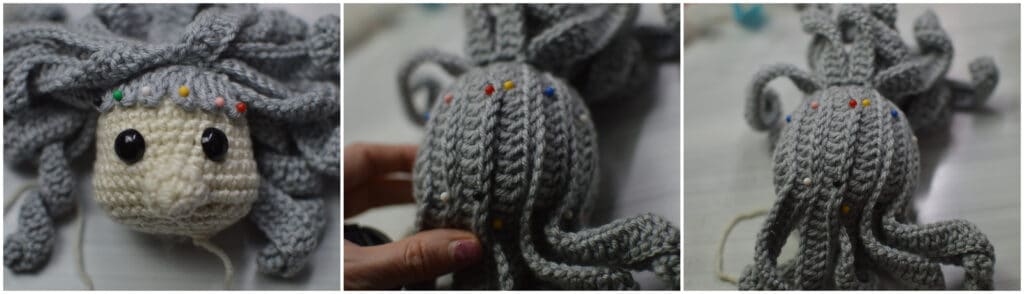
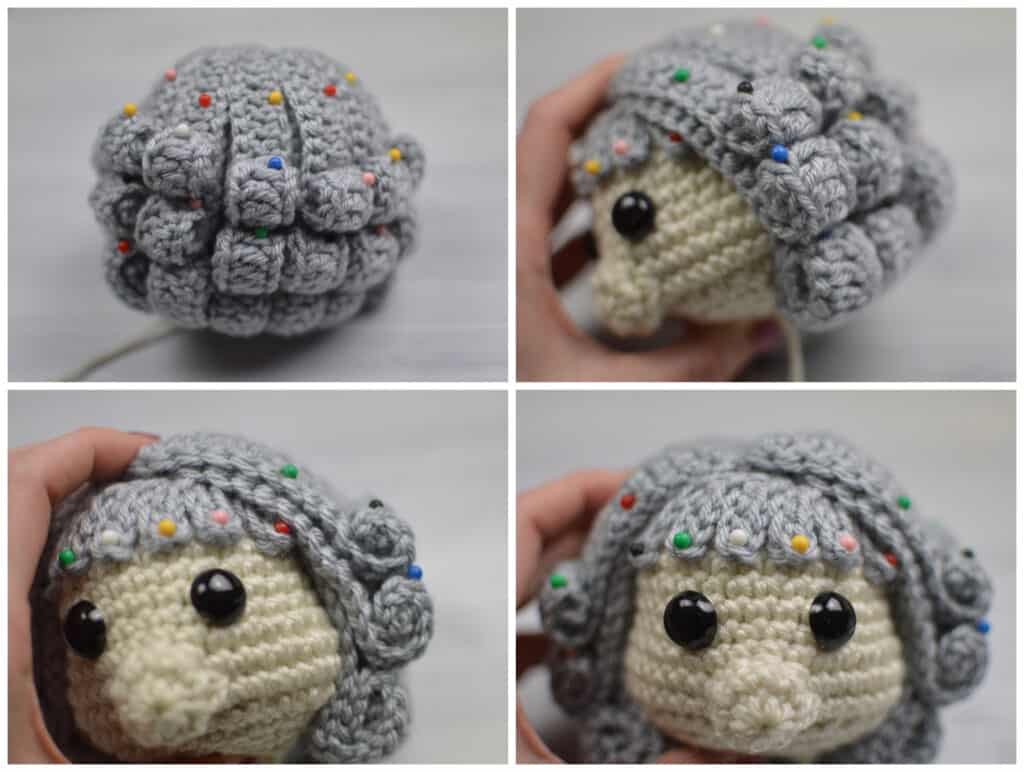
- Attaching Suzi’s hair to her head:
- Start by placing a pin through the top, center of the wig and then through the top, center of the head. Continue by pinning the bangs and the bottom layer of hair strands. Use fabric glue to secure the hair strands. Pin after glueing.
-
- Roll the hair strands, glue them in place and pin till dry.
-
- Remove the pins after the fabric glue has dried.
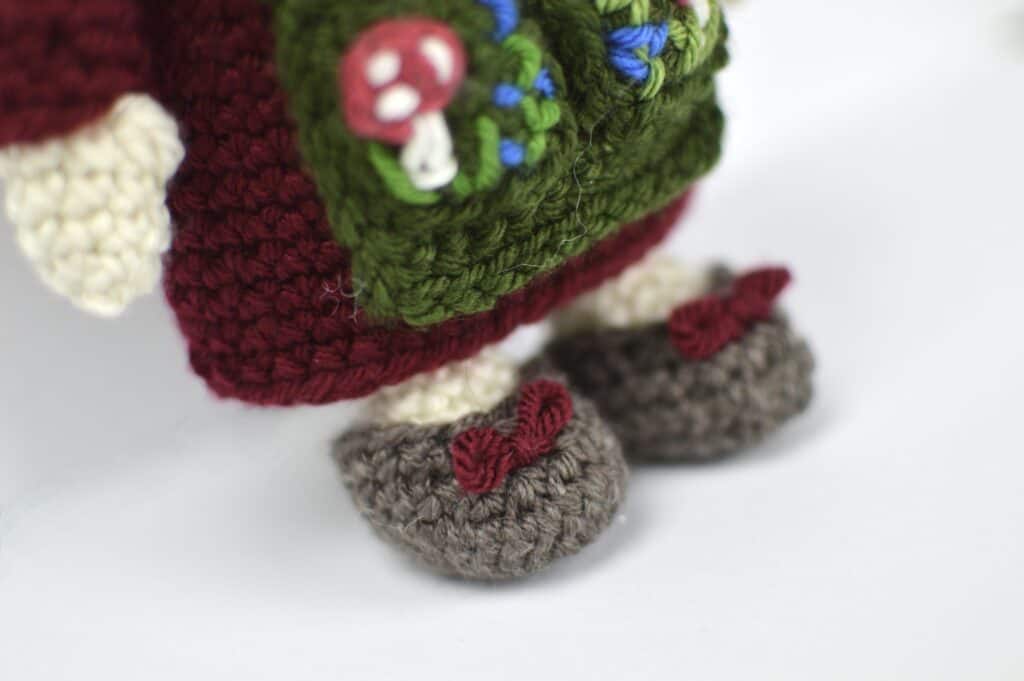
SUZI’S SHOE (make 2, use iron yarn):
- Round 1: Make a magic ring or a loose slip knot, ch 1 and put 8 sc into the magic ring or loose slip knot. =8
- Pull on the tail end to close the hole.
- Round 2: 2sc into each st around. =16
- Round 3: *2sc into the next st, sc into the next st. Repeat from the * around. =24
- Round 4: sc into each st around. =24
- Round 5: sc into the next 8 sts, (inv sc dec) x4, sc into the next 8 sts. =20
- Weave in the end and flip right side out.
- Round 6: sc into the next 6 sts, (inv sc dec) x4, sc into the next 6 sts. =16
- Cut the yarn, pull it through the last stitch and make an invisible join before weaving in the end. Add a bow with beet yarn.
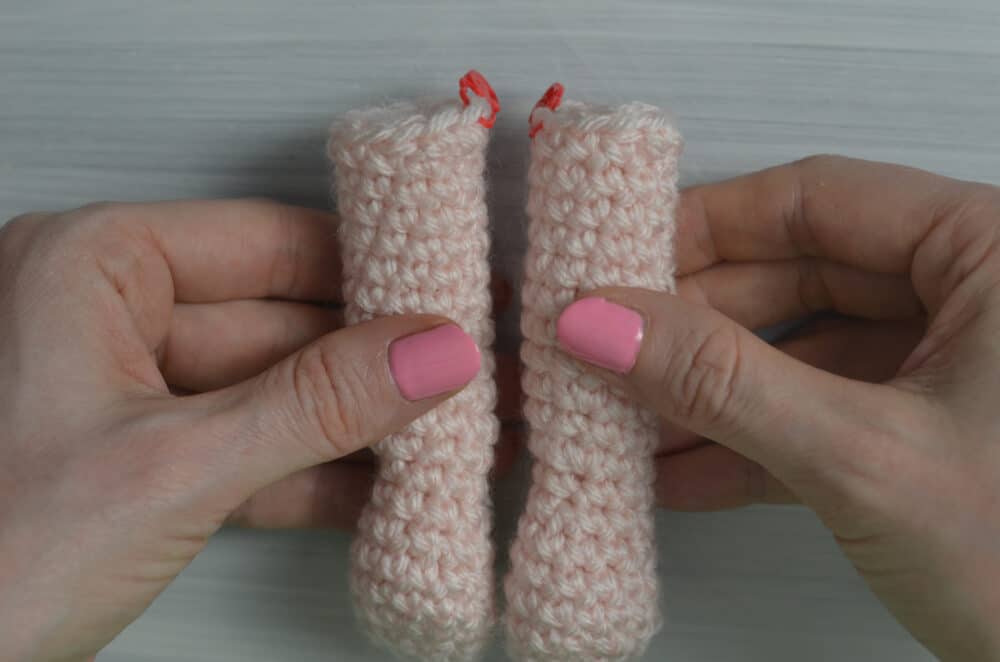
SUZI’S FOOT + LEG (make 2, use cream yarn):
- Round 1: Make a magic ring or a loose slip knot, ch 1 and put 8 sc into the magic ring or loose slip knot. =8
- Pull on the tail end to close the hole.
- Round 2: sc into the next 3 sts, 2sc into the next 2 sts, sc into the next 3 sts. =10
- Round 3: sc into the next 4 sts, 2sc into the next 2 sts, sc into the next 4 sts. =12
- Round 4: 2sc into the next st, sc into the next 10 sts, 2sc into the next st. =14
- Weave in the end and flip right side out.
- Round 5: sc into the next 5 sts, inv sc dec, sc into the next 5 sts, inv sc dec. =12
- Round 6: inv sc dec, sc into the next 4 sts, inv sc dec, sc into the next 4 sts. =10
- Round 7: sc into the next 3 sts, inv sc dec, sc into the next 3 sts, inv sc dec. =8
- Round 8: sc into each st around. =8
- Start stuffing the foot with polyester fiberfill and continue stuffing as you continue with the pattern.
- Round 9: sc into the next 7 sts, 2sc into the next st. =9
- Round 10: 2sc into the next st, sc into the next 8 sts. =10
- Round 11: sc into the next 9 sts, 2sc into the next st. =11
- Round 12 – Round 17: sc into each st around. =11
- Leg 1: R18: sc into the next 11 sts, mark the 11th st with the st marker. =11
- Leg 2: R18: sc into the next 5 sts, mark the 5th st with the st marker, sc into the next 6 sts. =11
- Cut the yarn, pull through the last stitch and make an invisible join on both legs. Do not take out the stitch markers.
SUZI’S BODY + NECK (use beet yarn):
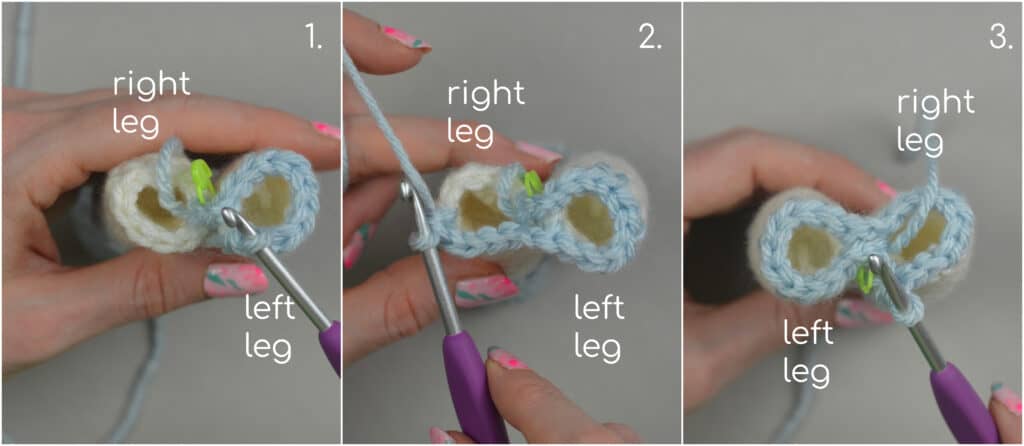
- Hold the legs next to each other with the feet facing away from you and the stitch markers in the middle.
- Leave the tail end long enough to sew the gap between the legs closed.
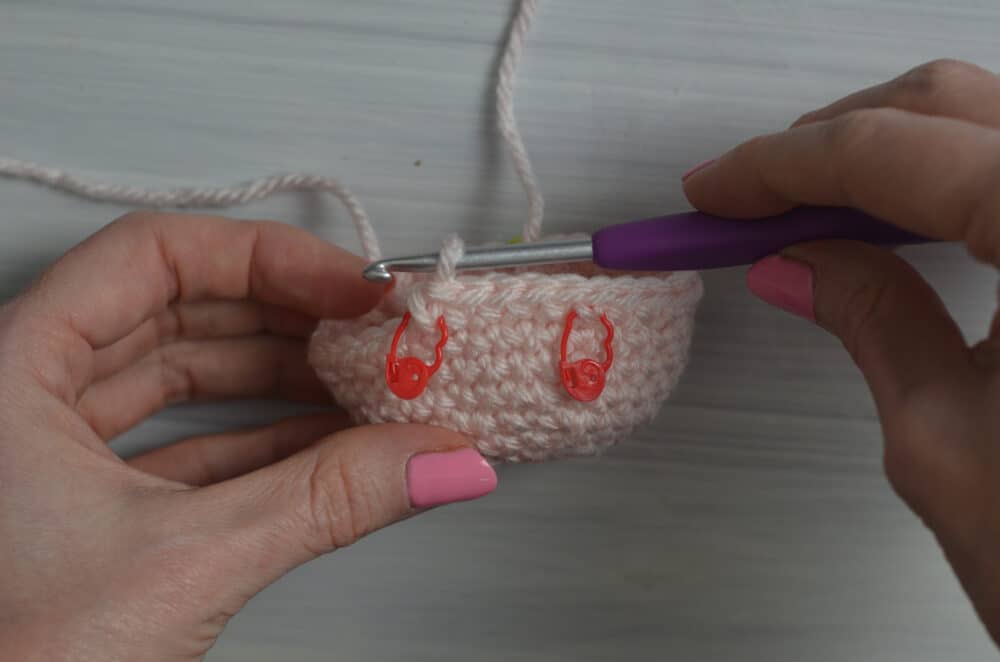
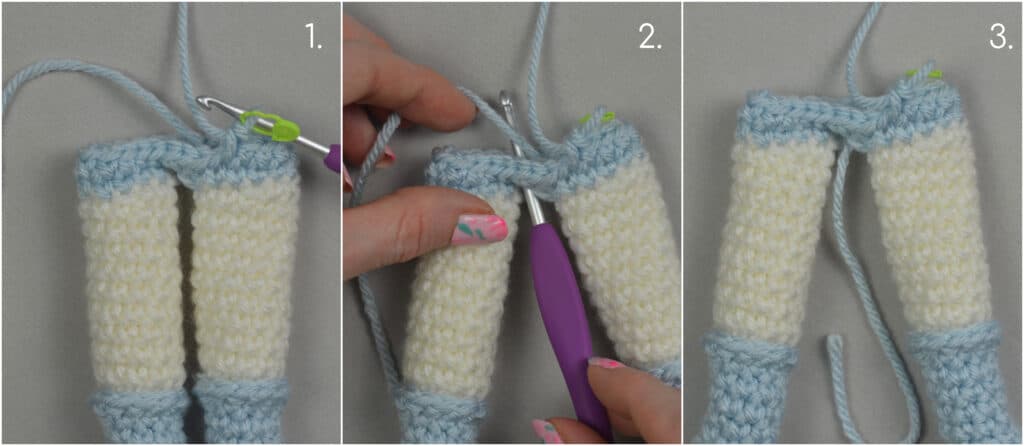
- Round 19: Starting on leg 2, insert the hook into the marked st (image 1), yo with the beet yarn (image 2) and pull up a loop (image 3), ch 1 (does not count as a st) (image 4), sc into the same st (image 5) and mark this st with the st marker (it is the new beginning of the round) (image 6), ch 1 (image 7), sc into the marked st on leg 1 (image 8), remove this st marker (image 9)
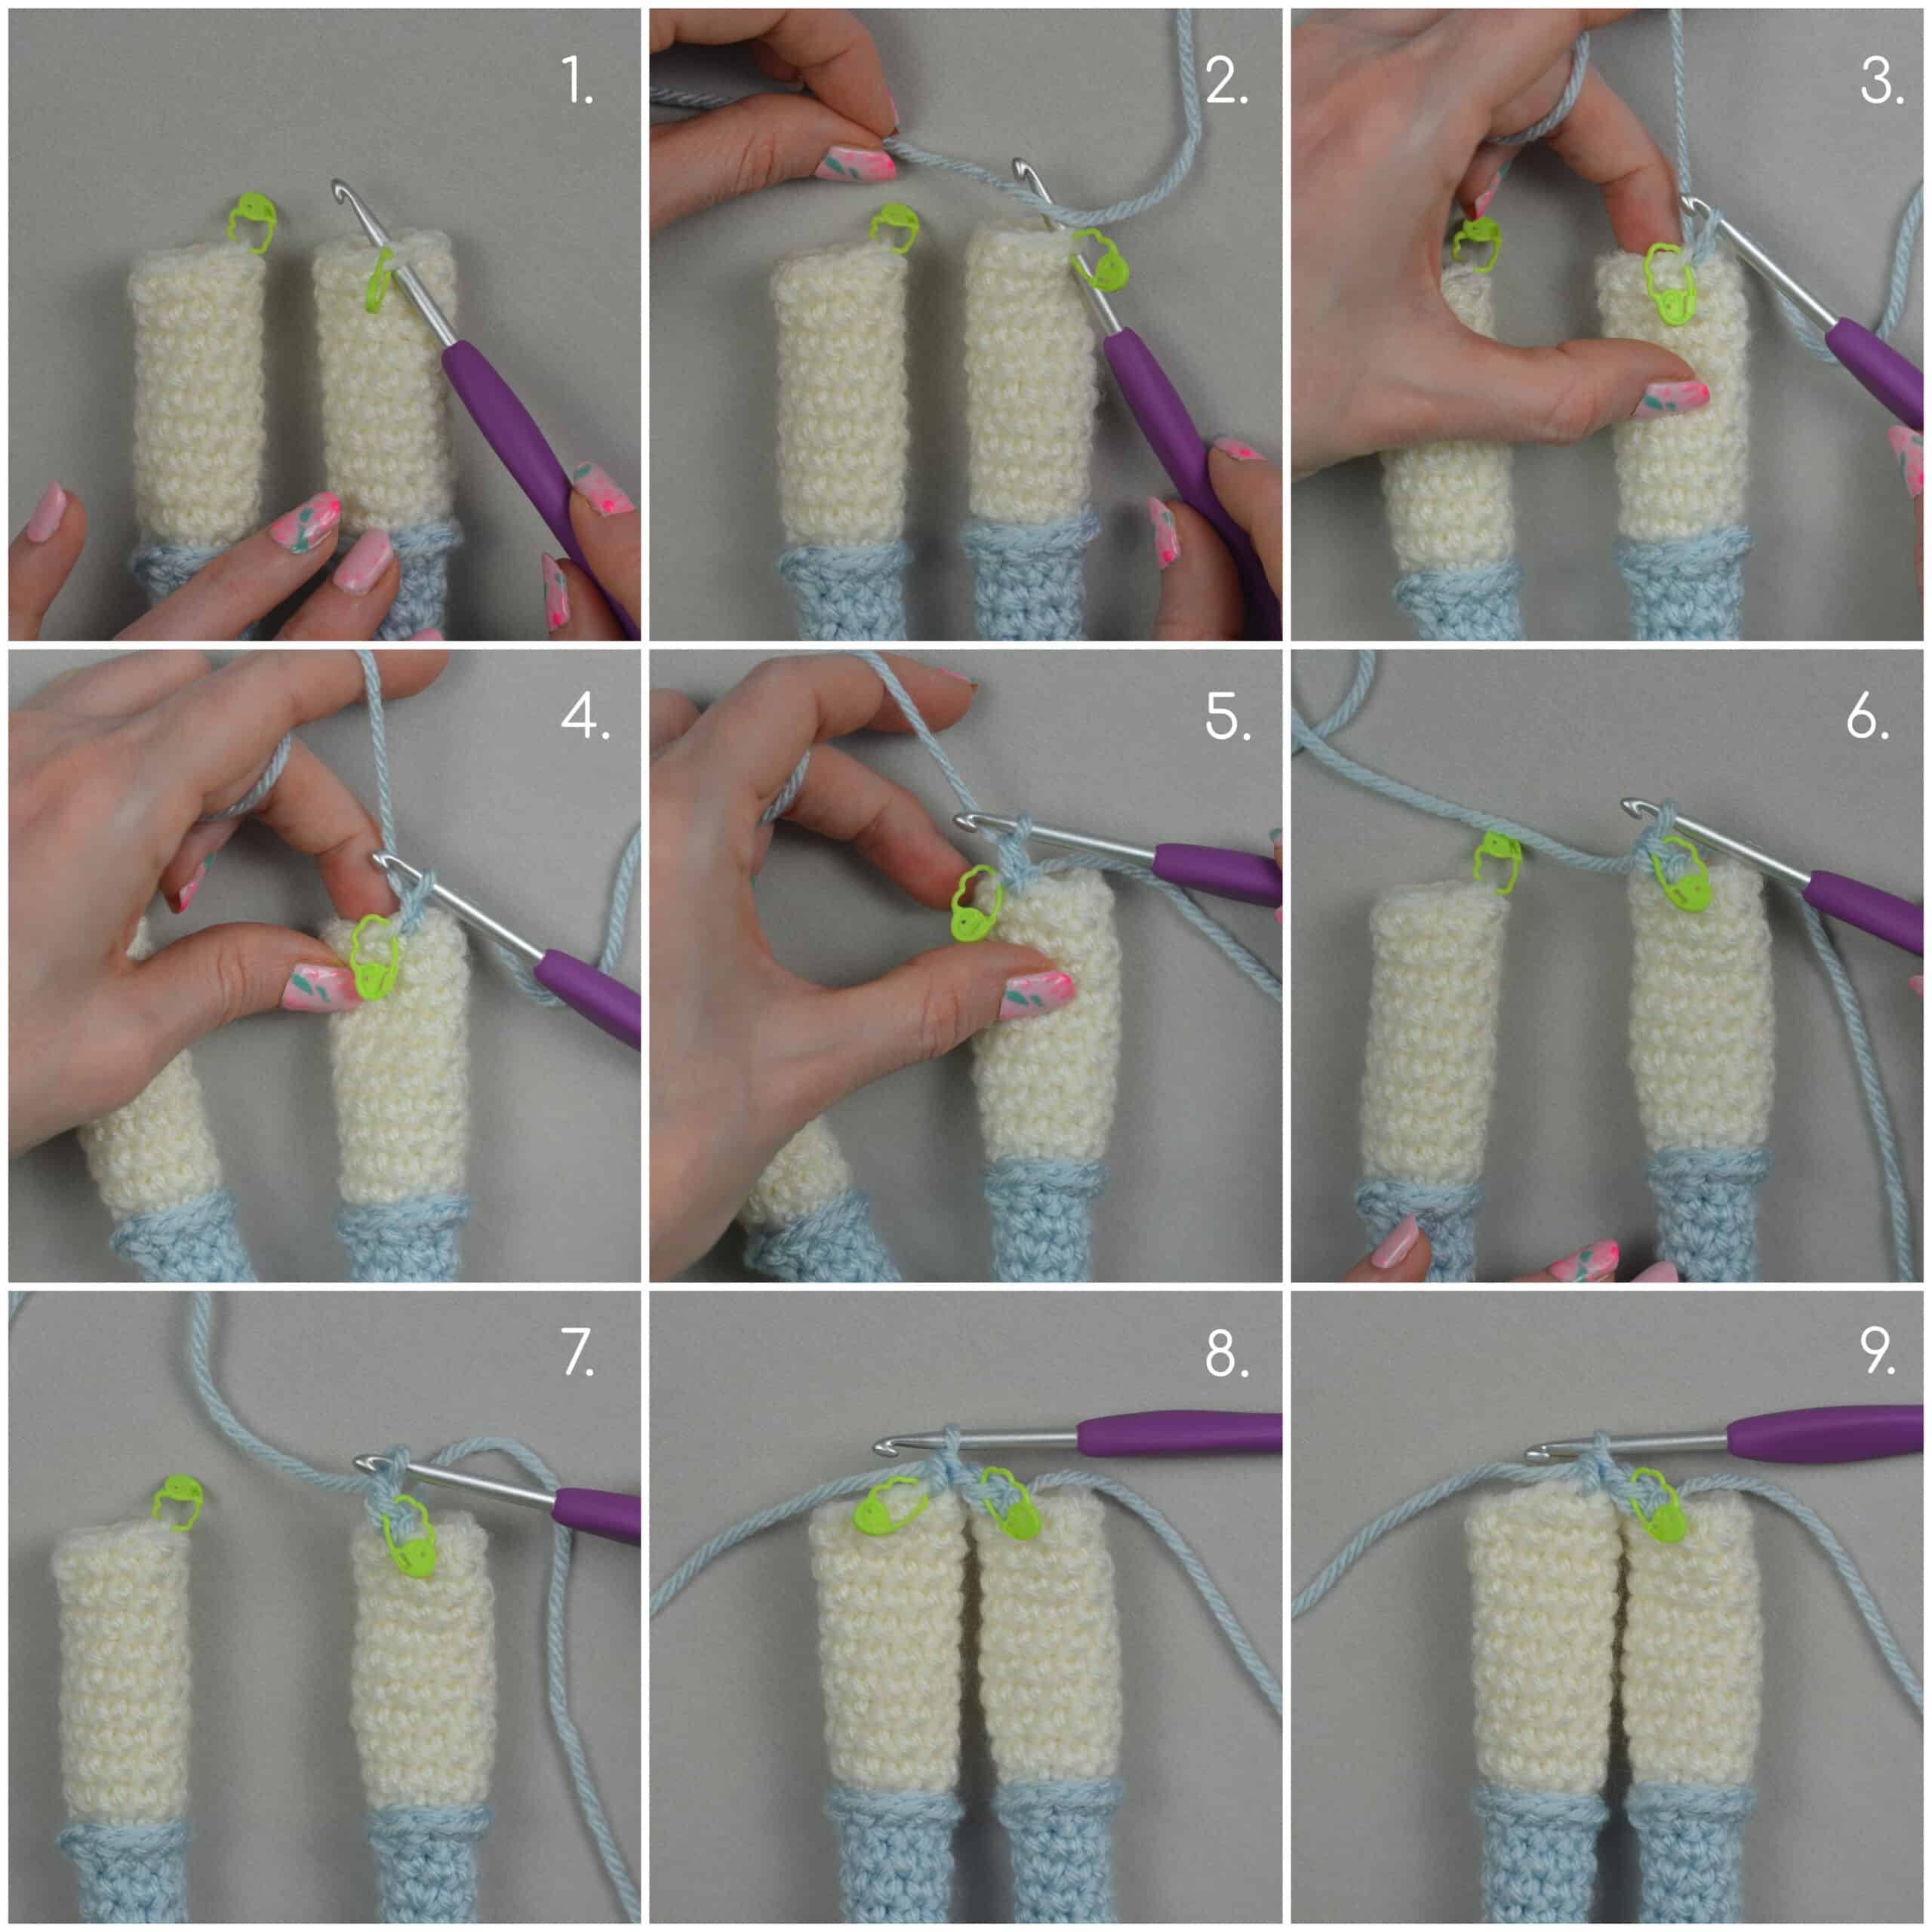
- sc into the next 10 sts on leg 1 (left leg) (image 1), ch 1, sc into the next 10 sts on leg 2 (right leg). (image 2 and 3) =24
- Round 20: sk the ch 1, sc into the next st, 2sc into the ch 1, sc into the next 11 sts, 2sc into the ch 1, sc into the next 10 sts. =26
- Pull the tail end through the gap between the legs.
- Round 21 – Round 23: sc into each st around. =26
- Round 24: sc into the next 8 sts, inv sc dec, sc into the next 11 sts, inv sc dec, sc into the next 3 sts. =24
- Round 25: sc into the next 8 sts, inv sc dec, sc into the next 10 sts, inv sc dec, sc into the next 2 sts. =22
- Round 26: sc BLO into each st around until 1 st remains, mark the next FLO with a new st marker (image 2) and sc BLO into that same st. (image 3) =22
- Round 27: sc into the next 7 sts, inv sc dec, sc into the next 9 sts, inv sc dec, sc into the next 2 sts. =20
- Round 28: sc into the next 7 sts, (inv sc dec) x2, sc into the next 5 sts, (inv sc dec) x2. =16
- Start stuffing the body with polyester fiberfill. Continue stuffing the body while continuing with the pattern.
- Round 29: sc into the next 7 sts, (inv sc dec) x2, sc into the next st, (inv sc dec) x2. =12
- Round 30: inv sc dec, sc into the next 3 sts, inv sc dec, sc into the next 4 sts, insert the hook into the next st, yu and pull up a loop, yo with cream yarn and pull through the loops on the hook. =10
- Round 31: sc BLO into each st around until 1 st remains, mark the FLO of the next st with a new st marker and sc BLO into the same st. =10
now with the cream yarn:
- Round 32: sc into each st around. =10
- Cut the cream yarn, pull it through the last stitch and make an invisible join before weaving in the end. Cut the beet yarn and weave in the other ends and finish stuffing.
- Hold the doll upside down and go back to Round 31. Continue with Round 31 below.
COLLAR (use cranberry yarn):
- I used the green stitch marker to show where I moved the red stitch marker.
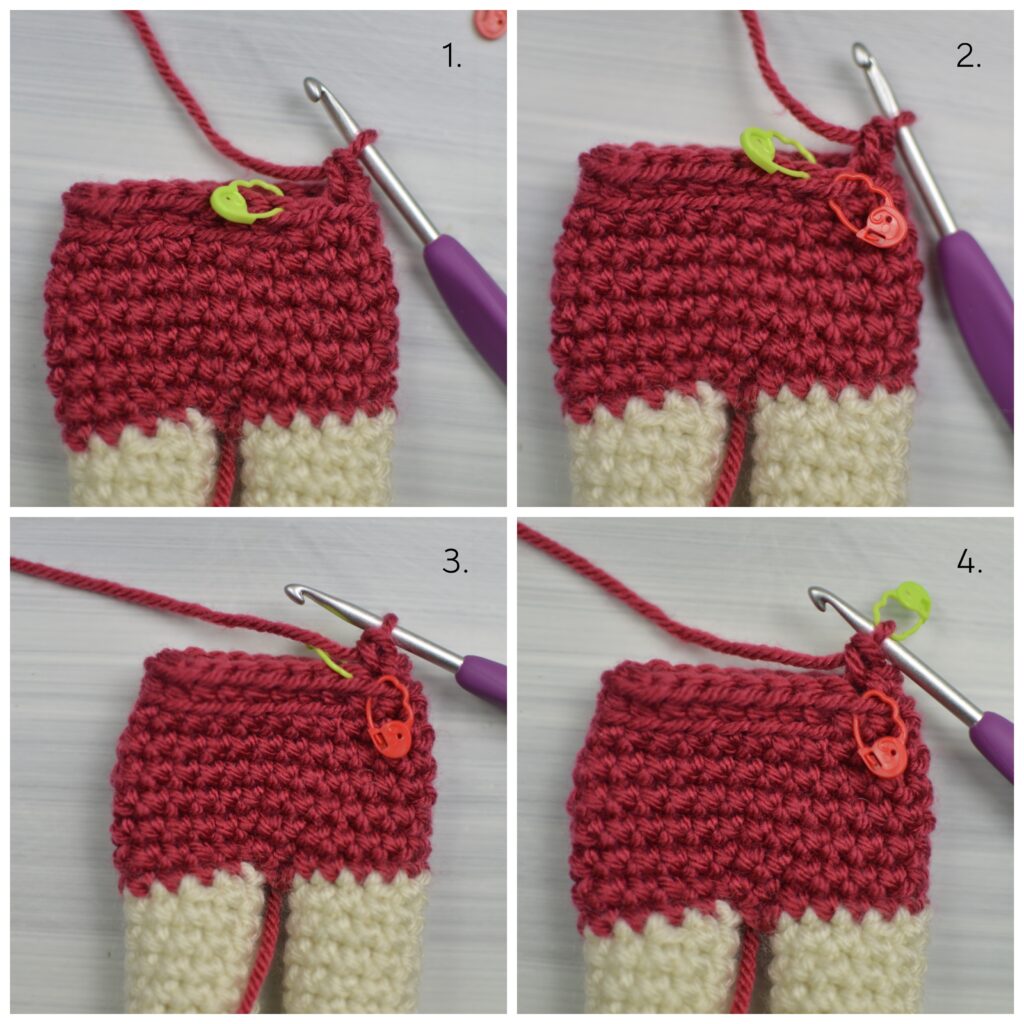
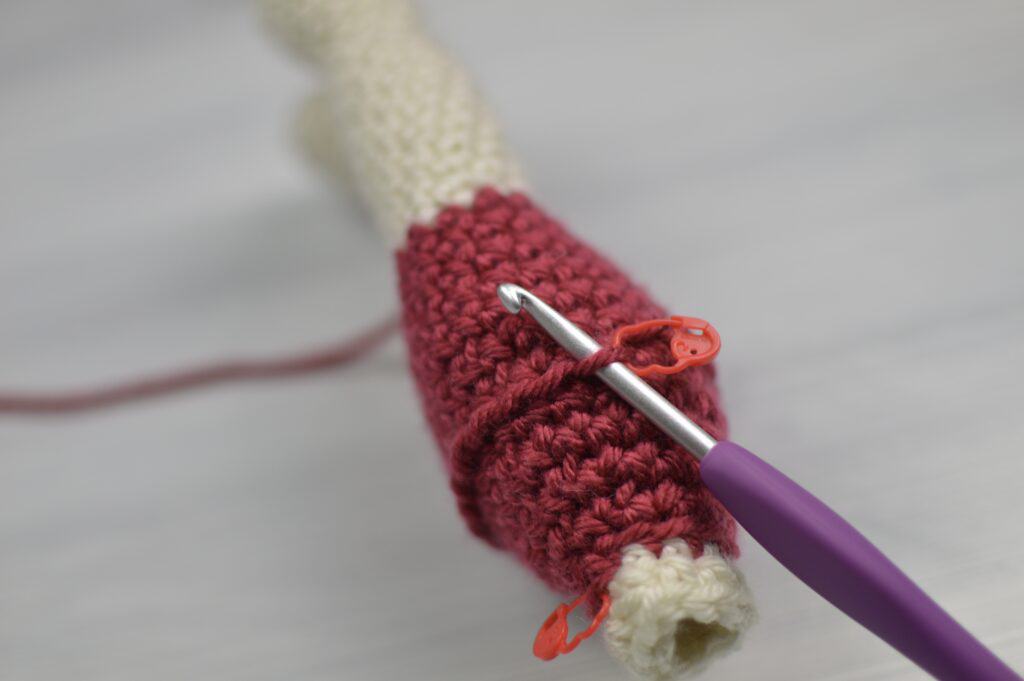
- Round 31: Sk the next 4 sts and move the st marker to the 5th st. (image 2 & 3) Insert the hook into the marked st (image 4), yo with cranberry yarn and pull up a loop, ch 1 (does not count as a st), sc FLO into the same st and sc FLO into the next 4 sts, (sc, hdc, dc, hdc, sc) into the next st, sl st into the next st, (sc, hdc, dc, hdc, sc) into the next st, sc into the next 2 sts. =18

- Cut the yarn, pull through the last stitch and make an invisible join before weaving in the ends.
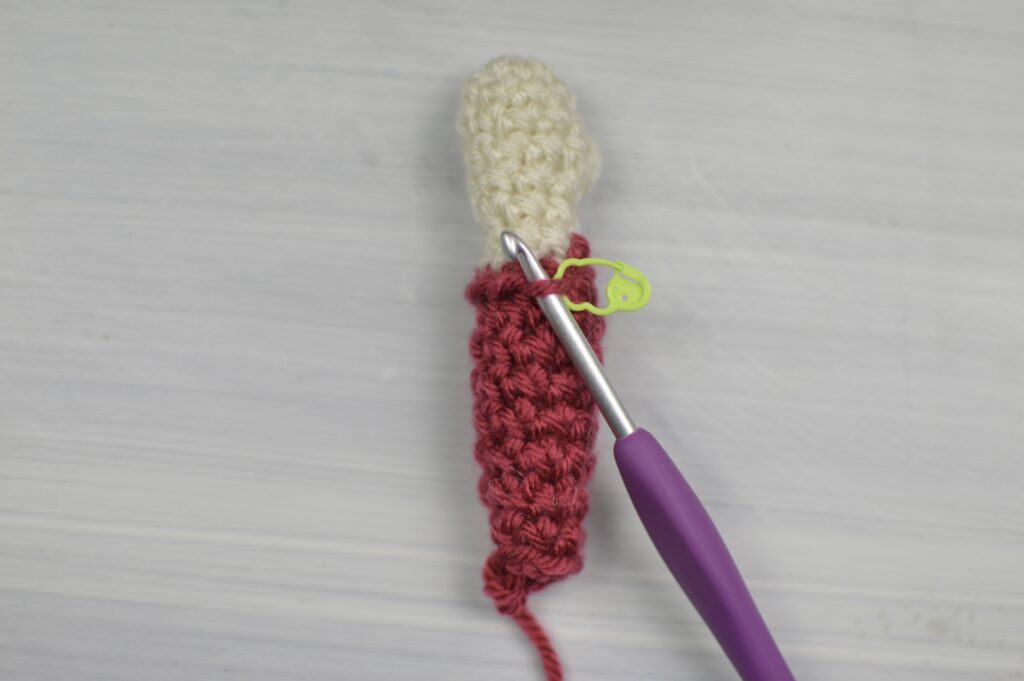
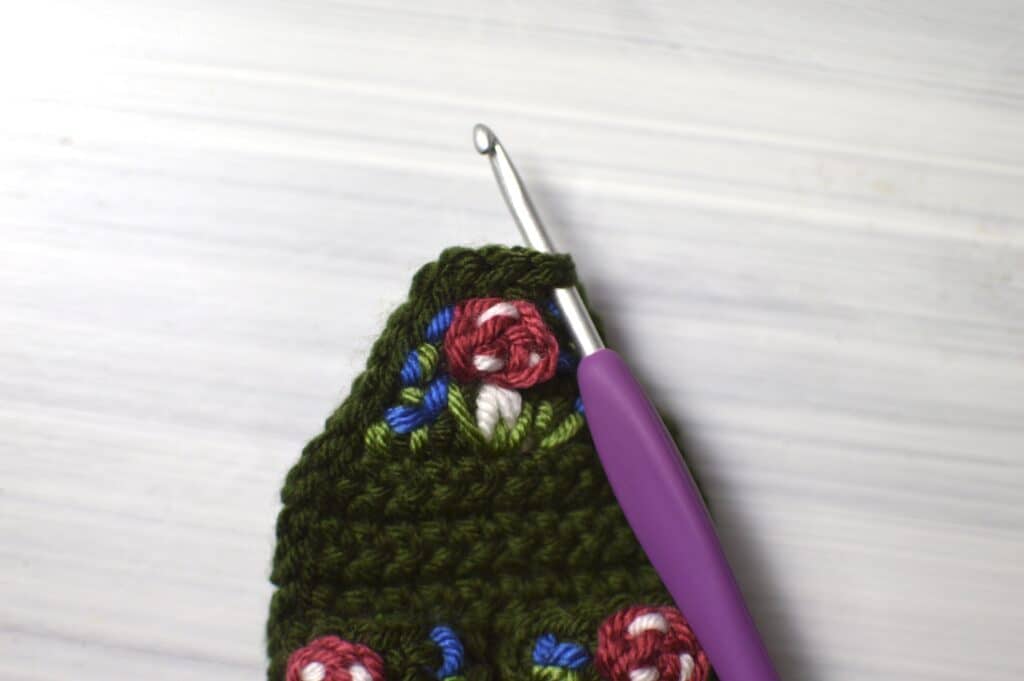
SUZI’S SKIRT (use beet yarn):
- Hold the doll upside down and go back to the marked stitch in R26.
- Round 26: Insert the hook into the marked st, yo with beet yarn and pull up a loop, ch 1 (does not count as a st), sc FLO into the same st, sc FLO into each st around. =22
- Round 27: 2sc into each st around. =44
- Round 28 – Round 29: sc into each st around. =44
- Round 30: sc into the next 3 sts, (inv sc dec, sc into the next 9 sts) x3, inv sc dec, sc into the next 6 sts. =40
- Round 31 – Round 41: sc into each st around. =40
- Cut the yarn, pull through the last stitch and make an invisible join before weaving in the ends.
SUZI’S HAND + ARM (make 2, use cream yarn):
- Round 1: Make a magic ring or a loose slip knot, ch 1 and put 8 sc into the magic ring or loose slip knot. =8
- Pull on the tail end to close the hole.
- Round 2 – Round 4: sc into each st around. =8
- Weave in the end and flip right side out.
- Round 5: Cluster into the next st, sc into the next st, pop the cluster out to the right side to make the thumb, sc into the next 6 sts. =8
- Round 6: inv sc dec, sc into the next 2 sts, inv sc dec, sc into the next 2 sts. =6
- Round 7: 2sc into the next st, sc into the next 2 sts, 2sc into the next st, sc into the next st. Insert the hook into the next st, yu and pull up a loop, yo with beet yarn and pull through the loops on the hook. =8
- with the beet yarn:
- Round 8: sc into the next 2 sts, 2sc into the next st, sc into the next 5 sts. =9
- Cut the cream yarn and weave in the ends. Start stuffing the hand and arm with polyester fiberfill and continue stuffing as you continue with the pattern.
- Round 9: sc BLO into each st around until 1 st remains. Mark the next FLO with a new st marker and sc BLO into that same st. =9
- Round 10 – Round 12: sc into each st around. =9
- Round 13: sc into the next 2 sts, inv sc dec, sc into the next 5 sts. =8
- Round 14: sc into the next 4 sts, inv sc dec, sc into the next 2 sts. =7
- Round 15: inv sc dec, sc into the next 5 sts. =6
- Round 16: sc into each st around. =6
- Cut the yarn, pull through the last stitch and go back to Round 9.
SUZI’S SLEEVE + CUFF (use beet yarn):
- Round 9: Hold the arm upside down and insert the hook into the marked st. Pull up a loop with beet yarn, ch 1 (does not count as a st), sc FLO into the same st and sc FLO into each st around. =9
- Round 10 – Round 12: sc into each st around. =9
- Cut the yarn, pull through the last stitch and make an invisible join before sewing the arm to the doll three rows down at the neck. Weave in the ends.
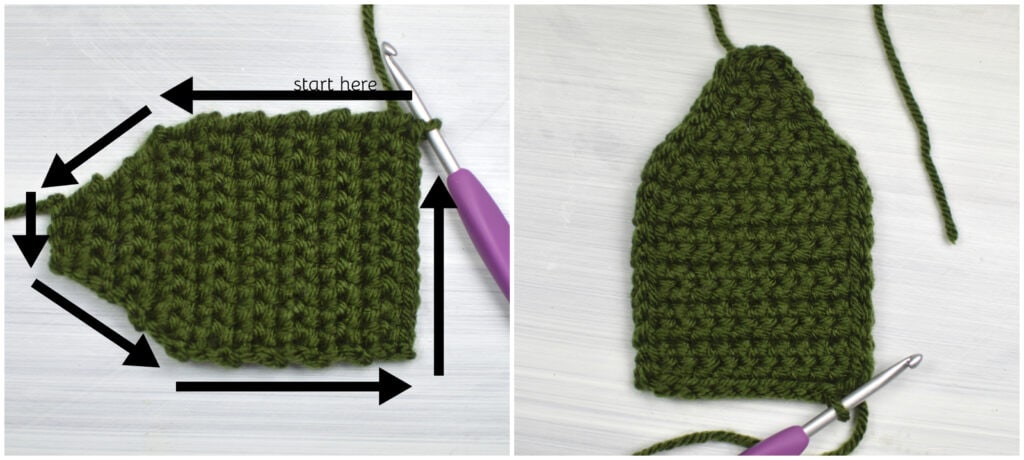
SUZI’S APRON (use hunter green yarn):
- Row 1: ch 4, starting in the 2nd ch from the hook, sc into each ch across. =3
- Row 2: ch 1 (does not count as a st), turn the work, 2sc into the same st, sc into the next st, 2sc into the last st. =5
- Row 3: ch 1, turn the work, sc into each st across. =5
- Row 4: ch 1, turn the work, 2sc into the same st, sc into the next 3 sts, 2sc into the last st. =7
- Row 5: ch 1, turn the work, 2sc into the same st, sc into the next 5 sts, 2sc into the last st. =9
- Row 6: ch 1, turn the work, 2sc into the same st, sc into the next 7 sts, 2sc into the last st. =11
- Row 7 – Row 17: ch 1, turn the work, sc into the same st, sc into each st across. =11
- for the border:
- Row 1: sl st around the border of the apron.
APRON TIES (make 2, use hunter green yarn):
- Insert the hook into the top corner of the apron and pull up a loop with hunter green yarn, ch 30.
- Cut the yarn and weave in the ends.
APRON BELT (use hunter green yarn):
- Row 1: ch 111, starting in the 2nd ch from the hook, sc into each st across. =110
- Cut the yarn, pull through the last stitch, weave in the ends, hot glue to the apron after decorating and embroidering and tie around the doll’s waist.
APRON POCKET (make 2, use hunter green yarn):
- Row 1: ch 5, sc into the 2nd ch from the hook and into each ch across. =4
- Row 2 – Row 4: ch 1, turn the work, sc into the same st and into each st across. =4
- for the border:
- Row 1: ch 1, sl st down the side, ch 1, sl st across the bottom, ch 1, sl st up the other side.
- Cut the yarn, sew to the front of the apron and weave in the ends.
![]()
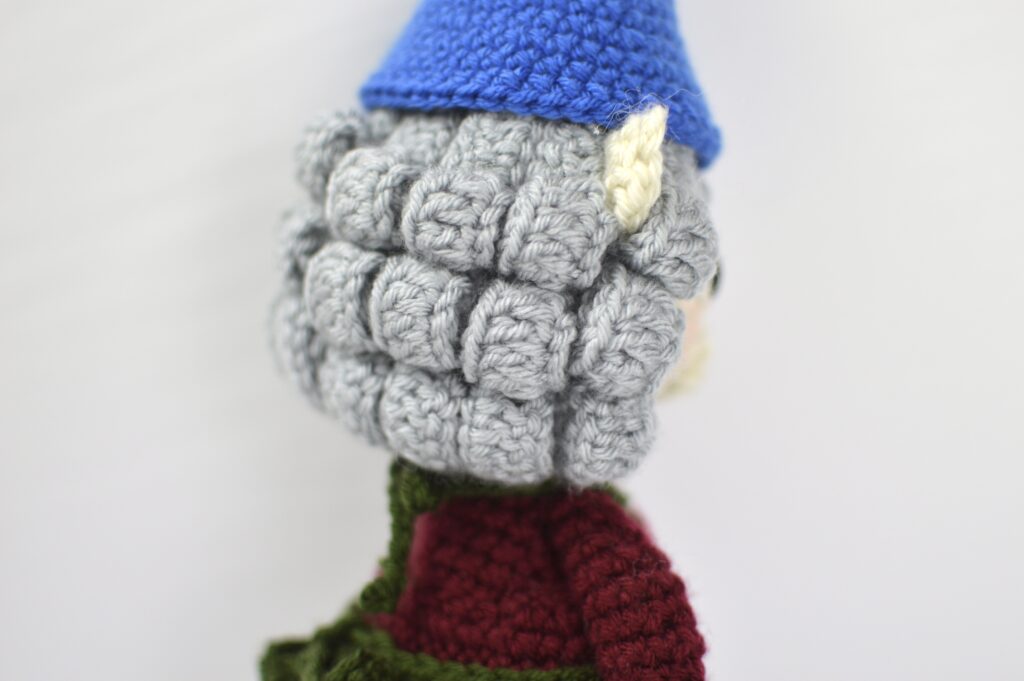
SUZI’S HAT (use bright blue yarn):
- Round 1: Make a loose slip knot or a magic ring, ch 1 and put 6 sc into the loose slip knot or magic ring. =6
- Pull on the tail end to close the hole.
- Round 2 – Round 4: sc into each st around. =6
- Round 5: 2sc into each st around. =12
- Round 6 – Round 7: sc into each st around. =12
- Round 8: *2sc into the next st, sc into the next st. Repeat from the * around. =18
- Round 9 – Round 10: sc into each st around. =18
- Round 11: *2sc into the next st, sc into the next 2 sts. Repeat from the * around. =24
- Round 12 – Round 13: sc into each st around. =24
- Round 14: *2sc into the next st, sc into the next 3 sts. Repeat from the * around. =30
- Round 15 – Round 16: sc into each st around. =30
- Round 17: *2sc into the next st, sc into the next 4 sts. Repeat from the * around. =36
- Round 18: sc into each st around. =36
- Round 19: *2sc into the next st, sc into the next 5 sts. Repeat from the * around. =42
- Round 20 – Round 22: sc into each st around. =42
- Cut the yarn, pull through the last stitch and make an invisible join before weaving in the ends.
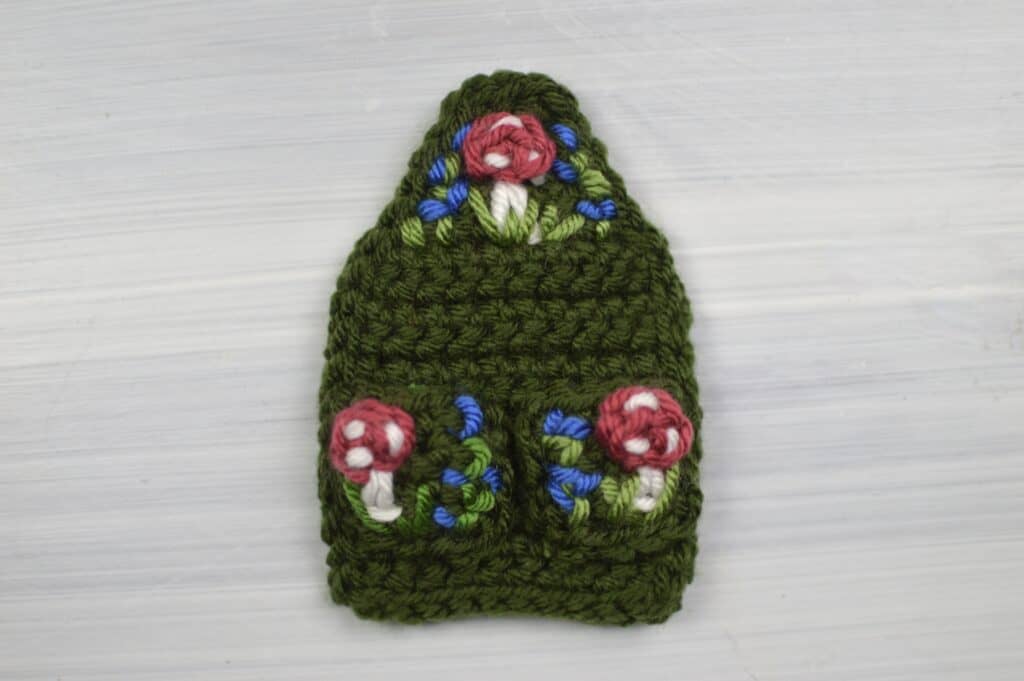
MUSHROOM CAP (make 3, use cranberry yarn):
- Round 1: Make a loose slip knot or a magic ring, ch 1 and put 3 sc into the loose slip knot or magic ring. =3
- Pull on the tail end to close the hole. Sew to the apron, weave in the ends and embroider white spots and a white stem.
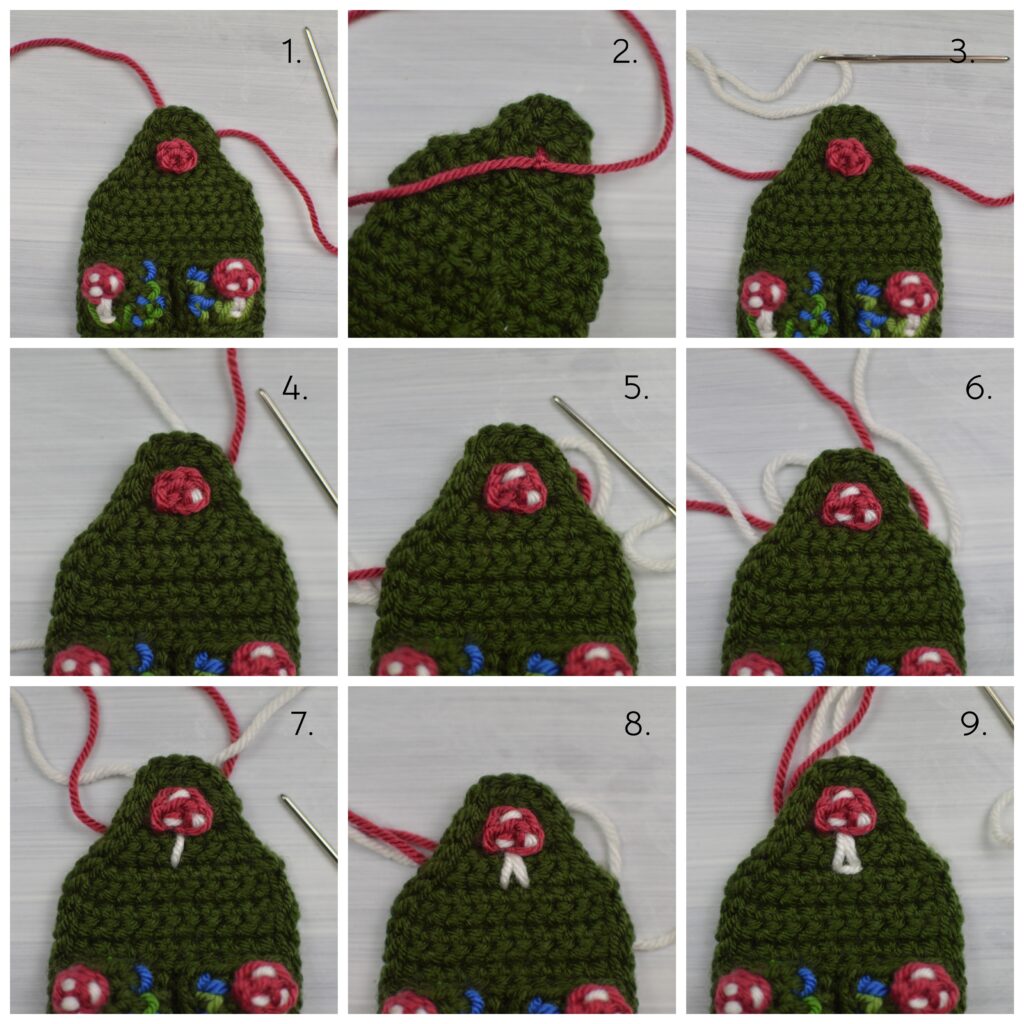
FLOWER STEMS + GRASS (use cedar yarn):
- Embroider the grass and stems.
FLOWERS (use bright blue yarn):
- Embroider the flowers.
SUZI’S CHRISTMAS VEST (use cedar yarn):
- Row 1: ch 41, sc into the 2nd ch from the hook and into each ch across. =40
- Row 2: ch 1 (does not count as a st), turn the work, sc into the same st, sc into the next st, sc2tog, *sc into the next 2 stitches, sc2tog. Repeat from the * across. =30
- Row 3: ch 1, turn the work, sc into the same st, sc2tog, sc across until 3 sts remain, sc2tog, sc into the last st. =28
- Row 4: ch 1, turn the work, sc into the same st and into the next 5 sts, sc2tog, sc into the next 13 sts, sc2tog, sc into the next 5 sts. =26
- Row 5: ch 1, turn the work, sc into the same st and into the next 5 sts, sc2tog, sc into the next 11 sts, sc2tog, sc into the next 5 sts. =24
- Row 6: ch 1, turn the work, sc into the same st and into the next 5 sts, sc2tog, sc into the next 9 sts, sc2tog, sc into the next 5 sts. =22
- Row 7: ch 1, turn the work, sc into the same st and into each st across. =22
- Row 8: ch 1, turn the work, sc into the same st and into the next 4 sts, ch 6, sk 4, sc into the next 5 sts, ch 6, sk 4, sc into the next 4 sts. =26
- Row 9: ch 1, turn the work, sc into the same st and into the next 3 sts, sc into the next 6 chs, sc into the next 5 sts, sc into the next 6 chs, sc into the next 5 sts. =26
- for the border:
- (RS) ch 1 with cranberry yarn, sc down the left side and carry the cedar yarn, ch 1 with cedar yarn, sc across the bottom and carry the cranberry yarn, ch 1 with cranberry yarn, sc up the right side.

- Cut the yarn, pull through the last stitch and weave in the ends.
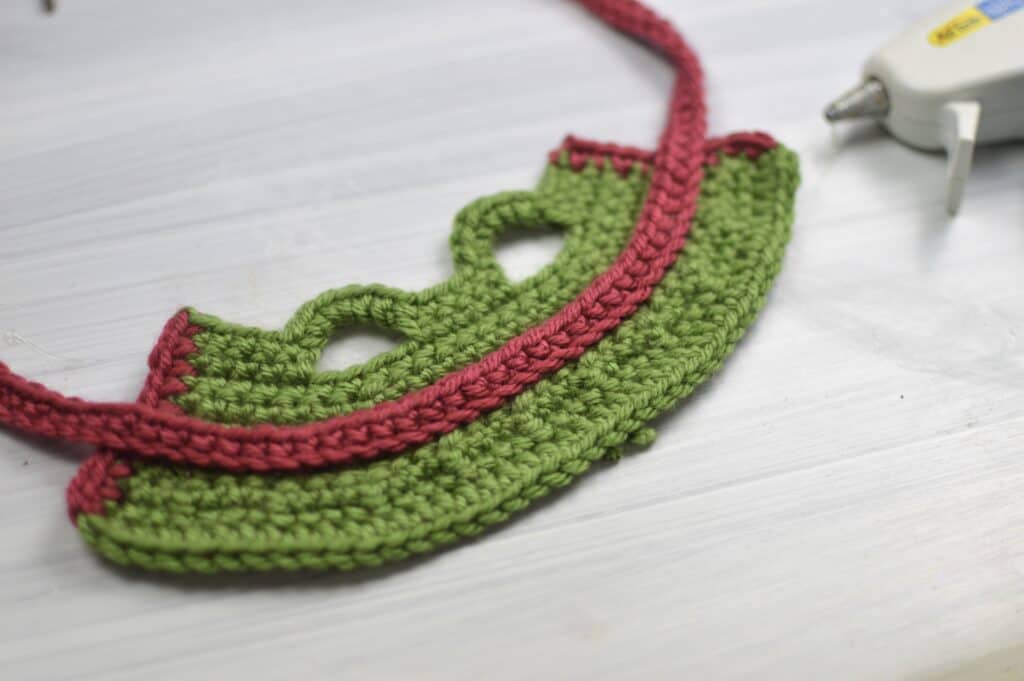
CHRISTMAS SASH/BELT (use cranberry yarn):
- Row 1: ch 111, starting in the 2nd ch from the hook, sc into each st across. =110
- Cut the yarn, pull through the last stitch, weave in the ends, glue to the sweater and tie around the dolls waist.
![]()
THE END! I would love to see your Alex In Yarnder Land Dolls! Tag @_with_alex and use #crochetingwithalex on Instagram so I can see and share your projects! Suzi’s Introduction Story will be available next Friday on my personal blog! Join the Alex In Yarnder Land Facebook Group to keep up to date on all things Alex In Yarnder Land!
If you want to keep up with me, Alex, on social media for other fun projects, follow me on social media: Blog | Instagram | Facebook | YouTube | Pinterest | Ravelry
If you want to keep up with all things Clover, follow us on: Facebook | Twitter | Instagram | Pinterest | YouTube | Ravelry