Thanksgiving Pie Garland!
Welcome back everybody, it’s Rumer (@rumer_has_it on IG)! Now that Halloween has come and gone, there’s been a boost in the online decor debate, with some in favor of jumping straight to Christmas and others saying that you can’t forget about Thanksgiving….Well, for those of you who want to highlight the autumnal holiday in between Halloween and Christmas, here’s a DIY project you NEED to try: a pie garland! So let’s get crafting 🙂
MATERIALS:
- Clover Chacopen (Blue) with Eraser (Water Soluble Pen)
- various shades of brown, cream, and orange felt
- scrap fabric of something red/burgundy colored
- Iron
- ruler
- paper
- pen/pencil
- matching thread
- Needle
- fusible bonding web
- Pinking shears
- Patchwork Scissors
- burlap ribbon (0.8 in wide)
- twine
- glue gun
INSTRUCTIONS:
- To create a pie crust template, measure a triangle on a piece of paper using a pen/pencil and ruler. The triangle will be 4” wide and 6” long.
- To create the pie filling template, create a second triangle that is about an 1/8 “ shorter on both sides of the triangle.
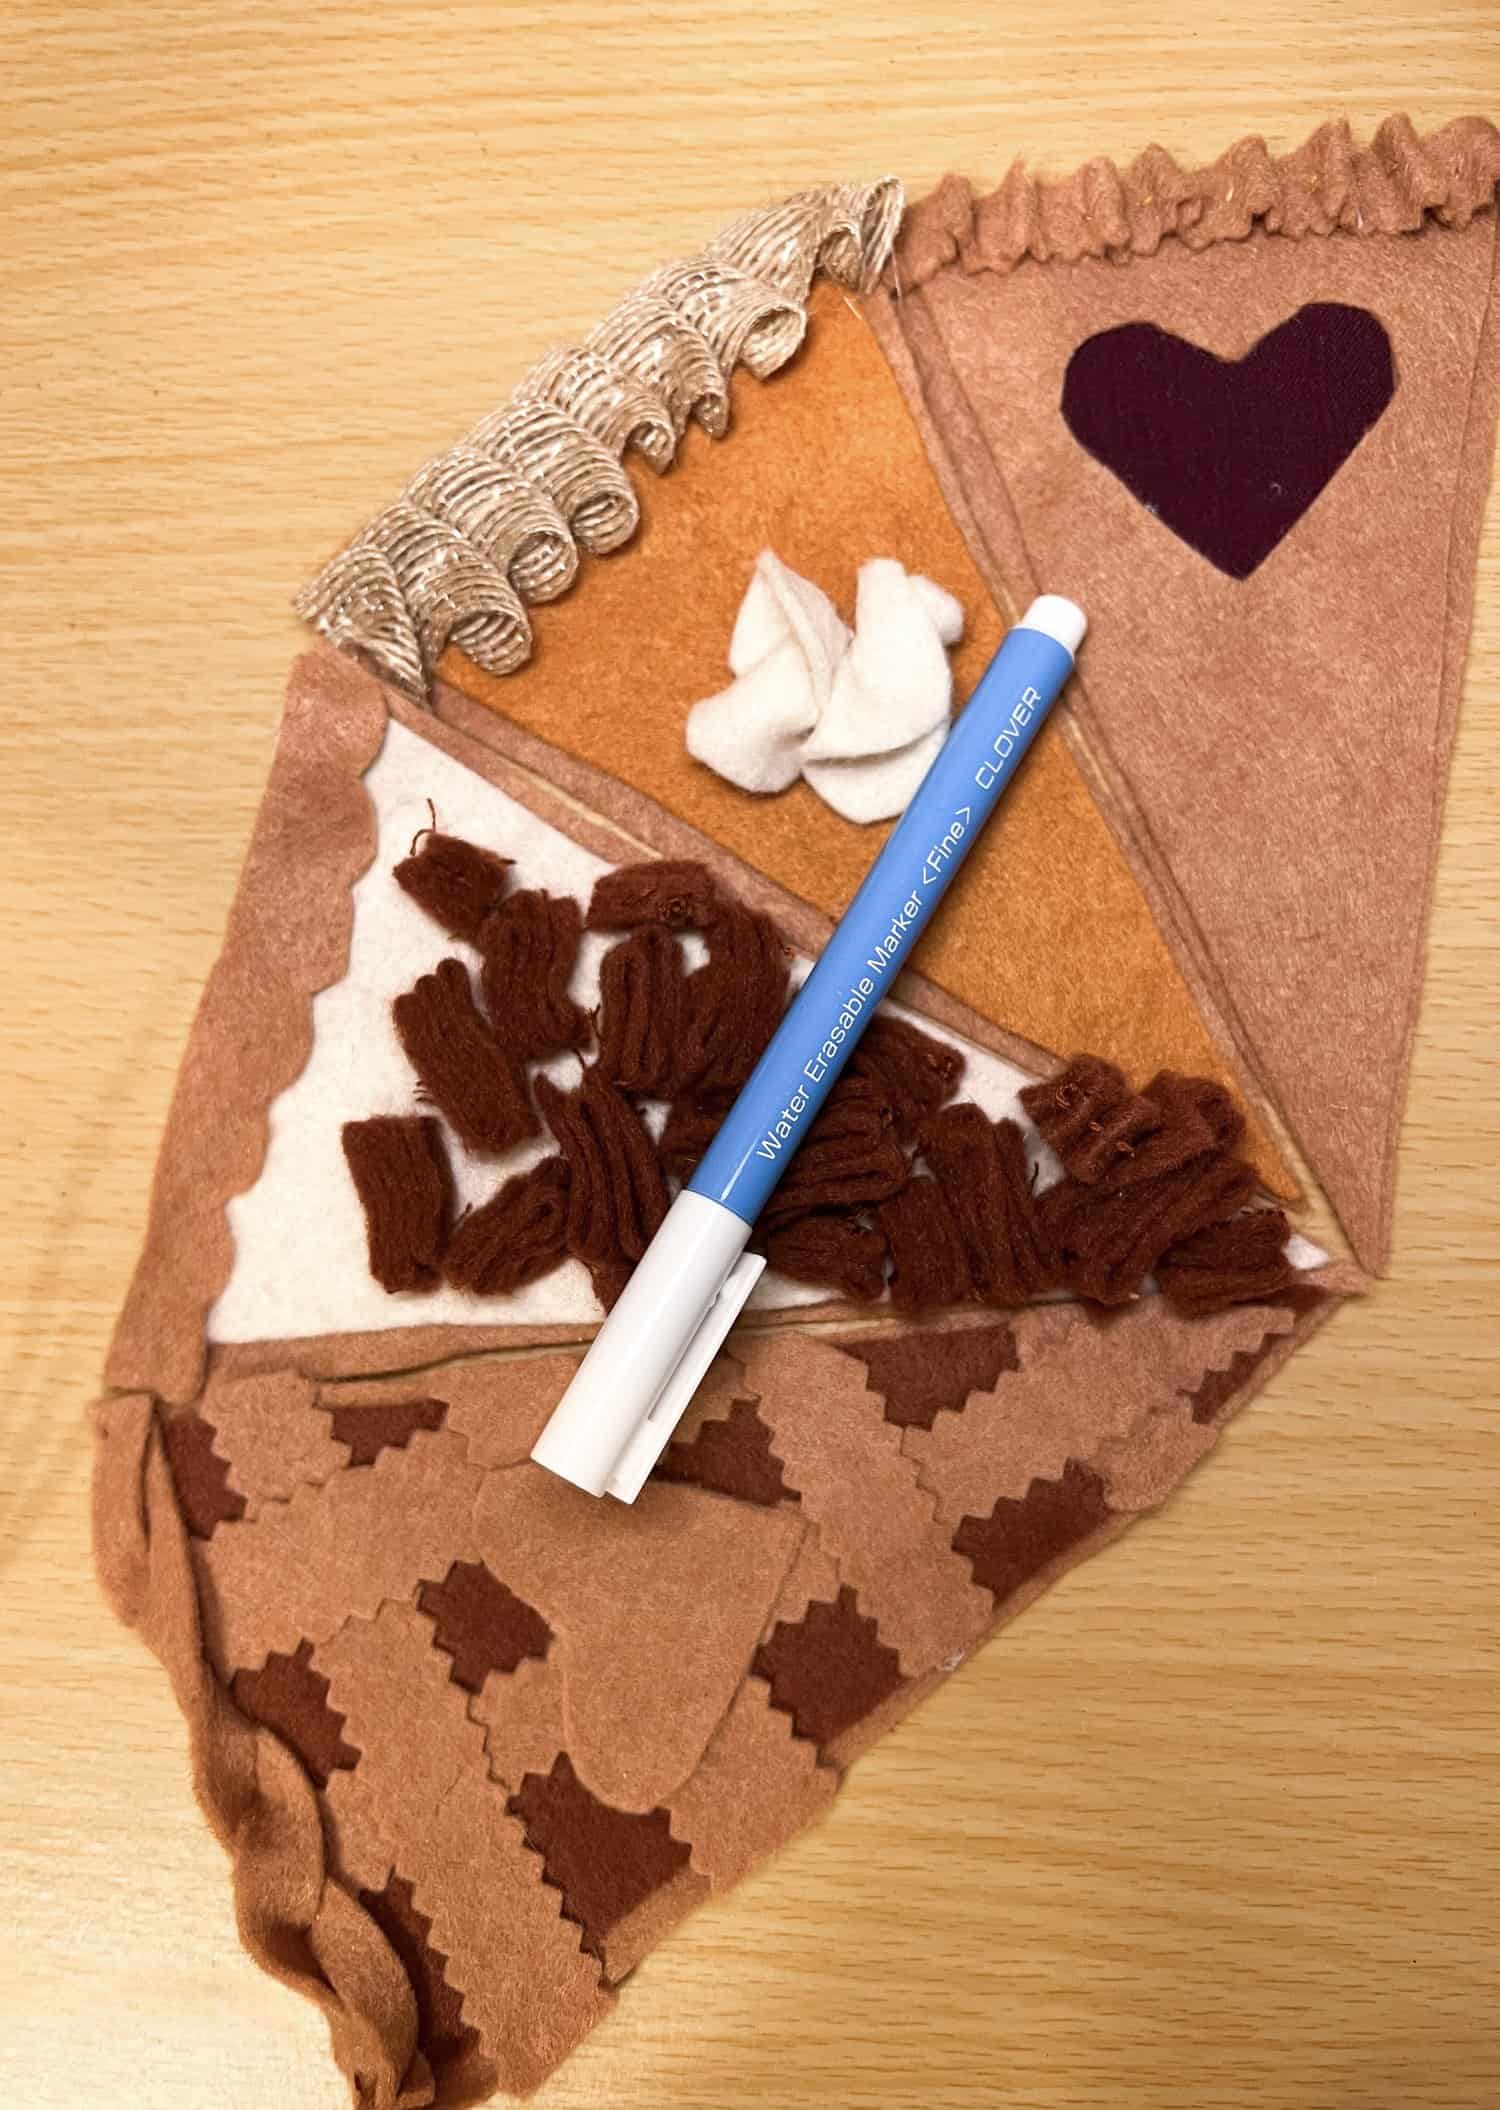
- Trace out 8 pie crusts and 2 pie fillings on a tan brown felt using a water erasable pen. Trace 2 pie fillings on a darker brown, cream, and orange felt respectively.
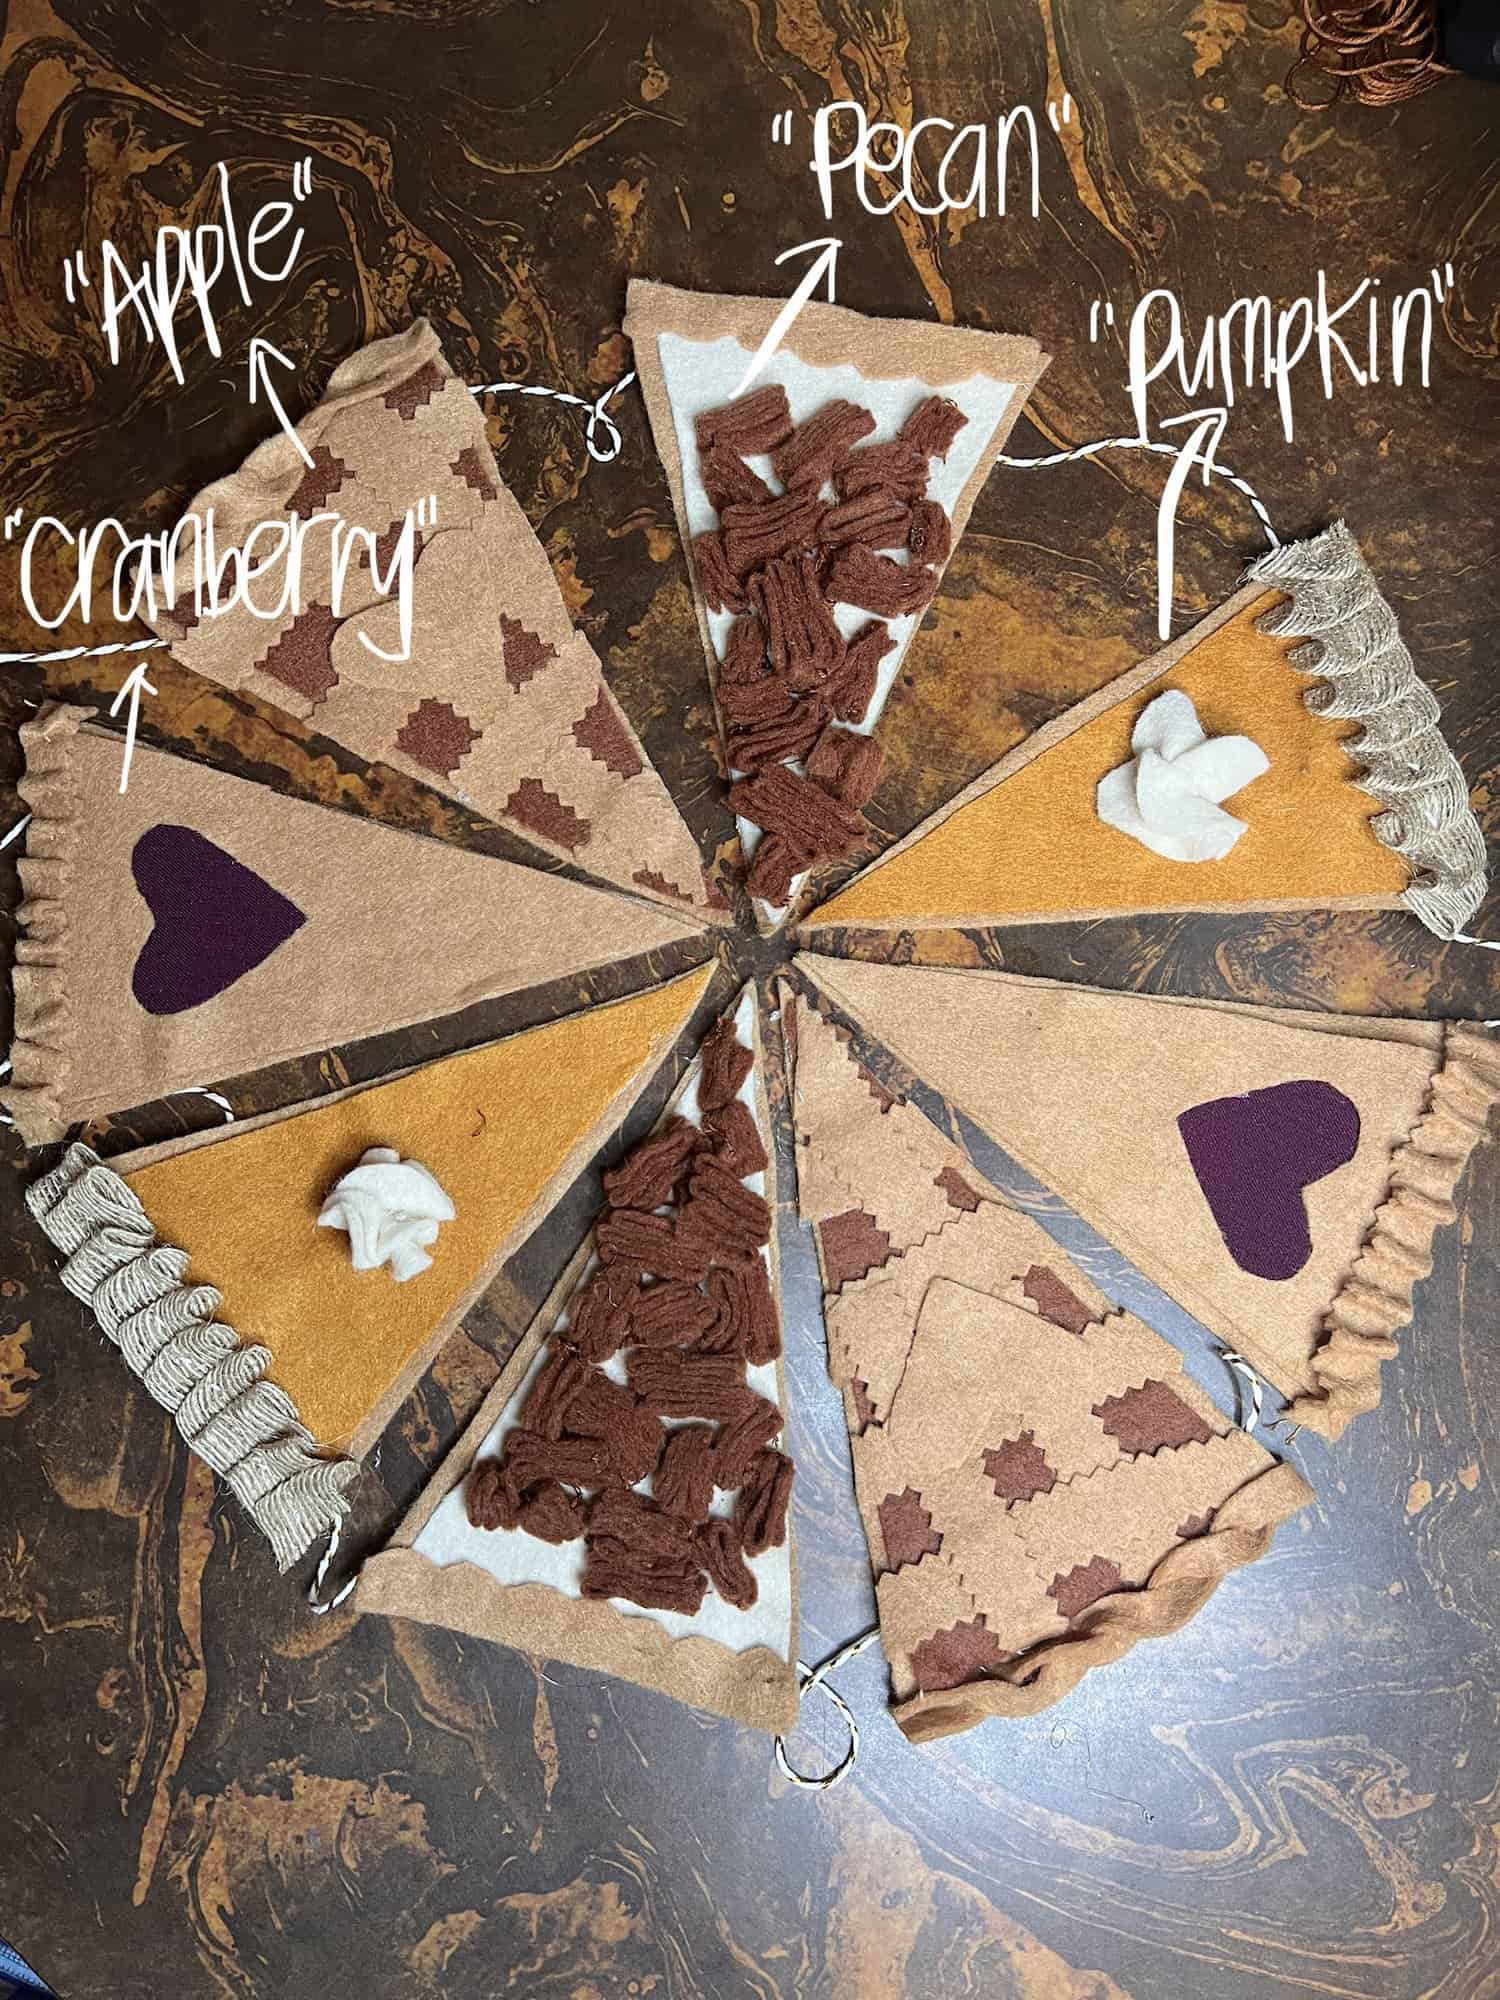
PUMPKIN PIE:
- Use fusible bonding web to attach the orange pie filling to the tan pie crust and iron to adhere.
- Cut out circular pieces of cream felt about ~1”-1.5” or so in diameter. You can play around with how many to cut 2-4 pieces per pie slice should suffice. To create the whipped cream topping, organically fold the circular pieces and hand sew them together using coordinating thread.
- Add burlap ribbon to the top of the pie slice to act as crust. Hand sew in place and pleat as you go. Trim ribbon down to match the width of the pie slice.
PECAN PIE:
- Use fusible bonding web to attach cream pie filling to the tan pie crust and iron to adhere.
- Cut out strips of dark brown felt, about 0.5” wide. Fold the strip a few times and hand sew in coordinating thread to secure in place. You don’t have to be super precise about folding the strip to create the look of a pecan.
- Repeat until you have enough pecans to cover the pie.
- Hand sew pecans in place using coordinating thread. Be sure to leave room to add crust at the top.
- To create crust, cut a repetitive rounded shape shape on about 0.5” of tan felt. Hand sew in place with coordinating thread. Try to ensure the right side of the crust doesn’t show any stitches for a cleaner look.
CRANBERRY PIE:
- Use fusible bonding web to attach red/maroon pie filling square to the tan pie crust and iron to adhere.
- Cut a heart shape out of the tan pie crust felt piece. Be sure to check where the red/maroon pie filling is so that it will line up with the cutout.
- Apply fusible bonding web to attach the tan felt pie crust top over the red/maroon pie filling square and iron to adhere.
- To create crust, cut a strip of tan felt with pinking shears on one side and straight edge on the other. This will help create texture. Hand sew the crust with pleats along the top of the pie slice.Try to ensure the right side of the crust doesn’t show any stitches for a cleaner look
APPLE PIE:
- Use fusible bonding web to attach dark brown pie filling to the tan pie crust and iron to adhere.
- Cut strips of tan felt about 0.5” wide using pinking shears. Lay these strips along the pie slice going vertically and horizontally, alternating (over, under) which strip shows on top. Secure in place using fusible bonding web and iron.
- Optional: use leftover heart shape from cranberry pie crust and secure on top of the alternating strips using fusible bonding web and iron!
- To create crust, twist two strips of tan felt (~¼” wide) together and hand sew with coordinating thread to the top of the pie slice. Trim down to size.
FINISHING:
- Once all the pie slices are complete, cut out 8 rectangles of felt about 1”x3”. This will be placed on the wrong side of the pie slice to secure it to the twine.
- Cut a piece of twine to fit the area where you will be hanging the garland (mine is about 4 ft long).
- Leave about a foot of the twine empty on each end so that the garland can be tied to hang up.
- Place the pie slices in whatever order you’d like and space them out evenly (mine were about 3.5” apart).
- Use a glue gun to secure the felt rectangle to the wrong side of the pie slice about ¼” from the top, making sure the twine is secured in between the pieces of felt. Repeat until all pie slices are secured.
Now you’ve got a fall inspired piece of holiday decor. If you make it and use it this holiday season, feel free to tag me on IG: @rumer_has_it!
If you want to keep up with me, Rumer, on social media for other fun projects, follow me on Instagram @rumer_has_it!
If you want to keep up with all things Clover, follow us on:
Facebook | Twitter | Instagram | Pinterest | YouTube | Ravelry