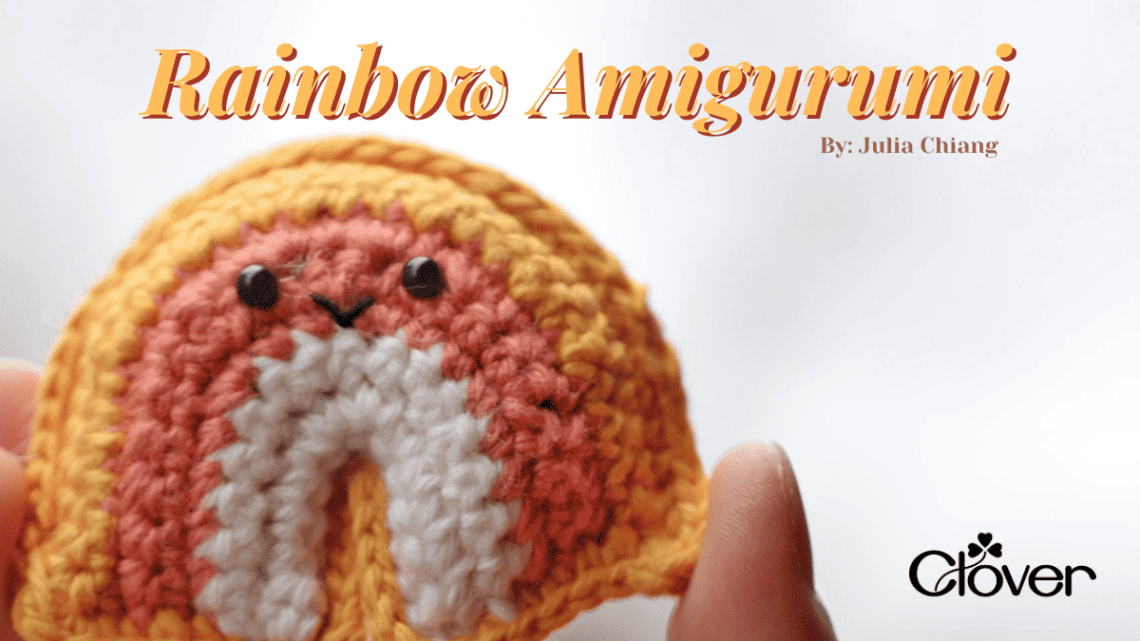
Rainbow Amigurumi- Crochet Pattern
Hi everyone! I’m Julia from Little World of Whimsy, and I’m here to share a cute rainbow pattern just in time for the beginning of Spring!
This adorable tiny rainbow has a bright smile and is sure to light up your day! This amigurumi is worked in turned rows in two halves and then crocheted together. The three stripes can be customized to fit any color scheme and this project works great as a party favor, bag charm, or keychain!

You can get the inexpensive, beautifully formatted, printable PDF on Etsy here.
Materials
Clover Amour Crochet Hook C (2.5 mm)- Art No. 1041/C
WeCrochet CotLin (Sport)
(<1 skein) White
(<1 skein) Marigold (orange)
(<1 skein) Conch (coral)
Black Embroidery thread
Mini Patchworks Scissors – Art. No 493/CW
Quick Locking Stitch Marker (Small) – Art. No 3030
Darning Needle Set (Bent Tip) – Art. No 3121
Fiberfill stuffing
Abbreviations
CC: contrast color
ch: chain
dec: decrease
FSC: foundation single crochet (tutorial here)
inc: increase (2 scs in the same stitch)
MC: main color
MR: magic ring
rnd: round
sc: single crochet
slst: slip stitch
st(s): stitch(es)
x sc: sc x number of times
(x sts): x total stitches in round/row
(…) x: repeat stitches within brackets x times
Technical Notes
- Crochet in turned rows, unless specified otherwise. Use a stitch marker or piece of yarn to keep track of the last stitch in each round.
- When filling with polyester stuffing, pull apart each large chunk into many smaller chunks. This ensures an even distribution of firmness within the amigurumi.
- To avoid large holes in the crochet fabric, increase tension until the holes cannot be seen, or choose a crochet hook a size down.
Color Coding
In this pattern, the MC is white, CC1 is coral, and CC2 is orange.
Final Size
3″ x 2″
PATTERN
RAINBOW HALF (begin in MC)
Row 1: FSC 12 (see Abbrev.), chain and turn (12 sts)
Row 2: 5 sc, inc x2, 5 sc, ch and turn (14 sts)
Row 3: 5 sc, (sc, inc) x2, 5 sc, ch and turn (16 sts)
Switch to CC1, see fig. 1 for how to seamlessly
change colors.
Row 4: 5 sc, (2 sc, inc) x2, 5 sc, ch and turn (18 sts)
Row 5: 5 sc, (sc, inc) x4, 5 sc, ch and turn (22 sts)
Row 6: 5 sc, (sc, inc) x6, 5 sc, ch and turn (28 sts)
Switch to CC2.
Row 7: 5 sc, (2 sc, inc) x6, 5 sc, ch and turn (34 sts)
Row 8: sc across (34 sts)
Invisible finish off and weave in the end.
Make another rainbow half but do not finish off. This half will be the front half.
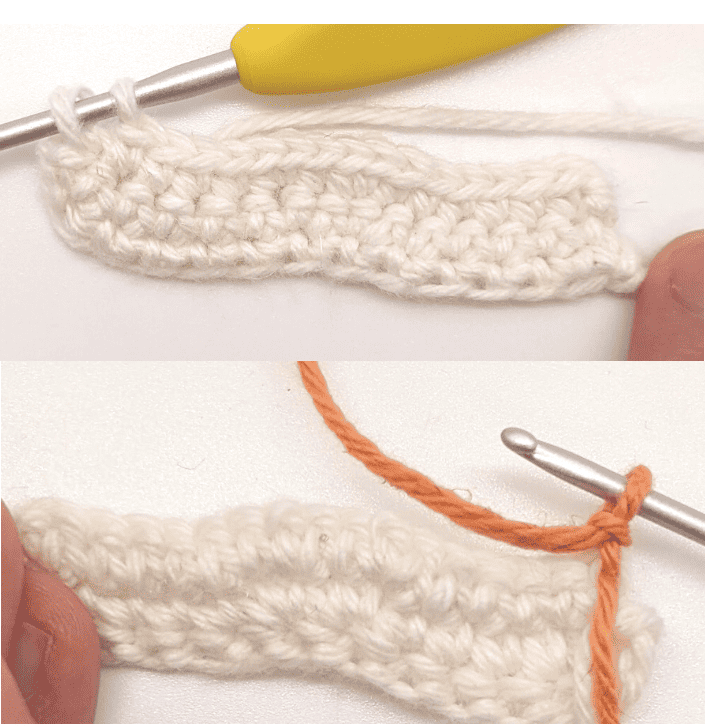
Fig. 1: For a seamless color change, switch colors in the last stitch of the last row with the old color. Work half of the stitch, but pull through the last two loops with the new color. Chain and turn in the new color.
Face details: in the front half, insert two 4.0mm safety eyes into the CC1 stripe, with 3 stitches in between. Using black embroidery thread, embroider a “v” shaped mouth one row below the eyes (see tutorial here and fig. 2 on the right).
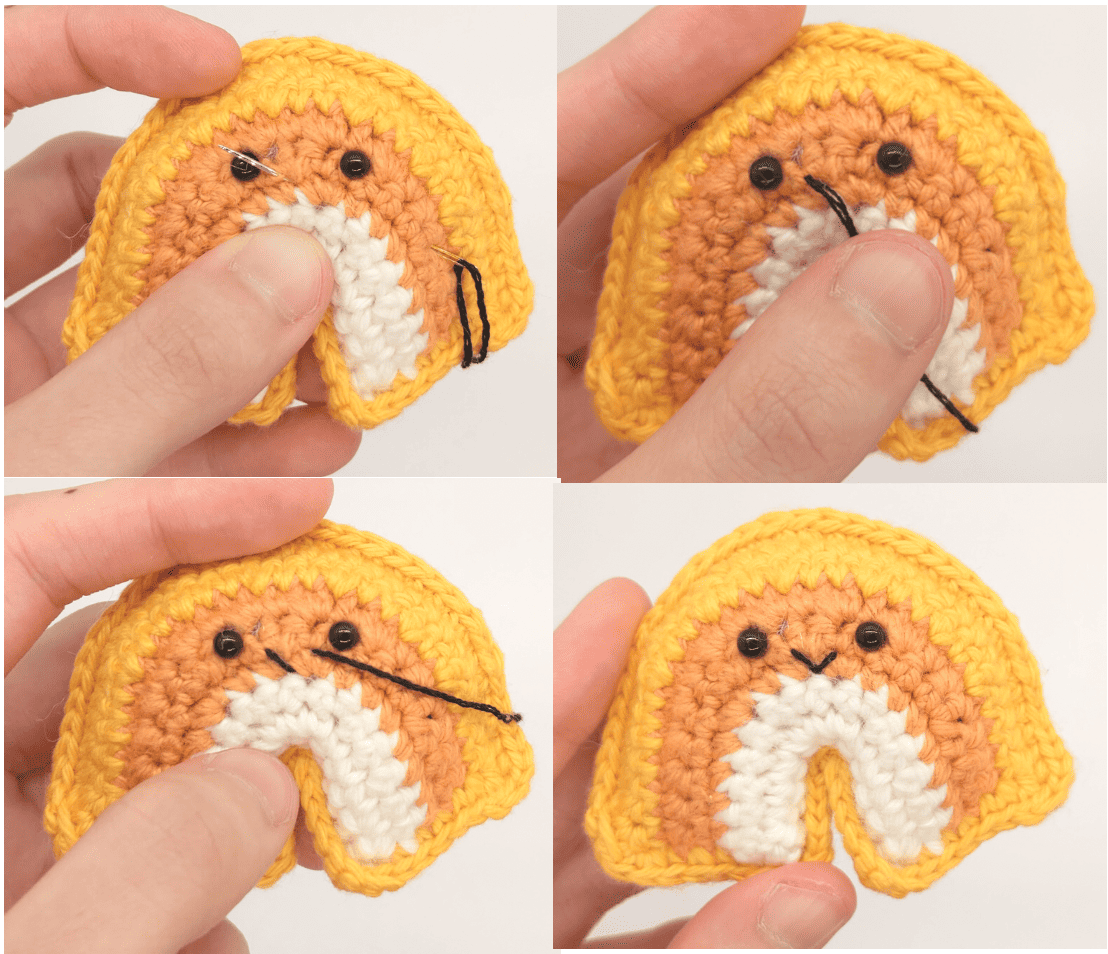
Fig. 2: Embroider a “v” shaped mouth below the eyes, making sure that the top of the “v” lines up with the bottom of the eyes.
ASSEMBLY (in MC)
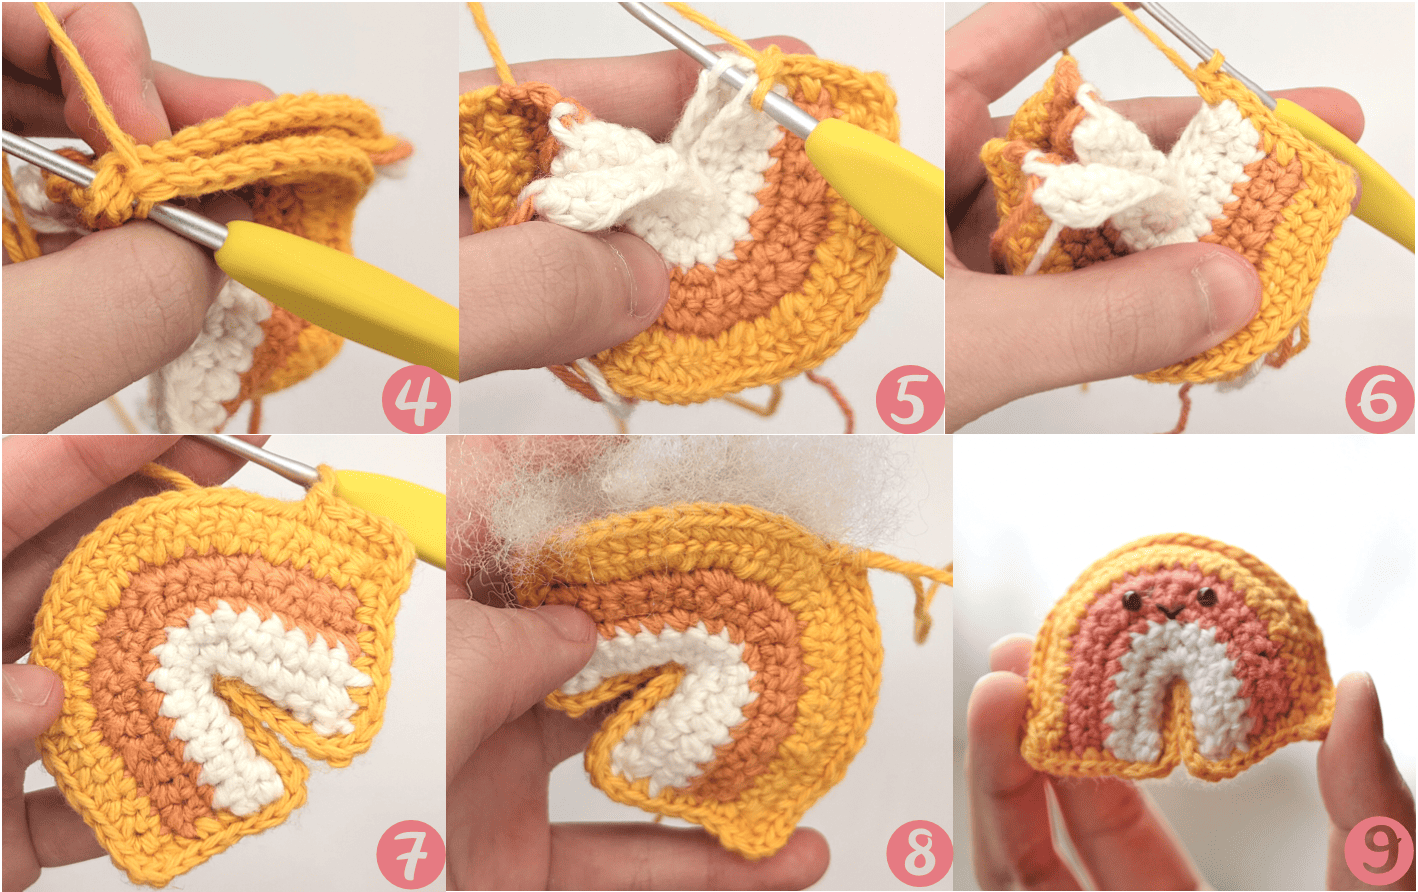
Line up both rainbow halves and pin them together (fig. 4), making sure that the colored stripes are lined up. You should be starting off where we left off for the second half, beginning at the red dot on fig. 3.
Figure 3 below demonstrates what the finished piece will look like. We will start crocheting at the red dot and work a sc border through both halves, with about one sc per row. At each blue corner, we will work 3 scs into that stitch.
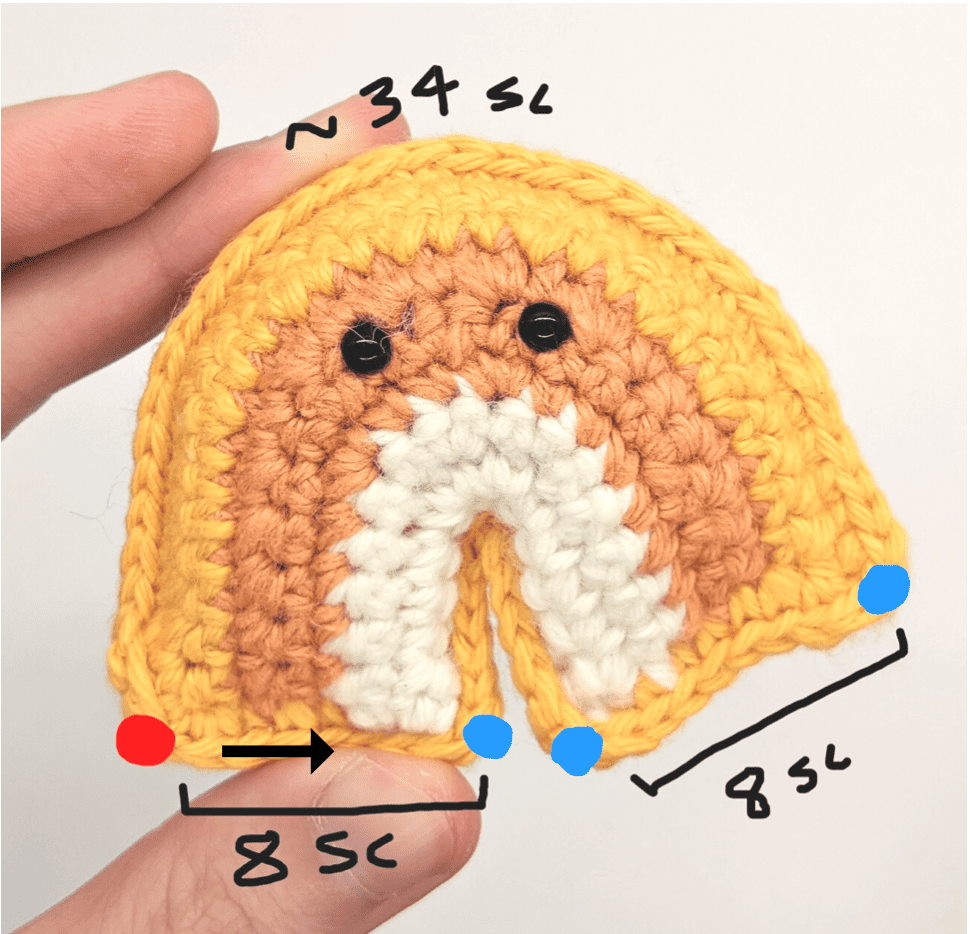
Fig. 3: Diagram of finished project and how we will work a border. Start at the red dot and work in the direction of the arrow. For the border, work one sc per row/stitch, with 3 scs at each corner (the blue dots).
Hold both halves together, insert the crochet hook through the first single crochet stitch through both layers (fig. 4). Continue working into both layers and work a single crochet border all around, working one sc for every row of the two short sides, with 3 scs in each corner (fig. 5 and 6).
Stuff as you go (fig. 8), and invisible finish off (fig. 9).
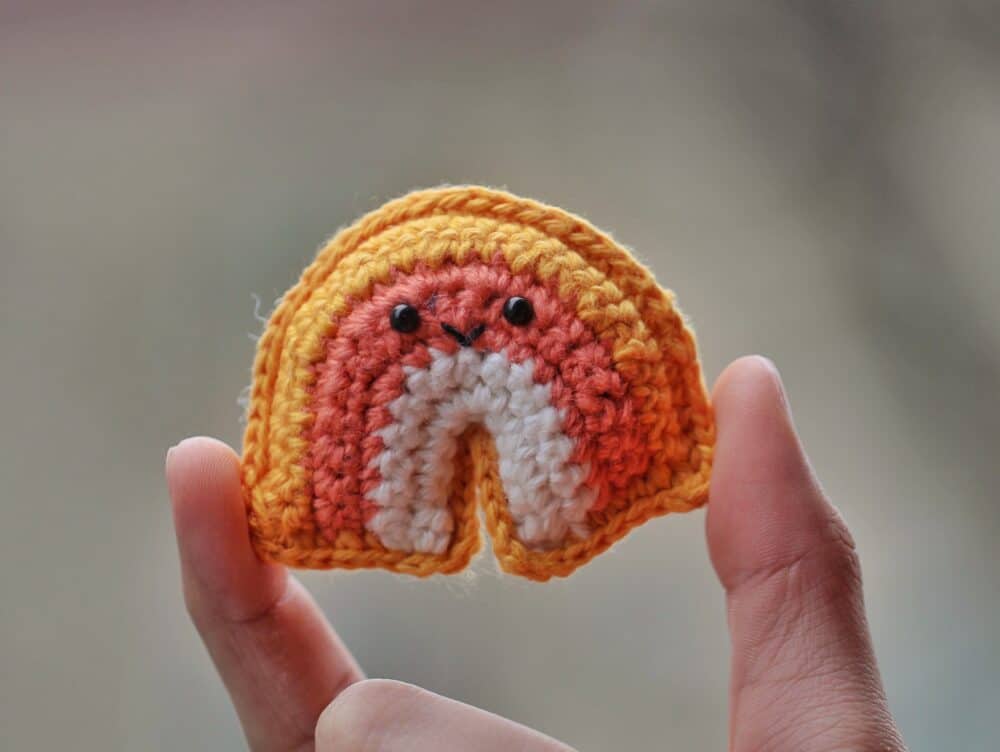
Your Mini Rainbow is all done!
I hope you enjoyed crocheting it and found the pattern helpful. I would love to see your finished amigurumi, so share a picture on Instagram with me by using the #littleworldofwhimsy and tagging me @littleworldofwhimsy.
This pattern is free but if you’d like to purchase a low-cost PDF, you can find it here.
Once again, if you have any questions don’t hesitate to reach out to me with a direct message on Instagram @littleworldofwhimsy or through email at littleworldofwhimsy@gmail.com.
Happy crocheting!
Stay connected with Clover on Facebook | Twitter | Instagram | Pinterest | YouTube | Ravelry