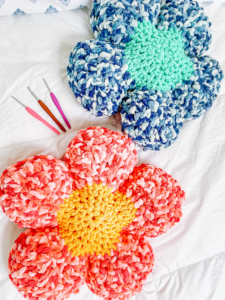
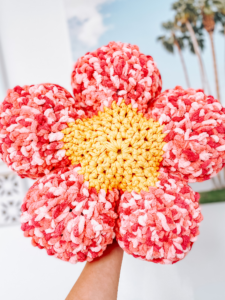
Flower Plushie Crochet Pattern
Hi friends, here comes the cutest crochet flower for your feed. I’m Christina from Citybrightknits, and I am overjoyed to be sharing my Flower Plushie Pattern with you! I have been seeing lots of crochet flowers in my feed lately, and I wanted to join in the flowery fun. I am using ribbon yarn and velvet yarn along with my size 10mm Clover Amour hook to make this plush pillow. You’ll absolutely love how cute yours turns out once you make it!
Skill Crochet
Skill Level Beginner
Gauge 1 stitch = equals .5″
Final Measurements 19″L x 5″H x 19″W
Materials
262 gr/ 121 m / 132 yds total of bulky weight yarn – Jumbo Ribbon and I Wanna Make a Blankie
1 balls – Jumbo Ribbon (color Sunny Yellow)
1 balls – I Wanna Make a Blankie (color Zinnia) Use my link for JumboRibbon from Hobbii.
Tools
Clover Amour hook size 10mm or 12mm
Fiberfill
Scissors
Smaller hook for weaving in ends 10 Stitch markers
Abbreviations and Special Stitches
Beg- beginning Ch – chain
De – double crochet
Ext-sc- extended single crochet – Insert your hook into the stitch as to work a sc, pull up a loop, pull through, yarnover, pull through 2 loops.
Pm – place marker
Sk – skip
SI – slip stitch
Sp – space
Sts -stitches
Note
Meeting gauge is not important, but I have included all my measurements for you as a guide.
I use two kinds of yarn, but you can use one type of yarn if you prefer. I use Jumbo Ribbon yarn from Hobbii for the center circle, and I use I Wanna Make a Blankie cake from LionBrand for the petals. You will not use the entireamount of these balls; you will use approx ¼ of each ball for buying purposes. If you plan to use worsted weight yarnfor the project, I suggest holding three strands together to meet the weight.
Working with bulky yarn – I find that making circles can tend to curl. To avoid curling, be sure to pull enough yarn through at the start of each stitch. Allowing for a little extra yarn at the beginning of the stitch will help your stitchesto lay flat and prevent curling.
Also you may try going up a hook size if your stitches feel too tight.
Working with fiberfill – be sure to leave a small opening in order to stuff the pillow, then you will sew the opening shut once filling is complete. I find that it is helpful to smooth out the fill with your hand while stuffing the pillow, and thenpush the pillow around a bit in order to fill the empty spaces completely.
Use a stitch marker to indicate the start of each round, it makes it easier to count stitches.
Construction – this pattern is made by creating two center circles first, and adding petals to the circles. You will make two sides, front and back. These will be seamed together and stuffed with fiberfill.
Pattern
Let’s get started! You will create two circles, these will be the centers of the flower.
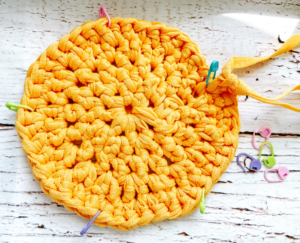
Center Circle (Yellow): make two
Begin by chaining 3, and join with a slip stitch into the first chain to create a ring. Round 1 – Ch 2. Into the ring,work 8 ext-sc. Pm. (9 sts)
Round 2 – Ch 2 (counts as stitch), work 1 ext-sc into the same chain space, work 2 ext-sc into each stitch around. Join into top of beg ch space. Pm. (18 sts)
Round 3 – Ch 2 (counts as stitch), work 1 ext-sc into each stitch around. Join into top of beg ch space. Pm. (18 sts)
Round 4 – Ch 2 (counts as stitch), work 1 ext-sc into the same chain space, work 2 ext-sc into each stitch around. Join into top of beg ch sp. Pm. (36 sts)
Round 5 – Ch 2 (counts as stitch), work 1 ext-sc into the next 2 sts, 2 ext-sc into the 4th stitch, *work 1 ext-sc into the next 3 sts, 2 ext-sc into the 4th stitch* around. Join into top of beg ch sp. Pm. (45 sts)
Center circle measures ~7″.
Cut yarn.
Mark where the petals will be:
Using your stitch markers, place a marker every 9 sts. (5 markers)
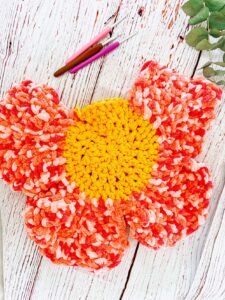
Petals (Pink): Make five
To begin, join the new color at the slip stitch you ended the center circle with.
Row 1- Ch 2 (counts as stitch), work 1 ext-sc into each stitch across. Turn. (9 sts) Row 2 – Ch 2 (counts as stitch),1 ext-sc into next 2 sts, work 2 ext-sc into next 3 sts, 1 ext-sc into last 3 sts. Turn. (12 sts)
Row 3 – Slip st into the first space, work 1 ext-sc into next 2 sts, 2 ext-sc into next 2 sts, 2 de into next st, 2 ext-sc intonext 2 sts, 1 ext-sc into next 2 sts, slip into last stitch.
Turn. (16 sts)
Row 4 – Repeat row 1; ext-sc into each stitch across. Turn. (16 sts)
*note, you will not chain at the beginning of rows 5 & 6.
Row 5 – Slip into first stitch, 1 ext-sc into next 3 sts, 2 ext-sc into next 2 sts, 2 de into next 2 sts, 2 ext-sc into next 2 sts, 1 ext-sc into next 3 sts, slip into last stitch. Turn. (20 sts)
Row 6 – slip into 2nd stitch from hook (counts as 2 sts) , 1 ext-sc into next 4 sts, slip stitch into the next 8 sts, 1 ext-sc into next 4 sts, slip stitch into the last 2 sts. (20 sts) Cut yarn.
You will make an additional four petals using the stitch markers as a guide where to begin and end each petal. Eachpetal is worked across 9 sts.
Make petals for the second center circle. You will have a front side and back side of the plush. You will join these two together and stuff with fiberfill.

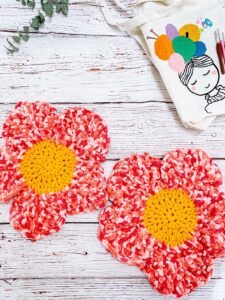
Joining the Front and Back:
To join the two pieces, lay them flat on top of each other with the right sides facing outwards. I recommend using a stitch marker to secure the sides together, this helps you evenly match the stitches while seaming. Secure all loose ends. Using a single crochet stitch, join along the outer petal edges. Note: I decided to use sc as the join because Ilike the crisp edge this stitch gives to the velvet blankie yam.
Single crochet into each stitch being sure to grab the complete stitches from both the front and back sides. Hint: you will have 4 loops to pull through from the two stitch heads. When you come to the end of the petal before the center, work a sc into the center circle stitch. This gives your petals a defined look before moving onto the nextpetal.
Once four of the five petals are seamed, you can begin stuffing with fiberfill. Stuff each individual petal completely and fill the center too. As you begin to close the last petal, gradually fill before closing shut. Cut yarn and secure, hideends inside the work.
You are now finished making your flower plushie, and I really hope you enjoyed this pattern.
Social Sharing
Thank you so very much for making my pattern. I would love to see your finished product! Share photos onFacebook, lnstagram, and Pinterest tagging @Citybrightknits. Find more patterns at www.citybrightknits.com and NOW on YouTube.
You are welcome to sell items made by this pattern. Please tag my account when sharing and selling online.
Care Instructions
Spot clean or wash by hand with a mild detergent. Gently dab out excess water. Lay flat. Gently stretch the sides while the piece is wet to maintain shape when air drying. For tips on handwashing knitwear, check out this post.