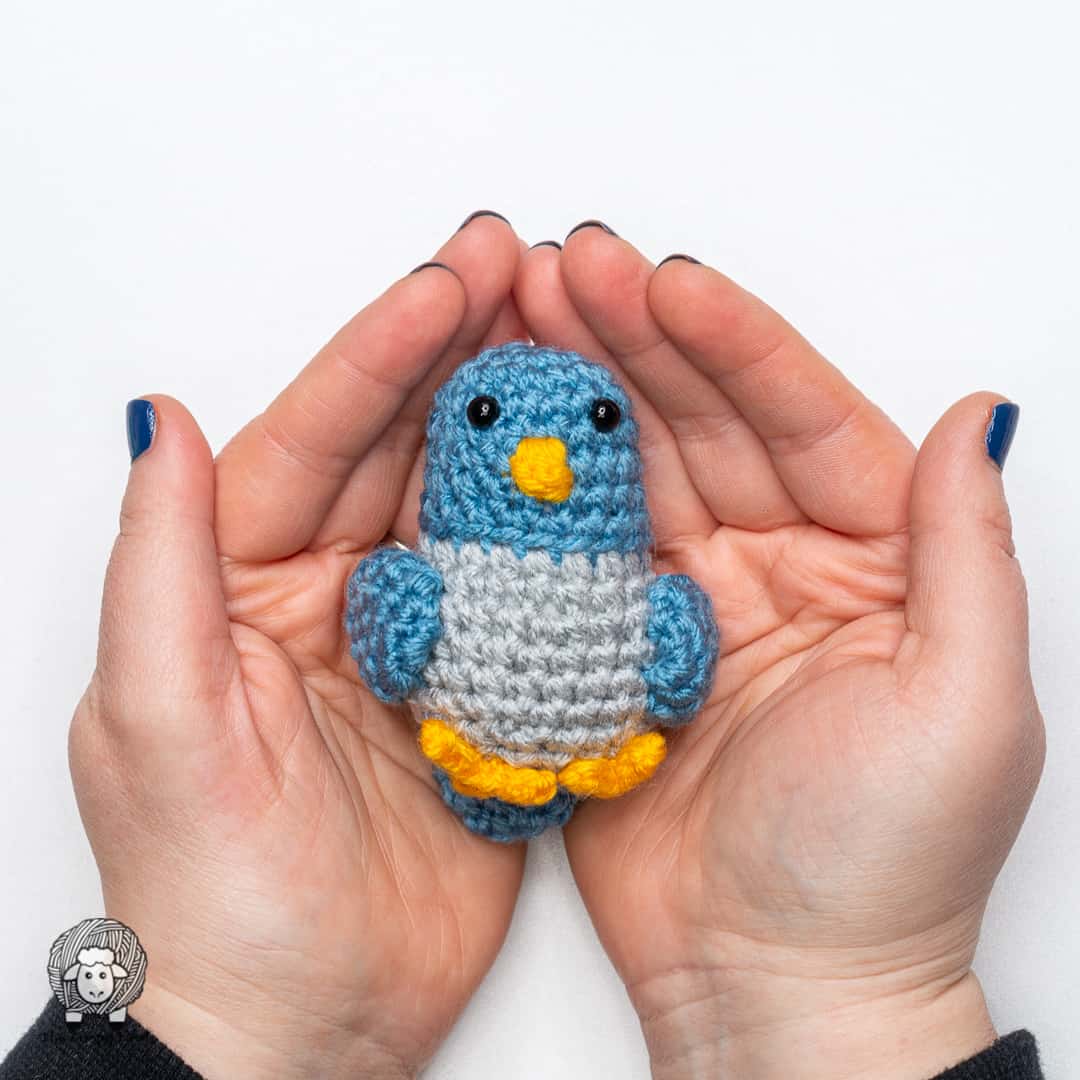
Percy the Crochet Pigeon- Amigurumi Pattern
Hi Everyone! I’m Ashley, the designer and maker behind The Loopy Lamb. I’m so excited to be invited back to the Clover blog to share a free crochet pattern to make my Percy the Pigeon This project is beginner-friendly and includes a step-by-step video tutorial.
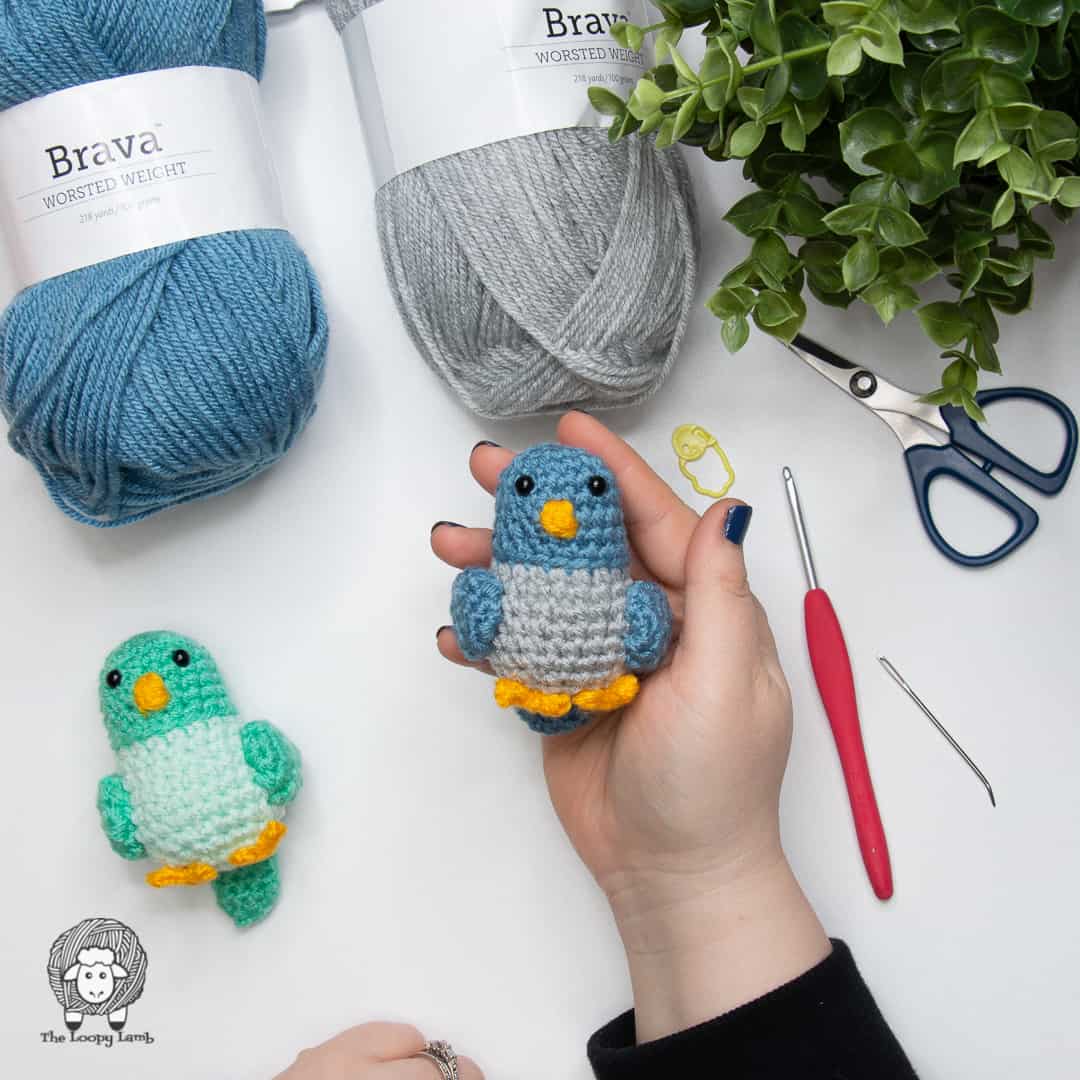
Percy the Pigeon uses the amigurumi crochet technique and creates a bird that is small enough to fit in the palm of your hand.
For materials, you’ll need three different colours of worsted weight yarn, 2 safety eyes and some stuffing to complete your bird.
For tools, we’ll be using my favourite go-to Clover tools that I use for amigurumi: a 3.5mm (E) crochet hook, locking stitch markers, mini patchwork scissors and a bent tip tapestry needle. You can use a normal tapestry needle if you’d like, however, I use the bent tip tapestry needles as I find that bent tip helps to make sewing pieces onto amigurumi projects easier to do.
Although I have used blue and grey as the main colours for my pigeon, Percy looks great in any colour combo you can come up with. I’ve also done Percy in two different shades of mint/teal as well as dark pink and light pink. Have fun playing with colour combos to creat your own unique flock.
You can purchase a PDF, printable copy of the written pattern for the Percy the Pigeon pattern HERE in my Ravelry shop or HERE in my Etsy shop. The PDF version of the pattern includes the written pattern and the photo tutorial for Percy’s feet.
Skill Level:
- Easy
Terminology:
- U.S. Terminology
Supplies:
- 3.5mm (E) Clover Amour Crochet Hook (or size needed to obtain gauge)
- WeCrochet Brava Worsted Weight Yarn (100% Premium Acrylic, Worsted Weight (4), 218yds/200m, 100g/3.5oz), 1 skein each of:
- Colour A: Denim
- Colour B: Caution
- Colour C: Dove Heather
- 2 – 6 mm Black Safety Eyes
- Polyester Stuffing
- Clover Chibi Bent Tip Tapestry Needle
- Clover Mini Patchwork Scissors
- Clover Quick Locking Stitch Marker
Abbreviations:
- BLO = Back Loop Only
- BO = Bobble (See Special Stitches)
- CH = Chain
- FLO = Front Loop Only
- FO = Finish Off
- MC = Magic Circle
- SC = Single Crochet
- SCDEC = Single Crochet Decrease/Single Crochet Two Stiches Together
- SCINC = Single Crochet Increase/2 Single Crochet Stitches in the Same Stitch
- SL ST = Slip Stitch
- ST = Stitch
- YO = Yarn Over
Special Stitches & Techniques:
- Bobble (BO): *YO, insert hook into designated stitch, YO, pull up a loop, YO, pull through first two loops, repeat from * two more times (4 loops on hook), YO, pull through all loops on hook.
- Invisible Finish/Join: FO leaving a long tail. Thread the tail onto a tapestry needle. Place the tapestry needle through the top of the 2nd ST from front to back and pull through. Place tip of needle into top of the last ST of the round, under the back loop of the stitch, and pull through to the back of the work. Weave in the end. Find a tutorial on my blog HERE.
Finished Size:
- Approximately 3.25” tall from bottom of feet to top of head.
Gauge:
- Rounds 1 – 3 of the body = 1.25” across at widest point.
Notes:
- Gauge is not vital to the project but it may effect the amount of yarn needed for the project and the size of your toy.
- All pieces of this project (except the feet) are worked in continuous rounds. Do not join at the end of the row, unless indicated. A stitch marker is used to keep track of the beginning of the round.
- For a cleaner SCDEC, do your SCDEC under the front loops only of each st rather than under both loops. This is often referred to as an invisible decrease. Find my tutorial on how to do this HERE.
- Colour changes are executed by using the last YO of the previous st.
Video Tutorial
[youtube https://www.youtube.com/watch?v=fZfaJMDKBP4&w=560&h=315]
Body
Round 1: Using Colour A, make a MC and SC 6 into the MC. (6)
Round 2: (SCINC) x 6. (12)
Round 3: (SC, SCINC) x 6. (18)
Rounds 4 – 5: SC around. (18)
Round 6: SC 8, change to Colour B, BO, change to Colour A, SC 9. (18) – push BO to right side of fabric.
Rounds 7 – 8: SC around. (18) – place safety eyes in round 5, on either side of the BO, with 3 STs between them.
FO using invisible join (see special techniques). Join Colour C to the BLO of the first ST of Round 8.
Round 9: SC in the BLO of the first ST and each ST around. (18)
Round 10: SC around. (18)
Round 11: SC, SCINC, (SC 2, SCINC) x 5, SC. (24)
Rounds 12 – 14: SC around. (24)
Round 15: SC, SCDEC, (SC 2, SCDEC) x 5, SC. (18) – Start stuffing, adding a bit more stuffing as you work. Stuff firmly.
Round 16: SC around. (18)
Round 17: (SC, SCDEC) x 6. (12)
Round 18: (SCDEC) x 6. (6)
FO leaving a long tail. Finish stuffing. Thread tail onto tapestry needle and weave tail through FLO of last round and pull tight to close up the hole. Weave in ends.
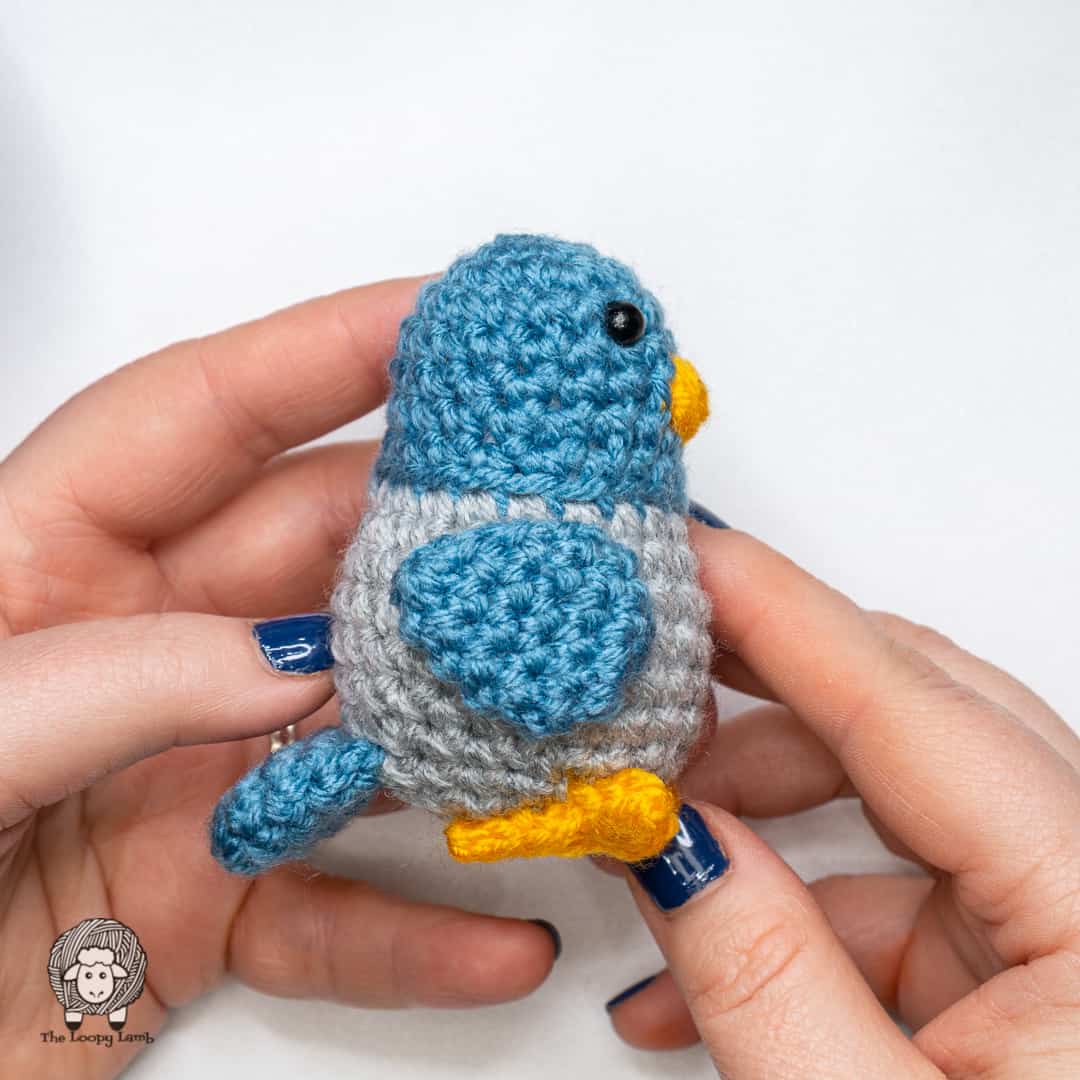
Wings (Make 2)
Round 1: Using Colour A, make a MC and SC 6 into the MC. (6)
Round 2: (SCINC) x 6. (12)
Round 3: SC around. (12)
Round 4: (SCDEC, SC 4) x 2. (10)
Round 5: (SCDEC, SC 3) x 2. (8)
Round 6: (SCDEC, SC 2) x 2. (6)
FO leaving a long tail. Flatten piece. Do NOT stuff.
Thread tail onto tapestry needle and weave tail through FLO of last round and pull tight to close up the hole. Insert needle through center of last round and pull out through the side of the piece. Set aside for assembly.
Tail
Round 1: Using Colour A, make a MC and SC 6 into the MC. (6)
Round 2: (SCINC) x 6. (12)
Rounds 3 – 5: SC around. (12)
FO leaving a long tail for sewing. Set aside for assembly.
Feet (Make 2)
Using Colour B, CH 8.
Row 1: (All STs of this Row should be worked in the back bump of the chain) SL ST in the 2nd CH from the hook and the next 3 CHs, CH 4, SL ST in the 2nd CH from the hook and the next 2 CHs, SL ST into the last worked CH of the initial CH-8, SL ST in the last 3 CHs.
FO leaving a long tail for sewing. Use tapestry needle to thread tails back into the foot and pull it through to the back of the center-point of the foot. Set aside for assembly.
Assembly
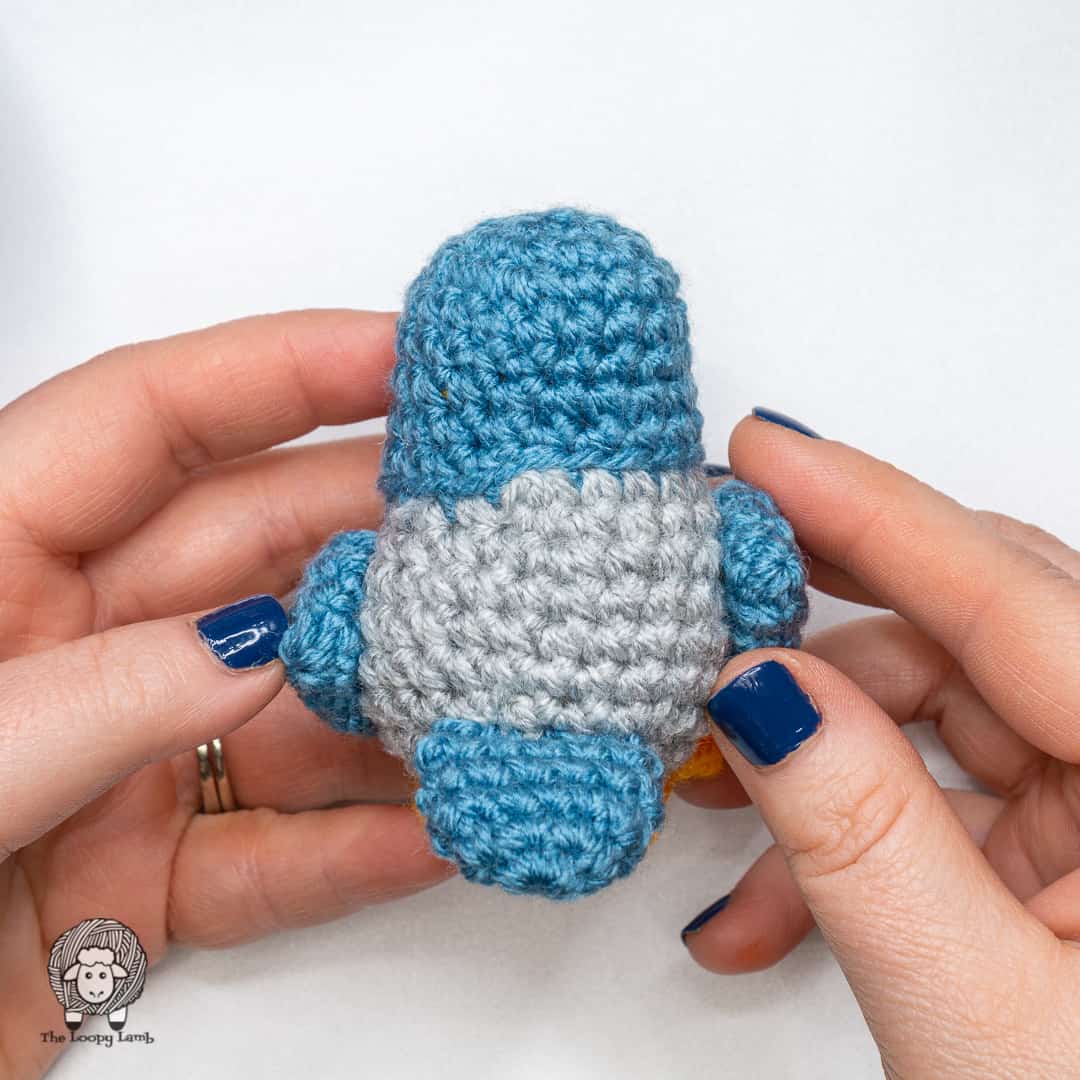
Place a wing on either side of the body, with the tips of the wings pointing towards the back of the bird. When sewing the wings to the body, I recommend leaving the tips unsewn so they will stick out from the body. Sew the wings to the body. Sew tail to bottom of bird. Sew feet to bottom of bird. Weave in ends.
Disclaimer:
Feel free to sell the item created by this pattern but please provide pattern credit back to me when posting online, and please provide a link to my blog: http://www.theloopylamb.com. Please do not resell, distribute, duplicate, or share this pattern in any printed or digital form, or claim this pattern as your own original design. Please do not use my photos when selling your finished items.
I’d love to see your finished items! Please share your finished makes by tagging the pattern on Ravelry, sharing it to our Facebook page or Instagram. Don’t forget to follow me on Facebook, Instagram and Pinterest
Facebook: www.facebook.com/TheLoopyLamb
Instagram: www.instagram.com/TheLoopyLamb
YouTube: The Loopy Lamb YouTube Channel
Pinterest: www.pinterest.com/theloopylamb
Newsletter: Sign up for my newsletter!
I hope that you enjoyed making your Percy the Pigeon! I’d love to see your finished projects! Please share your finished makes by tagging the pattern on Ravelry, tagging me or using #theloopylamb on Facebook and Instagram. Don’t forget to follow me on Facebook, Instagram and Pinterest
Find me on social media and check out my free crochet patterns on my Blog | YouTube | Instagram | Facebook | Pinterest