Make A Punchneedle ‘Peeps Bunny’ Wallhanging!

Spring has sprung, and with it comes pastel colors, and my favorite type of marshmallow treats! Ever since I was little, I’ve loved the classic taste of a fluffy and ever-sweet peep. Eastertime is in full swing, so now is the perfect time to turn out a quick and adorable wall hanging to pay homage to the iconic shape of the peep bunny. All you need is the new punch needle and hoop, some bright yarn, and an afternoon to make this simple and fun conversation starter!
Let’s get started
Supplies:
- Patchwork Scissors (Mini) – Art. No 493/CW
- Punch Needle – Art. No 8816
- Punch Needle Hoop – Art. No 8817
- Wonder Fuse – Art. No 4090
- 1/2 yard Monks Cloth
- Worsted Weight Black and Pink Yarn
- Glue Gun, Glue Sticks
- Iron, Ironing Board
- Foam Board
- A4 size Felt Sheet
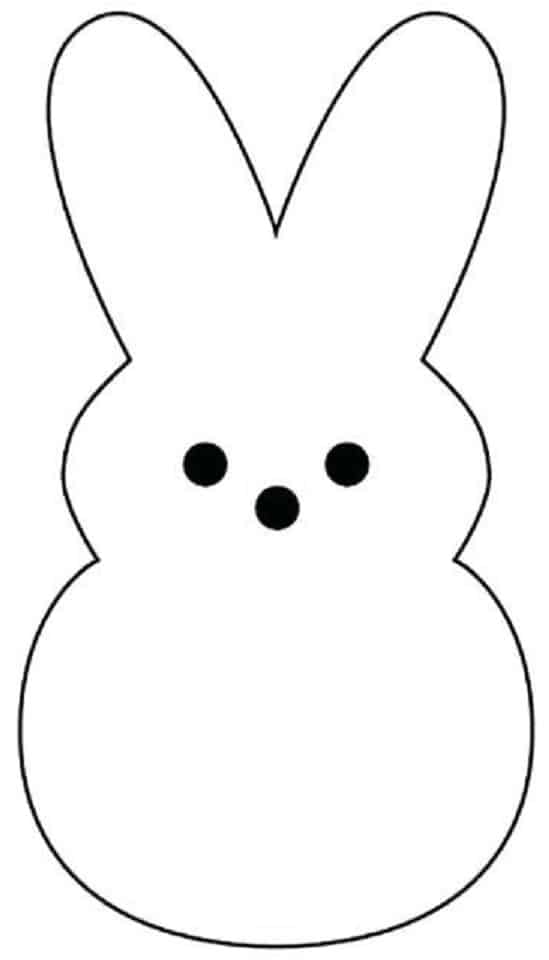
- Pattern Template (below)
Prep Fabric and Tools:
To begin, Print the template below at desired size or at full scale as the sample. Cut around the template body, and cut out the eyes and nose. Place the template over monks cloth and outline around the body, and around the inside of the nose and eyes to transfer the image pattern to the fabric. Prepare the hoop according to hoop instructions, and place the eyes and nose outline near the middle of the hoop before securing the fabric to the hoop. Set your punch needle to 1 ring depth. Finish prep work by threading the punch needle using two strands of your black yarn.


Embroider Eyes and Nose:
Begin punch needle embroidery by holding the needle perpendicular to the fabric starting on the edge of an eye or nose. Pull about 4” of yarn from the needle and push the needle through the fabric to the base of the tool. Carefully pull the needle back up through the fabric. Once the needle is removed, keep the tip of the needle against the fabric and slightly move the needle over in any direction. I prefer to work from side to side, as it’s easier, but up and down or diagonally works as well. Insert your needle right beside your first stitch within the eye or nose outline. Repeat this process of carefully removing the needle and inserting it beside the previous stitch until you fill the entire outline space. When filled, gently remove the needle, and pull excess yarn from the needle, careful not to pull out previous punch needle stitching. Clip yarn to finish section. Work the other two circles in the same way.


Embroider Body:
Move the fabric in the hoop up to the tops of the ears and secure the hoop. Rethread the punch needle with your peeps colored yarn. Repeat the punch needle process laid out in the previous step. Look at the front of your work regularly to check that the stitch length is even and that there are no patches that require additional stitching. Work down one ear, completely filling the space with stitching. Once the first ear is complete, embroider a line around the edge to the top of the second ear and fill it in the same way. After both ears are complete, move on to the head as far down as is comfortable within the hoop.


Move Fabric:
After you’ve reached the bottom of the hoop, carefully remove the fabric. You may cut the yarn to move the fabric and restart after securing, or keep the needle in the inserted position while moving your work. Place the new unfilled section in the middle of your work and loosen the top of the hoop to accommodate the previously made stitching. Secure the hoop back onto the base and continue to work down the body of the pattern.


Finishing Setup:
After the full piece has been filled with stitching, clip the end of your yarn and remove the fabric from the hoop. Flip the fabric over and trim all stray ends. If the loops of the eyes and nose are mixed with the body color around their edges, you can easily move them to their correct place with a pin or needle by gently moving each loop one at a time


Finishing:
To finish, trace around the embroidered bunny and cut out foamboard, felt, and wonder fuse to its shape. I cut my pieces to the template shape but due to stretching, the shapes were slightly small, so be sure to work against the actual final bunny shape! Apply the wonder fuse to the back of the bunny to secure the punch needle loops. With a glue gun and glue sticks, glue down foam board onto the back of the bunny directly on the fused loops. Cut monks cloth about an inch around the bunny, and finish fabric by cutting slits up to embroidery every inch or so. Glue this raw fabric around the bunny on the foam board. Cut a small horizontal slit in the middle of the felt sheet, and glue a loop of yarn to the middle of the foam board as pictured below. Pull yarn loop through felt sheet and glue felt sheet onto foam board to finish. Allow to fully cool before hanging.


We’ve completed our peeps bunny wall hanging! Now you will have a beautiful handmade decor piece for springtime! I can’t wait to see all of the beautiful pastel (or vibrant) color choices! Be sure to tag Clover and me in your finished piece, we’d love to see your take on it!

Follow what Quayln is up to next on his Blog | Instagram | Facebook | TikTok | YouTube | Ravelry
Stay connected with Clover on Facebook | Twitter | Instagram | Pinterest | YouTube | Ravelry