Splatted Witch Wall Hanging– Crochet Pattern

Hey everyone! I’m Rebecca, the designer and maker behind Lasheet. I’m honored to have this opportunity to be back here sharing another pattern with all of you. Spooky season wouldn’t be complete without a witch! Growing up my mom had this old, splattered witch decoration. I loved hanging it on the door every year. To make this memory even better. I crocheted my own and now you can too.
The hat is made in rounds. Do not join round unless told to. Use a stitch marker to mark the start of the round. A small piece of yarn in a different color works great. If you don’t have stitch markers. I personally like to start my round with a magic ring method, but you can also use other trusted methods like: ch 2, work 6 sc into first ch. Whichever you use make sure you have 6 sc in a circle, with no holes in the first row before you continue.
A finished Witch from the top of the rim to the end of the broom handle is approximately 17”. I personally crochet tightly so your Witch might be bigger then mine. That will not hurt anything.
Skill Level: Beginner friendly
Terminology: U.S. Terminology
Materials:
- Amour Crochet Hook H (5.0mm) – Art. No 1047/H
- Darning needle – Art. No 3121
- Scissors
- Sewing pins https://clover-usa.com/products/flower-head-pins-boxed?_pos=12&_sid=cc5bc770a&_ss=r
- Blocking foam mat or towel.
- Mod Podge Fabric-Tissu-Tela or Stiffener
- Paint brush or sponge
- Puff paint for nail details
- Black, pink, orange, yellow, teal, gold, brown, dark purple and light purple – 4 medium, Worsted weight yarn
- Black on Sliver, Big Twist Twinkle – 4 medium, Worsted weight yarn (Optional for the hat)
- Command hanger to hang the witch on wall or door.
Abbreviations:
- ch = chain
- ss = slip stitch
- sc = single crochet (US)/double crochet (UK)
- hdc = half double crochet (US)/half double crochet (UK)
- dc = double crochet (US)/triple crochet (UK)
- dec = decrease, by working two single crochets together, but you could also use sc2tog
- * = work everything in stars into the next stitch.
Witch Hat: Working in rounds, do not chain, join work, or turn unless told to. Use black yarn.
If you aren’t using Big Twist Twinkle yarn for the hat, please ignore this note. Big Twist Twinkle yarn is thin, I doubled my stands. Using one black worsted weight yarn with the Twinkle yarn. This is the only time you will use two stands of yarn in this project. Use “I” hook with two stands of yarn. The “H” hook will work it just makes the stitches tighter.
Row 1: magic ring. (6) or ch 2, work 6 sc into first ch, to form the ring. (6)
Row 2: 2 sc in the next stitch, sc in the next 5 stitches. (7)
Row 3: 2 sc in the next stitch, sc in the next 6 stitches. (8)
Row 4: 2 sc in the next stitch, sc in the next 7 stitches. (9)
Row 5: 2 sc in the next stitch, sc in the next 8 stitches. (10)
Row 6: 2 sc in the next stitch, sc in the next 9 stitches. (11)
Row 7: 2 sc in the next stitch, sc in the next 10 stitches. (12)
Row 8: *2 sc in the next stitch, sc in the next 11 stitches. (13)
Row 9: *2 sc in the next stitch, sc in the next 12 stitches. (14)
Row 10: *2 sc in the next stitch, sc in the next 13 stitches. (15)
Row 11: *2 sc in the next stitch, sc in the next 14 stitches. (16)
Row 13: *2 sc in the next stitch, sc in the next 15 stitches. (17)
Row 14: *2 sc in the next stitch, sc in the next 16 stitches. (18)
Row 15: *2 sc in next stitch, sc in the next stitches 2* repeat 6 times. (24)
Row 16: *2 sc in next stitch, sc in the next stitches 3 * repeat 6 times. (30)
Row 19: *2 sc in next stitch, sc in the next stitches 4* repeat 6 times. (36)
Row 20: *2 sc in next stitch, sc in the next stitches 5* repeat 6 times. (42)
Rows 21 – 22: sc in each stitch around. (42)
Starting the rim.
Row 23: Ch 1, *2 sc in the next stitch in the front loop, sc in the next 6 stitches. * Repeat 6 times. Join with a ss. (48)
Row 24: Ch 1, turn *2 sc in the next stitch, sc in the next 7 stitches. * Repeat 6 times. Join with a ss. (54)
Row 25: Ch 1, turn *2 sc in the next stitch, sc in the next 8 stitches. * Repeat 6 times. Join with a ss. (60)
Row 26: Ch 1, turn *2 sc in the next stitch, sc in the next 9 stitches. * Repeat 6 times. Join with a ss. (66)
Row 27: Ch 1, turn *2 sc in the next stitch, sc in the next 10 stitches. * Repeat 6 times. Join with a ss. (72)
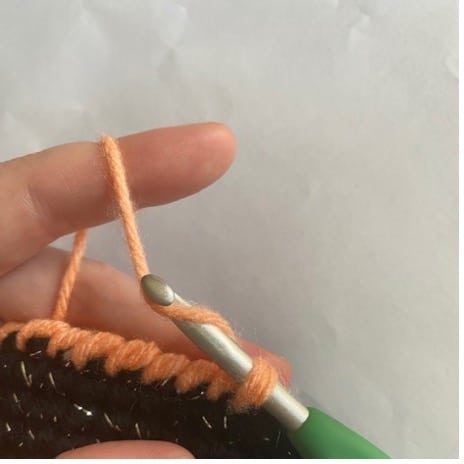
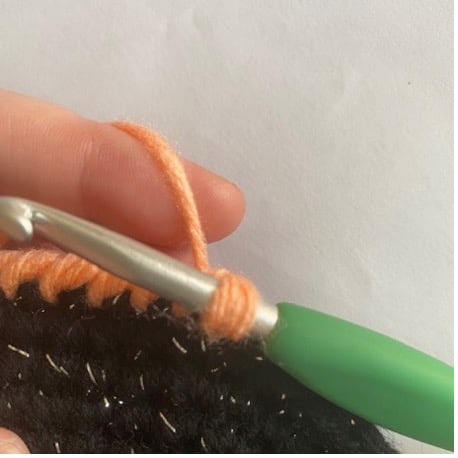
Row 28: Change color to orange. ch 1, crab stitch in each stitch around. Slip stitch to your chain stitch at the end. Cut and leave a long tail to weave in the ends.
Crab Stitches is where you crochet from left to right. (Unless you are left-handed) The basic stitch is still single crochet. We are just working in reverse. Making sure the right side is facing you, join the yarn and chain 1, insert your hook into the stitch to the right of your chain. Yarn over and pull through like normal single crochet except, as you can see the stitch will twist. Yarn over and pull through both loops on the hook. Repeat all the way around. Slip stitch to your chain stitch at the end. Cut and leave a long tail to weave in the ends.

Dress: Use black yarn. Don’t count the chain 1 as a stitch.
Row 1: Ch 15, sc 2nd from the hook, sc in each stitch down the chain. (14) I did work the back hump. I personally think it looks better, but it doesn’t matter the hat will hide this row.
Row 2: Ch 1, turn, sc in each stitch across. (14)
Row 3: Ch 1, turn, 2 sc in the next stitch, sc in the next 12 stitches, 2 sc in the remaining stitch. (16)
Row 4: Ch 1, turn, sc in each stitch around. (16)
Row 5: Ch 1, turn, 2 sc in the next stitch, sc in the next 14 stitches, 2 sc in the remaining stitch. (18)
Row 6: Ch 1, turn, sc in each stitch across. (18)
Row 7: Ch 1, turn, sc in the next stitch, sc in the next 16 stitches, 2 sc in the remaining stitch. (20)
Row 8: Ch 1, turn, sc in each stitch across. (20)
Row 9: Ch 1, turn, 2 sc in the next stitch, sc in the next 18 stitches, 2 sc in the remaining stitch. (22)
Rows 10 – 17: Ch 1, turn, sc in each stitch across. (22)
Row 18: Ch 1, turn, 2 sc in the next stitch, sc in the next 20 stitches, 2 sc in the remaining stitch. (24)
Rows 19 -24: Ch 1, turn, sc in each stitch across. (24)
Rows 25 – 26: Change color to purple. Ch 1, sc in each stitch across. (22)
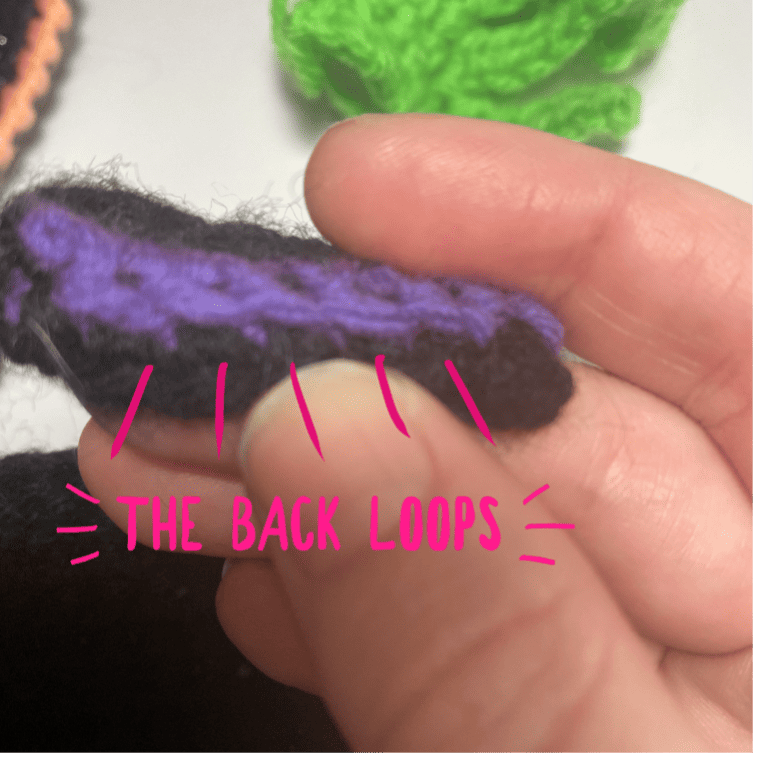
In the last row the back loops stitches are where we will attach the legs or broom.
Row 27: Change color to black. Ch 1, turn, sc in the next 2 stitches, sc in the back loop for the next 6 stitches, sc in the next 3 stitches, sc in the back loops of the next 2 stitches, sc in the next 3 stitches, sc in the back loops of the next 6 stitches, sc in the remaining 2 stitches. (24) Cut and leave a tail to weave in ends.
Right arm: Use black yarn. Don’t count the chain 1 as a stitch.
Row 1: At the “neck” of the dress, count 7 down the edge. Sc 7 across the edge.
Row 2: Ch 1, turn, 2 sc in the 1st stitch, sc in the next 4 stitches, sc dec in the last stitch. (7)
Row 3: Ch 1, turn, sc dec in the 1st stitch, sc in the next 4 stitches, 2 sc in the last stitch. (7)
Rows 4 – 9: Repeat rows 2 and 3.
Row 10: Ch 1, turn, sc in each stitch across. (7)
Row 11: Change color to purple. Ch 1, turn, sc in each stitch across. (7)
In the last row the back loops stitches are where we will attach the hands. Make sure these stitches are on the same side as the dress. That is the back of your witch.
Row 12: Change color to black. Ch 1, turn, sc in the 1st stitch, sc in the back loops of the next 5 stitches, sc in the last stitch. Cut and leave a long tail to weave in your ends.
Left arm: Use black yarn. Don’t count the chain 1 as a stitch.
Row 1: At the “neck” of the dress, sc 7 stitches down the opposite side of the right arm.
Row 2: Ch 1, turn, sc dec in the 1st stitch, sc in the next 4 stitches, 2 sc in the last stitch. (7)
Row 3: Ch 1, turn, 2 sc in the 1st stitch, sc in the next 4 stitches, sc dec in the last stitch. (7)
Rows 4 – 9: Repeat rows 2 and 3.
Row 10: Ch 1, turn, sc in each stitch across. (7)
Row 11: Change color to purple. Ch 1, turn, sc in each stitch across. (7)
In the last row the front loops stitches are where we will attach the hands. Make sure these stitches are on the same side as the dress. That is the back of your witch.
Row 12: Change color to black. Ch 1, turn, sc in the 1st stitch, sc in the front loops of the next 5 stitches, sc in the last stitch. Cut and leave a long tail to weave in your ends.
Hand 1: Use Green yarn. On the fingers I worked the back hump in the chain stitch.
Pink: Ch 5, sc 2nd stitch from the hook, sc along the chain in the back hump. (4)
Next: Ch 7, sc 2nd stitch from the hook, sc along the chain in the back hump. (6)
Middle: Ch 9, sc 2nd stitch from the hook, sc along the chain in the back hump. (8)
Pointer: Ch 7, sc 2nd stitch from the hook, sc along the chain in the back hump. (6)
Thumb: Ch 5, sc 2nd stitch from the hook, hdc in the next 3 stitches. (4)
- Ch 1, turn, sc dec into the 1st stitch, sc in the last 3 stitches. (4)
- Ch 1, turn, sc in each stitch across. (4)
- Ch 1, turn, sc dec into the 1st stitch, sc dec in the last stitch. (2)
- Ch 1, turn, sc in each stitch across. (2) cut and leave a long tail to sew to arm.
Hand 2: Use Green yarn. On the fingers I worked the back hump in the chain stitch.
Thumb: Ch 5, sc 2nd stitch from the hook, hdc in the next 3 stitches. (4)
Pointer: Ch 7, sc 2nd stitch from the hook, sc along the chain in the back hump. (6)
Middle: Ch 9, sc 2nd stitch from the hook, sc along the chain in the back hump. (8)
Next: Ch 7, sc 2nd stitch from the hook, sc along the chain in the back hump. (6)
Pink: Ch 5, sc 2nd stitch from the hook, sc along the chain in the back hump. (4)
- Ch 1, turn, sc dec into the 1st stitch, sc in the last 3 stitches. (4)
- Ch 1, turn, sc in each stitch across. (4)
- Ch 1, turn, sc dec into the 1st stitch, sc dec in the last stitch. (2)
- Ch 1, turn, sc in each stitch across. (2) cut and leave a long tail to sew to arm.
(Make sure when you sew the hands to the arms the thumbs are up.)


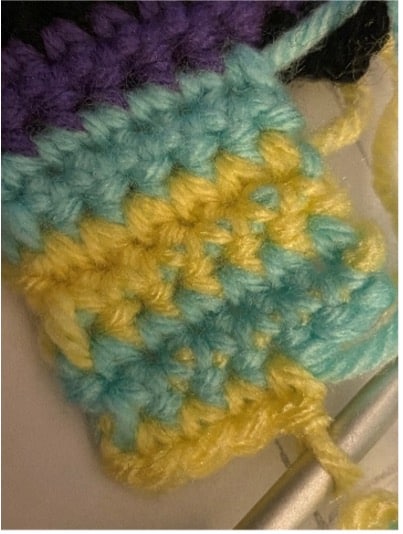
Legs Make 2: My witch has mix match socks because, I rarely have matching socks. Don’t count the chain 1 as a stitch.
Row 1: Sc into the 6 back loops on the dress. (6)
Row 2: Ch 1, turn, sc in the 6 stitches across. (6)
Rows 3 – 18: repeat row 2. Changing colors ever 2 rows. Giving you 8 strips. Cut at the end of row 18, leave a long tail to weave in ends.
Boots Make 2: Attach the shoes color to the side you want the toe to curl on. Don’t count the chain 1 as a stitch.
Row 1: Sc across the bottom of the leg. (6)
Row 2: ch 1, turn, sc in the next 5 stitches, 2 sc in the last stitch. (7)
Row 3: Ch 1, turn, 2 sc in the 1st stitch, sc in the next 6 sitches. (8)
The next row we will be making the curl and heel
Row 4: Ch 1, turn, sc in the next 7 stitches, 5 sc in the last stitch. Ch 3, sc in the 2nd from the hook, sc in the next 8 stitches, ss in the next 4 stitches, ch 1, hdc in the next 2 stitches. Cut and leave a long tail to weave in the ends.

Broom Handle: Use brown yarn. Don’t count the chain 1 as a stitch.
Row 1: Sc into the 2 back loops on the dress in the middle of the legs. (2)
Row 2: Ch 1, turn, sc in the 2 stitches across. (2)
Rows 3 – 24: repeat row 2. Changing colors ever 2 rows. Cut at the end of row 18, leave a long tail to weave in ends.

I made a big tassel for the broom head using the gold yarn.
- Wrap the yarn around your fingers. The more you wrap the fuller your tassel will become. I wrapped mine about 20 to 30 times.
- I just used a long piece of yarn and tied a double knot on the top, this will be used to sew to the broom handle.
- Next cut off a piece of yarn to tie near the top of your tassel. Tie a double knot, then wrap the yarn around a few times. Giving the tassel a more finished look, tie another double knot.
- Cut the bottom loops and trim the ends a bit to make your tassel pretty.
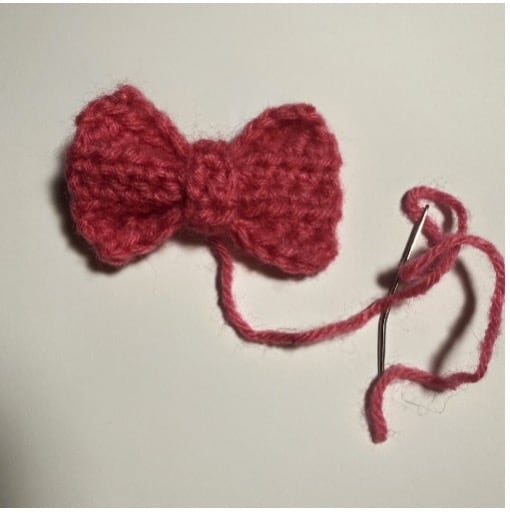
Bow: Use pink yarn. Don’t count the chain 1 as a stitch.
Row 1: Ch 11, hdc in the 2nd loop from the hook, hdc across the chain. (9)
Rows 2 – 8: Ch 1, turn, hdc in 8 stitches across. (9) On the 7th row cut and leave a long tail to weave in your ends.
Band for bow: Use pink yarn. Don’t count the chain 1 as a stitch.
Row 1: Ch 1, hdc in the 2nd loop from the hook, hdc across the chain. (2)
Rows 2 – 5: Ch 1, turn, hdc in 2 stitches across. (2) on the 5th row cut and leave a long tail to sew around the bow and to the witch’s dress.
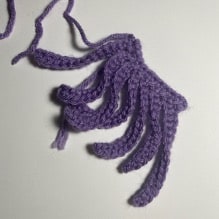
Hair: Use light purple yarn. The hair can be longer or shower if you wish. Have fun with it! On the hair I worked the back hump in the chain stitch.
Row 1: Ch 12, sc in the 2nd from the hook, sc across the chain. (11)
Rows 2 – 7: repeat row 1. On the 7th row cut and leave a long tail to weave in your ends.

Assembly:
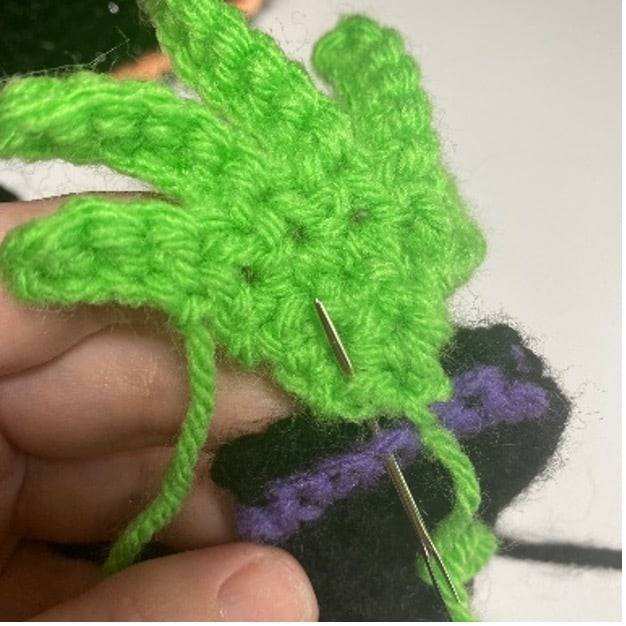
- Let’s start with the hands. Sew them in the middle of the arm on the back loop with the thumbs facing upward.

- To find the perfect placement for your bow. Count 10 rows up from the bottom of the dress.
- If you haven’t already sewed the tassel to the broom handle.
- Sew the hair to the middle of the “neck” of the dress. I only sewed the top chain down. Letting the long hair flow or twist anyway in wants.
- Now to sew the hat on. Cut a long piece of yarn the same color of the hat. Pin the hat in the middle of the “neck” over lapping over the hair and arms some. Sew from right arm across the hair and up the left arm.

- Free hand strip to hang your hat. I chained 15, sc in the 2nd from the stitch, then sc across the chain leaving me with 14 stitches, ch 1, turn, sc across. Cut and leave a long tail to sew in the inside of your hat. This is what I used to hang my witch on the wall or door.
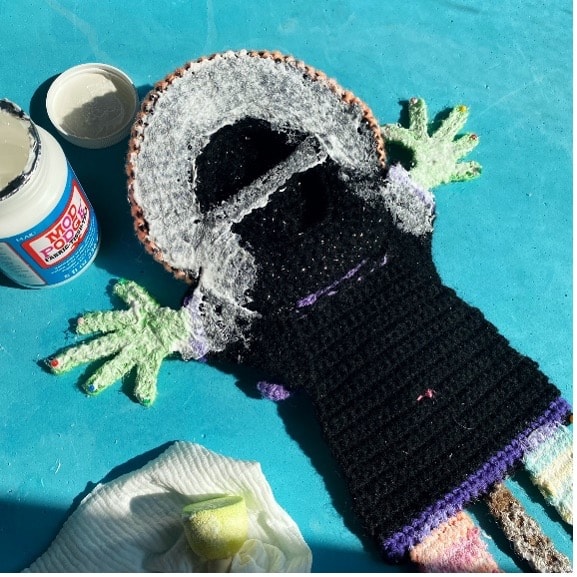

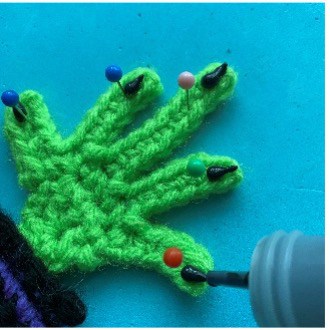
- Before hanging it on the wall or door, we need to stiffen the yarn. I used Mod Podge and this sponge. I pinned my witch down flat on my foam board. (A towel and flat surface will work too) I only added this glue to the back that was curl. So, on the legs, broom handle, hands, and hat.
Note: If you have puffy paint. Once the glue is dry flip your witch over and paint her nails with it. I hope you enjoyed making your splatted witch hanging. I cannot wait to see what you come up with.
I hope you use your imagination to come up with unique and colorful Splatted Witches, the possibilities are endless. I’d love to see your finished projects! Please share your finished Splatted Witch Wall Hanging by tagging the pattern on Ravelry or tagging me on Instagram, and Facebook. Want to see what fun project I’m working on next? Follow me on Instagram and Facebook.
You can purchase a PDF copy of the Splatted Witch Wall Hanging pattern in my Revelry or Etsy shop.
Shop Links here
Disclaimer:
This pattern may not be reproduced, please do not copy, and paste any of the information. Instead, please share the direct link to this posting only. I thank you in advance for sharing. You may sell items that you make yourself from this pattern. I would greatly appreciate a design create when you sell or post your handmade items from this pattern. Again, thank you and I hope you enjoyed this pattern. Happy crocheting!!