Sew A Pom-Pom Trim Pillow!
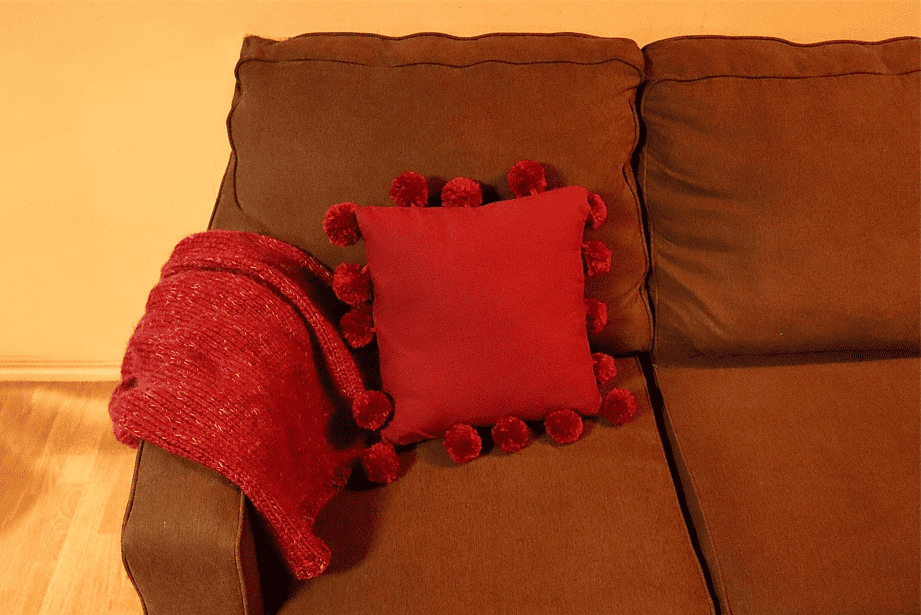
Fall is here, and as the leaves turn I always find myself wanting to change up my house to a more cozy and moody atmosphere. My first place to start is usually the couch. Something as simple as swapping out throw blankets and pillows goes a long way! With pom-pom trim being especially on-trend this year (and every year, in my opinion) I wanted to make a chic and simple pillowcase featuring it to get in the spirit of the season!
Let’s get started.
Supplies:
- Patchwork Scissors (mini)- Art. No 439
- Rotary Cutter (45mm) – Art. No 7500
- Cutting Mat (18″ x 24″) – Art. No 7521
- Pen Style Chaco Liner – Art. No 4710-4714
- Wonder Clips – Art. No 3185
- Universal Machine Needles – Art. No 9114
- Pom-Pom Maker Set – Art. No 3129
- 50 weight thread
- 1 Yard Cotton Fabric
- Bulky Weight Roving Yarn (I used Amano Yana)
- Iron and Ironing Board
- Sewing Machine
- 16” Square Pillow Insert

Begin Pom-Pom:
Decide how large you would like your pom-pom. I used the yellow maker, which makes about a 2” trimmed pom-pom. If you use a smaller maker, you can definitely add more to your trim! Begin by opening the arms of one side of the maker and wrapping yarn tightly around the legs from one side to the other. Once the space is filled, close the arms and cut the tail of yarn. Repeat the process on the second side. After, place scissors between the two halves of the maker on either side and cut through all yarn.


Finish Pom-Pom:
After pom-pom is cut, cut a length of yarn about 1 foot long and pass around the yarn through the halves of the maker. Secure tightly with a double knot. Carefully extend all arms of maker. Once arms are separated away from yarn, gently pull apart both halves of maker. Fluff up pom-pom and trim to round shape. Do not clip the long joining strand of yarn. Make 16 pom-poms.


Prepare Fabric:
Iron fabric before measuring and cutting. After ironing, measure one piece of fabric at 16” square, and two pieces at 16” by 10 1/2”. Mark out sections with chaco liner, and cut all panels with rotary cutter.


Sew Back Panels:
On 10 1/2” panels, fold over 1/4” along one of the wrong side (if applicable) of a 16” edge. Press edge, then fold over 1/2” along the same edge and press once more. Stitch down this edge on your machine using a straight stitch with a 3/8” seam allowance.

Stitching Pillow Case:
Place front panel right side up and place pom-poms onto panel with pom-poms facing in towards the middle of the panel, and long strands out of the fabric. Space pom-poms at approximately 3” intervals starting from the middle. Pin in place with wonderclips. Place one 10 1/2” panel wrong side up with sewn edge towards the middle of the pillowcase and pin in place using the same clips that secured the pom-poms. Repeat the process with the second 10 1/2” panel along opposite side. the sewn edges will overlap along the middle. Be sure to have all long strands of pom-poms pulled out of the fabric before sewing. Stitch all panels together with needle at its leftmost point on the machine using a straight stitch and 1/2” seam allowance.


Finishing:
Clip all corners and tails of pom-poms on the wrong side of the work, then turn work right side out. Run a lint roller over pillowcase if needed. Stuff case with pillow insert to finish. Handwash and air dry when needed.


We’ve completed our Pom-Pom Trim Pillow! Make a couple for yourself, and switch up the colors for all the other seasons! Be sure to tag Clover and me in your finished pillows, we’d love to see your take on them. Until next time, happy crafting!
Follow what Quayln is up to next on his Blog | Instagram | Facebook | Pinterest | YouTube | Ravelry
Stay connected with Clover on Facebook | Twitter | Instagram | Pinterest | YouTube | Ravelry