Crochet Laptop Tote

Hello! This is Kathy Olivarez, the designer behind Kathy’s Crochet Closet. I’m excited to be back on the Clover Blog with a new crochet project: the Laptop Tote!
Whether you use your laptop for school, for work, or just for fun, you need a great bag to carry it in. The Laptop Tote will take you to school or the office in style! The sturdy tote has a beautiful texture, and the strap construction keeps the bag from stretching out even when it’s holding a heavy laptop. The strap is created with purchased polyester strapping and requires just a small bit of sewing to finish it off. A medium-size laptop easily fits in this bag with room for other essentials as well.
The yarn I used for this project is Lion Brand Wool Ease Thick & Quick, a size 6, super bulky yarn. The hook is my favorite Clover Amour hook in size M/N 9mm. Even super bulky yarn glides along on this smooth, comfortable hook. The finished bag will measure approximately 15.5” high by 11.5” wide. The strap drop can be between 2” and 10”, depending on your preference. The strap shown has a 6” drop.
Let’s get started!
Difficulty level: Easy
Materials:
Lion Brand Wool Ease Thick & Quick, CYC 6, super bulky yarn: 3 – 5 oz skeins (River Run) or 2 – 6 oz skeins
Amour Crochet Hook M/N 9mm Art. No 1056/MN
Jumbo Darning Needle Set Art. No 340
Patchwork Scissors Mini Art. No 493/CW
Clover Quilting Pins Art. No 2508
Sewing needle: Clover Gold Eye Milliners Art. No 236
Upholstery thread: Coats and Clark Extra Strong and Upholstery Thread, Black or Navy, Joann Stores
3 yards 1” Strapping: Dritz 1” Polypro Belting and Strapping, Navy, Joann Stores
Optional – Decorative Tag: Customized Product Tag, AllThisWood, Etsy.com
Abbreviations:
ch – chain
chs – chains
dc – double crochet
dcflo – double crochet in front loop only
rs – right side
sc – single crochet
scflo – single crochet in front loop only
sl st – slip stitch
st – stitch
sts – stitches
ws – wrong side
Pattern Notes
- Bag is worked in joined rounds, turning or not turning as indicated in instructions.
- Join with slip stitch as indicated.
- The first stitch of each round is done at the base of the starting chain-one.
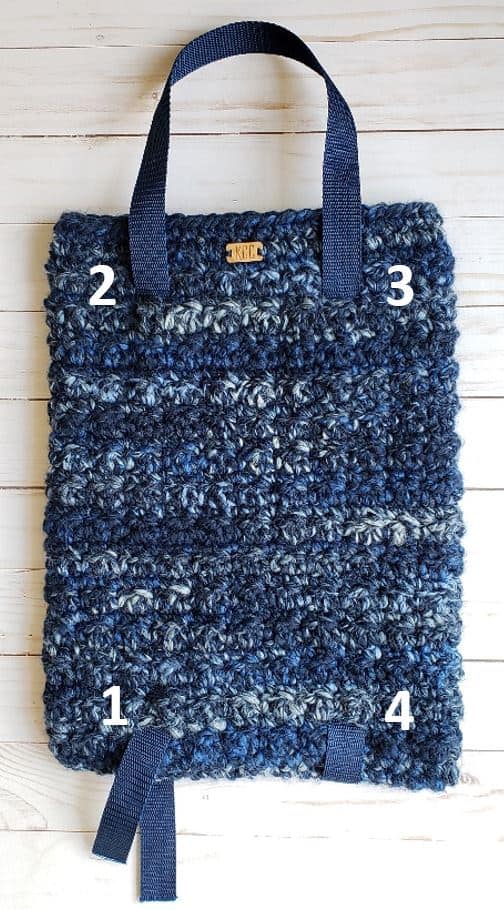
- Openings for the strap are created in rounds 4 and 28.
Gauge: 8 rows of 7 sc measures 4”.

Bag Instruction
Foundation chain: Ch 21.
Rnd 1: (RS) 2 sc in second ch from hook, sc in next 18 chs, 4 sc in last ch, now working on opposite side of foundation chain, sc in next 18 chs, 2 sc in last ch, join to first st, do not turn (see Pattern Notes). (44 sc)
Rnd 2: (RS) Ch 1, sc in first st and in each st around, join to first st, turn (see Pattern Notes). (44 sc)
Rnd 3: (WS) Ch 1, sc in first st, dc in next st, *sc in next st, dc in next st, repeat from * around, join to first st, turn. (22 sc, 22 dc)
Rnd 4: Ch 1, sc in first 5 sts, ch 2, skip 2 sts, sc in next 8 sts, ch 2, skip 2 sts, sc in next 10 sts, ch 2, skip 2 sts, sc in next 8 sts, ch 2, skip 2 sts, sc in last 5 sts, join to first st, turn. (36 sc, 4 ch-2)
Rnd 5: Ch 1, sc in first st, dc in next st, *sc in next st, dc in next st, repeat from * around, working sts in the front loops only of the ch-2 spaces and working sts normally in the sc below, join to first st, turn. (18 sc, 4 scflo, 18 dc, 4 dcflo)
Rnds 6-27: Repeat rounds 3-4 eleven times.
Rnd 28: Ch 1, sc in first 6 sts, ch 2, skip 2 sts, sc in next 8 sts, ch 2, skip 2 sts, sc in next 10 sts, ch 2, skip 2 sts, sc in next 8 sts, ch 2, skip 2 sts, sc in last 4 sts, join to first st, turn. (36 sc, 4 ch-2)
Rnd 29: Ch 1, sc in first st, dc in next st, *sc in next st, dc in next st, repeat from * around, working sts in the front loops only of the ch-2 spaces and working sts normally in the sc below, join to first st, turn. (18 sc, 4 scflo, 18 dc, 4 dcflo)
Rnds 30-32: Ch 1, sc in first st and in each st around, join to first st, do not turn. Fasten off after round 32 and weave in ends with darning needle. (44 sc)
Finishing
- Lay bag flat. Insert the strapping in and out of the openings as follows: in opening 1, out opening 2, in opening 3 and out opening 4.
- Turn bag over and continue weaving strapping in same pattern as first side.
- Make sure strapping is not twisted.
- Pull strapping up at top of each side to form straps.
- Determine how long or short you want the straps and pin the ends of the straps together to test out the length of the strap.
- When you have determined the length, cut off the excess strapping, making sure to leave enough for the two ends to overlap by about an inch.
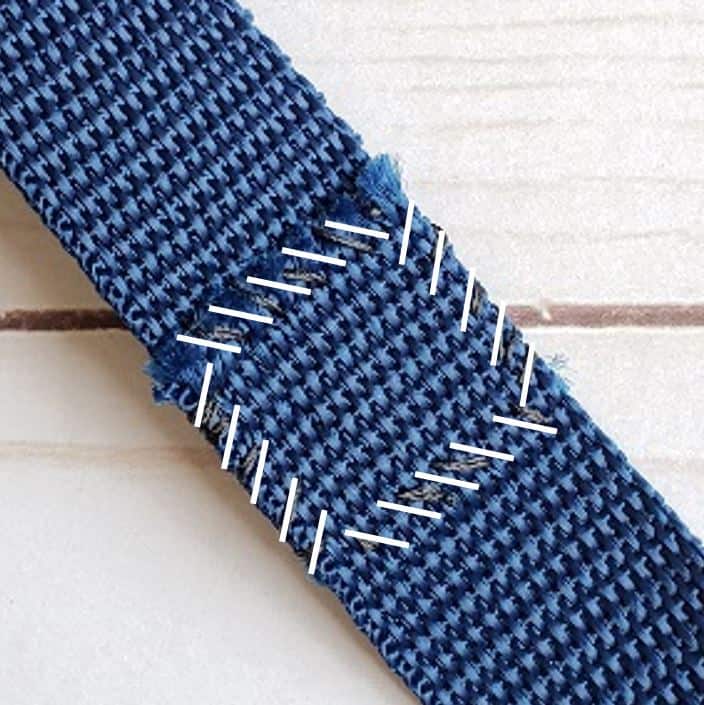
- With sewing needle and upholstery thread, whipstitch overlapped ends of strap together, sewing in a continuous square around the overlapped section as shown.
- Shift strap through the openings so that the sewn ends are hidden inside the bag.
- Reposition straps so that they are the same length.
- Lay bag flat and pin strap to bag just above top openings on both sides.
- Starting at any top opening and with sewing needle and upholstery thread, sew strap to bag in a short seam just below opening.
- With same needle and thread, tack down the side edges of strap just above opening (just a couple of stitches on each side).

- Repeat with other three top openings in bag to secure straps.
- With darning needle and yarn, sew decorative tag to top of bag as shown.
I hope you love using your new bag!
If you have any questions, you can connect with me on Instagram, Facebook or Pinterest. And if you’d like an ad-free PDF of this pattern, you can find it at a low cost on Etsy and Ravelry. Be sure to tag kathyscrochetcloset and Clover USA when you share your Laptop Tote on social media!
Happy crocheting!