How to Crochet the Ripple Stitch
Hi friends! I’m Toni, the designer and educator behind TL Yarn Crafts. What a pleasure it is to be here on the Clover blog. Today, I’m sharing one of my all-time favorite stitches: The Ripple Stitch!

The Ripple Stitch is a classic stitch pattern that uses mainly basic stitches. Strategically placed increases and decreases create a wave pattern. The simplicity of this stitch plays well with lots of different projects, the most obvious being blankets. But the Ripple Stitch is also a great choice for other home décor, as well as clothing and accessories. Scroll to the bottom of this post for some free patterns to practice the Ripple Stitch.
Supplies:
· DK weight yarn
· Soft Touch crochet hook (5mm) – Art. No 1008
Abbreviations:
· 2dc = place 2 dc in the next stitch (increase made
· Ch(s) = chain(s)
· Dc = double crochet
· Dc2tog = double crochet 2 together (decrease made)
· Rep = repeat
· St(s) = stitch(es)
· Tch = turning chain
Note: The starting chain 3 counts as the first double crochet.

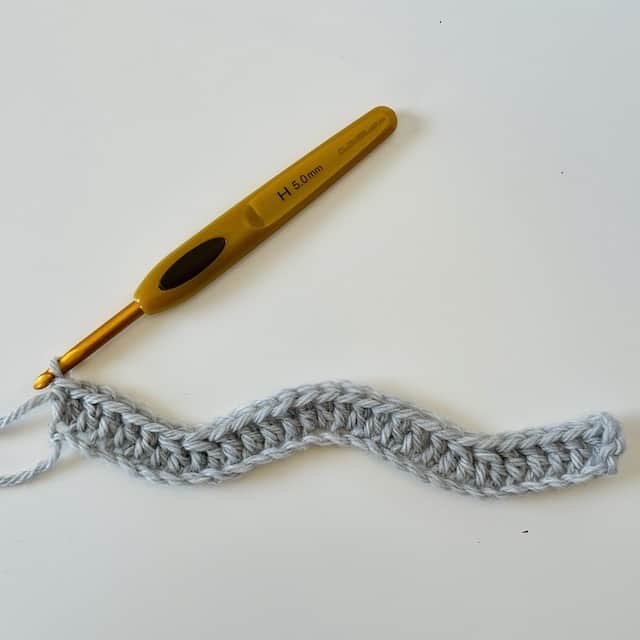
1 – Start with a chain that is a multiple of 14 plus 3. I’m starting with 31 chains. Here’s the math: 14 x 2 = 28. 28 + 3 = 31, so I’m starting with 31 chains.
2 – Double crochet in the 4th chain from the hook AND each of the next 5 stitches
3 – Double crochet 2 together over the next 2 stitches. Then double crochet 2 together over the following 2 stitches. This creates 2 decreases.

How to Dc2tog
1 – To make a double crochet 2 together, yarn over and pull up a loop in the first stitch. Yarn over and pull through 2 loops. There are 2 loops on the hook.
2 – Yarn over and pull up a loop in the second stitch. Yarn over and pull through 2 loops. There are 3 loops on the hook.
3 – Yarn over and pull through all 3 loops on the hook. The dc2tog is complete.

1 – Double crochet in each of the next 4 stitches. Then place 2 double crochet stitches in each of the next 2 stitches.
2 – This creates 2 increases.
3 – Double crochet in each of the next 4 stitches, then double crochet 2 together two times. Repeat Steps 1-3 until there are 5 chains remaining. Double crochet in each of the next 4 chains, then place 2 double crochet stitches in the last chain.

Here’s what I have after completing Row 1.

1 – Begin Row 2 with a chain 3. Remember, this chain 3 counts as a double crochet. Double crochet in the stitch at the base of the chain and in each of the next 4 stitches as well.
2 – Double crochet 2 together twice. This creates 2 decreases.
3 – Double crochet in each of the next 4 stitches, then place 2 double crochet stitches in each of the next 2 stitches. This creates 2 increases.

1 – Continue in this manner until you have 5 stitches left. Double crochet in each of the next 4 stitches, then place 2 double crochet stitches in the 3rd chain of the turning chain.
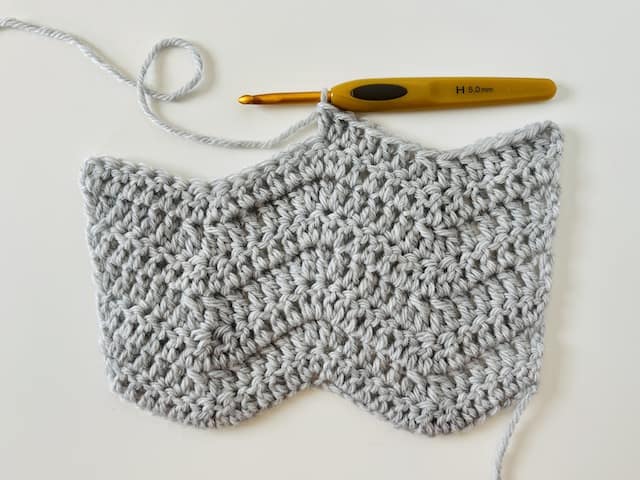
2 – Here’s what I have after completing Row 2.

Repeat Row 2 of the pattern until you reach the desired length.
How to Crochet the Ripple Stitch
Row 1: Ch any multiple of 14 + 3. Dc in the 4th ch from the hook and each of the next 4 chs, dc2tog 2x, *dc 4, 2dc 2x, dc4; rep from * until 5 chs remain, dc 4, 2dc in last ch, turn.
Row 2: Ch 3, dc in st at base of ch, dc 4, dc2tog 2x, *dc 4, 2dc 2x, dc 4, dc2tog 2x; rep from * until 5 sts remain, dc 4, 2dc in 3rd ch of tch, turn.
Rep Row 2 to desired length.

I really hope you enjoyed this tutorial and are starting to fall in love with the Ripple Stitch (I know I am!). Have some fun with different colors and shaping to see this stitch really come to life.
Ready to start a Ripple Stitch project? Try the Mocha Ripple Afghan, a free pattern. Find it HERE


