The Cameron Blanket – Crochet Pattern

Happy Spring, fiber friends! Last Autumn, I saw the most gorgeous Fall-inspired color palette and I knew instantly that I needed to make a blanket using those colors.
I scoured patterns all over the internet to find the perfect design, but it wasn’t until I saw my friend Cameron’s crochet project using the moss stitch that realized a simple combination of moss stitch and color fading would be absolutely perfect for my Fall-colored blanket.
And I was right!
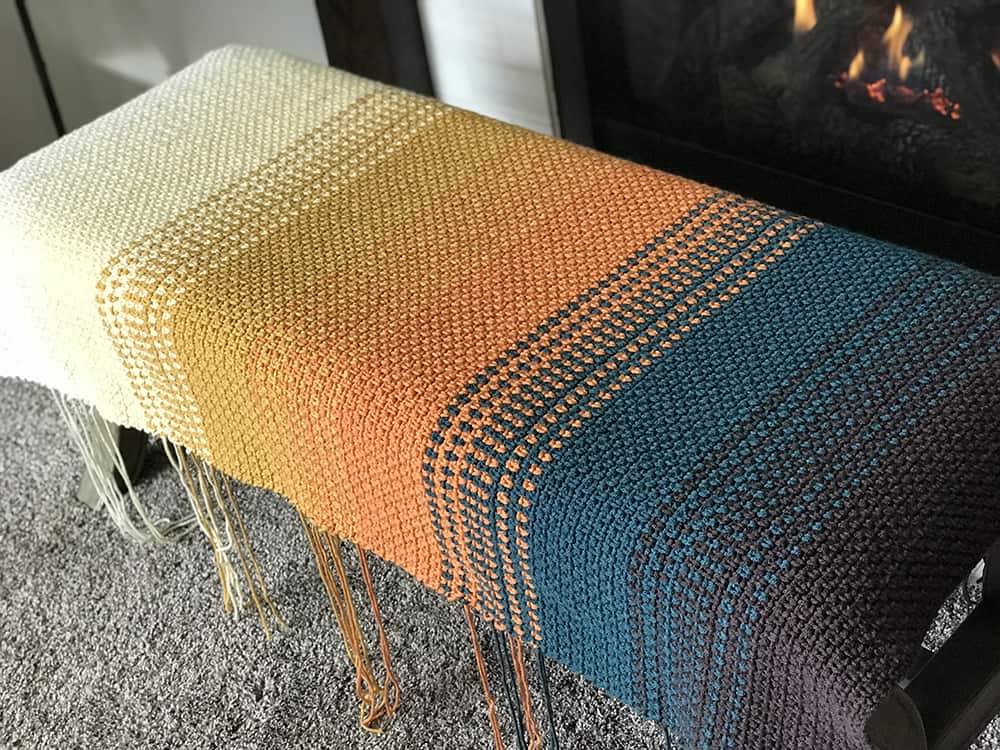
The moss stitch created a gorgeous, loose, and light texture that allowed me to whip up a fabulous, decorative throw blanket in less than a week. It accented the bench in my front entryway perfectly (check out the picture at the end of this post for proof… it’s lovely!). But before I knew it, Fall was over and I wanted a winter blanket. So I made one! And then I wanted a Christmas blanket–so I made one. And then my friend had a baby and I wanted to make a blanket that matched her nursery–so I made one. And as soon as this Winter weather started to ease up… yup! You guessed it: I made the Easter-inspired beauty that you see at the beginning of this post. It’s undeniable–I’m addicted to the moss stitch, and the Cameron Blanket is the perfect creative outlet for all my colorful ideas.
This blanket is so, so easy. We’re talking: if you can do a single crochet and a chain stitch, YOU CAN MAKE THIS BLANKET. I may be a little partial, but I have yet to see a bad color combination, so feel free to get creative! If you need ideas, google “color palettes” and prepare to be inspired by combinations for every season, holiday, sports team, Hogwarts house, you name it!
If you’d like an ad-free PDF of this pattern, you can find it at a low cost on Ravlery or my Etsy page. I’m also on Instagram and Facebook, so let’s be friends!
The Cameron Blanket
Skill Level:
Beginner
Materials:
- Amour Crochet Hook Size J (6.0 mm) – Art. No 1049/J
- Mini Patchwork Scissors – Art. No 493/CW
- Jumbo Darning Needle Set – Art. No 340
- Worsted Weight (#4) Yarn in 6 colors
- Color A: 190 yards
- Color B: 260 yards
- Color C: 260 yards
- Color D: 260 yards
- Color E: 260 yards
- Color F: 190 yards
Gauge:
13 SC x 15 rows = 4” x 4” square
Finished Measurement:
34” wide x 50” long with a lot of stretch in either direction.
Stitches & Abbreviations | US Terminology
- CH(s): chain(s)
- SC: single crochet
- SK: skip
- **: repeat everything between the ** markings until specified.
Notes
This pattern is written using US Crochet Terminology.
The color that you’re supposed to be crocheting with during each section of the pattern will be designated in bold at the beginning of the instructions for each row.
Color changes are completed during the final portion of your last SC of the old color. Using your old color, complete the first two steps of a SC: insert hook into the stitch or gap and pull up a loop. At this point, you should have two loops on the hook (see below; left). Using the new yarn color or the one that you’ve dropped and are picking back up again, pull the new yarn through the last two loops on the hook instead of the original yarn color (see below; right). Continue pattern as written.

Each color fade section in the pattern involves carrying a piece of yarn that you’re not currently using behind the working piece of yarn. I prefer this method to weaving in a million ends (you’ll only have 12 loose ends if you carry!), but if you prefer to cut your yarn for color changes and weave in all your ends, you can absolutely do that. I’ve made this blanket using both methods and either option works perfectly.
To “carry” a piece of yarn, crochet around the strand of yarn that you’re not using (as if it is part of the previous row that you’re stitching into) with the yarn that you’re working with.

The carried yarn will have the tendency to bunch up, so be sure to pause and pull the carried end tighter at several points while crocheting that row. If you pull the yarn too tightly, you’ll need to let go of the carried yarn and pull on both edges of the blanket to loosen the carried yarn back up again. Try to keep the tension of the carried piece of yarn equal to the tension of the rest of the blanket.

The recommended yardage for each color of yarn that I’ve provided in this pattern was measured using the carried yarn method, so keep in mind that you might use slightly different amounts of yarn if you decide to cut your yarn at color changes rather than carry it.
Because of the finished look of the edges on this blanket, I didn’t find it necessary to do a border. Even when dropping certain colors for two rows and picking them back up again on the third row, the edges of your blanket will still be clean and the carried colors won’t disrupt the pattern. However, if you want to do a border, DO IT! I’d love to see what you come up with.

This blanket is extremely customizable! If you want a wider or thinner blanket, simply increase or decrease your starting chain to any even number. If you want a longer or shorter blanket, increase or decrease the number of rows you complete in your pattern. You may need to adjust the number of rows in each solid-colored section equally to keep the pattern even, or you can use more/less than six colors in your color fade design. I have tips for making a twin-sized blanket at the end of this post.
This is the basic design for the blanket:
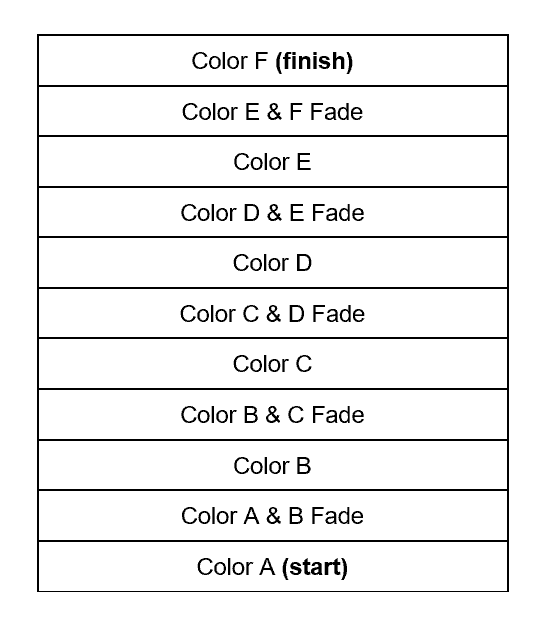
All COLOR FADE sections will follow this pattern (16 rows worked from the bottom, up):

SOLID COLOR 1 SECTION
Row 1: Color 2 (new color) — carry Color 1
Row 2: Color 1 (old color) — drop Color 2; you’ll come back to it later
Row 3: Color 1
Row 4: Color 2 — carry Color 1
Row 5: Color 1 — drop Color 2
Row 6: Color 1
Row 7: Color 2 — carry Color 1
Row 8: Color 1 — carry Color 2
Row 9: Color 2 — carry Color 1
Row 10: Color 1 — carry Color 2
Row 11: Color 2 — drop Color 1
Row 12: Color 2
Row 13: Color 1 — carry Color 2
Row 14: Color 2 — drop Color 1
Row 15: Color 2
Row 16: Color 1 — carry Color 2. At the end of the row, change to Color 2 and cut off Color 1.
SOLID COLOR 2 SECTION
Okay, are you ready for the world’s easiest blanket pattern? Here you go!
Pattern:
SOLID COLOR A SECTION
Start: Color A. Using your J Hook and Color A, CH 120.
Row 1: Color A. SC in fourth CH from the hook. *CH 1, SK 1 ST, and SC into the next ST.*
Repeat from * to * until the end; you’ll finish with a SC in the final CH. CH 2, turn. (59 SC)
From now until the end of the pattern, you will be completing all your stitches into the gaps created by the CH spaces made in the previous row, NOT into actual stitches.

Rows 2-15: Color A. SK 1st ST and SC into the first gap created by the CH space in the previous row. *CH 1, SK 1 ST, and SC into the gap.* Repeat from * to * until only 1 SC from the previous row remains. CH 1, SK 1 ST, and SC into the last space created by the CHs at the end of the previous row (see above). CH 2, turn. (59 SC)
Row 16: Color A. SK 1st ST and SC into the first gap. *CH 1, SK 1 ST, and SC into the next gap.* Repeat from * to * until only 1 SC from the previous row remains. CH 1, SK 1 ST, and begin to SC into the last space created by the 2 CHs at the end of the previous row. When there are two loops remaining on the hook for the final SC, drop Color A and pull Color B through both loops to switch colors. CH 2, turn. (59 SC)
COLOR A & B FADE SECTION:
Row 17: Crochet with Color B and carry Color A throughout this row. SK 1st ST and SC into the first gap. *CH 1, SK 1 ST, and SC into the next gap.* Repeat from * to * until only 1 SC from the previous row remains. Make sure to pull the carried end of Color A tight at several points along the row so the yarn doesn’t bunch up. CH 1, SK 1 ST, and SC into the last space created by the 2 CHs at the end of the previous row–change back to Color A while pulling through the last two loops of the final SC. CH 2, turn. (59 SC)
Row 18: Drop Color B and crochet using Color A. Repeat Row 2. (59 SC)
Row 19: Color A. Repeat Row 16. On final SC of the row, switch to Color B. Continue with CH 2, turn. (59 SC)
Row 20: Crochet with Color B and carry Color A throughout this row. Repeat Row 17. On final SC of the row, switch to Color A. Continue with CH 2, turn. (59 SC)
Row 21: Drop Color B and crochet using Color A. Repeat Row 2. (59 SC)
Row 22: Color A. Repeat Row 16. On final SC of the row, switch to Color B. Continue with CH 2, turn. (59 SC)
Row 23: Crochet with Color B and carry Color A throughout this row. Repeat Row 17. On final SC of the row, switch to Color A. Continue with CH 2, turn. (59 SC)
Row 24: Crochet with Color A and carry Color B throughout this row. SK 1st ST and SC into the first gap. *CH 1, SK 1 ST, and SC into the next gap.* Repeat from * to * until only 1 SC from the previous row remains. CH 1, SK 1 ST, and SC into the last space created by the 2 CHs at the end of the previous row–change back to Color B while pulling through the last two loops of the SC. CH 2, turn. (59 SC)
Row 25: Crochet with Color B and carry Color A throughout this row. Repeat Row 17. On final SC of the row, switch to Color A. Continue with CH 2, turn. (59 SC)
Row 26: Crochet with Color A and Carry Color B throughout this row. Repeat Row 24. On final SC of the row, switch to Color B. Continue with CH 2, turn. (59 SC)
Row 27: Drop Color A and crochet using Color B. Repeat Row 2. (59 SC)
Row 28: Color B. Repeat Row 16. On final SC of the row, switch to Color A. Continue with CH 2, turn. (59 SC)
Row 29: Crochet with Color A and carry Color B throughout this row. Repeat Row 17. On final SC of the row, switch to Color B. Continue with CH 2, turn. (59 SC).
Row 30: Drop Color A and crochet using Color B. Repeat Row 2. (59 SC)
Row 31: Color B. Repeat Row 16. On final SC of the row, switch to Color A. Continue with CH 2, turn. (59 SC)
Row 32: Crochet with Color A and carry Color B throughout this row: Repeat Row 17. On final SC of the row, switch to Color B. Continue with CH 2, turn. Cut off Color A and continue to the next Solid Color section. (59 SC)
SOLID COLOR B SECTION
Rows 33-47: Color B. Repeat Row 2. (59 SC)
Row 48: Color B. Repeat Row 16. On final SC of the row, switch to Color C. Continue with CH 2, turn. (59 SC)
COLOR B & C FADE SECTION
Rows 49-64: Repeat the Color Fade pattern for Rows 17-32, however, replace Color A instructions with Color B, and replace Color B instructions with Color C. (59 SC)
SOLID COLOR C SECTION
Rows 65-79: Color C. Repeat Row 2. (59 SC)
Row 80: Color C. Repeat Row 16. On final SC of the row, switch to Color D. Continue with CH 2, turn. (59 SC)
COLOR C & D FADE SECTION
Rows 81-96: Repeat the Color Fade pattern for Rows 17-32, however, replace Color A instructions with Color C, and replace Color B instructions with Color D. (59 SC)
SOLID COLOR D SECTION
Rows 97-111: Color D. Repeat Row 2. (59 SC)
Row 112: Color D. Repeat Row 16. On final SC of the row, switch to Color E. Continue with CH 2, turn. (59 SC)
COLOR D & E FADE SECTION
Rows 113-128: Repeat the Color Fade pattern for Rows 17-32, however, replace Color A instructions with Color D, and replace Color B instructions with Color E. (59 SC)
SOLID COLOR E SECTION
Rows 129-143: Color E. Repeat Row 2. (59 SC)
Row 144: Color E. Repeat Row 16. On final SC of the row, switch to Color F. Continue with CH 2, Turn. (59 SC)
COLOR E & F FADE SECTION
Rows 145-160: Repeat the Color Fade pattern for Rows 17-32, however, replace Color A instructions with Color E, and replace Color B instructions with Color F. (59 SC)
SOLID COLOR F SECTION
Rows 161-176: Color F. Repeat Row 2. Omit final “CH 2, turn” after the last row. Fasten off Color F. (59 SC)
Weave in all your loose ends and enjoy, because YOU’RE DONE. Now find a cute place to display your blanket and take lots of pictures, because I want to see your hard work! Feel free to tag @theacorncraftshop using #cameronblanket and I’ll feature your work in my stories. I can’t wait to see what you’ve made!
Here are a few of the many other Cameron Blankets I’ve whipped up (or am currently working on):

PRO TIP: For the twin blanket that I’m making to the left, I start with a CH of 250 and follow the same pattern, except all solid sections consist of 12 rows instead of 16. I have 13 solid-colored sections and 12 color fade sections, equaling a 66” x 90” blanket (348 rows).
If you’ve run into any issues along the way, please don’t hesitate to contact me at theacorncraftshop@gmail.com, or send a message through Instagram. I’m happy to help!
Thanks for sticking with me–I hope you find lots and lots of gorgeous ways to enjoy your Cameron Blanket(s). Happy hooking, friends!
Find Amy on Instagram | Ravelry | Etsy | Facebook
Stay connected with Clover on Facebook | Twitter | Instagram | Pinterest | YouTube | Ravelry
[mc4wp_form id=”11289″]