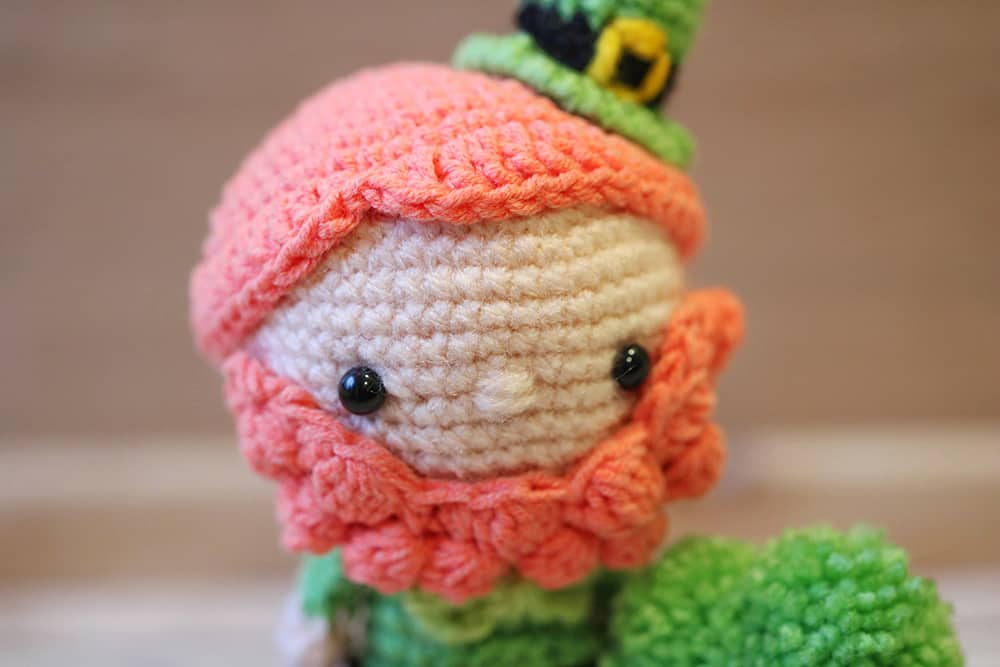
Liam the Leprechaun – Amigurumi Pattern

Hi everyone! I’m Julia from Little World of Whimsy, and I’m here to share a cute Leprechaun pattern, complete with a fluffy four-leaf clover, just in time for St. Patrick’s Day!
When I was researching how to design this pattern, I learned a lot about St. Patrick’s Day and the symbolism of Leprechauns! These red-headed Irish spirits are mischievous to a fault, but bring the “Luck o’ the Irish” and so are symbols of good luck, along with four-leaf clovers. This tiny doll is intricate, but captures all the classic elements of a Leprechaun that you’ll recognize and love. You can get the inexpensive, beautifully formatted, printable PDF on Etsy here.

Liam the Leprechaun is a mini doll with a flair for mischief. He is accompanied by a fluffy four-leaf clover, made up of four pom-poms. This tiny leprechaun doll is sure to please with his tiny hat and cute details. To create the four leaf clover, use Clover’s Extra Small Pom-Pom Maker (video tutorial here)!
Materials
- Clover Amour Crochet Hook D (3.25 mm) – Art. No 1042/D
- WeCrochet Brava Sport (Color: (<1 skein of each color: Grass (green), Peapod (light green), Cream, Sienna (brown), Orange, Black, Canary (yellow))
- Clover Extra Small Pom-Pom Maker – Art. No 3127
- Mini Patchworks Scissors – Art. No 493/CW
- Quick Locking Stitch Marker (Small) – Art. No 3030
- Darning Needle Set (Bent Tip) – Art. No 3121
- Sewing Pins – check out Clover’s pins
- 6.0mm Safety Eyes
- Fiberfill Stuffing
- Optional: Hot Glue Gun
Abbreviations
- CC: contrast color
- ch: chain
- dc: double crochet
- dec: decrease
- FSC: foundation single crochet (tutorial here)
- hdc: half double crochet
- inc: increase (2 scs in the same stitch)
- MC: main color
- MR: magic ring
- rnd: round
- sc: single crochet
- slst: slip stitch
- st(s): stitch(es)
- x sc: sc x number of times
- (x sts): x total stitches in round/row
- (…) x: repeat stitches within brackets x times
Finished Size
- Doll: 4.5″ x 2″
- Clover: 1.5″ x 1.5″
Technical Notes
- Crochet in continuous spiral rounds, unless specified otherwise. Use a stitch marker or piece of yarn to keep track of the last stitch in each round.
- When filling with polyester stuffing, pull apart each large chunk into many smaller chunks. This ensures an even distribution of firmness within the amigurumi.
- Stuff the head and the body firmly at the openings so that the neck is stable upon completion.
- For this pattern, the MC is green, CC1 is beige, CC2 is coral, CC3 is black, CC4 is brown, CC5 is light green, and CC6 is yellow.
Special Stitches
Invisible finish off: click here for tutorial
Bobble stitch (video tutorial here):
- Yarn over, insert hook into stitch and pull up
a loop. Yarn over, pull through two. (This is essentially completing the first half of one double crochet stitch.) - Repeat number one in the same stitch/space until you have a total of 6 loops on your hook.
- Yarn over, pull through all 6 loops at once.

The Pattern
LEG
(in CC4, then MC)
Round 1 5 sc in MR (5 sts)
Round 2 sc around (5 sts)
Round 3 2 sc, inc, 2 sc (6 sts)
Cut CC4 and switch to MC.
Round 4 sc around (6 sts)
Round 5 2 sc, inc, 3 sc (7 sts)
Round 6 sc around (7 sts)
Stuff very lightly. Finish off and weave in the end. Make another identically but do not finish off.
Chain 2 off the side of the leg you’re working on, attach yarn to the first leg and sc 7 around the leg. Sc 2 in the connecting chains, sc 7 around the second leg. (18 sts total, counting the 2 connecting chains)
BODY
(in MC)
Round 1 inc x2, 7 sc, inc x2, 7 sc (22 sts) Round 2 inc, sc 10, inc, sc 10 (24 sts) Round 3 sc around (24 sts)
Round 4 (dec, 2 sc) x6 (18 sts)
Round 5-8 (4 rnds) sc around (18 sts)
Stuff. Finish off, leaving a long tail for sewing.

HEAD
Round 1 6 sc in MR (6 sts)
Round 2 inc x6 (12 sts)
Round 3 (sc, inc) x6 (18 sts)
Round 4 (2 sc, inc) x6 (24 sts)
Round 5 (3 sc, inc) x6 (30 sts)
Round 6 (4 sc, inc) x6 (36 sts)
Round 7 (5 sc, inc) x6 (42 sts)
Round 8 (6 sc, inc) x6 (48 sts)
Round 9-15 (7 rnds) sc around (48 sts)
Insert 6mm safety eyes between rounds 12 and 13, 8 stitches apart. Embroider a nose using CC1 directly between the eyes, 2 stitches wide.
Round 16 (6 sc, dec) x6 (42 sts)
Round 17 (5 sc, dec) x6 (36 sts)
Round 18 (4 sc, dec) x6 (30 sts)
Round 19 (3 sc, dec) x6 (24 sts)
Round 20 (2 sc, dec) x6 (18 sts)
Stuff.
Round 21(sc, dec) x6 (12 sts)
Round 22 dec x6 (6 sts)
Finish off and weave in end. Using the tail from the body, sew the head to the body.

ARMS
(in CC1, then MC)
Round 1 5 sc in MR (5 sts)
Round 2 2 sc, inc, 2 sc (6 sts)
Round 3 sc around (6 sts)
Cut CC1 and switch to MC.
Round 4 2 sc, dec, 2 sc (5 sts)
Round 5-6 (2 rnds) sc around (5 sts)
Do not stuff. Finish off, leaving a tail for sewing. Make another identically. Sew to the left and right sides of the seam between the body and the head.


HAIR
(in CC2)
Round 1 6 sc in MR (6 sts)
Round 2 inc x6 (12 sts)
Round 3 (sc, inc) x6 (18 sts)
Round 4 (2 sc, inc) x6 (24 sts)
Round 5 (3 sc, inc) x6 (30 sts)
Round 6 (4 sc, inc) x6 (36 sts)
Round 7 (5 sc, inc) x6 (42 sts)
Round 8 (6 sc, inc) x6 (48 sts)
Round 9-11 (3 rnds) sc around (48 sts)
Round 12 chain 2, 20 dc, hdc, slst, hdc, 25 dc, slst to top of first stitch (48 sts)
Finish off. Either leave a long tail and sew the hair cap to the head with the part slightly off center, or use a hot glue gun to secure the hairpiece.

BEARD
(in CC2. See Special Stitches for Bobble Stitch.)
Begin Chain 18
Row 1 Beginning from the second chain from the hook, sc across, turn (17 sts)
Row 2 ch 2, (hdc, bobble stitch) x8, hdc, turn (17 sts, 8 bobbles)
Row 3 ch 2, hdc, (bobble, hdc dec) x5, hdc (12 sts, 5 bobbles)
For row 3, the bobbles will be facing the opposite direction as row 2. Using the back of your crochet hook or other blunt object, pop the bobbles on row 3 inside out so that all of the bobbles are facing the same direction.
Finish off. Either leave a long tail and sew the beard to the bottom of the head, or use a hot glue gun to secure. Row 3, with fewer bobbles, should be on top.

BELT
(in CC3. See Abbreviations for FSC.)
Row 1 FSC 16
Finish off, leaving a tail for sewing. Sew to the 3rd round of the body. Using CC6, embroider a square centered at the front of the belt.
BOWTIE
(in CC5, worked in turned rows. Video tutorial here.)
Row 1 FSC 4, chain and turn (4 sts)
Row 2-3 (2 rows) 4 sc, chain and turn (4 sts)
Cut a long tail, thread needle from the end of the rectangle to the middle. Wrap yarn around the middle of the rectangle several times, and then secure the end by passing the needle through the rectangle several times. Make sure to leave a tail for sewing to the body.
![]()
HAT BRIM
(in MC. Video tutorial for crab stitch here and invisible finish off here.)
Round 1 8 sc in MR (8 sts)
Round 2 inc x8 (16 sts)
Round 3 (sc, inc) x8 (24 sts)
Round 4 crab stitch all around. Invisible finish off. Weave in end.
HAT TOP
(in MC, then switch to CC3)
Round 1 8 sc in MR (8 sts)
Round 2 inc x8 (16 sts)
Round 3-6 (4 rnds) sc all around (16 sts)
Cut MC, switch to CC3.
Round 7-8 (2 rnds) sc around (16 sts)
Stuff. Finish off, leaving a long tail for sewing. Sew the top of the hat to the brim using CC3. Using CC6, embroider a rectangle on the black band of the hat. Sew the hat to the top of the head using MC.


FOUR-LEAF CLOVER
(in MC)
Make four pom-poms. If you have a Clover Extra Small Pom-Pom Maker, view this tutorial here. If you’re DIYing it, check out this tutorial for making pom-poms from scratch.
Holding each pair of arches together, wind the yarn around the arches until you completely cover them.

When you fill the arches all the way up with wound yarn, move on to the next pair of arches and repeat.

Cut the tail end of the yarn and close the two arches together until the Pom-Pom Maker is in a circle shape.

Using a sharp pair of scissors, cut the yarn between each pair of arches on both sides.

Cut a scrap piece of yarn, about a foot long, and wrap it around the center dowel in the middle of the Pom-Pom Maker, tugging it through the arches. Wrap it around once or twice to secure, and tie a knot.

Take the Pom-Pom Maker apart, fluff the Pom-Pom out a little, and cut off all the stray pieces of yarn.

Pom-pom finished! Make another 3 identically.

CLOVER STEM
(in MC)
Round 1 5 sc in MR (5 sts)
Round 2 (sc, inc) x2, sc (7 sts)
Round 3-6 (4 rnds) sc around (7 sts)
Stuff lightly. Finish off, leaving a long tail for sewing and thread a tapestry needle. Next, string all four pom-poms onto your tapestry needle one after another by inserting your needle through the middle of each pom-pom. Once you have all four pom-poms in a line on your needle, insert your needle back through the open end of the stem, forming a circle. Pull tight, and the four pom-poms should all squish together into a square shape. Insert your needle through all four pom-poms again to secure, then tie a knot and weave in the end. Trim the pom-poms of any stray yarn strands.

Liam the Leprechaun is all done!
I hope you enjoyed crocheting him and found the pattern helpful. I would love to see your finished amigurumi, so share a picture on Instagram with me by using the #littleworldofwhimsy and tagging me @littleworldofwhimsy.
This pattern is free but if you’d like to purchase a low-cost PDF, you can find it here.
Once again, if you have any questions don’t hesitate to reach out to me with a direct message on Instagram @littleworldofwhimsy or through email at littleworldofwhimsy@gmail.com.
Happy crocheting!
Find Little World of Whimsy on her Blog | Instagram | Facebook | Pinterest | Etsy
Stay connected with Clover on Facebook | Twitter | Instagram | Pinterest | YouTube | Ravelry
[mc4wp_form id=”11289″]