Cimelio Pumpkin Patterns – Knit Pattern
Hello Makers! It’s Elise again, the maker and designer behind Frosia Knits. Fall is in full force and Halloween is just around the corner. I wanted to put my own spin on a knitted pumpkin so this week I’m so excited to share with you all the Cimelio Pumpkin Patterns.
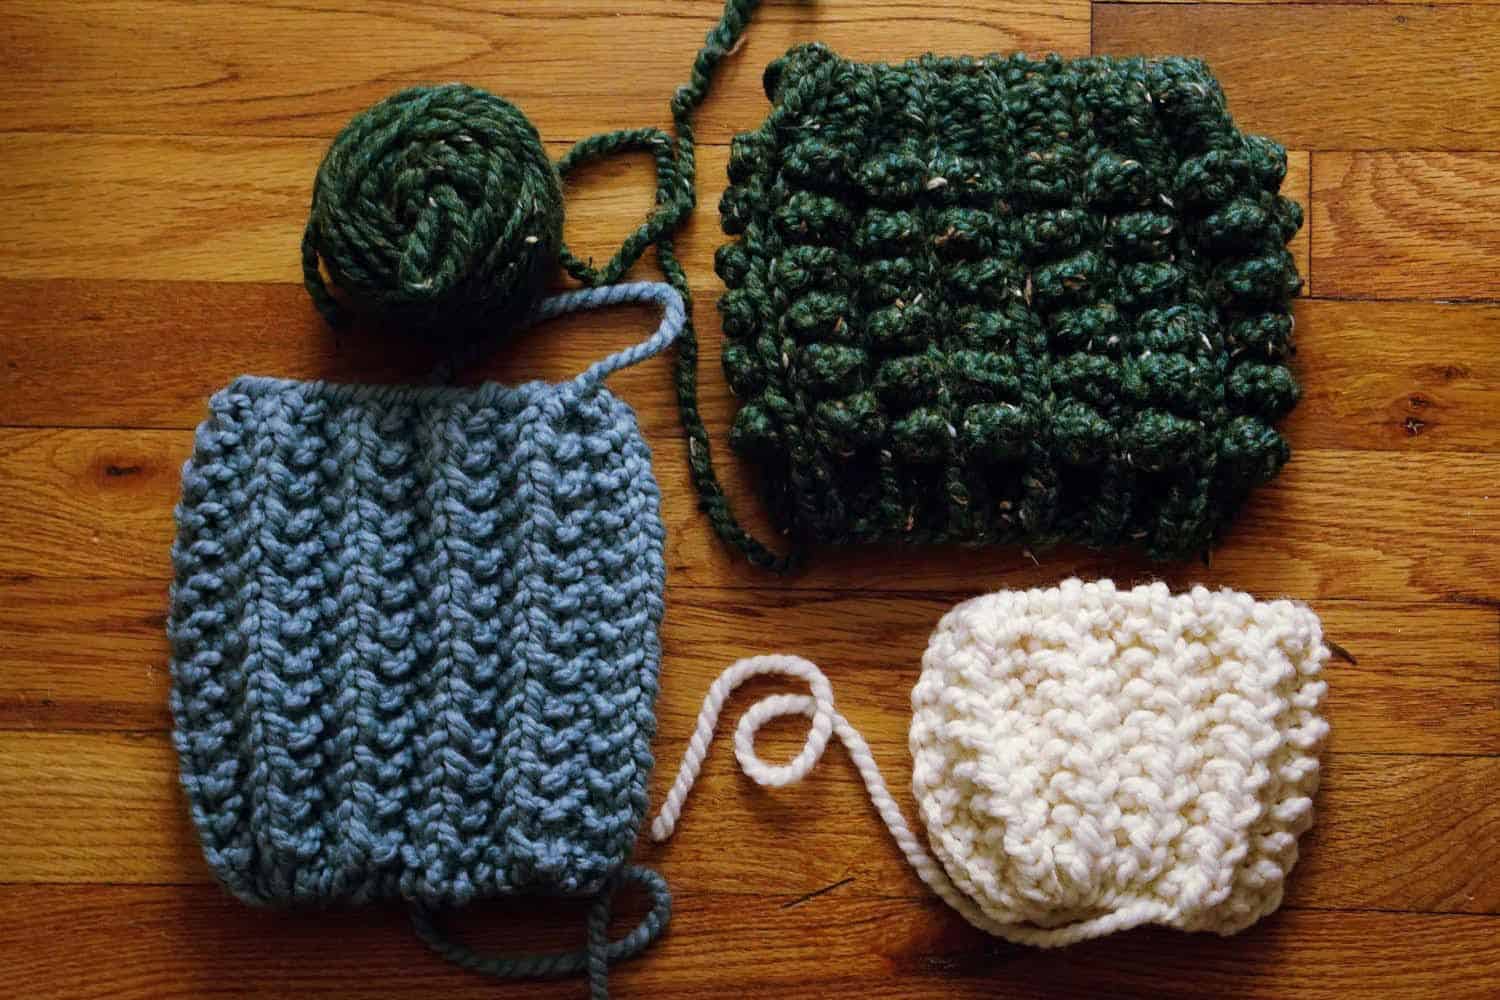
This set of patterns includes two types of pumpkins, a ribbed style and a bobble version. There are two sizes available in my pattern but can be easily modified to make whatever size you like. The heirloom pumpkins are a quick make but will be sure to be the star of your fall decor year after year!

This Cimelio Pumpkin pattern was inspired by my family’s traditions. So many of my patterns are inspired by my Italian roots but this pattern is a salute to my American upbringing and annual celebration of all things fall and Halloween. I fell in love with the heirloom pumpkin varieties as soon as they started to become available and I wanted to recreate those special pumpkins in a knitted pattern. Hope you enjoy!
Method:
Knitting
Skill Level:
Beginner to Advanced Beginner
Materials
- 1 skein of Lion Brand Wool-Ease Thick & Quick Super Bulky yarn (80% Acrylic, 20% Wool). Each skein is 114 yds (97m). You will need about 28 – 129 yds (27 – 118m) to complete one pumpkin. You can easily substitute any super bulky yarn, just make sure to check your gauge.
- Takumi Circular Knitting Needles US 11 (8.0 mm) 16″ – Art. No 3016/16-11
- OR Takumi Interchangeable Knitting Needle US 11 (8.0 mm) – Art. No 3642 with Interchangeable Cord 16″ – Art. No 3645
- Takumi Double Pointed Knitting Needles US 11 (8.0 mm) – Art. No 3015-11
- Stitch Marker – Art. No 354
- Tapestry Needle Set (Bent Tip) – Art. No 3121
- Mini Patchwork Scissors – Art. No 493/CW
- Spring Tape Measure – Art. No 806

Finished Sizes (laid flat)
- Small Ribbed Pumpkin
- Height = 4″
- Circumference = 12″
- Large Ribbed Pumpkin
- Height = 7″
- Circumference = 14″
- Small Bobble Pumpkin
- Height = 6″
- Circumference = 12″
- Large Bobble Pumpkin
- Height = 8.5″
- Circumference = 14″
Gauge
10 sts + 14.5 rows = 4” in stockinette
Abbreviations
- CO cast on
- k knit
- p purl
- mb make bobble
Make Bobble Stitch Explanation
This is a 5-stitch Bobble. Begin with the right side facing you and insert your needle into the next stitch where you want to create your bobble as if to knit.
Keep the stitch on the left needle, yarn over and insert needle in the same stitch as if to knit again, yarn over and insert needle in the same stitch as if to knit one more time. You will now have 5 stitches on your left where you previously had one. Turn the work so the wrong side is now facing you and knit the 5 bobble stitches. Turn the work so the right side is facing you and knit the first two bobble stitches together. Place this stitch back onto the left needle. Similar to binding off, pass the remaining three stitches, one at a time, over the first knit-together stitch. Knit the remaining bobble stitch, returning it to the right needle.
Check out my instructional video on IGTV here
Ribbed Pumpkin Note
The stitch pattern is a 4 stitch repeat. If you wish to increase the width of the pumpkin, do so by increasing your number of cast on stitches in multiples of 4. If you wish to increase the height for a taller pumpkin, continue to repeat rows until desired height is reached.
Bobble Pumpkin Note
The stitch pattern is a 6 stitch repeat. If you wish to increase the width of the pumpkin, do so by increasing your number of cast on stitches in multiples of 6. If you wish to increase the height for a taller pumpkin, continue to repeat bobble rows as desired and then continue to the last four rounds of the pattern.

Cimelio Pumpkin Patterns:
Mistake Rib Pattern
Small
Long tail Cast-on 36 stitches (stitches will be tight when you cast on – use DPNs if desired), place stitch marker, and join in the round, being careful not to twist the stitches. Leave a long tail, about 10-12in
Round 1: *k2, p2, repeat from * to end of round
Round 2: p1, *k2, p2, repeat from * to last 3 stitches, k2, p1
Repeat Rounds 1 and Round 2 seven more times or until piece measures about 4 inches
Cut yarn leaving a long tail.
Continue to finishing directions.
Large
Long tail Cast-on 44 stitches, place stitch marker, and join in the round, being careful not to twist the stitches. Leave a long tail, about 10-12in
Round 1: *k2, p2, repeat from * to end of round
Round 2: p1, *k2, p2, repeat from * to last 3 stitches, k2, p1
Repeat Rounds 1 and Round 2 twelve more times or until piece measures about 7 inches
Cut yarn leaving a long tail.
Continue to finishing directions.
Bobble Pattern
Small
Long tail Cast-on 36 stitches (stitches will be tight when you cast on – use DPNs if desired), place stitch marker, and join in the round, being careful not to twist the stitches. Leave a long tail, about 10-12in
Round 1: *p2, k1 repeat from * to end of round
Repeat Round 1 two more times
Round 4: *p1, mb, k1, mb, p1, k1 repeat from * to end of round
Round 5: *p2, k1 repeat from * to end of round
Repeat Round 4 & Round 5 four more times or until piece measures about 6 inches
Repeat Round 1 three more times
Cut yarn leaving a long tail.
Continue to finishing directions.
Large
Long tail Cast-on 42 stitches, place stitch marker, and join in the round, being careful not to twist the stitches. Leave a long tail, about 10-12in
Round 1: *p2, k1 repeat from * to end of round
Repeat Round 1 four more times
Round 6: *p1, mb, k1, mb, p1, k1 repeat from * to end of round
Round 7: *p2, k1 repeat from * to end of round
Repeat Round 6 & Round 7 five more times or until piece measures about 6.5 inches
Repeat Round 1 five more times
Cut yarn leaving a long tail.
Continue to finishing directions.
Finishing the Pumpkin
Run yarn through all the live stitches and cinch together leaving no gap. (this will be the bottom of the pumpkin)
Stuff with batting (I like to leave it a little under stuffed on the ribbed pumpkin so that the ribbing gives the effect of indentations)
Pick a stick to use for the stem. (I found a few at my local park and cut to size, feel free to get creative for your stem!).
Begin closing up the open end by running yarn through each of the outer loops of the CO stitches.
Place your stick and cinch together by pulling yarn and close up the end tightly around the stick and secure by running through the CO stitches again.
Run yarn down from the top through the center of the pumpkin to the bottom, run it through a few stitches and run it back up through the pumpkin to the top and cinch lightly. Do this a couple times until you get the desired appearance and secure and weave in ends.

This pattern is free but you may also purchase the inexpensive PDF file in my Etsy shop for easy printing and reading. If you’d like a printable version of the pattern, you can find that here.
Don’t forget to follow Frosia Knits on social media for more updates and to share your finished projects tagging @FrosiaKnits and with the hashtag #CimelioPumpkin!
*****
All photos and instructions in this pattern are the property of Frosia Knits. Do not publish or share this pattern as your own. You can sell the items you make from this pattern by crediting Elise Ljiko from Frosia Knits, linking to my Etsy site, and using your own photos.
Find Frosia Knits on Instagram | Pinterest | Etsy | Ravelry | Facebook
Stay connected with Clover on Facebook | Twitter | Instagram | Pinterest | YouTube | Ravelry
[mc4wp_form id=”11289″]