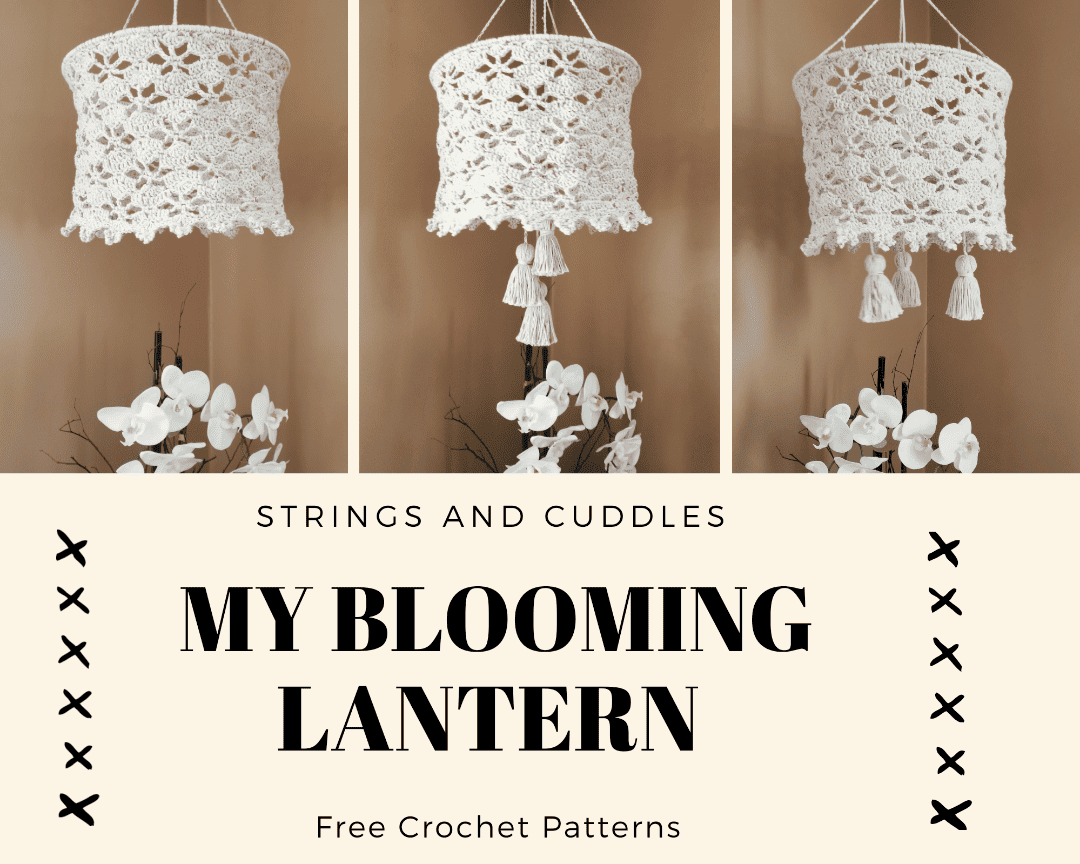
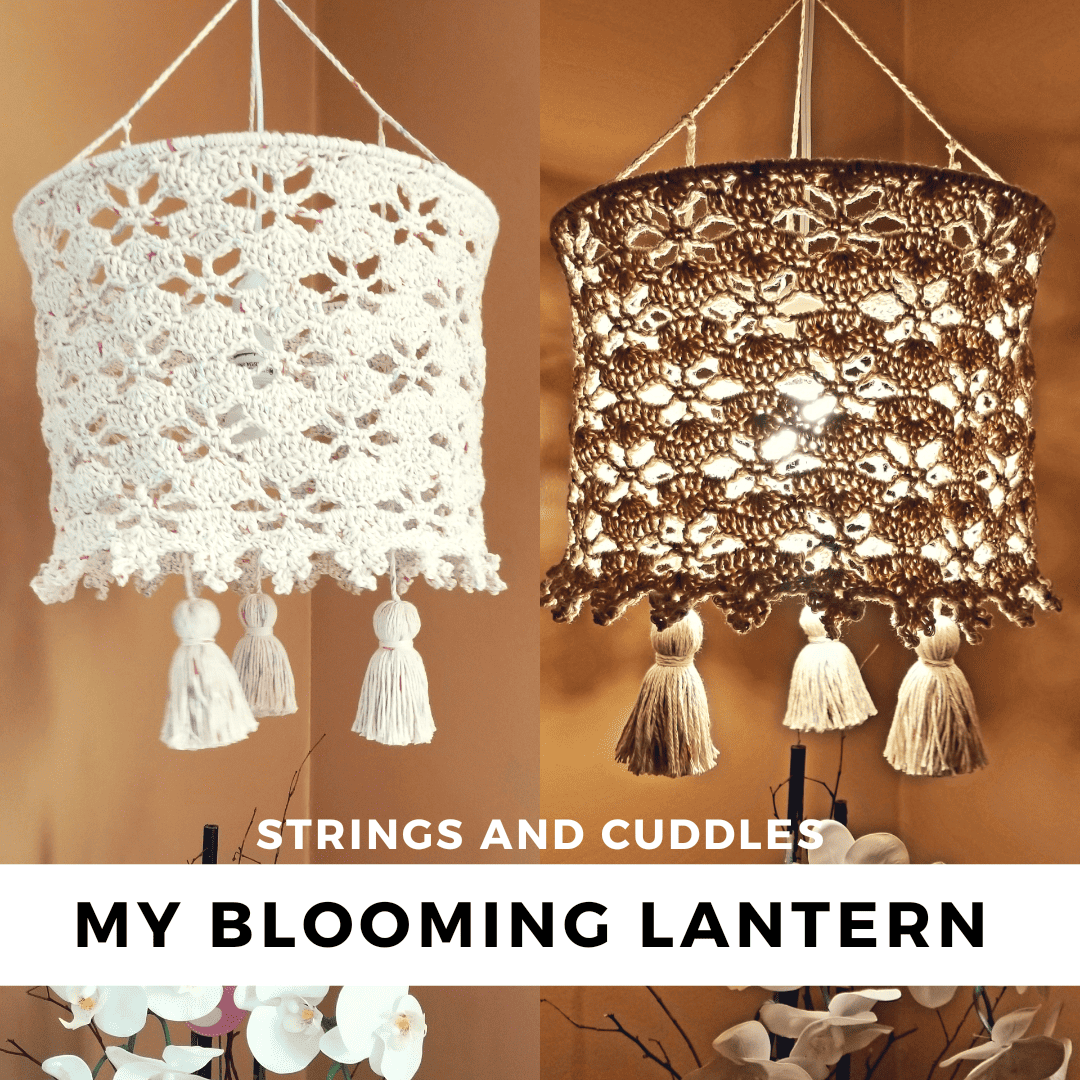
My Blooming Lantern – Crochet Pattern
Life is tough! This pandemic is making things harder for all of us! But I am so thankful for I have the ability to create something pretty.
Hi! My name is Elisa and I’m the maker and designer behind Strings and Cuddles. I am so glad to be back here and share with you my new design. I have been dreaming of making this design come to life. It was a delight to see when it was finally complete. I was thrilled and so pleased with the result!
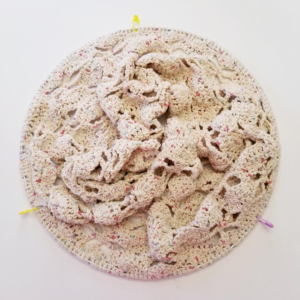
The design for this pattern was inspired by the Spring flowers blooming and blossoming around us. I fell in love with the stitch pattern I saw on Pinterest and I knew that this was the stitch I wanted to use for this pattern. Just the perfect piece for my feat!
Let’s dive into this design!
This pattern is FREE but you can also purchase the inexpensive PDF file (with chart) on my Ravelry shop for easy printing and reading. Purchasing the PDF file helps to support my blog and allows me to continue to share my patterns with you.
My Blooming Lantern
Skill Level
Intermediate
Materials
- 1 Peach & Crème Cone Panorama or any worsted weight cotton yarn | approximately 500 yards
- Soft Touch Crochet Hook (Size I/5.5 mm) – Art. No 1009/I
- Mini Patchwork Scissors – Art. No 493/CW
- Quick Locking Stitch Marker Set – Art. No 3033
- Tapestry Needle Set (Bent Tip) – Art. No 3121
- Tassel Maker (Large) – Art. No 9941
- Tape Measure
- Lantern Cord Cable Extender with Socket for Bulb Lamp
- 14’’ Floral / Metal Loop
- Adhesive Tape
Gauge:
17 sts x 9 rows = 4 Inches
Finished Measurement:
10” height not including the hanger and 14” loop diameter
Stitches & Abbreviations (US Terms)
- Ch(s) – Chain(s)
- SC – Single Crochet
- DC – Double Crochet
- Rep – Repeat
- Sl St(s) – Slip Stitch(es)
- Sk – Skip
- Sp – Space
Notes
- Read the pattern carefully before starting.
- The gauge for this pattern is not that important but make sure that your stitches are all even.
- This pattern is worked in the round. Join rounds with a slip stitch to the first stitch of each round. Start each round in the same stitch as the join, unless otherwise stated.
- The beginning ch 1 does not count as a chain but beginning ch 3 counts as 1 DC.
- The asterisk* indicates pattern repeats. You will need to repeat all the instructions between asterisks.
- Parentheses ( ) are used to indicate a group of stitches to be worked in the same st/sp.
- This pattern is customizable. You can use a smaller or even bigger metal hoop. Make sure that your foundation stitch is multiple of 16. For the height, you can also make it longer to your desired size but make sure you end with Round 5 or 10.
Pattern
Begin with a slip knot and sl st over the metal hoop.
Round 1: Ch 1, SC 176 around the metal hoop. Sl st to join.
Round 2: Ch 1, SC in the 1st st, ch 1, sk 1 st, SC in the next st, sk 2 sts, 5 DC in the next st, sk 2 sts. *SC in the next st, ch 1, sk 1 st, SC in the next st, sk 2 sts, 5 DC in the next st, sk 2 sts*. Rep from * to * to end. Sl st to join.
Round 3: Sl st in the ch-1-sp, ch 3, DC in the next 7 sts, DC in the ch-1-sp, ch 3, sk 3 sts, DC in the next st, ch 3, sk 3 sts. *DC in the ch-1-sp, DC in the next 7 sts, DC in the ch-1-sp, ch 3, sk 3 sts, DC in the next st, ch 3, sk 3 sts*. Rep from * to * to end. Sl st to join.
Round 4: Sl st in the next 3 sts, ch 1, SC in the same st as the last sl st, ch 1, sk 1 st, SC in the next st, ch 5, SC in the ch-3-sp, ch 1, sk 1 st, SC in the next ch-3-sp, ch 5, sk 3 sts, *SC in the next st, ch 1, sk 1 st, SC in the next st, ch 5, SC in the ch-3-sp, ch 1, sk 1 st, SC in the next ch-3-sp, ch 5, sk 3 sts*. Rep from * to * to end. Sl st to join.
Round 5: Ch 3, DC in the ch-1-sp, DC in the next st, 3 DC in the ch-5-sp, ch 3, DC in the next ch-1-sp, ch 3. *3 DC in the ch-5-sp, DC in the next st, DC in the ch-1-sp, 3 DC in the ch-5-sp, ch 3, DC in the ch-1-sp, ch 3*. Rep from * to * to last ch-5-sp, 3 DC in the ch 5 sp. Sl st to join.
Round 6: Sl st in the next st, ch 3, 4 DC in the same st as the sl st, sk 2 sts, SC in the next st, ch 1, sk 1 st, SC in the ch-3-sp, 5 DC in the next st, SC in the next ch-3-sp, ch 1, sk 1 st, SC in the next st, sk 2 sts. *5 DC in the next st, sk 2 sts, SC in the next st, ch 1, sk 1 st, SC in the ch-3-sp, 5 DC in the next st, SC in the next ch-3-sp, ch 1, sk 1 st, SC in the next st, sk 2 sts*. Rep from * to * to end. Sl st to join.
Round 7: Sl st in the next 2 sts, ch 6 (counts as 1 DC + ch 3), sk 3 sts, DC in the ch-1-sp, DC in the next 7 sts, DC in the ch-1-sp, ch 3, sk 3 sts. *DC in the next st, ch 3, sk 3 sts, DC in the ch-1-sp, DC in the next 7 sts, DC in the ch-1-sp, ch 3, sk 3 sts*. Rep from * to * to end. Sl st in the 3rd ch to join.
Round 8: Sl st in the ch-3-sp, ch 1, SC in the same ch-3-sp, ch 5, sk 3 sts, SC in the next st, ch 1, sk 1 st, SC in the next st, ch 5. *SC in the ch-3-sp, ch 1, SC in the next ch-3-sp, ch 5, sk 3 sts, SC in the next st, ch 1, sk 1 st, SC in the next st, ch 5*. Rep from * to * to the last ch-3-sp, SC in the ch-3-sp, ch 1. Sl st to join.
Round 9: Ch 6 (counts a 1 DC + ch 3), 3 DC in the ch-5-sp, DC in the next st, DC in the ch-1-sp, DC in the next st, 3 DC in the ch-5-sp, ch 3. *DC in the ch-1-sp, ch 3, 3 DC in the ch-5-sp, DC in the next st, DC in the ch-1-sp, DC in the next st, 3 DC in the ch-5-sp, ch 3*. Rep from * to * to end. Sl st in the 3rd ch to join.
Round 10: Ch 3, 4 DC in the 1st st, SC in the ch-3-sp, ch 1, sk 1 st, SC in the next st, sk 2 sts, 5 DC in the next st, sk 2 sts, SC in the next st, ch 1, sk 1 st, SC in the ch-3-sp. *5 DC in the next st, SC in the ch-3-sp, ch 1, sk 1 st, SC in the next st, sk 2 sts, 5 DC in the next st, sk 2 sts, SC in the next st, ch 1, sk 1 st, SC in the ch-3-sp*. Rep from * to * to end. Sl t to join.
Round 11: Ch 3, DC in the next 5 sts, DC in the ch-1-sp, ch 3, sk 3 sts, DC in the next st, ch 3, sk 3 sts. *DC in the ch-1-sp, DC in the next 7 sts, DC in the ch-1-sp, ch3, sk 3 sts, DC in the next xt, ch 3, sk 3 sts*. Rep from * to * to the last ch-1-sp and 1 st remaining, DC in the ch-1-sp and in the next st. Sl st to join.
Round 12: Sl st in the next st, ch 1, SC in the same st as the sl st, ch 1, sk 1 st, SC in the next st, ch 5, SC in the ch-3-sp, ch 1, sk 1 st, SC in the ch-3-sp, ch 5, sk 3 sts. *SC in the next st, ch 1, sk 1 st, SC in the next st, ch 5, SC in the ch-3-sp, ch 1, sk 1 st, SC in the ch-1-sp, ch 5, sk 3 sts*. Rep from * to * to end. Sl st to join.
Round 13 – 20: Rep Round 5 – 12.
Round 21 – 22: Repeat Round 5 and 6.
Do not fasten off. Continue with the edging pattern.
Edging
Sl st to the middle st of 5 DC, (ch 5, sl st in the same st, ch 7, sl st in the same st, ch 5 sl st in the same st). *sl st to the next middle st of 5 DC, (ch 5, sl st in the same st, ch 7, sl st in the same st, ch 5 sl st in the same st)*. Rep from * to * to end. Sl st to join.
Fasten off. Weave in ends.
Making the string hanger for the lantern
With your stitch markers or waste yarn, mark 3 points from the loop evenly (see photo below).
Attach yarn to one of the marked points and ch 30 or longer, depending on how long you want your string hanger to be. Fasten off. Repeat on the other 2 marked points (see photo below).

Bring the 3 string hangers together and tie the ends in a knot, making sure all the lengths of the strings are the same (see photo below).

Making Tassels (Optional)
If you have the Clover Tassel Maker, you can follow the directions printed in the packet. I used the large Tassel Maker and chose the 4 inches size.
If you don’t have a Clover Tassel Maker, you can use anything that is flat or strong cardboard as your template. Cut your template to your desired length of the tassel. You can also watch this video as a guide.
Make 3 tassels. These tassels are going to be attached according to the option you’ll choose.
Now, take one of your finished tassels and attach yarn, ch 40, and fasten off. Leave a long tail and cut yarn. Repeat on the other 2 tassels.
- Note: If you’re not adding the Lantern Cord Cable Extender with Socket for Bulb Lamp, I recommend chaining 3 different lengths for the tassels.


Lantern Options
- Simple Lantern. No tassels and no Lantern Cord Cable Extender with Socket for Bulb Lamp.

- Lantern with Tassels. Just knot the 3 tassels (with different string length) together with the string hanger.

- My Blooming Lantern. With tassels and Lantern Cord Cable Extender with Socket for Bulb Lamp.
Drop the extension cord in the middle of the loop (like the first photo below) then tape the hanger and the cord together (like the second photo below).


With a yarn, tie a knot just below where you put the tape, wrap the cord with the yarn and then secure it tightly. Cut yarn (see the photos below).


Attach the tassel to the hanger about ch 10 from the loop (see the photo below). Rep on the other 2 tassels.

You may steam block your lantern for better shaping.
All done!


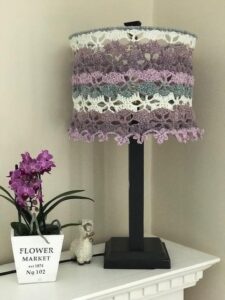
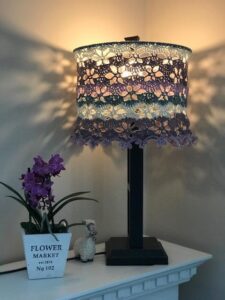
Now, let’s see my tester’s version! They are pretty cool and amazing!
Here’s the finished lantern of Ms. Stefanie Budnik | @made_with_love_by_steffi. She turned hers into a lampshade! How cool is that?
And here is the version of Ms. Carrie Ferrier | @carrieperlf. She decided to make the Simple version. Less is more! Looks so pretty too!


Now, I am excited to see your version!
Happy crocheting!
*** *** ***
All images and patterns are the copyrighted property of STRINGS AND CUDDLES. You may sell any items that you make from this pattern. You may NOT use my images. Please DO NOT copy, redistribute or claim as your own. If selling items from this pattern, please give credit to STRINGS AND CUDDLES by linking to my shops or on social media @stringsandcuddles.
I would love to see what you create! Please use these hashtags to share:
#stringsandcuddles, #stringsandcuddlesdesigns, #mybloominglantern
Please don’t hesitate to reach out for questions regarding this pattern.
Connect with me Instagram | Pinterest | Facebook | Blog | Ravelry
*** *** ***
Stay connected with Clover on Facebook | Twitter | Instagram | Pinterest | YouTube | Ravelry
[mc4wp_form id=”11289″]