Making Rosettes with Dori Troutman
I have never made rosettes before, have you? I’ve always found them very fun to look at and I’ve even looked at them very closely to see how they are made!
So I was really excited to get the Clover Rosette Maker in the mail and realize that it actually comes in a kit with everything you need to get started. The instructions are fantastic, as well as the video tutorials that you can find here.

I have to admit that usually when I sit down to craft or sew, I already have an idea in mind of what I am going to do. But this time, I had no ideas. I had my grand girls come over and I literally let them just start pulling fabric scraps, ribbon, hot glue gun, scissors, card stock, paper, letter stamps, ink…and we had so much fun!

Before I show you what we each made, I do need to tell you that making the rosette is a little tricky on the first try. It took each of us about two tries to get it right. But the good thing is that it is real easy to pull the ribbon out and start over! (My little grand-girl wanted me to tell you that she is left-handed and using the Rosette Maker for a leftie is very easy. She said “you just turn the tabs the other way”!)

The girls wanted to make Father’s Day cards for their daddy with their rosettes. Their color choices were all theirs. As a matter of fact all I helped them with was the hot glue gun. I love that the rosettes might not be perfect… but when they were attached to the cards they were completely darling! (I did use hot glue here and there on the rosette with the black ribbon that my 8 year old grand girl made, as it was falling apart a little bit. But that worked great.)
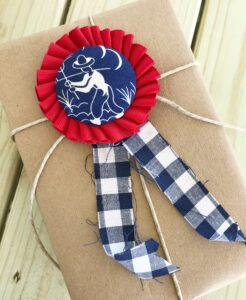
They also wanted to make one for their uncle who has a birthday next week. We attached it to his birthday gift. It is adorable and we all love it. Such a simple way to dress up a brown paper package!
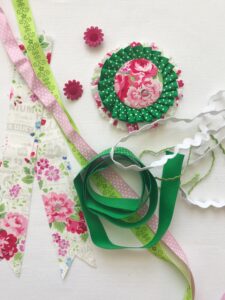
I had so much fun with my project. I had some green polka dot ribbon that I love and I made the Rosette without having any idea what the center would like or what I would actually do with it. I started pulling out some ribbon, rick-rack, and fabric scraps in pink and green and the assembling began!

One thing that was fun was making a double rosette. The top one was made with 1 inch wide ribbon and the one underneath was made with a 1.5 inch fabric strip, cut with pinking shears. I just used hot glue to hold them together. I absolutely love how it came out!
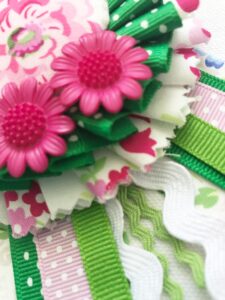
I used hot glue to attach a couple bright pink buttons to the rosette and ribbon and rick-rack scraps to the fabric back.

Then I attached the included felt and pin to the back. This gave it a very nice finish and will make the rosette re-usable.

I have a little something I’ve been wanting to send to a friend; so I put it in a white paper sack and attached the rosette to the outside of the sack. I think it is adorable and I can’t wait to mail it to her! My favorite thing is that it just screams “springtime”!


We couldn’t have been happier with our experience with the Clover Rosette Maker. I think what I discovered is that a pretty rosette makes a simple card or package rather dramatic! I’m looking forward to making more and the ideas are brewing! I hope they will bring out some fun creativity in you too!
~ Dori ~
Find Dori on her Blog | Instagram | Pinterest
Stay connected with Clover on Facebook | Twitter | Instagram | Pinterest | YouTube | Ravelry
[mc4wp_form id=”11289″]