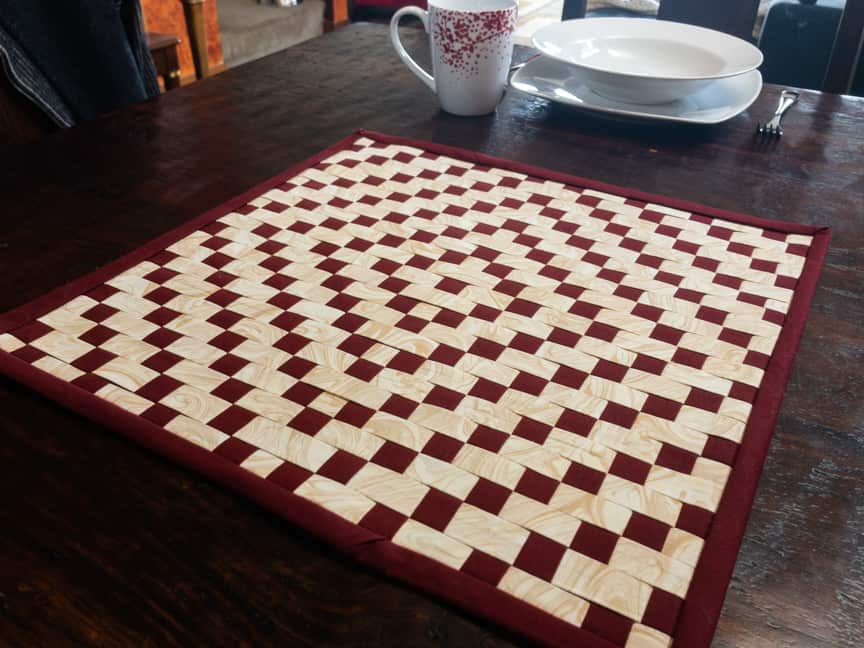
Bias Tape Woven Mini Quilt
Not all fabric tapes made with a bias tape maker have to be or should be made from bias cut fabric.
Depending on your project, you will have three options for cutting your fabric: with the grain, cross grain, or bias.
With the Grain
Very simply, cutting with the grain is cutting the fabric so your cut is parallel to the selvedge. Fabric strips cut with the grain have no stretch in them and are best for woven designs or when you need a very stable binding for a quilt or project.
Cross Grain
Cutting fabric across the grain is cutting the fabric so your cut is going from selvedge to selvedge. Fabric strips cut across the grain have a little stretch in them and can be used to go around gentle curves and can be used to bind quilts and projects where a moderate amount of stability is needed but there will be some handling and washing.
Bias
Fabric cut on the bias is cut on a 45º angle from selvedge to selvedge. Bias cut fabric provides the maximum amount of stretch in the cut fabric strips making them perfect for tight curves and intricate applique designs.
For our project, we are using strips cut in two directions. The strips for weaving are cut with the grain of the fabric to give them maximum stability and to keep them from stretching as we weave with them. The binding for the outside of the project is cut across the grain of the fabric to give us stability while maintaining a bit of flexibility for daily use (should we decide to use it as a centerpiece for a table.
The woven pattern for our mini quilt is, of course, inspired by sashiko stitch patterns. The center is the persimmon flower pattern surrounded by the mountain form pattern. We secure the entire woven surface to the backing using Wonder Fuse then use a cross grain cut binding for the edging. Don’t worry if you’ve never done any weaving or made a quilt before… we’ve written step by step instructions and made a video that walks you through the project from beginning to end. But, first, gather your tools, notions, and fabric!
What you’ll need
Tools
Bias Tape Makers (Art. No 464) 18mm/ 3/4” & 50mm/ 2”
Wonder Clips (Art. No 3156)
Quilting Pins (Art. No 2509)
Curved Tailor’s Awl, (Art. No 4880)
Flex ‘n Glide Bodkins (Art. No 9581)
Sewing machine – ours in the video is the BERNINA 790+
Iron – we are using a Maven 120IS Home Ironing System from Reliable Corporation
Materials
Wonder Fuse (Art. No 4091)
Aurifil 50wt cotton thread (color #2460) **or color to match your fabric choices
Fabric
- Strips:
- Michael Miller Fabrics – Cotton Couture (color SC5333-BURG-D)
- Michael Miller Fabrics – Marble (color CX1087-SAND-D)
- Backing Fabric: Aged Muslin – Marcus Fabrics
- Binding Fabric: Michael Miller Fabrics Cotton Couture (color SC5333-BURG-D)
Fabric Cuts
- Weaving Strips: 23 strips of each color (2 colors), 19.25” x 1 3/8” cut with the grain
- Backing: 18” square
- Binding: 88” x 3 7/8” strips cut cross grain
Finished Size
17.5” square
Instructions
Start by cutting 23, 19.25” x 1 3/8” strips cut with the grain of your light and dark fabrics.
Feed the strips through the Bias Tape Maker tool. Our video shows how to use both the Fusible Bias Tape Makers and the regular Bias Tape Makers. For this project, we use the regular Bias Tape Makers.
Tip: If your fabric won’t push easily through the opening of the Bias Tape Maker, use your Curved Tailor’s Awl to give it some encouragement.
Once you feed a length of your fabric though the Bias Tape Maker, pin it into place on your pressing mat or ironing board.
Gently pull the Bias Tape Maker along while you iron the fabric flat as it comes out the tip of the tool. Again, our video shows using both types of bias tape makers as well as the Clover Mini Iron. For our project, we are using a sheet of Wonder Fuse rather than strips of fusible web.
Now cut an 18” square of the backing fabric and a 17.5” square of Wonder Fuse.
Center the Wonder Fuse on the backing fabric and iron into place. After it cools, peel off the backing.
In the video, you will see we place this backing panel onto an exercise floor mat that we normally use for blocking our crochet and knit projects. This allows us to pin the strips into place on a thick but firm surface.
To prepare for weaving, lay your vertical strips on the Wonder Fuse side of the backing and pin into place. Be sure these first strips are snugged tightly against one another.
Now pin the opposite end of the base strips into place. Again, be sure the strips are snugged up tight.
If you don’t have a bodkin or yours have gone mysteriously missing *ahem*, you can use a safety pin.
Now follow the weaving chart using the safety pin to weave over and under the fabric strips creating the overall pattern.
Pin down both ends of each strip after they are woven into place and snug up those strips to ensure the finished piece doesn’t have any gaps.
You will notice this weaving pattern has a 3-row repeat. This mean you can start to look back at your previous rows and follow those rather than staring at your pattern chart.
Once you have all of your strips woven, go back and give all of the horizontal and vertical strips a good snugging up. You will want to make sure the woven section of your piece is square so that when you trim it up, you won’t have any wonky edges.
Now, remove your pins and iron the top and back sides of your quilt to activate the Wonder Fuse.
Use a quilting ruler to square up the sides of your quilt leaving a 1/4” seam allowance.
Binding
Now cutting across the grain of your fabric, cut 88” of strips that are each 3 7/8” wide.
To make one continuous piece of binding, overlap the ends of the strips at a 90º angle. Draw a line from corner to corner of the overlap and pin.
Sew a straight stitch along the marked line.
Open up your strips to check that they lay straight and trim off the excess fabric leaving a 1/4” seam.
Press the seam open.
Feed the fabric through your 50mm/ 2” Bias Tape Maker and press with an iron.
Fold the strip in half again and press.
With the right sides facing, pin the binding to the raw edge of the quilt.
Starting approximately 6” from one corner, sew a 1/4” seam.
Making a Mitered Corner
- When you reach a corner, stop 1/4” from the edge and cut your thread.
- Lay the binding strip out in a straight line from the sewn edge.
- Fold the binding strip up 90º creating a 45º angle fold.
- Fold the binding strip down over the 45º angle fold and pin the corner.
Start sewing again where you left off.
Continue stitching and folding corners all the way around the quilt stopping about 6” from where you started sewing.
Joining the Ends
- Fold the starting end of the binding strip to create a 45º angle.
- Lay the end of the binding strip over the 45º angle fold and pin into place.
- Lay a quilting ruler along the fold of the 45º angle and mark with a line.
- Sew along the marked line and cut off the excess fabric leaving a 1/4” seam.
- Press the seam open.
First side of the binding strip is attached!
Flip the quilt over and fold the binding to the back side of the piece. Secure with Wonder Clips.
Finger press the mitered corners and pin to secure.
Turn the work over and sew closely along the folded edge of the binding on the front side of the quilt. Be mindful of your corners to preserve your miters.
TAADAA!!
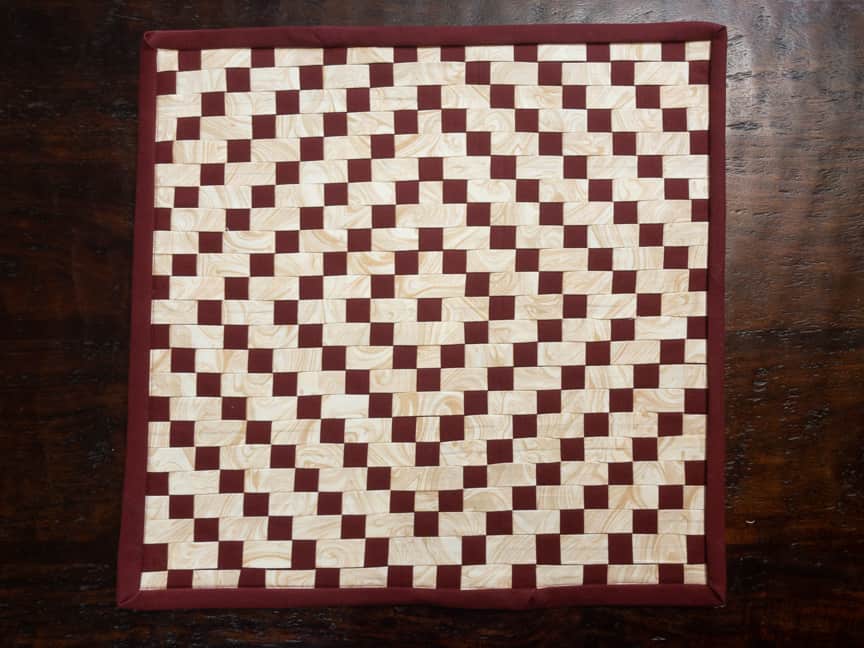
Frame or hang your mini quilt or use to adorn the surface of your dining or living room table.
Watch the video tutorial here:
Find the Shibaguyz on Facebook | Twitter | Instagram | Pinterest
Stay connected with Clover on Facebook | Twitter | Instagram | Pinterest | YouTube | Ravelry
[mc4wp_form id=”11289″]