Mocha Choco Latte Scarf *crochet pattern*
Perhaps most recognized for its mention in the catchy song, “Lady Marmalade”, the Mocha Choco Latte is nothing short of delectable. This concoction is made with cocoa, milk, and coffee (usually, espresso). It’s no wonder that Pantone’s color of the year is “Mocha Brown”! When I saw these velvety shades of brown yarn, I was inspired to create this chunky crochet scarf.
MATERIALS:
- Clover Amour Hook (8 mm)
- Clover Patchwork Scissors
- Clover Yarn Needle
- Clover Stitch Markers
- Sewing Needle
- Sewing Pins
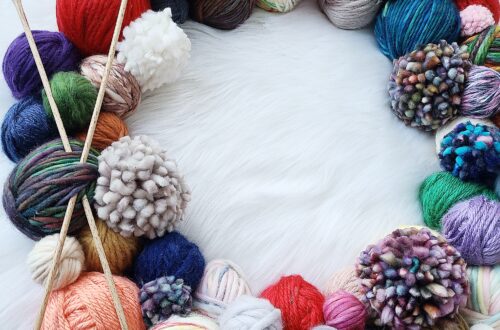
- #5 bulky yarn
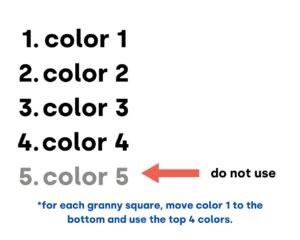
- Note: You will want to choose 5 colors for your palette. Here, I used a combination of brown and neutral shades.
- color 1: light taupe (Desert)
- color 2: taupe (Terra)
- color 3: cream (Salt)
- color 4: tan (Toast)
- color 5: dark taupe (Shadow)
- Note: You will want to choose 5 colors for your palette. Here, I used a combination of brown and neutral shades.
- optional: Clover Needle Felting Pen and Brush Pad (for securing in ends)
NOTES:
- Please do not copy/redistribute any part of this pattern as your own. This includes reposting/translating without permission. Feel free to sell your finished products in small quantities as long as you give credit to help support my work. Tag your creations with #curiouspapaya so I can feature you!
- Each granny square is made in joined rounds.
- This pattern is written in US terminology.
- difficulty: intermediate-beginner +
- measurement of one granny square: 6 in. x 6 in. [~15 cm x ~15 cm]
ABBREVIATIONS:
- ch: chain
- ch-sp: chain space
- dc: double crochet
- slst: slip stitch
- st(s): stitch(es)
- rnd(s): round(s)
- [#]: stitch count
- (…) x #: repeat instructions the number of times
GRANNY SQUARE PATTERN:
Use the 8 mm Clover Amour Hook and start in color 1.
If you prefer the printable premium pdf, you can find it HERE. Thank you for supporting my designs!
*Note: This scarf is meant to be a chunky statement piece. We want it to be extra long so that it can wrap around your neck comfortably. For my height (5’7”), I made 12 squares total. Modify as desired for a shorter or longer scarf. See the diagram for a helpful visual on how to alternate the colors for each square.
Leave a short tail and make a slipknot and ch 6. slst into the first ch to form a loop. Working into the center of the loop (NOT the individual chains),
In Color 1:
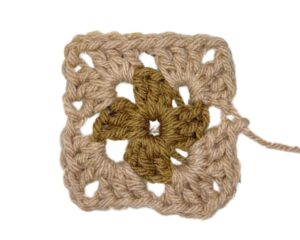
- Round 1: ch 3 (this will count as your first dc), 2 dc. This will be your first cluster. ch 2, *3 dc, ch 2* x3, slst into the top of the first dc (which was the ch 3) to join the rnd.
Fasten off and leave a 6 in. [~15 cm] tail to crochet over/weave in.

Caption: Don’t mind the colors used for each process image.
*Note: For each round/color change, join the new yarn into the ch-sp on the opposite side of the square. This will allow you plenty of room to crochet over (or weave in) the yarn tails. Each “cluster” will be worked into the next ch-sp.
Join Color 2:
- Round 2: ch 3, 2 dc into the same ch-sp, ch 2, 3 dc into the same ch-sp. This will be your first double cluster that will make up a “corner”. ch 1 and work into the next 3 ch-sps to complete the rnd. *3 dc, ch 2, 3 dc, ch 1* x3, slst into the top of the first dc to join the rnd.
Fasten off and leave a 6 in. [~15 cm] tail to crochet over/weave in.
Join Color 3:
- Round 3: ch 3, 2 dc, ch 2, 3 dc into the same ch-sp. Again, this will be your first double cluster, or “corner”. ch 1, 3 dc into the next ch-sp. This will be your first single cluster. *ch 1, 3 dc, ch 2, 3 dc into the same ch-sp, ch 1, 3 dc into the next ch-sp* x3, ch 2, slst into the top of the first dc to join the rnd.
Fasten off and leave a 6 in. [~15 cm] tail to crochet over/weave in.
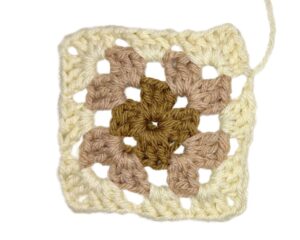
Join Color 4:
- Round 4: ch 3, 2 dc, ch 2, 3 dc into the same ch-sp. This will be your first double cluster, or “corner”. ch 1, 3 dc into the next ch-sp, ch 1, 3 dc into the same ch-sp, ch 1, *3 dc, ch 2, 3 dc into the same ch-sp, ch 1, 3 dc into the next ch-sp, ch 1, 3 dc into the next ch-sp, ch 1* x3, slst into the top of the first dc to join the rnd.
Fasten off and leave an 18 in. [~46 cm] yarn tail for sewing.

Repeat these steps to make a total of 12 squares.
ASSEMBLY:
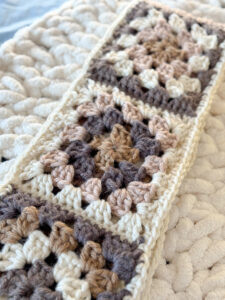
- Step 1: To assemble the granny squares together, Position two squares with the wrong side facing you and with the yarn tail on the side of your dominant hand.
- Step 2: Use your yarn needle to weave the yarn tail to the top right-hand (or left-hand) corner.
*Note: The reason why we did not start each round with half of a double cluster is because then, the joined yarn would be in the ch-sp. This will cause your squares to cave in when sewing. Making a complete double cluster (for the first corner) and then weaving the yarn tail up to the appropriate ch-sp will maintain the shape of the corners.
- Step 3: Use the 8 mm hook and go through the blo of both squares. slst across the edge.
- Step 4: Repeat this for all of the squares.
- Step 5: After all squares have been connected, join your lightest color anywhere on the perimeter. sc around the whole border, working into each ch-sp as you pass them. Make a *sc, ch 1, sc* into each corner. [st count is not important].
- Step 6: Fasten off and leave a short tail for weaving in.
- Step 7: Though we crocheted over our yarn tails, weave in any remaining ones using your darning needle.
*Tip: For extra security, you can needle felt the yarn tails in place so that they don’t come undone. This works best if your yarn contains some acrylic or natural fibers.
You’re finished! We’d love to see your creations over on Instagram. Tag your creations with #cloversquad and #curiouspapaya to share your makes 🙂
If you want to keep up with me, Amy, on social media for other fun projects, follow me on: Instagram
If you want to keep up with all things Clover, follow us on: Facebook | Twitter | Instagram | Pinterest | YouTube | Ravelry