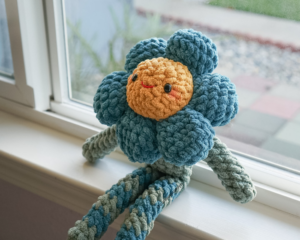
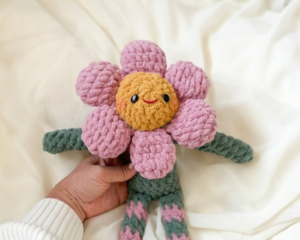
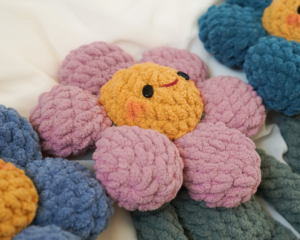
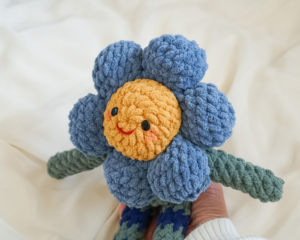
Petal Pals *no-sew crochet pattern*
Meet your new favorite snuggle buddy! These crocheted Petal Pals are perfect for cuddling and are completely no-sew. They’re soft and just the right size for little hands.
– Amy (@curiouspapaya)
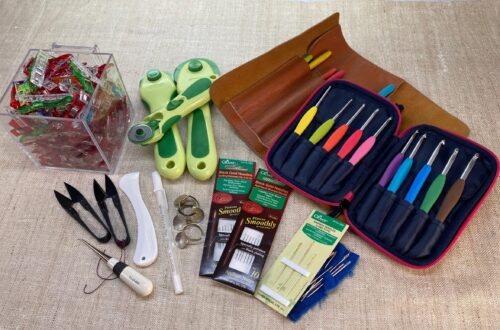
MATERIALS:
- Clover Amour Hook (7.0 mm)
- Clover Patchwork Scissors (small)
- Clover Yarn Needle
- Clover Stitch Markers
- fiber fill stuffing
- UHU glue
- two 8 mm x 12 mm oval safety eyes
- red cotton yarn (for the mouth)
- #6 super bulky chenille yarn
- 1 skein of golden yellow
- 1 skein of sage green
- 1 skein of petal color of your choice
- Note: for the exact dimensions, I used the brand Bernat blanket yarn.
NOTES:
- Please do not copy/redistribute any part of this pattern as your own. This includes reposting/translating without permission. Feel free to sell your finished products in small quantities as long as you give credit to help support my work. Tag your creations with @curiouspapaya so I can feature you!
- This pattern is written in US terminology.
- The pattern is worked in continuous rounds (a spiral).
- All parts are crocheted in (no-sew).
- Use the ch 2 method instead of a magic ring when working with chenille yarn to prevent snagging.
- “Yarn under, yarn over” creates tighter, X-shaped stitches. Your finished size may vary depending on tension and method.
- Difficulty: intermediate-beginner+ due to no-sew techniques
- Techniques used: crocheting pieces in, invisible finish, surface crocheting
- Measurements: 10 in. x 8 in. [~24 cm x ~20 cm] if using the prescribed materials
- Time: ~2.5 hrs
ABBREVIATIONS:
- blo: back loops only
- ch: chain
- dec: (invisible) decrease
- flo: front loops only
- inc: increase
- sc: single crochet
- slst: slip stitch
- st(s): stitch(es)
- [#]: stitch count
- (…) x#: repeat instructions the number of times
PETAL PAL PATTERN:
*Note: Make the parts in the order that they are written to be able to crochet them in.
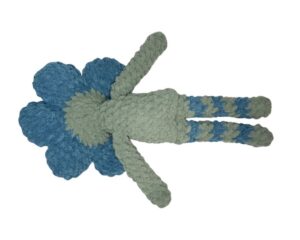
ARMS:
Make two in sage green yarn and a 7 mm Clover Amour hook:
- Find the premium, printable PDF HERE.
- Round 1: ch 2, work into the second ch from the hook, (sc) x6 [6]
- Follow my support tutorial for this alternative magic circle method.
- Rounds 2-12 (11 rounds total): sc all around [6]
Do not stuff. Fasten off and leave a short tail.

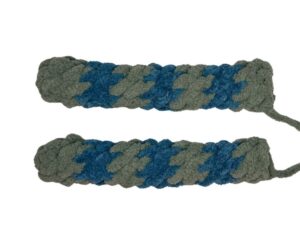
LEGS:
Make two, start in sage green yarn and a 7 mm Clover Amour hook:
- Round 1: ch 2, work into the second ch from the hook, (sc) x6 [6]
- Follow my support tutorial for this alternative magic circle method.
- Rounds 2-3 (2 rounds total): sc all around [6]
Change to your chosen petal color. Do not cut either color until instructed to (near the end).
Begin stripe sequence as follows:
- Rounds 4-5 (2 rounds total): sc all around [6]
Change to sage green yarn.
- Rounds 6-7 (2 rounds total): sc all around [6]
Change to the color of your choice.
- Rounds 8-9 (2 rounds total): sc all around [6]
Change to sage green yarn.
- Rounds 10-11 (2 rounds total): sc all around [6]
Change to the color of your choice.
- Rounds 12-13 (2 rounds total): sc all around [6]
Change to sage green yarn. Cut the previous color.
- Rounds 14-15 (2 rounds total): sc all around [6]
Fasten off and leave a short tail. Do not stuff.
PETALS:
Make six in color of your choice yarn and a 7 mm Clover Amour hook:
- Round 1: ch 2, work into the second ch from the hook, (sc) x8 [8]
- Round 2: (inc) x8 [16]
- Rounds 3-4 (2 rounds total): sc all around [16]
- Round 5: (2 sc, dec) x4 [12]
- Round 6: (sc, dec) x4 [8]
Fasten off and leave a short tail.
Do not stuff.
FLOWER CENTER:
In golden yellow yarn and a 7 mm Clover Amour hook:
- Round 1: ch 2, work into the second ch from the hook, (sc) x8 [8]
- Round 2: (inc) x8 [16]
- Round 3: (sc, inc) x8 [24]
- Round 4: sc all around [24]
Use the invisible finish and leave a short tail.
Tie the yarn tail to the yarn tail left from making the slipknot at the beginning of the pattern to secure them.
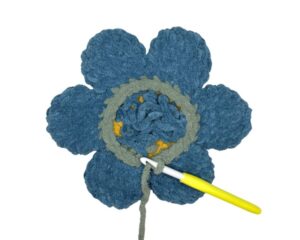
Next, we will join the Petals. Each petal will span 4 sts.
We will flatten and work through both layers of the petal and the back loops only of the flower center.
*Tip: Be sure to position all of the yarn tails the same way when joining them. This is to make the stitches more uniform.
- Round 5: (broken into steps)
- Step 1: Flatten a petal and position it in front of the yellow center. Insert your hook through both layers of the petal and through the back loop only of the flower center. Keep all of the loops on the hook.
- Step 2: In sage green yarn, make a slipknot and place it over the hook. Make a sc as you normally would through all of the loops. (This is 1 of the 4 sts).
-
-
- Step 3: Make the remaining 3 sts in the same way to finish joining the petal.
- Step 4: Join the remaining 5 petals in the same way.
-
There are 6 short yarn tails from the petals. Tie them into knots to secure them in place.
Set your hook aside to create the facial features. We will close up the piece after.
FACIAL FEATURES:
*Note: Align the face with one of the petals. Find the horizontal line of symmetry and create the facial features just below it.
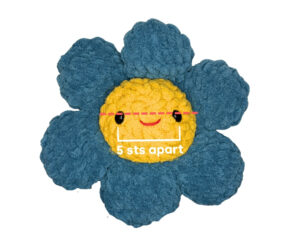
- Safety eyes: Insert the eyes between rounds 2-3, 5 sts apart (3 sts in between).
- Mouth: Cut 6 in. [~15 cm] of red cotton yarn. Use the Clover darning needle and weave from the back of the piece to the front. Embroider a smile 2 sts wide, centered with the eyes, between rounds 1-2. Pierce in between the stitches to make it symmetrical. Add a dab of UHU glue to secure the smile down. Secure the yarn tails on the back of the piece.
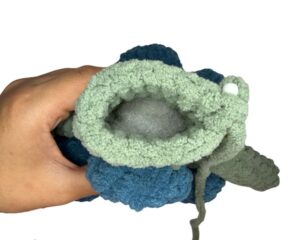
Continue where we left off on the flower head.
- Round 6: (sc, dec) x8 [16]
Stuff.
- Round 7: (dec) x8 [8]
Fasten off and leave a tail for closing up the piece. Using the Clover darning needle, weave through the front loops only and pull the hole closed. Weave in the remaining tail.
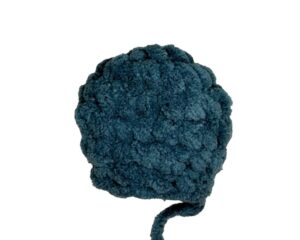
BODY:
In sage green yarn and a 7 mm Clover Amour hook:
*Note: The body will be created using the surface crocheting technique.
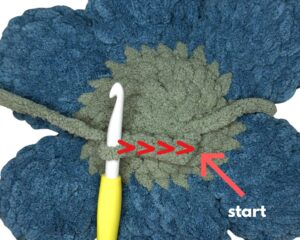
- Round 1: (broken into steps)
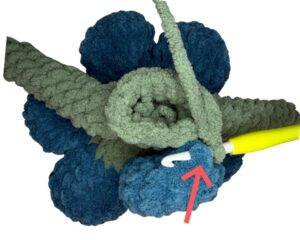
- Step 1: Determine the position of the body using the face as a reference point.
- Step 2: Make a slipknot and make a surface single crochet stitch where the image indicates.
- Step 3: Make 3 more surface sc for a total of 4 sts.
-
-
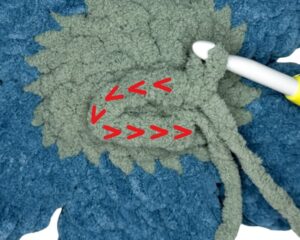
- Step 4: Turn the flower head and work in the opposite direction.
- Step 5: Make 4 surface sc for a total of 8 sts. [8]
-
- Round 2: (sc, inc) x4 [12]
- Round 3: sc all around [12]
Next, we will join the arms. Undo 1-2 sts to align the arm with the side of the body.
Each arm will span 3 sts. Modify the placement if needed so that they are symmetrical with the face.
- Round 4: *arm*, 3 sc, *arm*, 3 sc [12]

- Round 5: (2 sc, inc) x4 [16]
- Round 6: sc all around [16]
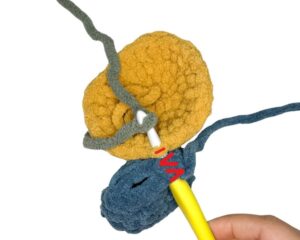
In the next round, we will crochet the body to the petal directly below the mouth to provide support for the head. The technique is similar to surface crocheting.
Insert the hook through the petal and then into both layers of the body when making the 4 sc to connect them.
- Round 7: 3 sc, *4 sc through the petal*, 9 sc [16]
*Caption: Top angle of inserting the hook through the petal. Be sure to insert the hook into both layers of the body too!
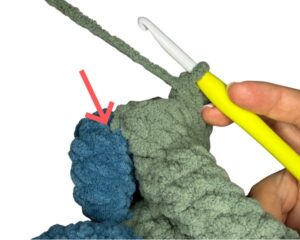
*Caption: Side angle of what a completed stitch will look like
- Rounds 8-11 (4 rounds total): sc all around [16]
Stuff.
Add ~3 sts to be aligned with the right edge of the body (which should resemble an oval). Modify as needed to get there.
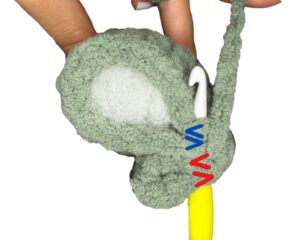
Next, we will join the legs while we also crochet the body closed. Each leg will span 3 sts.
- Round 12: (broken into steps)
- Step 1: Position the first leg in front of the body with the yarn tail facing the right.
- Tip: This is to make the color changes not visible from the front.
- Step 2: Insert your hook through both layers of the leg and both layers of the body.
- Step 1: Position the first leg in front of the body with the yarn tail facing the right.
-
- Step 3: Make a sc as you normally would. Make 2 more sc to complete joining the leg.
- Step 4: Make 2 sc through both layers of the body.
- Step 5: Join the second leg and repeat steps 1-3.
Fasten off and leave a tail for weaving in.
 \
\
You’re finished! Tag your creations with @cloverusa and @curiouspapaya to share your makes 🙂
If you want to keep up with me, Amy, on social media for other fun projects, follow me on: Instagram
If you want to keep up with all things Clover, follow us on: Facebook | Twitter | Instagram | Pinterest | YouTube | Ravelry