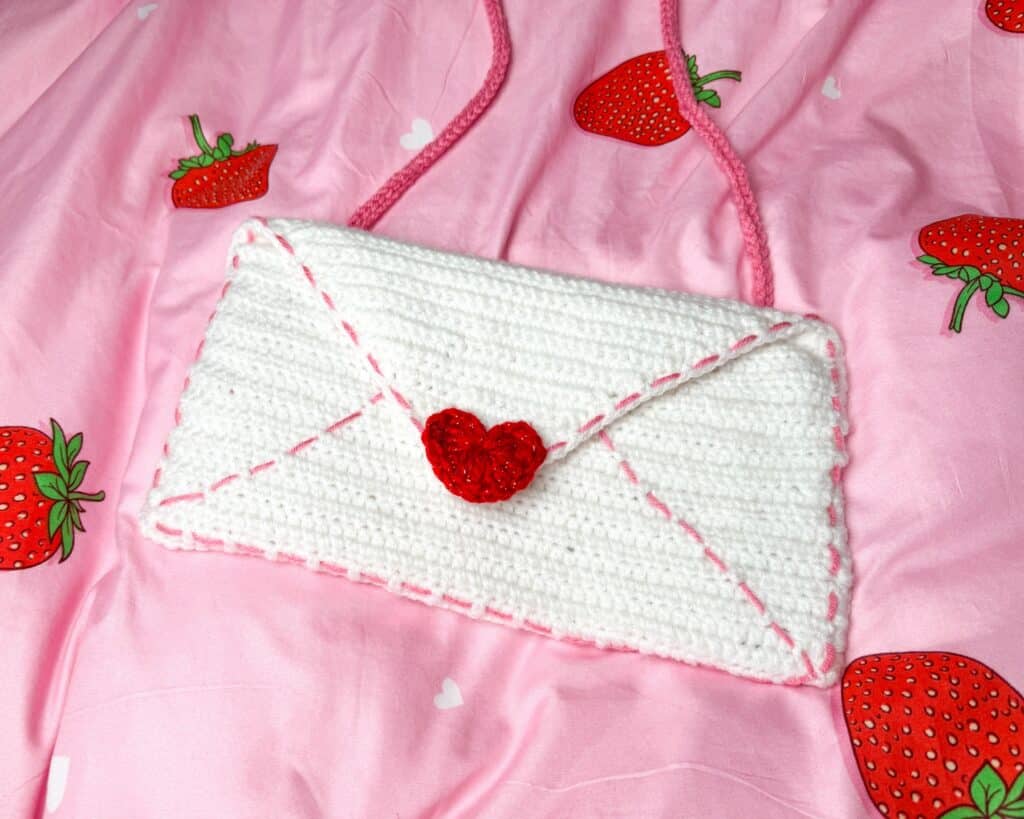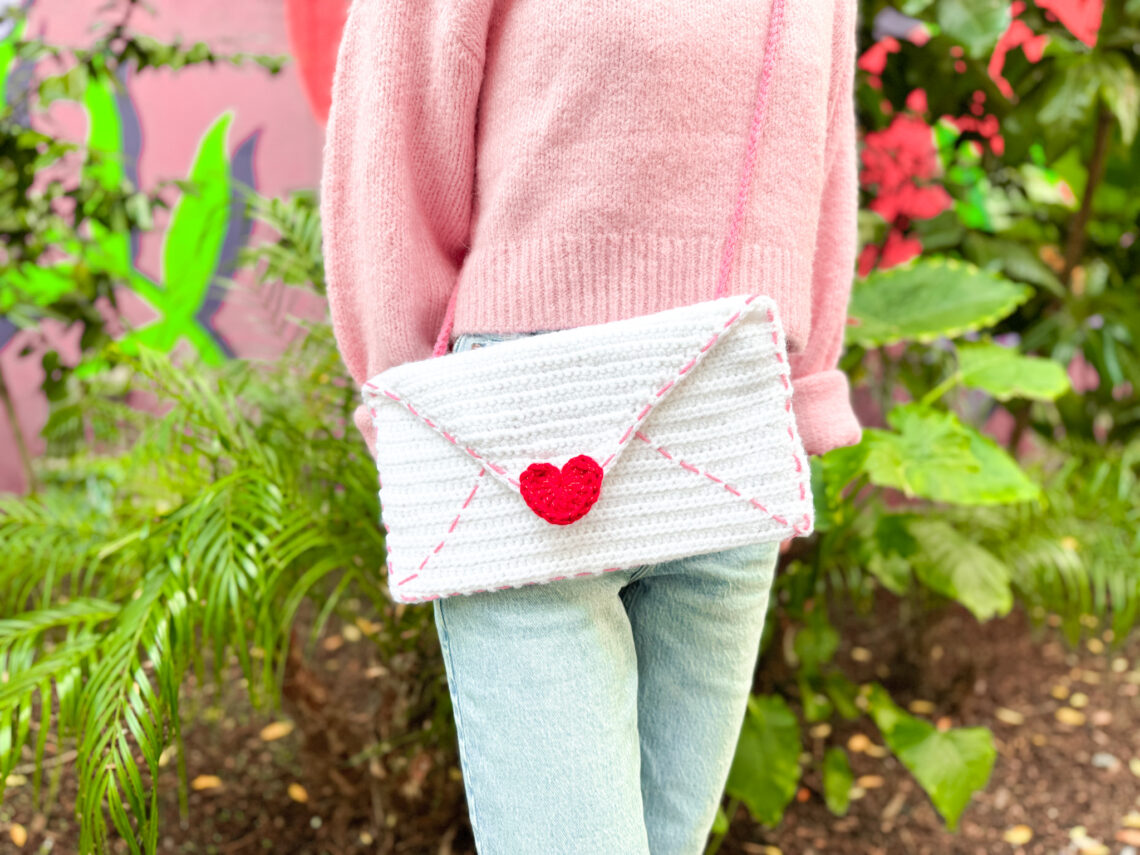
Love Letter Crossbody (Envelope Purse) Crochet Pattern
Hello loves! It’s Amy from @curiouspapaya and I’m excited to share with you our newest pattern: the Love Letter Crossbody. I’ve always loved “kitsch bags” (I just learned recently that that was the term for it) and I knew I wanted something fun, flirty, and functional for Valentine’s Day! If you’re a bit like me, adding some cloth lining to a bag might seem daunting. But have no fear! I’ve got three words for ya: HEAT n BOND (more on this below). Let’s get started!
NOTES:
- We will be working in rows.
- This pattern is written in US terminology.
- Measurements:
- 12.5 in x 7 in [31.75 cm x 17.78 cm] if using the prescribed materials
- Gauge:
- 16 sts x 13 rows (in 4 in x 4 in)
- As I primarily design amigurumi, gauge isn’t as important. But friends, do yourself a big favor and CHECK for this project, or risk your final result being tiny or gigantic! You have been warned! 😉
- 16 sts x 13 rows (in 4 in x 4 in)
- Difficulty:
- advanced beginner
- Time:
- 3-4 hr
MATERIALS:
- #4 medium worsted yarn (Big Twist)
- white
- medium rose
- twinkle red
- Clover Amour Hook (3.25 mm)
- Clover Amour Hook (4.0 mm)
- Clover Quick Locking Stitch Marker
- Clover Darning Needle
- Clover Mini Patchwork Scissors
- hot glue
- magnetic clasp
- If you choose to line your bag with fabric:
- iron
- cotton cloth of your choice (12 in x 20 in)
- I found an adorable strawberry print at my local Joann’s!
- Mesh embroidery plastic (12 in x 18 in)
- Heat n Bond – ULTRA HOLD – 5/8 in.
- I found that this one was the perfect width for our project so I didn’t have to do any extra trimming!
- ruler
- pencil
- sharpie
ABREVIATIONS:
- blo: back loops only
- ch: chain
- dc: double crochet
- dec: (sc) decrease
- hdc: half double crochet
- inc: (sc) increase
- sc: single crochet
- slst: slip stitch
- st(s): stitch(es)
- tr: treble crochet
ENVELOPE PATTERN:
- using your Clover Amour Hook (3.25 mm) and white yarn
- Note: We will work from the bottom up. The “ch” at the beginning counts as a st.
- Row 1: Create a slipknot and ch 53, starting from the third ch from the hook, hdc down the row, ch 2 and turn [50]
- Rows 2-42: (41 rows total): hdc down the row, ch 2 and turn [50]
- Note: At this point, fold your rectangle in half and check the size. It should measure ~7 in. if you followed my gauge. Add more rows if necessary.
Next, we will begin making the envelope flap:
- Row 43: dec, 46 sc, dec, ch 1 and turn [48]
- Row 44: dec, 44 sc, dec, ch 1 and turn [46]
- Row 45: dec, 42 sc, dec, ch 1 and turn [44]
- Row 46: dec, 40 sc, dec, ch 1 and turn [42]
- Row 47: dec, 38 sc, dec, ch 1 and turn [40]
- Row 48: dec, 36 sc, dec, ch 1 and turn [38]
- Row 49: dec, 34 sc, dec, ch 1 and turn [36]
- Row 50: dec, 32 sc, dec, ch 1 and turn [34]
- Row 51: dec, 30 sc, dec, ch 1 and turn [32]
- Row 52: dec, 28 sc, dec, ch 1 and turn [30]
- Row 53: dec, 26 sc, dec, ch 1 and turn [28]
- Row 54: dec, 24 sc, dec, ch 1 and turn [26]
- Row 55: dec, 22 sc, dec, ch 1 and turn [24]
- Row 56: dec, 20 sc, dec, ch 1 and turn [22]
- Row 57: dec, 18 sc, dec, ch 1 and turn [20]
- Row 58: dec, 16 sc, dec, ch 1 and turn [18]
- Row 59: dec, 14 sc, dec, ch 1 and turn [16]
- Row 60: dec, 12 sc, dec, ch 1 and turn [14]
- Row 61: dec, 10 sc, dec, ch 1 and turn [12]
- Row 62: dec, 8 sc, dec, ch 1 and turn [10]
- Row 63: dec, 6 sc, dec, ch 1 and turn [8]
- Row 64: dec, 4 sc, dec, ch 1 and turn [6]
- Row 65: dec, 2 sc, dec, ch 1 and turn [4]
Fasten off and leave a short tail. We will crochet over it later.

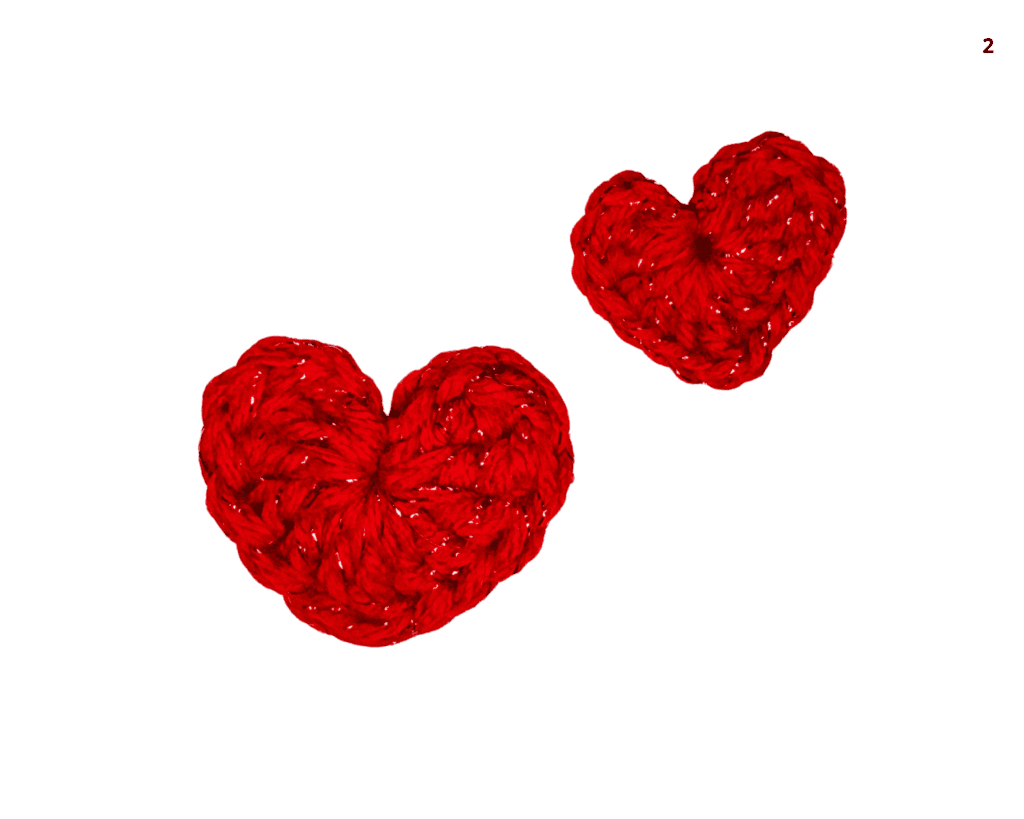
HEARTS PATTERN:
- using red yarn
- Note: For the heart on the front of the envelope, crochet with two strands of yarn at the same time with a 4 mm hook. This will make it larger with the exact same pattern! For the heart that will be the “stamp” on the back of the envelope, crochet with one strand and a 3.25 mm hook.
- Rnd 1: make a magic circle, ch 2, 3 tr, 3 dc, tr, 3 dc, 3 tr, ch 2, slst into the center of the magic circle. Pull the magic circle closed and fasten off and leave a short tail.
STRAP TUTORIAL:
- using a Clover Amour Hook (3.25 mm) and “medium rose” yarn
Leave a long tail for sewing before creating a slipknot. ch ~141. Wrap the strap around your neck to check for length. It should stop around your belly button/hip area. Modify as needed.
- Row 1: work into the second ch from the hook and slst all the way down, ch 1, turn [140]
- Row 2: (blo) slst all the way down [140]
Fasten off and leave a tail for sewing. Sew each end of the strap onto the back panel of the bag 2 rows below the top flap. Secure the yarn tails in a knot and cut the excess length. This will be covered in the next step where we add the lining.
LINING TUTORIAL:
- Step 1: Fold the envelope so that the flap lays over the front. Position the metal clasps on both the flap and the front of the envelope and secure them once you are happy with the placement. (The heart will cover the back of the metal clasp and the pointy part of the flap).
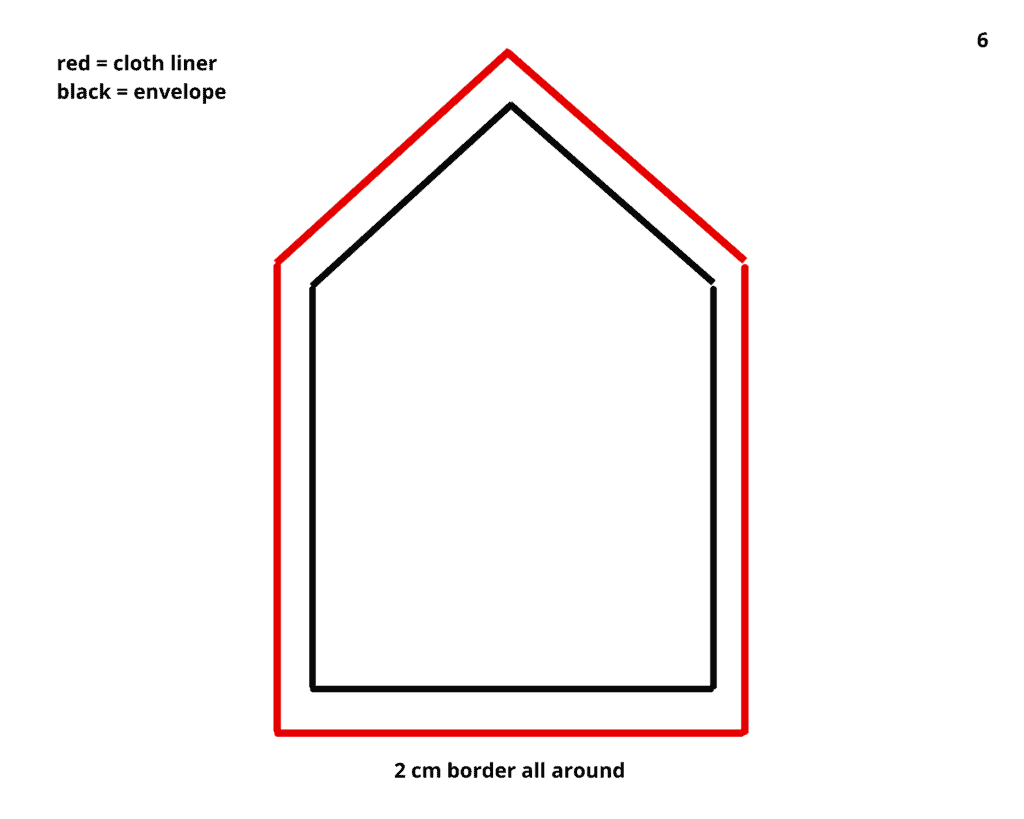
- Step 2: Lay out the cloth liner on a flat surface and position the open envelope on top of it. Using a ruler and a pencil, trace a 2 cm perimeter around the liner. We will need a little extra space to fold the edges in when we use Heat n Bond. Cut the cloth liner out.
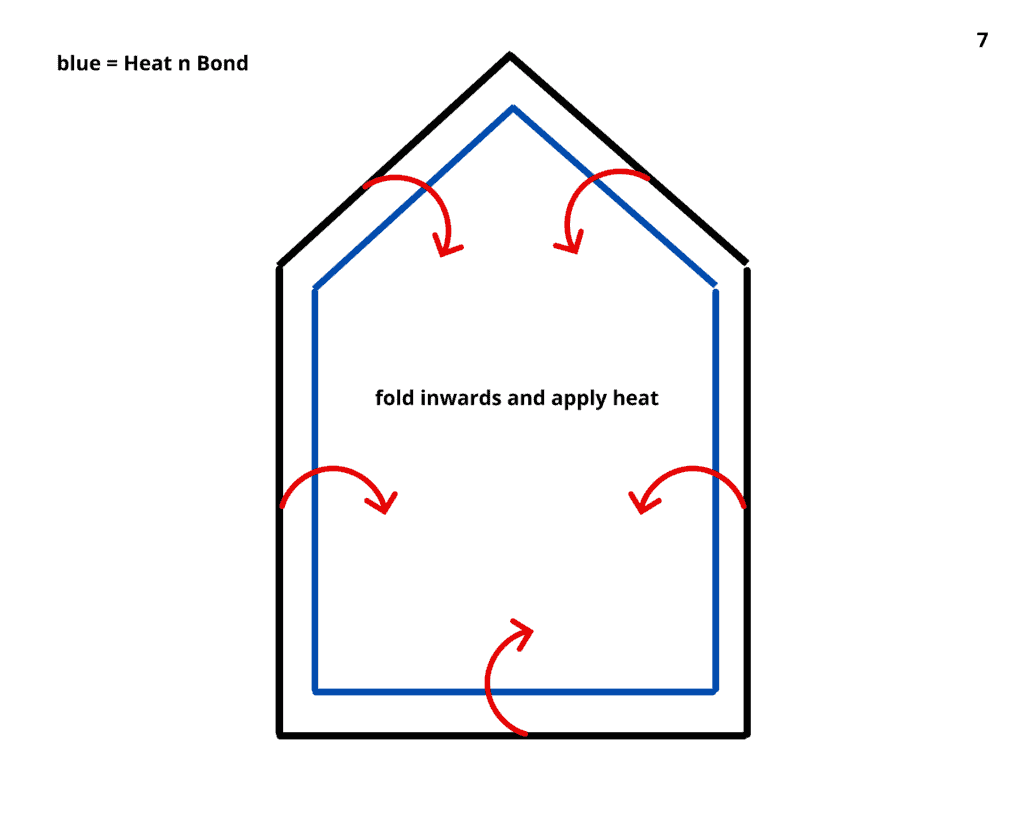
- Step 3: Position the liner so that the wrong side is facing you. Apply Heat n Bond on each edge of the liner and fold the edges in. Be sure to follow the heat/timing instructions on the package.
- Tip: Work one edge at a time since the Heat n Bond is not sticky and can move around easily.
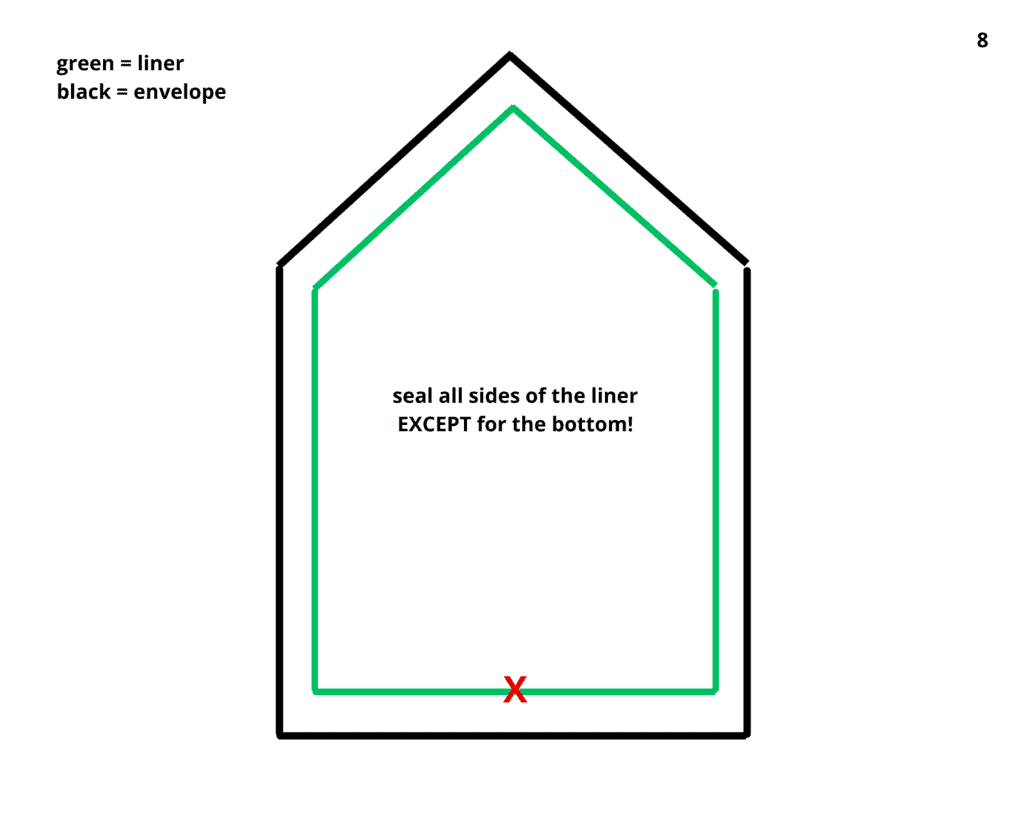
- Step 4: Now, position the liner so that the right side is facing you. Apply Heat n Bond to secure the liner to the crochet envelope except for the bottom.
In the next step, we will add a plastic mesh sheet to the body of the bag to give it more structure when items are put in it. The nice thing about this liner is that it still allows the bag lots of flexibility.
- Step 5: Measure the plastic mesh liner sheet against the cloth liner. I marked my lines with sharpie for better visibility. Cut two rectangles out.
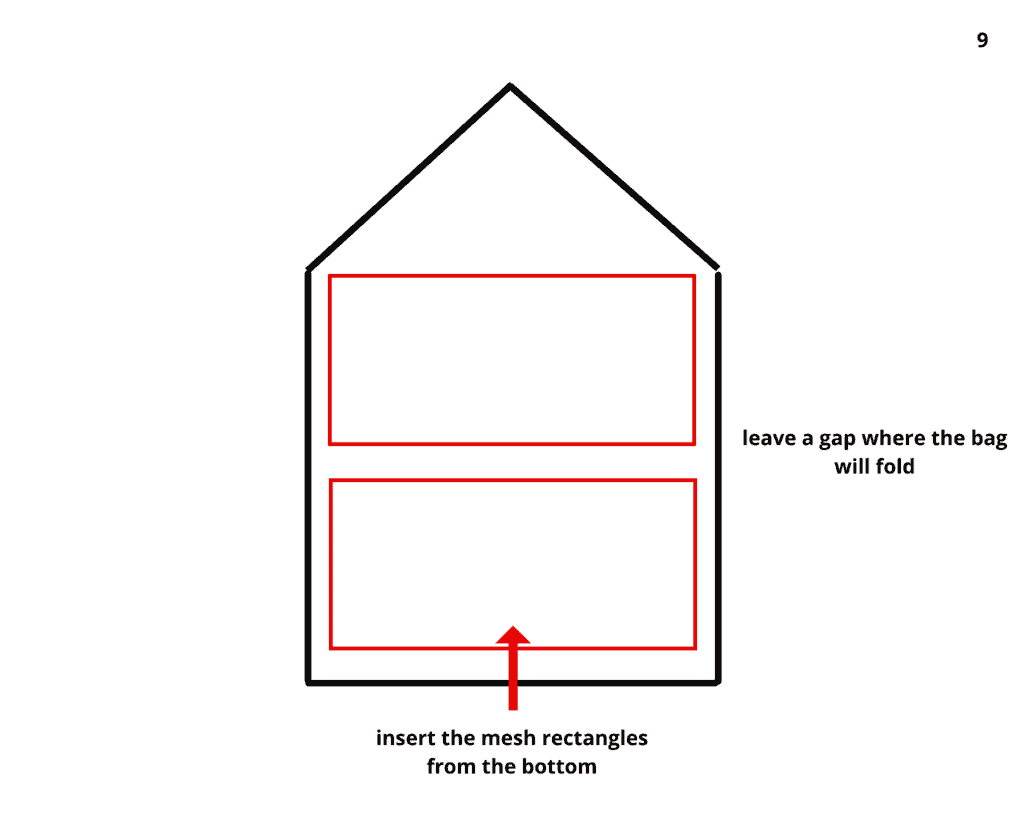
- Step 6: Insert the plastic mesh liners where the image shows. To prevent them from shifting around, add a small dab of hot glue to the center.
- Step 7: Apply Heat n Bond to the bottom of the cloth liner now. Hooray! Our bag has structure!
ASSEMBLY:
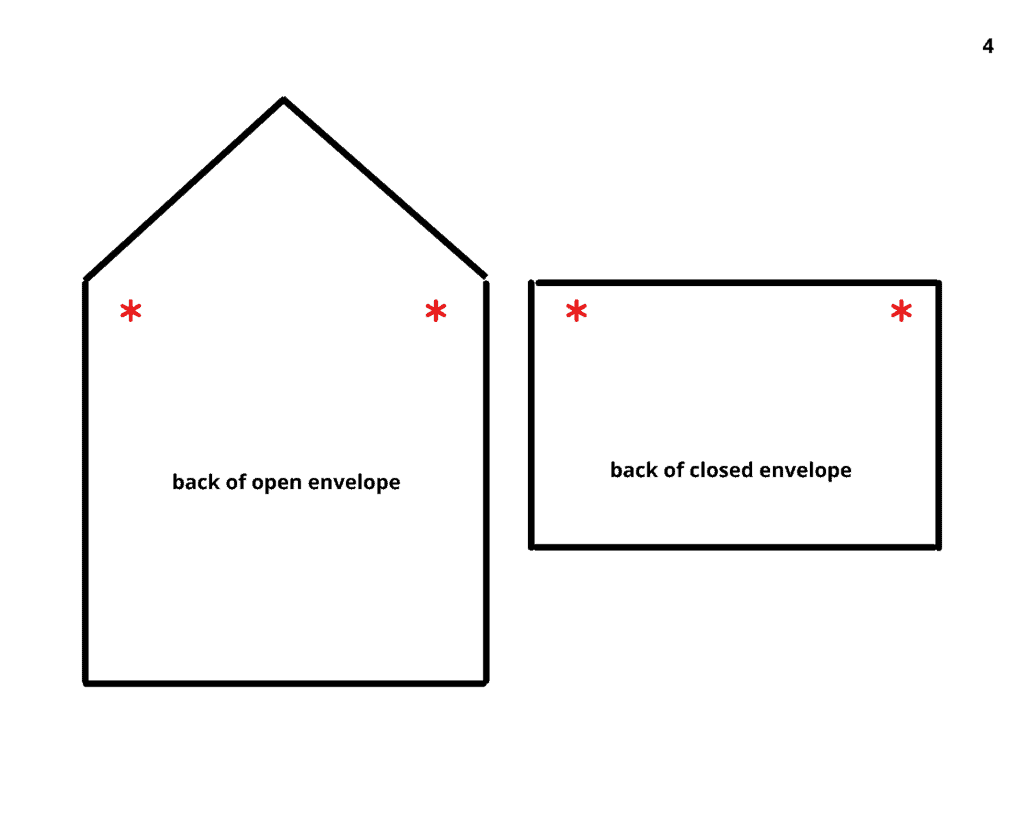
- Step 1: Fold the envelope in half and secure the two layers together with stitch markers where the image shows.
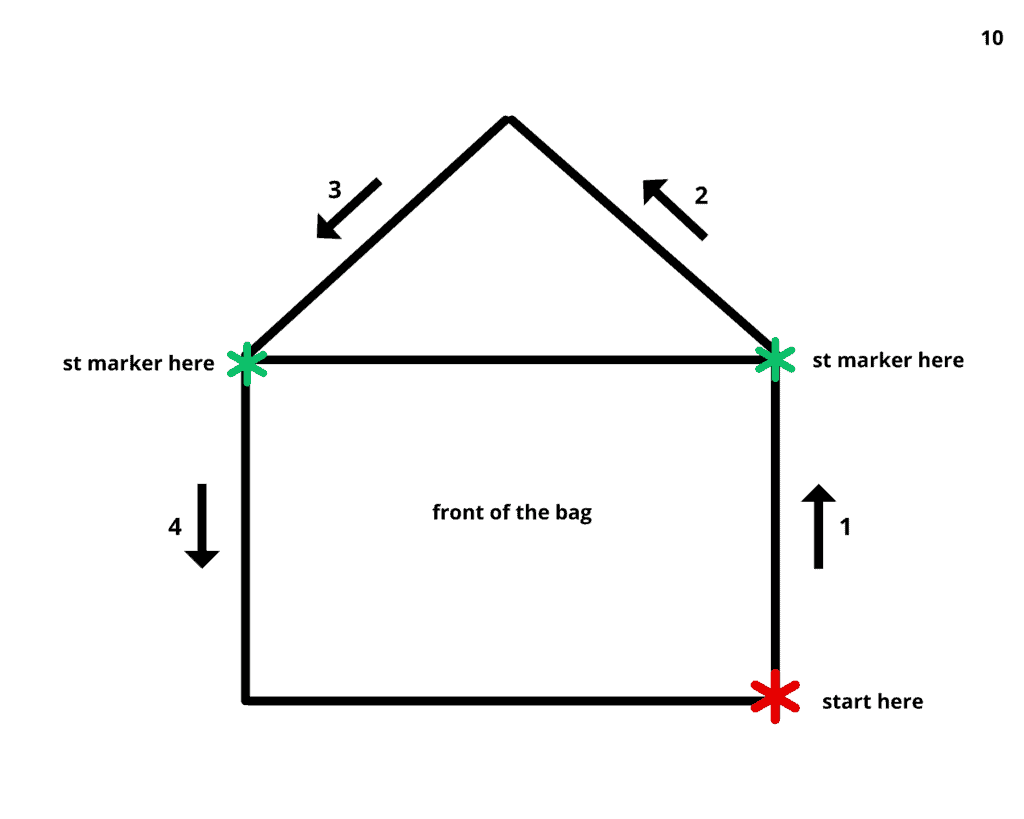
- Step 2: Use White yarn and the 3.25 mm hook to crochet a border around the bag. Start in the bottom righthand corner with the front of the envelope facing you and go through both layers. Follow the diagram above.
- Note: st count here is not as important. We are just cleaning up the edges 🙂
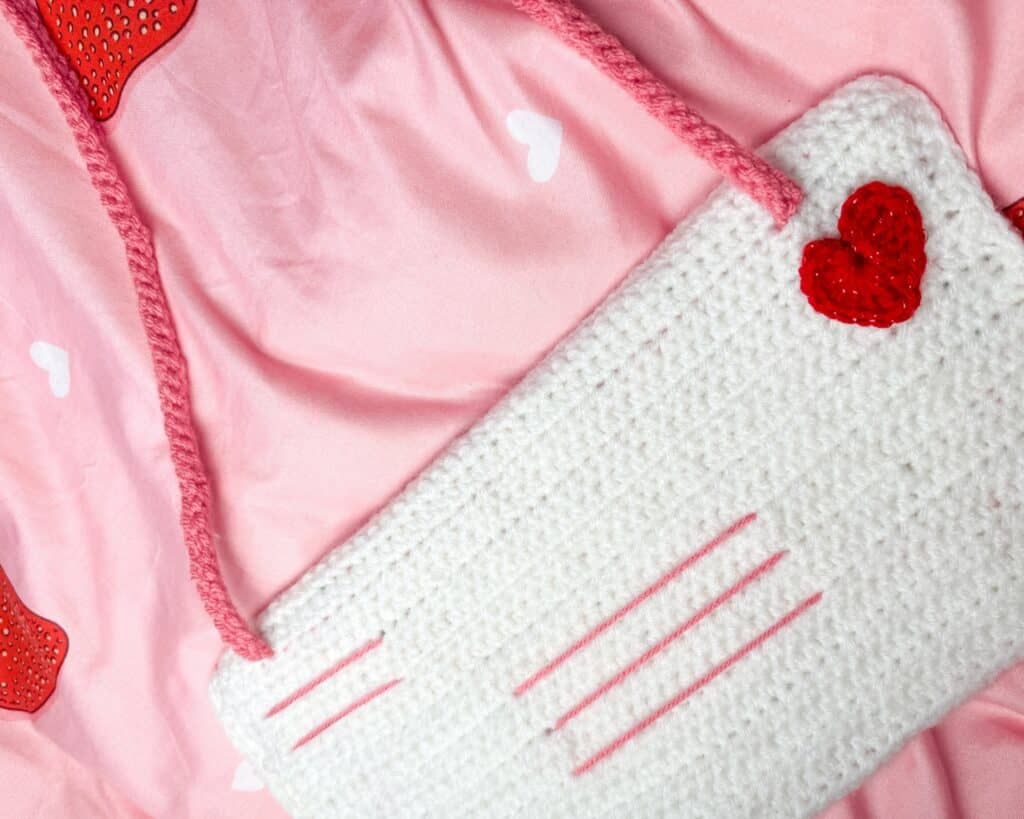
- Step 3: Cut a long strand (3 ft) of Medium Rose yarn and embroider the dashed lines (2 sts wide, 1 st in between) on the front of the envelope. Follow the directions in the image.
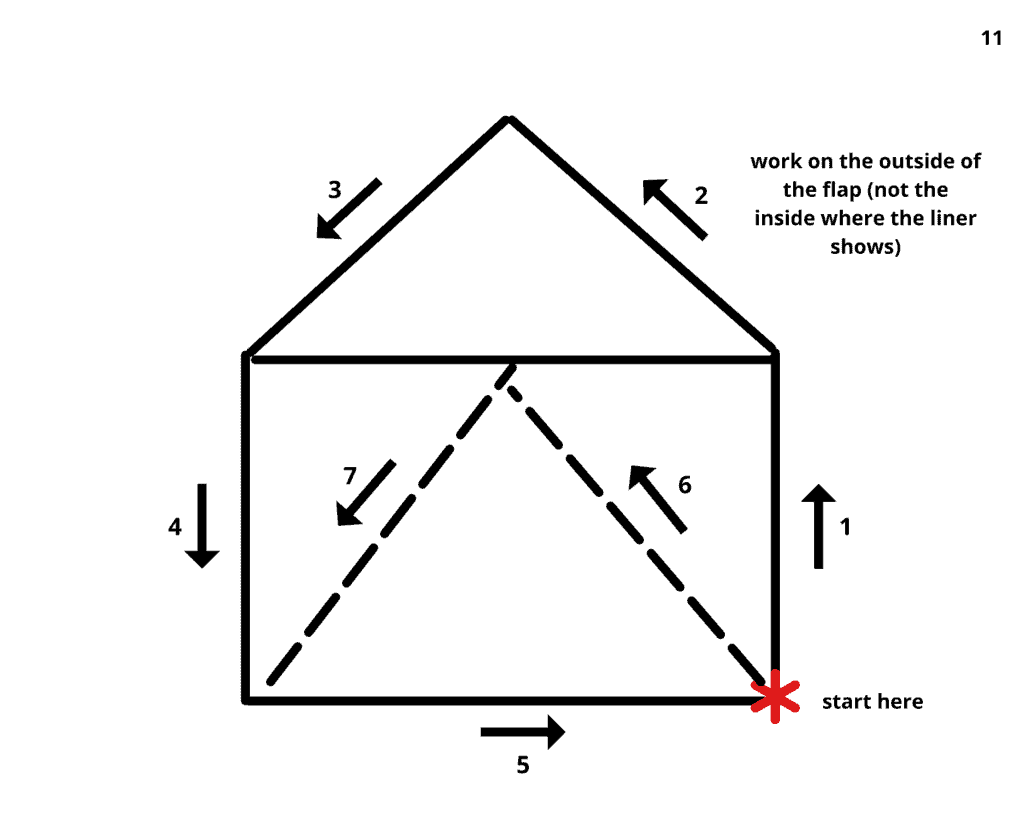
- Step 4: With the same yarn, weave over to the back of the envelope and embroider some lines to mimic the address fields.
- Tip: Navigate around the liner instead of piercing through it! I found that it was way easier to embroider the details after everything was assembled rather than before so that I didn’t need to second guess my placement.
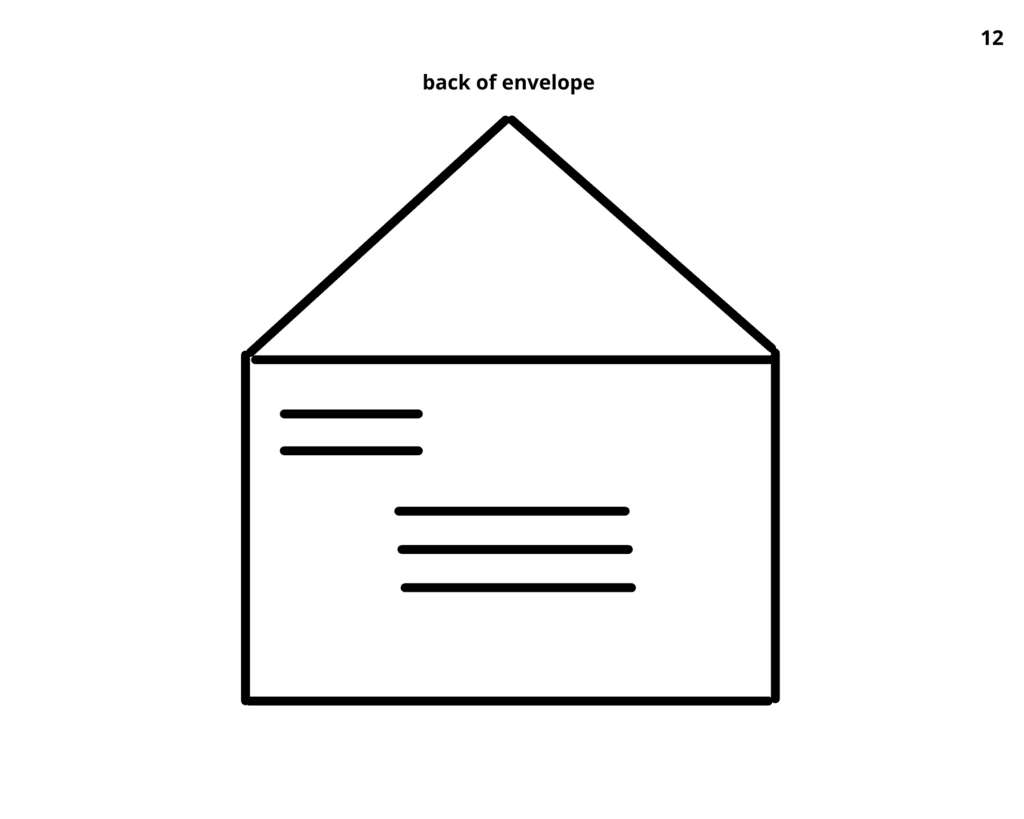
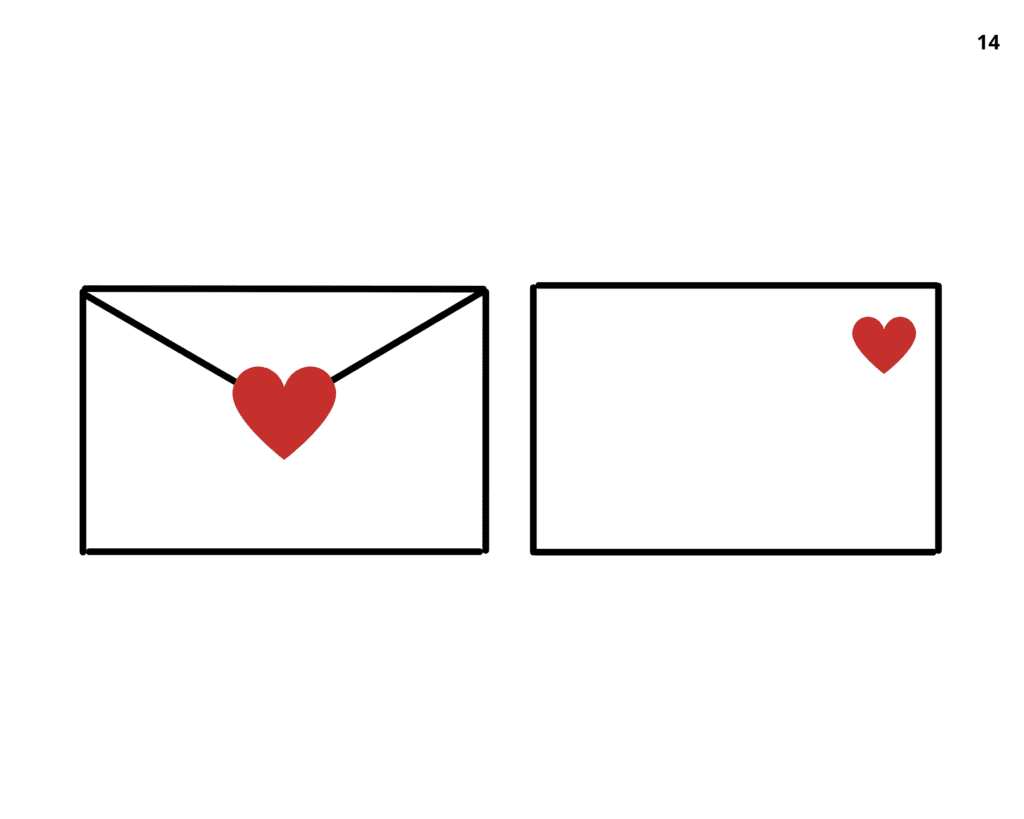
- Step 5: Use hot glue to secure the larger heart onto the envelope flap, making sure that half of it hangs off of the edge and that the metal clasp is completely covered. Secure the smaller heart in the righthand corner of the envelope.
You’re finished! If you enjoyed making this bag, we’d love to see your makes over on Instagram. Tag your creations with #cloverusa and #curiouspapaya so we can feature you! 🙂Happy Valentine’s Day! <3
If you want to keep up with me, Amy, on social media for other fun projects, follow me on social media: Instagram
If you want to keep up with all things Clover, follow us on: Facebook | Twitter | Instagram | Pinterest | YouTube | Ravelry