Easy Fall Felt Projects- Tutorial
Hello my sewing friends!!! Happy National Sewing Month! It’s Dori, back with you again this month to share two very simple projects with you that require very little sewing… and only hand sewing! Sometimes we get the idea that sewing must mean using a sewing machine, and for some people that can be intimidating if they don’t own one. So my sewing projects this month are easy and all done by simple hand sewing stitches! These finished felt garlands are such fun fall decoration and so satisfying to make – whether you are a beginner or an advanced sewist. When it comes to seasonal sewing what I want more than anything is a finished product with dramatic effect and this is it!
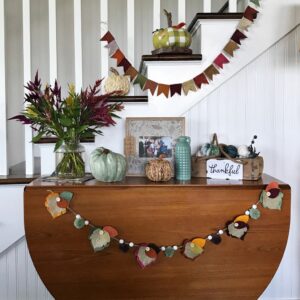
Fall Leaf Garland
My grand girls had so much fun making the pompoms, cutting the leaves, and following along with me to make their Momma a Fall Leaf Garland to hang on her mantle! This is seriously such a fun project!
Necessary Supplies
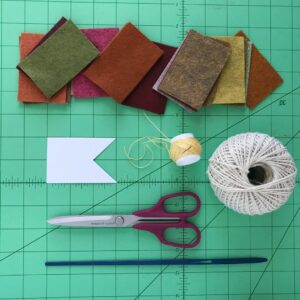
- Felt
- Burlap
- Buttons
- Twine
- Yarn
- Beads (optional)
- Clover Sashico Needle- Art No. Q2007
- Thread (I use Perl Cotton Embroidery thread)
- Flower Head Pens- Art No. Q2505
- Clover Pompom Maker- Art No. 3129
- Bordeaux Scissors- Art No. 4941
- Leaf Patterns

Instructions:
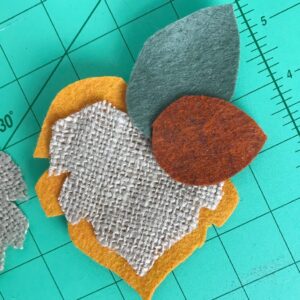
Step One: The first thing you’ll need to do after gathering your supplies is to print a leaf pattern off of the internet (or draw your own). There are so many leaf images and it all depends on what you like. I chose to print up a maple leaf template. You will have two sizes of this leaf – one larger (mine was about 4 x 3) and one smaller (about 3 x 2). You will also need two sizes of an oval leaf shape. I just drew that one. You can experiment with size and style.
Step Two: Using the larger maple leaf, cut out as many felt leaves as you want for your garland. I decided to go with six. You will also cut the same number of leaves out of the smaller pattern in burlap. To finish, cut one of each of the oval-shaped leaves (you will need two per maple leaf – one small and one large). I used a Clover flower head pen to hold my pattern in place to cut. You’ll also want to use sharp scissors for this part of the project and of course, my very favorite are the Bordeaux scissors.

Step Three: Layer your maple leaf with a burlap leaf directly on top, then a large and small oval leaf overlapping at an angle (or anyway that you choose – make it yours!). I laid out six of my leaves and moved colors around until I liked each one.
Step Four: Thread your Clover sashico needle with the embroidery thread. (I prefer the Sashico needle because it has a large eye and makes it very easy to thread, and has a sharp point.) Put a knot in the end of the thread and starting from the back of the leaf, use several simple stitches to attach the main leaf, burlap leaf, and two oval leaves together to form one piece. Don’t worry too much about how your stitches look – they will be covered with a button. Mainly you just want to make sure they are secured together.

Step Five: With your thread still attached to the leaf, place your button over your stitches and sew that in place. Knot your thread on the back and cut it off.

Step Six: Repeat with remaining leaves.
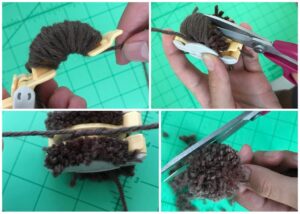
Step Seven: Using the size yellow Clover pompom maker, make eight pompoms of varying colors. I love this YouTube tutorial on making pompoms. It makes it so easy to understand the pompom maker. Be sure to use your Bordeaux scissors for this step as well; in order to have really fluffy uniform pompoms, you’ll want good sharp scissors for trimming! Leave the long two long yarn pieces hanging on each pompom for now.
Step Eight: Lay your pompoms, beads (if you choose to use them), and felt leaves out on the table in a manner that is pleasing to you. You might want to play around with the order a few times to get the way you like.

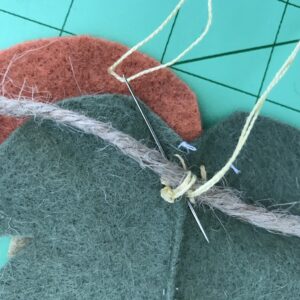
Step Nine: Once you are happy with your layout, attach everything to the twine. You could use hot glue for this part but I’m not a fan of hot glue so here is how I did it: I threaded my beads through the twine, tied each pompom to the twine using the long yarn pieces (trim them after you are satisfied with placement), and I used the same needle and thread to simply hand stitch each leaf to the twine. You won’t need to use too many stitches for it to attach securely.
And now you are finished with your Felt Leaf Garland – see how easy that was!! I love how mine turned out so much that I made several and gifted them. You can too!

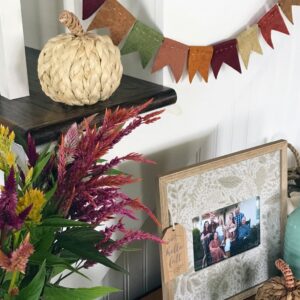
Felt Pendant Garland
This is literally the fastest project!!! You can have a darling garland made in less than an hour! Excellent project with children as well.
Necessary Supplies
- Felt
- Pendant Pattern
- Bordeaux Scissors- Art No 4941
- String
- Clover Easy Loop Turner- Art No. 472
- Clover Sashico Needle- Art No. Q2007
- Embroidery Thread
Instructions:
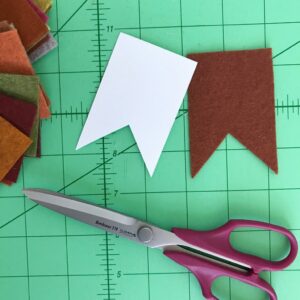
Step One: Gather supplies and make a pendant pattern from paper. I made mine 2 inches wide by 3 inches long and I simply cut the middle points from the bottom edge to the center. Using your Bordeaux scissors cut as many little felt pendants as you want.
Step Two: Fold the top part of the pendant over about 1/2 inch and press with a warm iron.

Step Three: Using the Clover sashico needle and embroidery thread, simply sew a running stitch close to the raw edge of each pendant, creating a hem. This is a quick process and you do not need to get too concerned about perfection – I promise it won’t even be noticeable! Continue until you have sewn all pendants.

Step Four: Using the Clover easy loop turner, attach one end of the string to the turner by sliding it into the slot. Push the turner through the hem you created at the top of each pendant. Continue until all pendants are threaded on the string. This just might be the most satisfying part of the project! And let me tell you this: if you do not own an easy loop turner… well, you are missing out!!! This step could also be done with string attached to a safety pen.

Your Felt Flag Pendant is finished and now you can hang it and enjoy it. Honestly, it is so simple yet so adorable!
I loved making these two projects. I think it is so easy to get overwhelmed with big sewing projects that take so much time and often don’t even get finished. These projects are something that anyone can start… AND finish! I want to see yours so please tag me on IG @redfeedsack!

Thank you for following along! I look forward to seeing you back here in October!
~ Dori ~
Stay connected with Clover on Facebook | Twitter | Instagram | Pinterest | YouTube | Ravelry