
Hello! I’m Mary from MarysYarnBasket! Back-to-school time is just around the corner! Make a couple of these cute crayons for your child, your child’s teacher, or for yourself! They work up quick, are super adorable, and the color possibilities are endless! You can find the inexpensive pattern in a printable PDF version in my Etsy shop as well. (etsy.com/shop/marysyarnbasket)


Abbreviations
(U.S. crochet terms)
sc – single crochet
MR – magic ring
dec – crochet two stitches together (decreasing)
inc – crochet two stitches into the same stitch (increasing)
BLO – crochet into the back loops only
[ ] – repeat only what is with-in brackets
Asterisk (*) – repeat around (unless otherwise noted)
Materials
- Scissors
- Yarn needle
- Poly-fil stuffing
- Stuffing stick
- Clover Amour Crochet
- 4mm Hook- Art No. 1045/G
- 5.5mm- Art No. 1048/I
- 7mm- Art No. 1054
- Yarn in worsted weight, Premier parfait chunky, or Bernat blanket yarn.
- Black
- The dark and light color of your choice. For mine, I used dark green and light green.
| Yarn | Hook | Eyes | Plastic Canvas | Finished Size |
| Worsted
Weight |
4mm | 10mm | 1 ½ inch circle | 6 ½ inches
tall |
| Parfait
Chunky |
5.5mm | 12mm | 2-inch circle | 9 ½ inches
tall |
| Bernat
Blanket |
7mm | 15mm | 2 ½ inch circle | 13 ½ inches
tall |
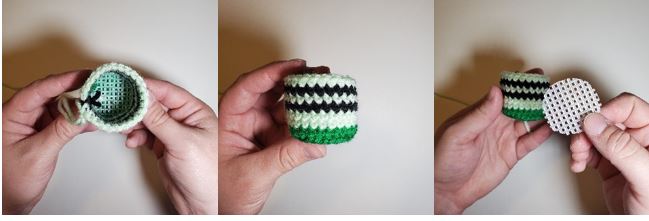
The plastic canvas is optional, but I find it does help keep the bottom of the crayon nice and flat. I got my plastic canvas off Amazon, but it should be available at most craft stores as well. You may use cardboard instead of plastic canvas. However, I would not recommend cardboard if there is a chance your finished item could get wet.
If you need to make your plastic canvas pieces bigger or smaller, that’s ok. My measurements are just guidelines that should fit most pieces. You can lay your plastic on your finished piece to trim accordingly before placement.
Starting at the base with your dark color. Be sure to stuff as you go for a less lumpy crayon.
- Place 6 sc into a MR (6)
- Inc in each st around (12)
- Sc, inc* (18)
- Sc, inc, [sc 2, inc*] [repeat 5x], sc (24)
- BLO sc around (24)
Color change to your light color.
6-7. sc around (24)
Color change to black.
8. sc around (24)
Color change to light.
9. sc around (24)
Color change to black.
10. sc around (24)
If you are using plastic canvas, insert that now into the base of the crayon.

Color change to light.
11-21. sc around (24)
22. sc around then add 3 to 4 sc past the starting point. This will help line up the color change areas on the top and bottom of the crayon.
Color change to black.
23. sc around (24)
Insert the safety eyes in-between rounds 20 and 21. Place 4 stitches apart. (Safety eyes are not recommended for children.)
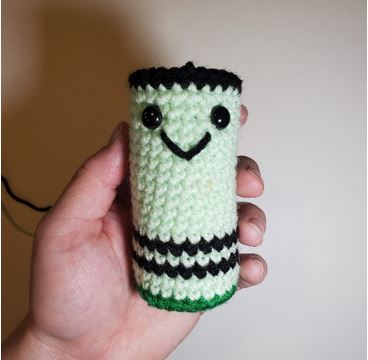

Embroider the mouth in a “V” shape in-between and just below the eyes.
Color change to light.
24. sc around (24)
Color change to black.
25. sc around (24)
Color change to light.
26-27. sc around (24)
Color change to dark.
28. sc around (24)
29. BLO sc, dec, [sc 2, dec*] [repeat 5x], sc (18)
30-31. sc around (18)
A stuffing stick helps to stuff the crayon from this point on.
32. sc, dec* (12)
33-34. sc around (12)
35. dec* (6)
36. sc around (6)
Fasten off and use the tail to sew shut. Weave in ends.
I hope you have enjoyed this pattern! I would love to see your finished creations! Feel free to tag me on Instagram @marysyarnbasket or use the hashtag #marysyarnbasket. You can also find me on TikTok as well at marysyarnbasket.
If you have any questions, don’t hesitate to contact me at marysyarnbasket@outlook.com
Stay connected with Clover on Facebook|Twitter|Instagram|Pinterest |YouTube|Ravelry