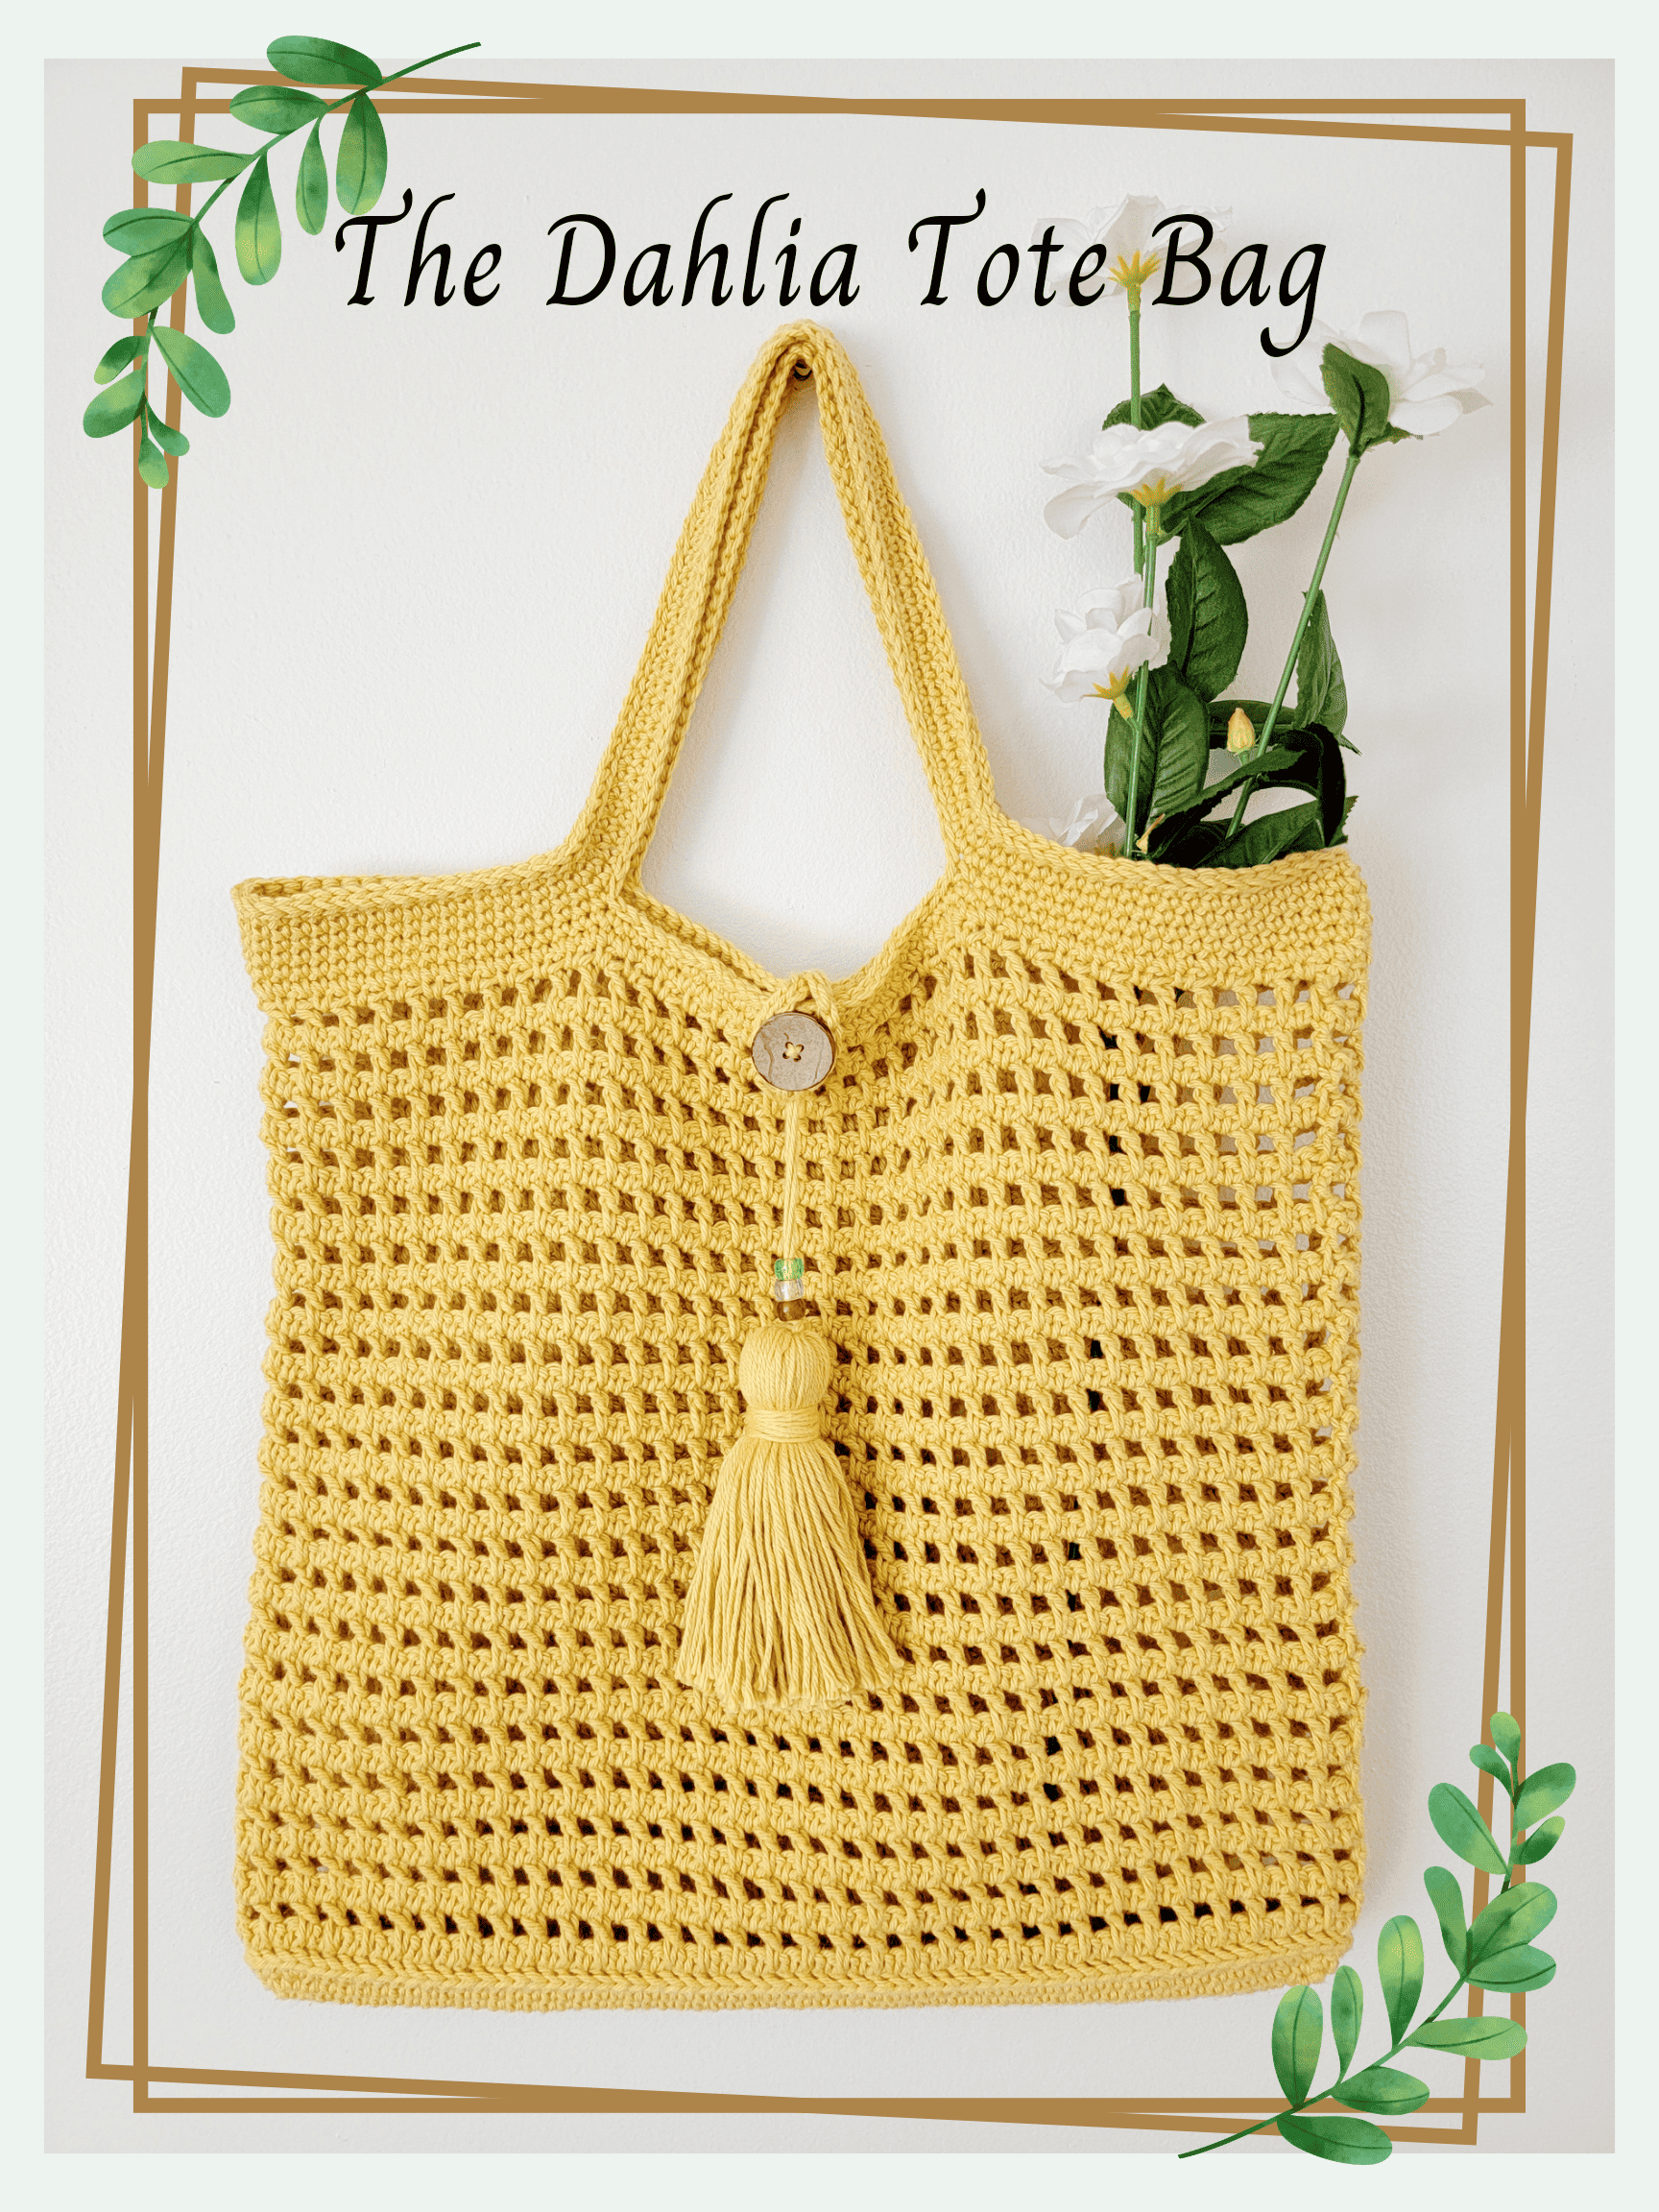
The Dahlia Tote Bag – Crochet Pattern
Hi fellow crafters! My name is Elisa from Strings and Cuddles! I am here again to share with you a new crochet pattern. I designed and crocheted this multi-purpose bag that I named The Dahlia Tote Bag. The name was suggested by a good friend and I love it! Dahlia symbolizes a new birth. Since it is springtime, plants and trees are coming to life again and that to me is a new birth! Thus, Dahlia is just the perfect name for our new pattern!

It has been a while since I designed a bag and I kind of missed it. The Dahlia Tote Bag is fun and easy to make. It features simple crochet stitches that when combined create a beautiful pattern design and texture. I also used cotton yarn for this bag so when it gets dirty, I can just toss it in the washing machine to be washed!
Let’s get started!
THE DAHLIA TOTE BAG
~ CROCHET PATTERN ~
SKILL LEVEL: Advanced Beginner/Intermediate
MATERIALS
Worsted Weight (#4) Cotton Yarn, approximately 350 yards
Clover Amour Crochet Hook Size H – 5 mm
Clover Mini Patchwork Scissors
Clover Jumbo Bent-Tip Tapestry Needle
Clover Quick Locking Stitch Markers
Tape Measure
Optional: Clover Tassel Maker and 1 Pc of 1/2 or 1″ Button
GAUGE: 19 sts x 13 rows = 4 x 4 inches (see gauge pattern)
GAUGE PATTERN:
R1: Ch 20, SC in the 2nd ch from the hook, ch 1, sk 1 st, *SC in the next st, ch 1, sk 1 st*; Rep from * to * to the last sts, SC in the last st. Turn. 19 sts
R2: Ch 2 (does not count as a st), DC in the 1st st, *DC into the skipped st from 2 rows below, ch 1, sk 1 st*; Rep from * to * to the last 2 sts, DC into the skipped st from 2 rows below, DC in the last st. Turn. 19 sts
R3: Ch 1, SC in the 1st st, ch 1, sk 1 st, *SC in the next st, ch 1, sk 1 st*; Rep from * to * to the last st, SC in the last st. Turn. 19 sts
R4 – R13: Rep R2 and R3.
FINISHED MEASUREMENT: 28 (circumference) x 14 (height) inches – excluding handles
STITCHES AND ABBREVIATIONS | US Terminology
BPSC – Back Post Single Crochet
Ch(s) – Chain(s)
DC – Double Crochet
PM – Place (Stitch) Marker
R – Row/Round
Rep – Repeat
RS – Right Side
SC – Single Crochet
Sk – Skip
Sl st(s) – Slip Stitch(es)
Sk – Skip
Sp – Space
St(s) – Stitch(es)
WS – Wrong Side
NOTES
- Read the pattern carefully before starting.
- The beginning ch 1 does NOT count as a stitch.
- Asterisks * * indicates pattern repeats. You need to repeat instructions between asterisks as many times as directed or repeat at specified locations.
- When you see something like this 2 SC, it means you have to work 2 SC in the same stitch, and when you see something like this SC 2, it means you have to SC in the next 2 stitches.
- This pattern can be easily adjusted to your preferred size but bear in mind that the amount of yarn will not be the same as listed. When adjusting the size of your bag, make sure to have an odd number for your foundation chain.
PATTERN INSTRUCTIONS
BASE. This part is worked in the round. You may mark the beginning of the round stitch using your stitch marker.
R1: Ch 61, 2 SC in the 2nd ch from the hook, SC 58, 3 SC, in the last st. DO NOT turn, but continue working into the other side of the foundation chains. SC 58 and SC in the very 2nd st of R1. Sl st in the 1st st to join. 122 sts
R2: Ch 1, SC in the 1st st, 2 SC, SC 58, 2 SC, SC, 2 SC, SC 58, and 2 SC in the last st. Sl st in the 1st st to join. 126 sts
R3: Ch 1, SC in the 1st 2 sts, 2 SC, SC 58, 2 SC, SC 3, 2 SC, SC 58, 2 SC, SC in the last st. Sl st in the 1st st to join. 130 sts
R4: Ch 1, SC in the 1st 3 sts, 2 SC, SC 58, 2 SC, SC 5, 2 SC, SC 58, 2 SC, SC 2 in the last 2 sts. Sl st in the 1st st to join. 134 sts
R5: Ch 1, BPSC around. Sl st in the 1st st to join. Turn and continue with the BODY pattern. 134 sts
BODY. This part is worked in the rounds, but you will have to turn after each row/round.
R6 (WS): Ch 1, SC in the 1st st, ch 1, sk 1 st, *SC in the next st, ch 1, sk 1 st*; Rep from * to * around. Sl st in the 1st st to join. Turn. 134 sts
This next round is done by working your DCs into the skipped sts from 2 rows below, more like ignoring the ch 1 you’ve made from the previous row. Now, begin this row/round with the RS facing out, no ch 1 is needed.
R7 (RS): Sl st in the ch-1-sp, SC in the skipped st from 2 rows below, ch 3, sk 1 st, *DC into the skipped st from 2 rows below, ch 1, sk 1 st*; Rep from * to * around. Sl st in the 2nd ch from the beginning ch 3 to join. Turn. 134 sts
R8 (WS): Sl st in the ch-1-sp, SC in the same ch-1-sp, ch 1, sk 1 st, *SC in the next ch-1-sp, ch 1, sk 1 st*; Rep from * to * around. Sl st in the 1st st to join. Turn. 134 sts
R9 – R46: Rep R7 and R8, ending with R8.
R47 – R48 (RS): Ch 1, SC around. Sl st in the 1st st to join. DO NOT turn on R48. 134 sts

Here are some steps in adding the handles to your bag:
Step 1: Lay your bag on a flat surface to determine the mid-point sts on the right and left sides. PM in these sts. In case the 1st st of R48 is not your mid-point st, fasten off and weave in ends. There should be 66 sts between these mid-point sts. 134 sts

Step 2: Start at one marked mid-point st, count 21 sts – including the marked mid-point st, PM in the 21st st; then count the next 27 st, PM in 27th st. Repeat the same instruction on the other side starting at the other marked mid-point sts.

Step 3: In case you had to fasten off your yarn in R48, attach a new one on either marked mid-point sts, then you can remove both mid-point st markers and continue with R49.
R49: Ch 1, SC in the 1st st and in each st to the 1st st marker, ch 60, sk 26 sts, SC into the 2nd st marker and in each st to the 3rd st marker, ch 60, sk 26 sts, and then SC into the last st marker and in each remaining sts. Sl st in the 1st st to join. 202 sts
Note: You may change the number of chains for the handles. You can add more if you want it to be longer.
R50 – R52: Ch 1, SC in the 1st st and in every st and ch around. Sl st in the 1st st to join. 202 sts
R53: Ch 1, sl st in every st around. Sl st in the 1st st to join. 202 sts
Fasten off and weave in all ends.
Last Step: Add sl sts edging around the inner part of the handles. Attach yarn in the 14th st from the right corner in R48 and sl st in every st around. Sl st in the 1st st to join. Fasten off and weave in all ends. 86 sts.

Rep this step on the other handle. Fasten off and weave in all ends.
Optional: In case you want to add a button, follow the Last Step instruction to the last st, then ch 21 (for the buttonhole), sl st in the 2nd ch from the hook, and all the way down to the 1st ch loop, and into the same last st from R48. Cut yarn, leaving a long tail for sewing the buttonhole. Now take the end of the ch, form a loop, then secure it by sewing it into the base. Fasten off and weave in all ends.
Lastly, sew a button on the opposite side of the bag and you are all done! Woo hoo!!!

Optional: You may add a tassel or any accessory you have for a nice finishing touch.
To download the PDF version of THE DAHLIA TOTE BAG and my other patterns, please visit my Ravelry shop.
I would love to see your work! Please use these hashtags to share: #stringsandcuddles, #stringsandcuddlesdesigns, #TheDahliaToteBag, and please don’t forget to tag me @stringsandcuddles.
Please don’t hesitate to reach out for questions regarding this pattern.
Connect with me: Instagram | Pinterest | Facebook | Blog | Ravelry