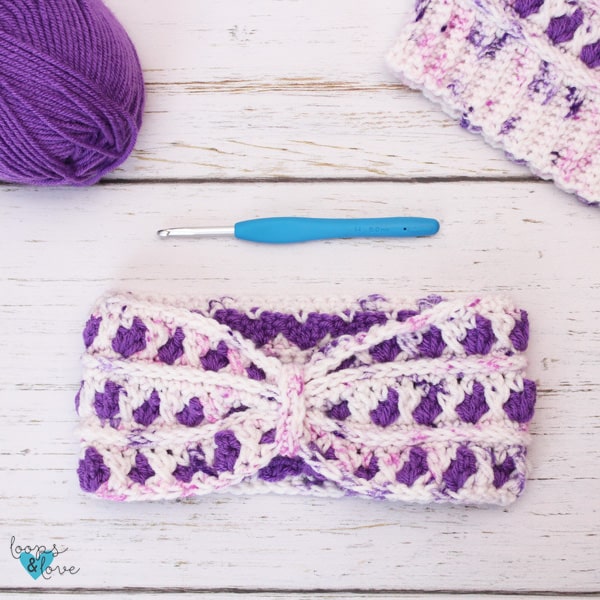
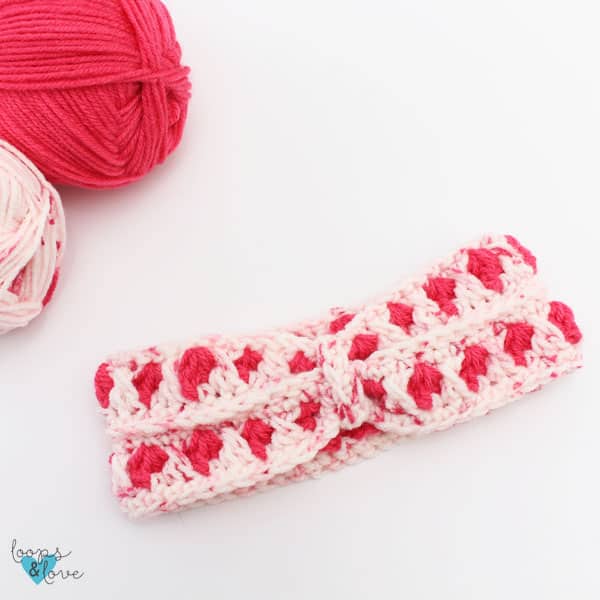
Crochet Peek-a-Boo Ear Warmer Pattern
Hello! I’m Amanda from Loops and Love Crochet. I am so excited to be back on the Clover blog to share my most recent design with you, the Peek-a-Boo Ear Warmer. This ear warmer pattern is such a fun one to work up with beautiful texture created by the combination of stitches.
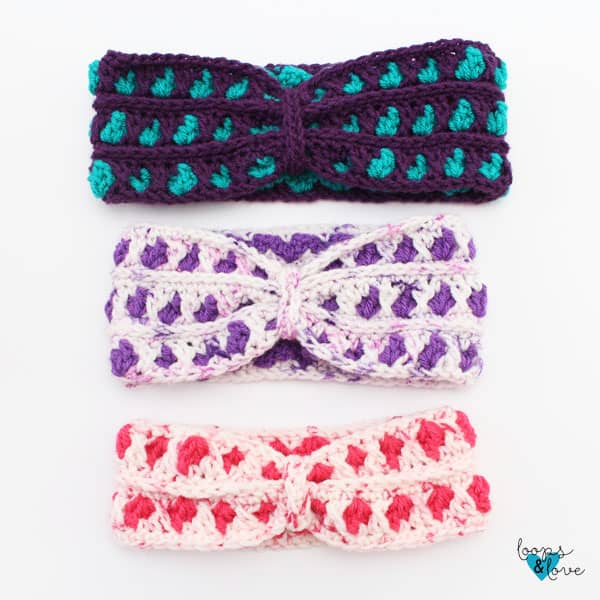
The Peek-a-Boo Ear Warmer is part of the Peek-a-Boo series of patterns on my blog which currently includes a matching beanie and messy bun beanie.

There are four sizes of ear warmer included in the pattern below: toddler, child, teen, and adult. You’ll be working this ear warmer from the bottom up with the gathering and ring around the center added at the end.
Keep on reading for the Peek-a-Boo Ear Warmer crochet pattern below. If you’d like the inexpensive, printable PDF version, you can grab it in my Etsy or Ravelry shops.
This is an intermediate-beginner crochet pattern. I’ve created a video tutorial to go along with this pattern to provide a visual and extra explanation to help you along the way, if needed. The video will show you all the stitches and steps to crochet your Peek-a-Boo Ear Warmer from start to finish.
You can find the video on my YouTube Channel here!
Let’s get started on this project! I hope you enjoy making your Peek-a-Boo Ear Warmer!
Materials:
- Amour Crochet Hook H (5.0 mm) – Art. No 1047/H
- Worsted-weight (#4) yarn – Any worsted-weight yarn can be used for this project. I used WeCrochet Brava You’ll need approx. 70-130 yds, depending on the size of ear warmer you are making.
- Yarn needle (for weaving in ends and sewing on the ring in the center of the ear warmer)
Stitches Used:
- Ch – chain
- Sl St – slip stitch
- SC – single crochet
- DC – double crochet
- FSC – foundation single crochet (see video tutorial)
- FPSC – font post single crochet
- Cluster V-Stitch (a modified version) – Two double crochet stitches, chain 1, two double crochet stitches, all worked in the same stitch.
- Crossed Double Crochet – Skip first stitch, DC in next stitch, then go back and DC in skipped stitch (this will layer the DC stitches so one is crossed over the other).
Gauge
- 8 SC stitches = approx. 2” long
- Each section of the ear warmer, including one round of SC, Cluster V-stitches, Crossed DC stitches, SC, and FPSC, measures approx. 1.25-1.5 inches tall.
- When you finish the starting chain or foundation for the size of ear warmer you are making, make sure it is approximately the same length as what it states in the pattern for that size. This is so your ear warmer comes out the right size and fits properly.
Finished Size
- Here are the finished ear warmer measurements (approximate) for each size. Measurements were taken with the ear warmer laying flat.
- Toddler – width: 8”, height: 2.5”
- Child – width: 9”, height: 4”
- Teen – width: 10”, height: 4”
- Adult – width: 11”, height: 4”
Important Notes:
- Always start the first stitch of the round in the same space as the chain 1 or chain 2. Chain stitches at the start of each round do not count towards stitch count.
- This pattern is worked in joined rounds. When you finish the stitches of one round, you will join to the first stitch of the round with a slip stitch, chain 1 (or 2) and then start the next round of the pattern, beginning in the same stitch as the chain.
- When working this pattern, you’ll be using a main color and an accent color. You can keep both colors attached while you work the whole pattern and just pick up and drop each color as you need to change colors.
- Each size of this pattern includes the number of stitches in the starting chain or foundation, as well the length (in inches) the starting chain or foundation should be. If your gauge is different than the one listed in the pattern, use the measurement information instead of the stitches to help with sizes. For the stitch pattern to work, your foundation single crochet should be a multiple of 3 (add one extra stitch if you are using a starting chain instead of a foundation).
- Video Tutorial – There are a couple videos on my YouTube channel that will be helpful in working up this pattern.
The Pattern
- Below are the number of starting foundation stitches needed for each size of ear warmer, as well as the measurements for each foundation/chain. If you are using a starting chain instead of the foundation stitches, you’ll need to add one extra stitch to your chain.
- For starting chain method, measure the length after you have completed row/round 1 (the chain and the first row of SC) and compare it to the chart. For foundation stitches, the measurement can be taken when finished the row of foundation single crochet stitches.
- Remember, if you need to add or remove stitches to get the length given below, you’ll need to make sure the stitch count of each round is a multiple of 3.
Toddler (ages 1-3 ~ 18-19” head circumference): 54 stitches (approx. 14”)
Child (ages 4-10 ~19-20” head circumference): 60 stitches (approx. 16”)
Teen (~ 20-21” head circumference): 63 stitches (approx. 17”)
Adult (~22-23” head circumference): 66 stitches (approx. 18”)
Stitch counts are listed for each size as follows: (Toddler, Child, Teen, Adult).
Row/Round 1: FSC 54, 60, 63, 66, change to accent color, join with a sl st to top of first FSC, ch 2.
*If you prefer to start with a starting chain instead, chain 54, 60, 63, 66, then add one additional chain. SC in 2nd ch from hook and each across, change to accent color, join to top of first SC with a sl st. Ch. 2
*Make sure you keep the right (front) side of the work facing out and towards you when you join, and make sure your foundation is not twisted.
*There will be a gap at the bottom where the band is not connected. You can use your yarn needle to sew it together now or leave it until the end.
Round 2: Cluster V-stitch in first stitch, skip 2 stitches, *cluster v-stitch in next, skip 2 sts, repeat from *around, join to first stitch, do not ch 2. (18, 20, 21, 22 Cluster V-stitches)
If your ear warmer is curling as you work, don’t worry, it’ll straighten out when you add more rounds and stretch it around a head. Make sure your Cluster V-stitches are worked with a consistent tension as your first round.
Round 3: Sl st in next stitch, then sl st into ch 1 space in center of first cluster v-stitch (changing back to the main color), ch 1, *SC in center of first cluster v-stitch, work crossed DC sts down into the 2 skipped sts following the cluster-v stitch (skip first st, DC in next st, go back and DC in skipped st), making sure to yarn over in front of the cluster v-stitch round so your stitches stay in front of the clusters. Repeat from * around, join to first SC, ch 1. (54, 60, 63, 66) *See video tutorial to see a visual of working this round.
Round 4: SC in the first st and in each st around, join, ch 1. (54, 60, 63, 66)
Round 5: FPSC in each st around, join with a sl st to first FPSC. Then sl st back to the first SC of the last round (behind the FPSC round) so your next round is not worked in the post stitches (see photo or video tutorial), ch 1. (54, 60, 63, 66)
Round 6: SC in each st around, change to accent color, join, ch 2 (54, 60, 63, 66)
*Make sure you are not working in the post stitches. Your SC stitches should be going into the round before the FPSC round (these are the stitches behind the FPSC stitches).
Round 7: Cluster V-stitch in first stitch, skip 2 stitches, *cluster v-stitch in next, skip 2 sts, repeat from *around, join to first stitch, do not ch 2. (18, 20, 21, 22 Cluster V-stitches)
Round 8: Sl st in next stitch, then sl st into ch 1 space in center of first cluster v-stitch (changing back to the main color), ch 1, *SC in center of first cluster v-stitch, work crossed DC sts down into the 2 skipped sts following the cluster-v stitch (skip first st, DC in next st, go back and DC in skipped st), making sure to yarn over in front of the cluster v-stitch round so your stitches stay in front of the clusters. Repeat from * around, join to first SC, ch 1. (54, 60, 63, 66)
Round 9: SC in the first st and in each st around, join, ch 1. (54, 60, 63, 66)
*If making the toddler size, don’t chain 1. Instead, fasten off and weave in ends here.
Round 10: FPSC in each st around, join with a sl st to first FPSC. Then sl st back to the first SC of the last round (behind the FPSC round) so your next round is not worked in the post stitches (see photo tutorial), ch 1. (60, 63, 66)
Round 11: SC in each st around, change to accent color, join, ch 2. (60, 63, 66)
Round 12: Cluster V-stitch in first stitch, skip 2 stitches, *cluster v-stitch in next, skip 2 sts, repeat from *around, join to first stitch, do not ch 2. (20, 21, 22 Cluster V-stitches)
Round 13: Sl st in next stitch, then sl st into ch 1 space in center of first cluster v-stitch (changing back to the main color), ch 1, *SC in center of first cluster v-stitch, work crossed DC sts down into the 2 skipped sts following the cluster-v stitch (skip first st, DC in next st, go back and DC in skipped st), making sure to yarn over in front of the cluster v-stitch round so your stitches stay in front of the clusters. Repeat from * around, join to first SC, ch 1. (60, 63, 66)
If you’d like the adult sized ear warmer to have more height on it, repeat rounds 9-13 one more time before finishing off with round 14.
Round 14: SC in the first st and in each st around, join. (60, 63, 66)
Fasten off and cut yarn, leaving a long tail to use to add the gathered detail at the front (instructions below). If you did not sew together the bottom of the ear warmer earlier, you can use your yarn needle and starting yarn tail to do that now before cutting it.
Next, follow the instructions to add the gathered detail and ring in the center of the ear warmer.
Adding the Gathered Detail to your Ear Warmer
Thread your yarn needle with your yarn tail (or a separate piece of yarn if you have already woven in the tail or it’s too short). Start by finding the seam on your ear warmer from where you joined at the end of each row. This is where the gathered section will be lined up. With your fingers, squeeze the rows of your ear warmer together, stacking the post stitch rows and the starting and ending rows together. You can decide how much or little you’d like to gather the center. Next, use your yarn needle to add a few stitches through the gathered section to hold it in place. Tie off your yarn and cut the ends.
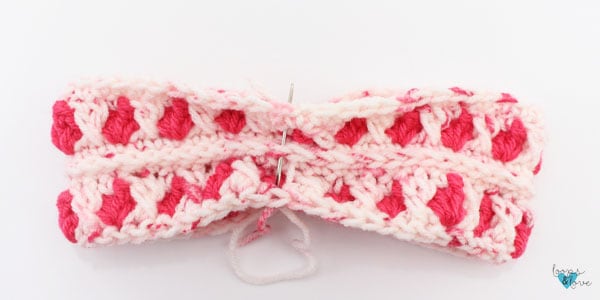
Adding the Ring to the Center of your Ear Warmer
With your yarn and hook, make a chain long enough to fit snuggly around the gathered section and then work a SC in each stitch across your chain. I started with a chain of 15 for the child, teen, and adult size. For the toddler size, a chain of chain 10-12 was long enough. Fasten off, leaving one of the tails for sewing. *Note that a foundation single crochet would also work great for this part too.
Next, wrap the row of SC around the gathered section with the ends meeting on the inside, forming a ring around the ear warmer. Use your yarn needle to stitch the together the ends. Then secure it in place by adding some stitches through the ring, passing through the gathered ear warmer section. Tie off your ends, weave them in, and cut all tails.

You’re all done with your ear warmer! I hope you enjoyed working up your ear warmer and love all the fun texture it has! Enjoy making them in all different sizes and color combinations.
If you are sharing your project on Instagram, I’d love to see it! Please tag @loopsandlovecrochet when posting your photos.
If you’re looking for more crochet patterns, tutorials, and inspiration, be sure to follow me at these links: Blog | Instagram| Facebook | Etsy | Ravelry | YouTube | Newsletter