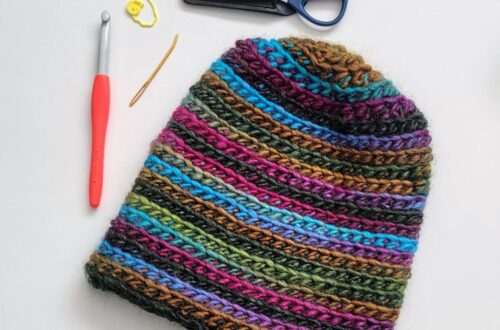
Crossy Road Beanie – Crochet Pattern
Hello! This is Tonja the designer behind Pink Plumeria Maui and I’m delighted to be back on Clover USA’s Blog.
Today I’m sharing with you a new crochet pattern using Clover’s Amour Crochet Hooks, the Crossy Road Beanie. I used an H (5 mm) & I (5.5 mm) Amour Crochet Hooks to create this beanie!
The Crossy Road Beanie pattern is designed to have texture as well as be fashionable. The Messy Bun version is a super cute way to wear your hair up while keeping your head warm. As you can see I made a messy bun beanie version of the Crossy Road Beanie.

In this Crossy Road Beanie pattern, I used worsted weight yarn and cables to create this beautiful texture. When working these cables you always work your cables on top of the same four stitches. Working in the round please pay attention to where it says to turn at the end of the row after slip stitching. This keeps the texture on the right side of the beanie. The Spiked Baskets pattern is an intermediate pattern however beginners can definitely make it as cables are made of double crochet stitches.

Let’s get to it. Here’s what you’ll need.
Supplies:
- Amour Crochet Hook H (5mm) – Art. No 1047/H
- Amour Crochet Hook I (5.5mm) – Art. No 1048/I
- Jumbo Darning Needle Set – Art. No 340
- Patchwork Scissors Mini – Art. No 493/CW
- Worsted Weight #4 Yarn, I used WeCrochet, Swish, 100% Fine Superwash Merino Wool in Highlighter, 7oz/200g or 2200y/200m.
Size:
Adult & Adult Messy Bun
- Beanie Finished Circumference 18 in (46 cm), Height 8 in (20 cm)
- Messy Bun Finished Circumference 18 in (46 cm), Height 7 in (18 cm)
Gauge:
10 FPsc x 19 rows = about 1.5 in. (4 cm) x 4 in. (10 cm), BE SURE TO CHECK YOUR GAUGE.
Abbreviations:
- ch = chain
- CB = Cable Back
- CF = Cable Front
- dc = double crochet
- FPsc = front post single crochet
- rep = repeat
- RS = right side
- sc = single crochet
- sp(s) = space(s)
- st(s) = stitch(es)
Stitch Explanation:
- FPsc (Front Post single crochet) Insert hook from front to back then to front, going around post of indicated st, draw up a loop, yarn over and draw through 2 loops on hook. Skip top of st behind the FPsc.
- CB (Cable Back) Sk 2 sts, work a dc in next 2 sts, work in back of sts just made with dc in the 2 sts you skipped.
- CF (Cable Front) Sk 2 sts, work a dc in next 2 sts, work in front of sts just made with dc in the 2 sts you skipped.
Notes:
- Beanie is worked by making the brim in rows back and forth, brim is slip stitched together to form a circle, and the body of beanie is worked in the round on top of brim.
- In the body of the Beanie make sure to turn when indicated at the beginning of rows.
- Four cable stitches are always worked on top of same four cable stitches from row below.
Brim
With H-8 (5 mm) hook, ch 11.
Row 1(RS): Sc in 2nd ch from hook, sc in each ch across – you will have 10 sc.
Row 2-84: Ch 1 (does not count as a st), turn, FPsc in across.
Brim will measure approximately 17.5 in (43 cm)
With RS facing each other, line up sts, sl st together through both ends.
Turn RS facing out, rotate to work on top of brim.
Do not fasten off.
Body
With I-9 (5.5mm) hook.
Rnd 1: Ch 1, sc in top of each row, sl st to first st. (84 sc).
Row 2: Ch 2 (counts as dc here and throughout), dc in next st, work CF pattern around, sl st to top of ch-2 – you will have 14 rep of pattern.
Row 3: Ch 2, turn, work CB pattern to last st, dc in last st, sl st to ch-2.
Rep rounds 2-3 until you have 14 rounds.
Rnd 15: ch 1 (does not count as a st), turn, *sc 4, sc2tog*; rep from *, sl st to 1st sc – you will have 70 sc.
Rnd 16: Ch 1, *sc, sc2tog; rep from * around until last st, sc in last st, sl st to 1st sc – you will have 47 sc.
Rnd 17: Ch 1, *sc2tog in next two sts; rep from * around until last st, sc in last st, sl st to 1st sc – you will have 24 sts.
Rnd 18: Ch 1, sc in each st around, sl st to 1st sc.
Leave a long tail and fasten off.
Messy Bun
For Messy Bun Rep Rnds until you have 12 rounds.
Rnd 13: ch 1 (does not count as a st), turn, *sc 4, sc2tog*; rep from *, sl st to 1st sc – you will have 70 sc.
Rnd 14: Ch 1, *sc, sc2tog; rep from * around until last st, sc in last st, sl st to 1st sc – you will have 47 sc.
Rnd 15: Ch 1, *sc2tog in next two sts; rep from * around until last st, sc in last st, sl st to 1st sc – you will have 24 sts.
Rnd 16: Ch 1, sc in each st around, sl st to 1st sc.
Fasten off.
Finsihing
To finish up your closed beanie, turn beanie RS in, darn large blunt needle with long tail, weave in and out under sc sts. Pull yarn to close opening and use long tail to secure end.
Fasten off.
Weave ends in.

You can find the FREE written instructions as a FREE PDF for the Crossy Road Beanie by clicking HERE. You can also save this pattern on Ravelry by click HERE & Pin it on Pinterest HERE.
I would love to see your Crossy Road Beanie. Please tag me @pinkplumeriamaui and use #pinkplumeriamaui on Instagram so I can share your project.
Find Pink Plumeria Maui on her Blog | Instagram | Facebook | Pinterest | Etsy | Ravelry
Stay connected with Clover on Facebook | Twitter | Instagram | Pinterest | YouTube | Ravelry
[mc4wp_form id=”11289″]


