Jumbo Turkey Amigurumi

Hi everyone! I’m Julia from Little World of Whimsy, and I’m here to share a cute Turkey pattern, just in time for Thanksgiving Day here in the US!
You can get the inexpensive, beautifully formatted, printable PDF on Etsy here.

This jumbo turkey is pillow sized and works as an adorable accent cushion for a child’s room or an eccentric couch pillow! Using velvet makes this amigurumi even more plush, but you can make it palm sized by using sport or worsted weight yarn.

Materials
- Clover Amour Crochet Hook I (5.5 mm) – Art. No 1048/I
- Chenille Home (Jumbo)
- (2 skeins) Mustard
- (<1 skein) Burgundy
- Sweet Snuggles
- (<1 skein) Yellow
- (<1 skein) Coral
- Mini Patchworks Scissors – Art. No 493/CW
- Quick Locking Stitch Marker (Small) – Art. No 3030
- Darning Needle Set (Bent Tip) – Art. No 3121
- 10.0mm Safety eyes
- Fiberfill stuffing
Abbreviations
- CC: contrast color
- ch: chain
- dec: decrease
- inc: increase (2 scs in the same stitch)
- MC: main color
- MR: magic ring
- rnd: round
- sc: single crochet
- slst: slip stitch
- st(s): stitch(es)
- x sc: sc x number of times
- (x sts): x total stitches in round/row
- (…) x: repeat stitches within brackets x times
Technical Notes
1.Crochet in continuous spiral rounds, unless specified otherwise. Use a stitch marker or piece of yarn to keep track of the last stitch in each round.2. Jumbo velvet yarn sheds very easily, so keep that in mind while working.
3.When creating the magic ring at the beginning, pull the circle as tight as possible before working into it. Otherwise, sometimes the circle gets stuck and it’s difficult to cinch tight.
4.If your amigurumi has gaps, size down your hook.
5.When filling with polyester stuffing, pull apart each large chunk into many smaller chunks. This ensures an even distribution of firmness within the amigurumi.
6.To make this amigurumi child safe, use black felt and hot glue for the eyes rather than safety eyes, which are not child-safe.
7.For this pattern, the MC is Mustard, CC1 is Yellow, CC2 is Burgundy, and CC3 is Coral.
Final Size
Approx. 9″ (23 cm) wide, 8″ (21 cm) tall, 12″ (31 cm) long
Size up or down this pattern by changing hook and yarn size.

PATTERN
HEAD/BODY (in MC)
Round 1: 8 sc in MR (8 sts)
Round 2: inc x8 (16 sts)
Round 3: (sc, inc) x8 (24 sts)
Round 4: (2 sc, inc) x8 (32 sts)
Round 5: (3 sc, inc) x8 (40 sts)
Round 6: (4 sc, inc) x8 (48 sts)
Round 7: (5 sc, inc) x8 (56 sts)
Round 8-13 (6 rnds): sc around (56 sts)
Place 10mm safety eyes between rounds 9 and 10, with 11 stitches in between.
Round 14: (6 sc, inc) x8 (64 sts)
Round 15-16 (2 rnds): sc around (64 sts) Round 17: (6 sc, dec) x8 (56 sts)
Round 18: (5 sc, dec) x8 (48 sts)
Round 19: (4 sc, dec) x8 (40 sts)
Round 20: (3 sc, dec) x8 (32 sts)
Round 21: (2 sc, dec) x8 (24 sts)
Stuff.
Round 22: (sc, dec) x8 (16 sts)
Round 23: dec x8 (8 sts)
Finish off and weave in end (fig. 1).

Fig. 1: Finished head.
WINGS (in MC)
Round 1: 6 sc in MR (6 sts)
Round 2: (2 sc, inc) x2 (8 sts)
Round 3: (3 sc, inc) x2 (10 sts)
Round 4: (4 sc, inc) x2 (12 sts)
Round 5: (5 sc, inc) x2 (14 sts)
Round 6: (6 sc, inc) x2 (16 sts)
Do not stuff. Finish off, leaving a tail for sewing (fig. 2). Seam opening shut and sew to the side of the body with the wide edge flush with round 9 (counting from the top). See cover photo for final placement.

Fig. 2: Finished wings.
BEAK (in CC1)
Round 1: 6 sc in MR (6 sts)
Round 2: (2 sc, inc) x2 (8 sts)
Round 3: sc around (8 sts)
Round 4: sc around, slst to the first stitch (8 sts)
Stuff lightly (I use the tail end of the yarn). Invisible finish off, and weave in end, leaving a tail for sewing (fig. 3). Sew to the body between rounds 10 and 11. It should be directly between the eyes (fig. 4).

Fig. 3: Finished beak.
FEET (in CC1. Make two.)
Round 1: 6 sc in MR, sist to first stitch (6 sts)
Round 2: (slst in the next stitch, chain 4 off the side and beginning from the 2nd chain from the hook, work 3 single crochet stitches into the remaining 3 chains) x2, 2 slst. See fig. 5 for a crochet chart if needed.
Invisible finish off, leaving a tail for sewing. Make another identically and sew to the bottom of the body, starting from round 6 (counting from bottom).

Fig. 4: Finished feet.
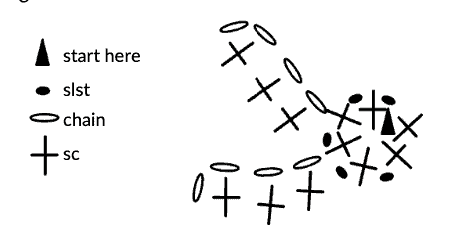
Fig. 5: Feet crochet chart.
WATTLE (in CC2)
Chain 7. Beginning from the second chain from the hook, work 3 single crochets, then slip stitch. Invisible finish off, leaving a tail for sewing, then sew it to the right of the beak, at its base. See fig. 6 for finished placement.

Fig. 6: Finished beak and wattle.
TAIL FEATHERS (Make 2 in CC1, 2 in CC2, and 3 in CC3)
Round 1: 6 sc in MR (6 sts)
Round 2: (sc, inc) x3 (9 sts)
Round 3: (2 sc, inc) x3 (12 sts)
Round 4: (3 sc, inc) x3 (15 sts)
Round 5-6 (2 rnds): sc around (15 sts) Round 7: (3 sc, dec) x3 (12 sts)
Round 8-11 (4 rnds): sc around (12 sts) Round 12: (2 sc, dec) x3 (9 sts)
Round 13-15 (3 rnds): sc around (9 sts)
Do not stuff. Invisible finish off, leaving a long tail for sewing (fig. 7). After finishing all 7 feathers, sew them to the body (beginning from 7th rnd from bottom).
I arranged them in two layers; the first layer has the two CC2 feathers in the middle and the two CC1 feathers on the left and right side. On the second layer, I staggered the three CC3 feathers in the gaps created by the front layer.

Fig. 7: Finished tail feather.

Fig. 8: Front view of tail feathers.

Fig. 9: Back view of tail feathers.
Your Jumbo Turkey is all done!
I hope you enjoyed crocheting him and found the pattern helpful. I would love to see your finished amigurumi, so share a picture on Instagram with me by using the #littleworldofwhimsy and tagging me @littleworldofwhimsy.
This pattern is free but if you’d like to purchase a low-cost PDF, you can find it here.
Once again, if you have any questions don’t hesitate to reach out to me with a direct message on Instagram @littleworldofwhimsy or through email at littleworldofwhimsy@gmail.com.
Happy crocheting!