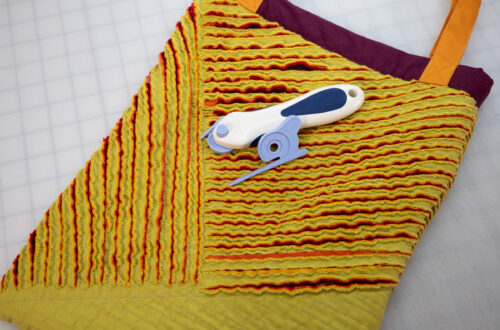
Magnolia Market Bag

Hi there, Erin from CraftsEverywhere here to show you how to make a fun market bag to take along with you and fill up with goodies! Now that things are starting to open back up, there will be markets and this quick bag is a great way to be cute AND eco-friendly. Win!
This bag contains drop stitches and sections of Latvian Braid. I’ve been loving this texture combo lately and have used it in a cardigan, a wall hanging and now this bag.
This is an intermediate pattern which you can modify for any yarn weight. As written, you’ll need 8 mm US 11 and 9 mm US 13 24-29″ circular knitting needles and 2 strands of worsted weight yarn held together. If you’d like an ad-free version with more photos, you can find that on Etsy or Ravelry. Let’s get started!

Skill Level
Intermediate
Materials
- Interchangeable Knitting Needles (8mm) – Art. No 11
- Takumi Bamboo Knitting Needles Circular – Art. No 9
- Interchangeable Cord 24 in. – Art. No 3646
- Worsted weight yarn held double
- Any yarn or weight will work with this pattern! Double stranded Lion Brand 24/7 Cotton is shown in the sample but with some needle size and cast on amount adjustments, you can use any yarn/needle combo.
- Darning Needle Set – Art. No 3121
- Locking Stitch Markers – Art. No 353
- 2″ wood craft rings x 4
- Bag straps
Gauge
Gauge is not important for this project. As written with 2 strands of worsted weight yarn and using 8/9 mm needles, bag measures approx. 10.5” wide and 14” in length. Adjust cast on amount to change width if desired to make bigger/smaller bag.
Terms
- st(s) – Stitch(es)
- co – cast on
- St mk – Stitch marker
- Pl st mk – Place stitch marker
- P – Purl
- K – Knit
- K2tog – Knit 2 stitches together
- K2tog tbl – Knit 2 stitches together through the back loops
- (RS) – Right side
- (WS) – Wrong side
- M1R – Make 1 right – Pick up the post between stitches by inserting your lhn from back to front of work, knit into the front of the stitch to increase 1 st.
- rhn – right hand needle
- lhn – left hand needle
Notes
- Please read ALL notes before beginning.
- *Asterisks mark a repeated stitch pattern*
- This pattern is very easy to adjust length on both the bag length and width.
- If adjusting length, end on a repeat of row 14 before moving to the top band.
- Any yarn/needle adjustments will affect the bag size. Check your width after knitting a few rows to see if you like the size!
- The bag sides are worked in one long panel and then joined for the top band. The sides are seamed together after finishing the top band.
- I highly recommend that you keep medium to tight tension on the Latvian braid and drop stitch rows/rounds and rows/rounds following AND on all sts that begin and end each row/round. This helps keep the fabric and edges neat and even throughout.
- 2 wrap drop stitch – Insert rhn needle into st as to knit, wrap your yarn twice around the rhn and knit like usual. On the next row, purl through one loop of each stitch and drop the extra loop off your needle.
- Suspended Bind Off
- Slip 1 stitch, knit 1 stitch, *insert left needle tip into first stitch on right needle and lift the first stitch over the second.
- Leaving the first stitch on the left needle, knit the next stitch.
- Then slip both stitches off the left needle. 2 stitches remain on right needle and 1 stitch has been bound off.
- Repeat from * until no stitches remain on left needle, then pass first stitch on right needle over the second stitch.
- When finished binding off, give the round below a tug to help settle the braided edge in place.
- Latvian Braid – https://youtu.be/nRZR5exz6vY
- Knit 1 stitch, M1R
- Slip the st just knit from the rhn to the lhn
- Bypass the first st, knit through the back loop of the second st on the lhn then knit into the front of the first st on the lhn. Let both stitches slip off the lhn.
- Repeat steps 2-3 until one st remains on the lhn. Sl the first st on the rhn back to the lhn, K2tog tbl.
- Provisional Cast On – https://www.purlsoho.com/create/provisional-cast-on/
Pattern
Bag Body
Using the provisional method, co 30 sts with 2 strands of 4 weight yarn held together and 9 mm (US 13) 24-29” circular needles.
Row 1 – (RS) K all sts (30).
Row 2 – (WS) P all sts.
**Switch your right hand needle down one size for the following row.**
Row 3 – Latvian Braid.
**Switch back to using all 9 mm (US 13) needles.**
Row 4 – P all sts.
Rows 5-6 – K all sts.
Row 7 – 2 wrap drop st all sts.
Row 8 – P all sts, dropping the extra wrap off the needle as you go!
Rows 9-10 – P all sts.
Row 11 – K all sts.
Row 12 – P all sts.
**Switch your right hand needle down one size for the following row.**
Row 13 – Latvian Braid.
**Switch back to using all 9 mm (US 13) needles.**
Row 14 – P all sts.
Rows 15-84 – Repeat rows 5-14 seven more times (or desired length).
Row 85 – P all sts. When finished with this row, use your rhn and pick up your 30 beginning stitches to work in the round. Remove provisional cast on yarn. Pl st mk.

Top Band
Row 1 – K all sts (60).
Row 2 – P all sts.
Rows 3-5 – K all sts.
Bind off using the suspended bind off method. Add wooden rings if desired as you are binding off. I placed my rings over stitches 4-8, 23-27, 34-38 and 53-57.
How to add wood rings to knits – https://youtu.be/2HSOUMxU2Yc
Leave a long tail for sewing in when bind off is complete.
Finishing
Turn bag inside out and match up sides. Seam together using a mattress seam or method of choice. Sew in all other ends on the inside, block if desired and add handles.
For my mint green bag, I knotted sewn fabric strips onto the wood rings for handles so that I can change them easily if I want to.
You can also leave the wood rings off and make knit icord handles, pick up 6 stitches on one side of the top band and knit approx. 25 rows of garter stitch and then join to other side of the band or buy leather or wooden handles too. There is a wide selection on Amazon if you search for “purse straps”.

Now that you’ve finished your bag, make sure to show it off on social media by tagging me using #magnoliamarketbag and @craftseverywhere on Instagram or Facebook!
If you have any questions regarding the pattern, don’t hesitate to contact me at erin.oetker@gmail.com or through my messages on Etsy or Instagram.
Erin
Find CraftsEverywhere on social media! Instagram | Facebook | Ravelry | Etsy
Stay connected with Clover on Facebook | Twitter | Instagram | Pinterest | YouTube | Ravelry
[mc4wp_form id=”11289″]