Mix n’ Match Cupcakes – Amigurumi Pattern
 Calling all who have a Sweet Tooth! Hey everyone, it’s Amy from curiouspapaya. I’m excited to introduce my interactive crocheted Mix n’ Match Cupcakes.
I designed these with my daughter in mind and thought of how fun it would be to have playfood that you can manipulate with interchangeable parts. The different cupcake flavors can be mixed and matched with different frostings, making a fun handmade gift for little ones (or for yourself!).
This pattern is free but if you would like a downloadable/printable PDF version of this pattern, you can find it on my Etsy shop here.

My Mix n’ Match Cupcakes come in the classic flavors – chocolate, vanilla, and strawberry but of course, the options are limitless. They work up quickly and use a bit of magic – err… I mean, magnets! Here’s what you’ll need for this project:
Materials:
- Clover Amour Crochet Hook C (2.75 mm) – No 1041/C
- Paintbox Cotton Aran (in Vanilla Cream, Champagne White, Soft Fudge, Coffee Bean, Blush Pink, and Ballet Pink. I also used Daffodil Yellow for one of the cupcake liners.)
- Mini Patchworks Scissors – No 493/CW
- Quick Locking Stitch Marker (Small) – No 3030
- Darning Needle Set (Bent Tip) – No 3121
- Fiberfill stuffing
- Neodymium magnets (two for each cupcake)
- Felt in brown, pink, and white (to match your cupcake flavors)
- Three 3 x 3 in. squares of scrap cardboard
- Hot glue gun
Terms
- CH – chain
- SC – single crochet
- DEC – decrease
- INC – increase
- SLST – slip stitch
- HDC – half double crochet
- DC – double crochet
- DC INC – double crochet increase
- RND – round
- FLO – front loops only
- BLO – back loops only
- WS – wrong side
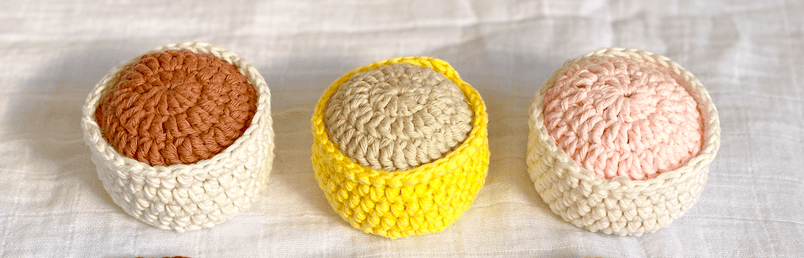
Cupcake Liner
(in color of your choice)
Rnd 1: Make a magic circle and (SC) x 6 [6]
Rnd 2: (INC) x 6 [12]
Rnd 3: (SC, INC) x 6 [18]
Rnd 4: (2 SC, INC) x 6 [24]
Rnd 5: (3 SC, INC) x 6 [30]
Rnd 6: (4 SC, INC) x 6 [36] ***For the last stitch in the last INC, make a SLST.
Rnd 7: BLO – HDC all the way around. At the end of the round, SLST into the first stitch to join the round. [36]
Rnd 8-10: CH 2. This will count as your first stitch. HDC all the way around. SLST into the first stitch of the round (3 rounds total). [36]
Rnd 11: CH 1. FLO – HDC all the way around. SLST into the first stitch of the round. [36].
Trace the base onto scrap cardboard and cut out a circle for each cupcake you make. Use hot glue to secure the circle onto the inside of the cupcake liner to give it more structure.
Leave a short tail to weave in and fasten off.

Cupcake
(in Vanilla Cream, Ballet Pink, or Soft Fudge)
Rnd 1: Make a magic circle and CH 3. This will count as your first stitch. Then, (DC) x 11. SLST into the first stitch of the round. [12]
Rnd 2: CH 3. DC into the same stitch. (DC INC) x 11. SLST into the first stitch of the round. [24]
Rnd 3: CH 3. DC into the same stitch (this will count as your first increase). DC into the next stitch.
(DC INC, DC) x 11. SLST into the first stitch of the round. [36]
Leave a 10 inch tail to attach pieces and fasten off.
Glue a magnet onto the WS.

Frosting
(in Champagne White, Blush Pink, or Coffee Bean)
Note: The frosting will turn into a curly strip.
Row 1: CH 56. Starting in the second chain from the hook, (HDC) x 3 in each stitch. [165]
Fasten off and weave in the tails.

Assembly
Cupcake
Fill the liner with fiberfill stuffing. Using your yarn needle, sew the cupcake onto the liner by going through both loops of the cupcake and only the back loops that were left from RND 11 of the liner. Around 5 stitches before you reach the end, stuff your cupcake some more. Bury the tail.
Frosting
Start on one end and begin curling the frosting into a spiral. Add a dot of hot glue near the chain every 2 inches as you continue to work towards the end of the row.


In the end, you will have yummy, swirly frosting.

Use hot glue to secure a magnet onto the bottom center of the frosting swirl. ***Be sure to test the polarity to make sure it attracts and does not repel to the cupcake!
Cut out a circle out of the matching color felt and cover the magnet.

Easy peasy! Your cupcakes are finished! Because mine will be for my infant daughter to play with, I chose to skip embellishing the frosting.
Enjoy!
If you would like a downloadable/printable PDF version of this pattern, you can find it on my Etsy shop here.


Find curiouspapaya on Instagram | Ravelry | Etsy| Tik Tok
Stay connected with Clover on Facebook | Twitter | Instagram | Pinterest | YouTube | Ravelry
[mc4wp_form id=”11289″]