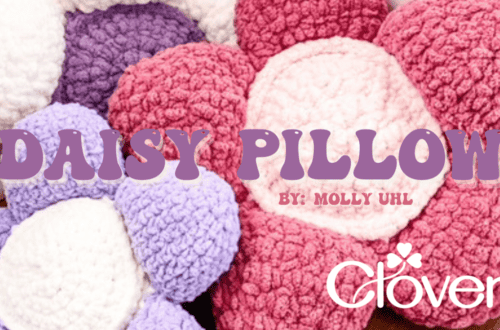
New Beginnings Overlay Pillow – Crochet Pattern
 As we welcome in a new year, I can’t help but to think about the old and new — Old as in vintage….
There’s something special about vintage crochet. It’s not just about style. It’s about bringing you to your roots. Stories. Heirlooms. I love mixing the old with the new and having fresh patterns to make and share with my family – young and old. Old and new.
Having a large family comes with its perks. In this case, hand-me-downs! Not clothes, but heirlooms. A few years ago, my father’s cousin contacted me and wanted to know if I wanted my Great Grandmother’s sewing machine table. He was moving and didn’t have room for it and since I was the crafty one out of 30+ cousins and second cousins, he thought of me. Um, yes please!!!! This thing is a beauty. It’s a table with a flip-up working Singer sewing machine . I had to clean it and dust it for spiders but I couldn’t bring myself to wipe off the dirt and smudges where she placed her fingers over and over….. This heirloom had a special place in this woman’s heart and no telling what all she made. I’d like to think we’d be crafting buddies if we were not such distant relatives!
When the sewing machine was sent over, a box of old Workbasket booklets that were dated 1950s-1980s were sent, too! These books are a treasure. My Great Grandmother wrote on many of the patterns and I just couldn’t believe they were mine! Only a pattern-loving-crochet-gal like me can get excited about handwriting on a pattern book 60+ years old!
And let me tell ya-vintage crochet had it goin’ on! Color. Style. Yep, it’s all there. Even dog bonnets were a thing! The patterns were very time appropriate though! I like to think we can be inspired by these styles and mix in a bit in our modern color and design.
Speaking of time…..My Great Aunt Gail, loved to tell stories of when she was younger. Her favorite story to tell me is one of when she was a young teen (she was born in 1936 — so you can do the math). Her family farmed and didn’t have much money and couldn’t afford luxuries such as traditional store bought yarn. However, they used what they had…..fertilizer bags. She tells the story with big smiles and shows me how they unraveled the bags. They would wash them and then unravel for yarn, rolling the ‘yarn’ in balls as they go. It was thin and had a plastic coating on it so they couldn’t make hats or scarves. Instead, they made doilies, placemats and things like table runners to cover table cloth seams. She said she still had one or two her mom made…..oh, to get my hands on those!
I know that crochet has changed with the times, and I love to look back and see how it’s evolved. Simple Workbasket projects made from fertilizer bags just hold a special place in my heart. It makes me appreciate the aisles of yarn in my local craft store….not to mention – the full storage tubs in my own stash!
I hope you take the time to tell your stories and listen to those with vintage hearts. And be sure crochet something new and special for those you love….. It’ll be vintage one day!

Materials
- Lion Brand 24/7 Cotton (3.5oz/100g/186yd/170m per skein)
- 1 skein each: #761-98 Ecru (A), #761-156 Mint (B), #761-143 Lilac (C), #761-126 Cafe au lait (D)
- Amour Crochet Hook G (4.0 mm) – Art. No 1045/G
- Tapestry Needle Set (Bent Tip) – Art. No 3121
- Mini Patchwork Scissors – Art. No 493/CW
- Quick Locking Stitch Markers – Art. No 3030
Finished Size
Circumference: Approx. 12″ x 12″
Gauge
18 sc = about 4 in. (10 cm) over chart pattern.
*Be sure to check your gauge.
Abbreviations
- ch = chain
- dc = double crochet
- hdc = half double crochet
- rep = repeat
- rnd(s) = round(s)
- RS = right side
- sc = single crochet
- sk = skip
- sl st = slip stitch
- st(s) = stitch(es)
- Tr = treble crochet
- WS = wrong side
Notes
- Pillow is worked in 2 pieces: Front and Back.
- Front is worked in overlay crochet in the round, working in and around stitches as written.
- Back is worked in single crochet and double crochet using a single color in rows to create a panel.
- Front and Back are slip stitched together and pillow form is inserted before stitching the 4th side to complete Pillow.
- To change yarn color, work last st of old color to last yarn over. Yarn over with new color and draw through all loops on hook to complete the st. Work over the strand of the old color as you work each row.
Special Stitches
3 Double Crochet Cluster: (YO, insert hook in st, YO, pull through st, YO, pull through 2 loops on hook) 3 times, YO, pull through all 4 loops on hook
Beginning 3 Double Crochet Cluster (Beg 3-dc cl): Ch 3, (YO, insert hook in st, YO, pull through st, YO, pull through 2 loops on hook) 2 times, YO, pull through all 3 loops on hook.
Pattern:
Front
With A, ch 2.
Rnd 1 (RS): 8 Sc in 2nd ch from hook; join with a sl st to first sc – you’ll have 8 sc in this rnd.
Rnd 2: Ch 1, 2 sc in each st around; join with a sl st to first sc – 16 sc.
Rnd 3: (Ch 4, 3 tr, ch 4, sl st to first sc, sc in next sc, *(sl st, ch 4, 3 tr, ch 4, sl st) in next sc, sc in next sc; rep from * around; join with sl st to beg ch-4 – 8 petals, 8 sc. Fasten off.

Rnd 4: Join B in any sc between petals, ch 7 (counts as first dc and ch 4), *working BEHIND petal, dc in next sc, ch 4; rep from * around; join with sl st to ch-3 of beg ch-7 – 8 dc, 8 ch-4 sps.
Rnd 5: Ch 3, *5 dc in next ch-4 sp, ch 3, sl st to next dc**, ch 3; rep from * around, ending last rep at ** – 8 petals with sl st between each. Fasten off.


Rnd 6: Join A in any sl st between petals, ch 1, sc in same st, *ch 5, sc in next sl st between petals; rep from * around, ending with sl st in first sc to join – 8 sc, 8 ch-5 sps.
Rnd 7: Sl st to next ch-5 sp, Beg 3-dc cl, ch 2, (3-dc cl, ch 2) 3 more times in same sp, (3-dc cl, ch 2 (4 times in each ch-5 sp; join with sl st to first cl – 32 cl, 32 ch-2 sps. Fasten off.


Rnd 8: Join C in any ch-2 sp, ch 1, sc in same sp, ch 1, *sc in next ch-2 sp, ch 1; rep from * around; join with sl st to first sc – 32 sc, 32 ch-1 sps. Fasten off.
Rnd 9: Join B in any ch-1 sp, ch 3 (counts as dc), 7 dc in same sp, sk 1 ch-1 sp, sl st in next ch-1 sp; sk 1 ch-1 sp, *8 dc in next ch-1 sp, sk 1 ch-1 sp, sl st in next ch-1 sp, sk 1 ch-1 sp; rep from * around; join with sl st to beg ch-3 – 8 8-dc sets, 8 sl st sets. Fasten off.


Rnd 10: Join D over any sl st into ch-1 sp of Rnd 8, Beg 3-dc cl,

(ch 2, cl) 2 times in same sp, *ch 3, sl st in 5th dc in BACK of 5th of 8 dc on Rnd 9 (photo shows back of work so the sc in seen),

ch 3**, [cl, (ch 2, cl), 2 times] over sl st from Rnd 9 into Rnd 8 ch-1 sp; rep from * around, ending last rep at **; join with sl st to beg cl – 8 cl sets, 16 ch-3, 8 sl st. Fasten off.

Rnd 11: Join C in ch-sp to right of any Rnd 10 cluster set, ch 5 (counts as tr and ch-1), (tr, ch 1) seven times, cl (total of 8 trebles and 7 ch-1),

*ch 6, sk cl set, sk 8 dc set, sl st to BACK of Rnd 8 (photo shows back of work so you can see sl st),

ch 6**, sk 1 cl set, sk 8 dc set, [tr, (ch 1, tr) seven times] in ch-sp before next cl set; rep from * around, ending last rep at **; join with sl st to ch-4 of beg ch-5 – 4 tr sets; 8 ch-6, 4 sl st. Fasten off.

Rnd 12: Join A in sl st in Rnd 11 that is on BACK of work, ch 1, sc in same, *(sc, hdc, 3 dc) in same sp [NOTE: place stitch marker in the 3rd dc just made], dc OVER the ch-3 from Rnd 10 and Rnd 11 at same time,

[cl in next ch-1 sp, ch 1] 6 times, cl in next ch-1 sp, dc over ch-3 sp from Rnd 10 and Rnd 11 at same time, (3 dc, hdc, sc) in ch-6 sp, sc in next sl st; rep from * around; join with sl st to first sc. Fasten off.


Rnd 13: Join D in dc in marked dc,

ch 3 (counts as first dc), dc in next 10 sts, *ch 6, sl st to BACK of 4th tr in Rnd 11 treble (photo shows back of work so you can see sl st),

ch 6**, dc in 2nd dc after clusters, dc in next 10 sts; rep from * around; join with sl st to beg ch-3; join to beg ch-3. Fasten off.

Rnd 14: Join B in first st of Rnd 13, ch 1, *sc in same st and in next 3 sts, sk 1 st, using the next POST (not st), (cl, ch 2, cl),

sk next st, sc in next 4 sts, sl in next st, [cl in next cl, cl in next ch-1 sp] 3 times, (cl, ch 2, cl) in next cl, [cl in next ch-1 sp, sl in next cl] 3 times, cl in next st; rep from * around; join with sl st to first sc. Fasten off.


Rnd 15: Join C in corner ch-2 sp, ch 1, *3 hdc in same sp, hdc in next 12 sts, sk 1 cl, (cl, ch 1, cl) in next ch-2 sp, sk 1 cl, hdc in next 12 sts**, 3 hdc in corner ch-2 sp; rep from * around, ending last rep at **; join with sl st to first hdc. Fasten off.
Rnd 16: Join A in 3rd loop of hdc in 2nd hdc in corner, ch 1, work in 3rd loop of each hdc around, *3 hdc in corner, hdc in next 13 sts, sk 1 cl, (cl, ch 1, cl) in ch-1 sp, sk 1 cl, hdc in next 13 sts; rep from * around; join with sl st to first hdc. Fasten off.

Rnd 17: Join D in 3rd loop of hdc in 2nd hdc in corner, ch 1, work in 3rd loop of each hdc around, *3 hdc in corner, hdc in next 14 sts, sk 1 cl, (cl, ch 1, cl) in ch-1 sp, sk 1 cl, hdc in next 14 sts; rep from * around; join with sl st to first hdc. Fasten off.
Rnd 18: Join A in 3rd loop of hdc in 2nd hdc in corner, ch 3 (counts as first dc), work in 3rd loop of each hdc around, 2 dc in same st, *dc in next 15 sts, sc in next cl, sc in next ch-1, sc in next cl, dc in next 15 sts**, 3 dc in next st; rep from * around, ending last rep at **; join with sl st to beg ch-3. Do not fasten off.
Rnd 19: Sl st to next st (middle of corner), ch 1, *3 sc in corner, sc in next 35 sts; rep from * around; join with sl st to first sc. Fasten off.

Rnd 20: Join C in 2nd sc in corner, ch 1, *3 sc in corner, sc in next st, [ch 1, sk 1 st, sc in next sc] 18 times; rep from * around; join with sl st to first sc. Fasten off.
Rnd 21: Join B in 2nd sc in corner, ch 1, *3 sc in corner, sc in next st, [ch 1, sk 1 sc, sc in next ch-1 sp] 18 times, ch 1, sk 1, sc in next st; rep from * around; join with sl st to first sc.

Rnd 22: Join A in 2nd sc in corner, *3 sc in corner, sc in each sc and ch-1 on side (41 sc); rep from * around; join with sl st to first sc.
Rnd 23: Sl st to next st; ch 3 (counts as first dc), 2 dc in same st, dc in next 43 sts, *3 dc in next st, dc in next 43 sts; rep from * around; join with sl st to beg ch-3. Fasten off.

Front Center Flower
With D, ch 2.
Rnd 1: 6 sc in 2nd ch from hook; join with sl st to first sc.
Rnd 2: *Ch 3, sl st to next st; rep from * around; join with sl st to first sc.
Fasten off leaving a long tail for sewing.
Sew onto center of Rnd 1.

Back
With D, ch 46.
Row 1 (RS): Dc in 4th ch from hook, sc in next st, *dc in next st, sc in next st; rep from * across – 44 sc.
Row 2: Ch 3 (counts as first dc), turn, *sc in next st, dc in next st; rep from * across.
Row 3: Ch 1, turn, sc in first st, *dc in next st, sc in next st; rep from * across.
Rows 4-45: Repeat Rows 2 and 3 or until panel is about 12 inches.
Do not fasten off.
Trim
Rnd 1: Continuing with D, ch 1, do not turn, work 42 sc evenly spaced along side edge; working along opposite side of foundation ch, work 3 sc in ch at base of first sc of Row 1, sc in each ch across to ch at base of last sc, 3 sc in last ch; work 42 sc evenly spaced along next side edge, work 3 sc in first sc of Row 45, sc in each st across to last st, 3 sc in last st; join with sl st in first sc.
Fasten off.
Assembly
Hold Front and Back WS together with sts and rows matching. With Front facing you and working through both thicknesses, join B and sl st in each st around, inserting pillow form before working along last edge; join with sl st in first sl st.
Fasten off.

See some tester samples!


Find Kristi Simpson on Ravelry | Facebook
Stay connected with Clover on Facebook | Twitter | Instagram | Pinterest | YouTube | Ravelry
[mc4wp_form id=”11289″]