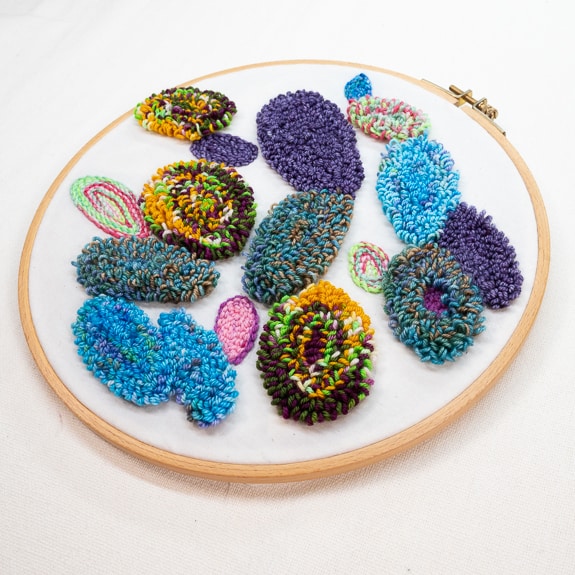
Embroidered Dino Eggs
Not so big of a secret… but Shannon was at one point in time a paleontologist. No, we are not kidding…
Shannon’s love affair with all things dinosaur has always followed us and more than one crochet pattern has been inspired by some long extinct species. When we first began playing with the Embroidery Stitching Tool, making round, colorful “rocks” They decided that these were not rocks, but instead dinosaur eggs. (Because dinosaurs are cool… RAWR! – Shannon)
This project is an easy afternoon of punching and placing your work in an antique hoop to hang on your wall or door for an added bit of color and whimsy. It’s a great project for learning this tool… or for getting inspired by color and texture.
Watch the video tutorial:
Or scroll down for written instructions
What you’ll need:
Notions and Tools
- Clover Embroidery Hoop (7in) – Art. No 8812
- Triangle Tailor’s Chalk – Art. No 432
- Scissors – Bordeaux 130 – Art. No 4940
- Embroidery Stitching Tool – Art. No 8800
- Embroidery Stitching Tool Needle Refill (6-ply) – Art. No 8803
Materials
Embroidery Hoop
- 1 antique or otherwise pretty embroidery hoop. Check your basement, or grandmother’s attic… there’s usually one hanging around somewhere.
Fabric
- Plain cotton fabric or muslin, enough to fully cover the display embroidery hoop.
Yarn
- 3-5 skeins (or partial skeins) of variegated Fingering Weight yarn. Colorful is the word of the day! This is a FAB way to use up scrap yarn… just sayin’.
Instructions
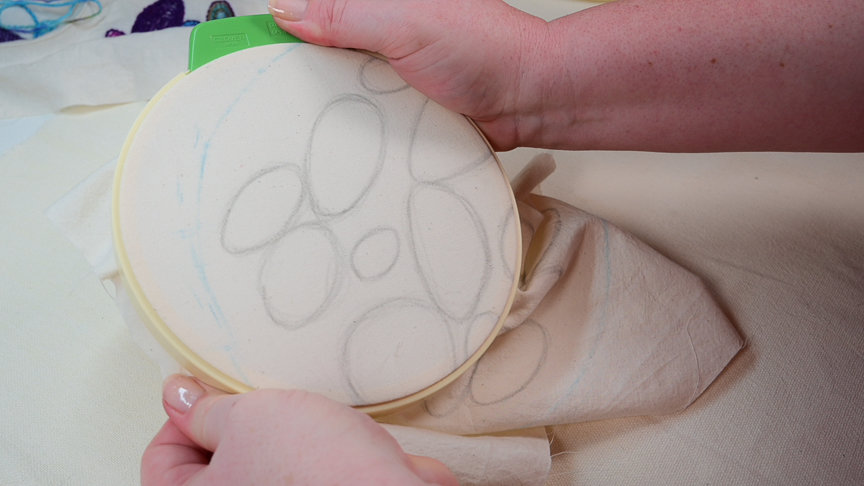
Step 1: Cut your fabric to cover the framing embroidery hoop
Step 2: Trace the edge of the hoop on to your fabric.
- Use tailor’s chalk to mark the edge of the hoop on your fabric. This is the border of what will show in the frame. Don’t cross the border!
Step 3: Draw your “eggs”
- Use a pencil or air erasable fabric marker to draw oval shapes on the front side of your fabric. Make them different sizes and shapes.
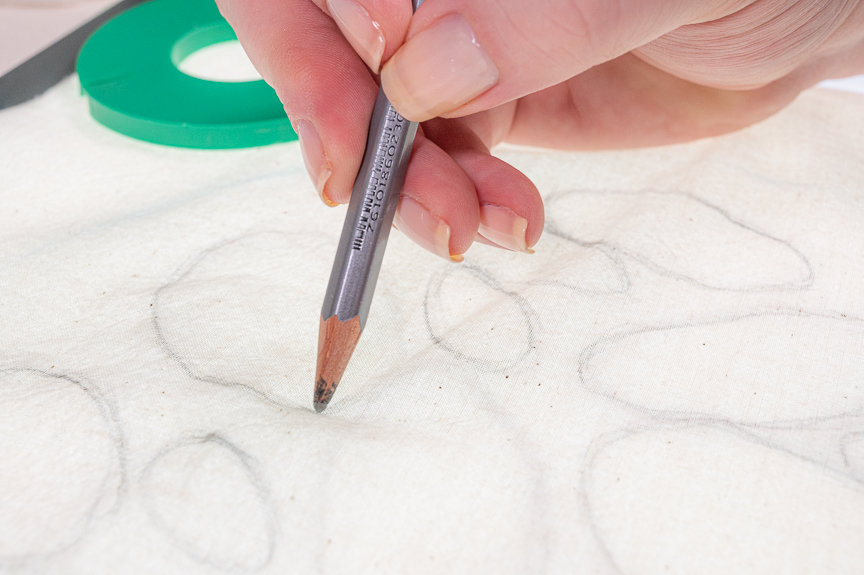
Note: Don’t think too hard when you first start drawing your dinosaur eggs. Think more about doodling than actually trying to create shapes. Then go back and look at spaces that might need filled in.

Step 4: Trace the shapes on the back of the fabric
- Since we will be punching on both sides of the fabric you will need to mark the shapes on both sides.
- Use a lightbox or tape your fabric Right side to a window. Use a pencil or fabric pen to trace the design to the Wrong side of your fabric.
Step 4: Punch Away
- Place your marked fabric in the Clover Embroidery Hoop so that the majority of the eggs are available to embroider.
- Make sure your Embroidery Stitching Tool is equipped with the 6-strand needle refill.
- Follow the directions included with the Embroidery Stitching Tool and outline, then fill in each egg with different colored variegated yarn.
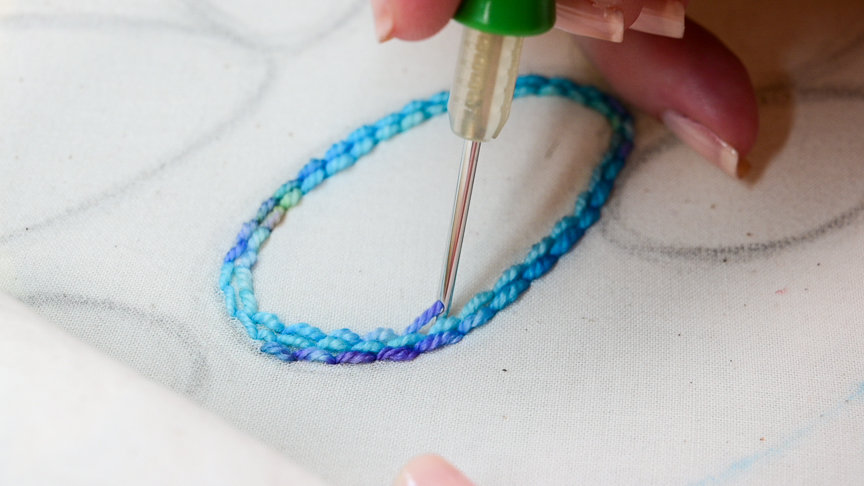
- Punching from the Right side will make smooth looking eggs.
- Punching from the Wrong side will make fuzzy eggs.
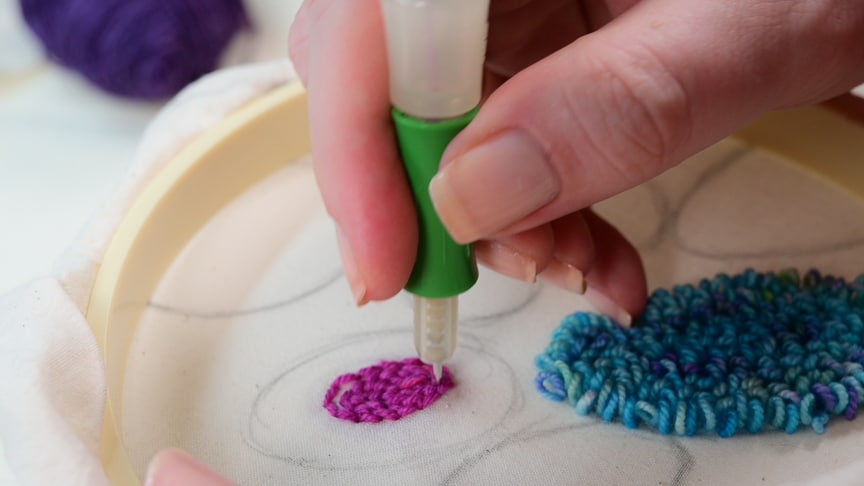
- Punching partly from the Right and the Wrong sides make really fun eggs!
- Snug up your fabric if you notice it getting too relaxed.
- Continue to move the fabric in your hoop until all the eggs are embroidered.
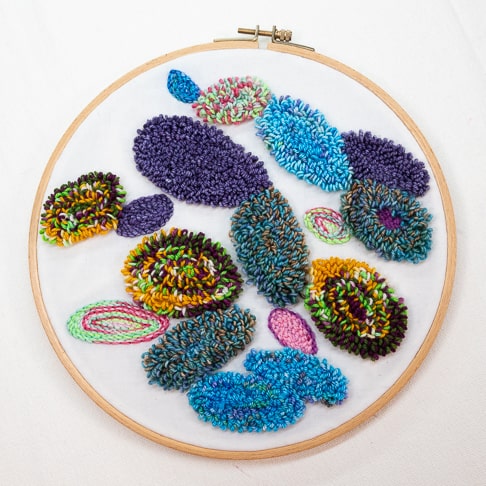
Step 6: Finishing
- Remove your fabric from the Clover Embroidery Hoop.
- Use and iron to steam the fabric and your stitching.
- This will smooth out any wrinkles and fluff up the yarn.
- Now comes the hardest part. Choose which side you want to be the Right side… this may not be what you initially thought it would be (ours was not)! And, if you change your mind later, just flip the fabric over and display the other side.
- Center your embroidered art in the Antique Embroidery Hoop and secure
- For a clean look, glue the overhanging edges to the back side of your work. We used a washable fabric glue so we could soak it out if we want to reverse the design later on.
- Hang on any wall or door that you think needs a little Dino Love… RAWR!
Watch the video tutorial:
Find the Shibaguyz on Facebook | Twitter | Instagram | Pinterest
Stay connected with Clover on Facebook | Twitter | Instagram | Pinterest | YouTube | Ravelry
[mc4wp_form id=”11289″]