Intro To Smocking (QUOE TIPS)

There are few hand basting projects that thrill me as much as smocking.
I love fabric manipulation, and I find that I come back to it every so often through forms of knit, crochet, and sewing. Of all the tried and true projects and techniques used, I think smocking is the easiest and most meditative. The added bonus is that in the end, you have a unique fabric that is truly stunning.
Let’s dip our toes into the world of smocking by making a simple throw pillow!
Supplies:
- Gold Eye Applique Needles (Size 12)- Art. No 497/12
- Desk Needle Threader (Green) – Art. No 4072
- Thread Clipper “Kuroha”- Art. No 415
- Wonder Clips- Art. No 3210
- Universal Machine Needles – Art. No 9115
- Rotary Cutter (45mm) – Art. No 7500
- Cutting Mat (18″ x 24″) – Art. No 7521
- 6-in-1 Stick ‘n Stitch Guide – Art. No 9584
- Pen Style Chaco Liner – Art. No 4710-4714
- Wonder Clips – Art. No 3185
- Fabric
- 12” Square Pillow Insert
- 50 Weight Thread
- Sewing Machine
- Tape Measure

Step 1:
First, we will cut the fabric to our required dimensions. Using the chalk liner and a tape measure, measure and cut one 12” square, and one 24” square. If you want a custom sized pillow, cut the smaller panel to the pillow’s exact square measurement. Cut the second panel at twice the length and width of that. Smocking with the Celtic style basket weave pattern we are working on today will shrink the front panel fabric to about half its original size.


Step 2:
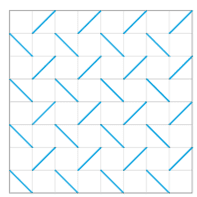
Now we will create our smocking grid. On the wrong side of your large panel, measure out and draw a parallel line every inch in one direction using the chalk liner. Turn your fabric grid 90 degrees and repeat the process, careful to make perfectly perpendicular corners to the previous lines. You will have a 24×24 grid. We will be leaving the entire outer grid blocks unsmocked to seam, leaving you with a workable grid of 22×22 squares. Now, take your chalk liner and mark diagonal lines across grid squares that follow the pattern below. Be careful to follow the chart correctly. every other square should be skipped, and every diagonal line on the same column should be facing the same direction. The adjacent columns should have their diagonal lines facing the opposite direction, staggered in their spacing.


Step 3:
 Thread your applique needle using the threader tool, holding the strand double and tying a knot at the tail end. You want about as much thread as the length of your large panel. With the wrong side facing you, find the bottom left-hand square with a diagonal line. At the top of this line pass your needle through a few strands of the fabric on the corner, and lock your stitch in place by looping through the end of your doubled thread. Now following the diagonal line, pass the needle through the opposite corner, and pull taught. You want the fabric to fold downwards, puckering to the right side. Whip stitch through both corners you have previously passed through to secure. If you want added security, make a quilter’s knot without breaking the thread afterward.


Step 4:
Now you will move to the next pucker. Look at the adjacent column to one square above with the diagonal line facing the opposite direction. This will be your next square. Like previously, pass your needle through a few strands of the fabric on the top corner of the diagonal. Do not pull taught, we will leave the strand of fabric connecting puckers loose at all times. Pass through the same spot a second time to lock the stitch in place, so you are sure to keep the connecting thread untouched. Repeat the process of stitching the last pucker; picking up the opposite corner, and whip stitching. Once the pucker is locked in place, move to the next pucker, repeating to the end of both columns.


Work all eleven sets of columns in this same manner. Be careful to watch the pucker’s folding, and not accidentally pick up any part of a folded pucker, as this will show as a pinched pleat on the front of the work. Check the right side after every set of columns. When you are finished, move to seaming the pillow.


Step 5:
Place your smaller panel down with right side facing up, and smocked panel on top with right side facing down. Take your Wonder Clips and carefully clip together with your panels, watching for pleated folds. Leave about an 8” open space at the bottom of the pillowcase for turning and stuffing.


Step 6:
Stick your 6-in-1 Stick ‘n Stitch Guide onto the 1/2” seam allowance preset for your machine. Set seam to straight stitching, with a short stitch length. begin seaming, careful to back stitch, and hold pleated folds down. Sew around the pillowcase, leaving your turning space.


Step 7:
Clip all four corners of pillowcase up to the seam using your snips, then turn right side out. Begin stuffing pillowcase. I enjoy firmer, and squishier pillows, so even though my actual pillowcase is around 11” square, I am using a slightly larger pillow insert to puff it out a bit more.


Step 8:
To finish your pillow, thread your applique needle and hand stitch the opening space closed. I recommend using an invisible ladder stitch, but any preferred method of closure will work.


Now we have successfully dipped our toes into smocking! If you create your own chic pillowcase, be sure to tag Clover and me (@portquoelio) in your finished projects! We would love to see them.
Until next time, break the status.

Follow what Quayln is up to next on his Blog | Instagram | Facebook | Pinterest | YouTube | Ravelry
Stay connected with Clover on Facebook | Twitter | Instagram | Pinterest | YouTube | Ravelry
[mc4wp_form id=”11289″]