Happy Birthday Banner – Crochet Pattern
Hi makers! This is Katlyn, crochet home decor designer and owner of Oak + Willow LLC. I’m so excited to share my newest design with you, the Happy Birthday Banner!
I had the idea for this design during our days stuck at home in quarantine. I kept seeing so many people having to celebrate their birthdays at home, trying to make the best of it and decorate their space for their loved ones. So I decided to create the Happy Birthday Banner! It is a beginner friendly pattern that uses worsted weight yarn and is something that is quick to make. Yet once it’s done and hanging on the wall, it’ll look so festive and fun!

As per my style, the letters are cross stitched on top of the crocheted pieces. Never cross stitched before? There are photos to help walk you through! I also have video tutorials on my Instagram @oakandwillowllc.
This banner has endless possibilities! Since it includes the charts of all 26 letters, you could make the banner say whatever you’d like! You could make one for a baby shower, anniversary, or even graduation.

Okay, let’s get to the pattern!
Materials:
- Tassel Maker (Small) – Art. No 9940
- Amour Crochet Hook Size J (6mm) –Art. No 1049/J
- Tapestry Needle Set – Art. No 339
- 1 Skein of medium weight yarn (I used Big Twist in the color “Cream”)/315 yards
- A small amount of medium weight yarn in a contrasting color (I used Big Twist in the color “Black.”)/27 yards
Skill Level:
Beginner
Gauge:
16 stitches & 16 rows of SC measures 4×4″ square
If your gauge doesn’t match mine, go up or down a hook size depending on your tension.
Finished Size:
- Each crochet piece measures: 3.5″ x 7.5″
- Tassels measure: 2″
Abbreviations
- CH: Chain
- SC: Single Crochet
- DEC: Decrease or Single Crochet 2 Together
- Cross Stitch one square on the chart counts as one “X”
Notes:
- CH 1 does not count as the first SC in the row.
- Make sure to read over the helpful tips on page 3.
- If you have any questions at all, please reach out to me and I’d be happy to help!
- Follow me on Instagram @oakandwillowllc for cross stitch crochet video tutorials.
How to Decrease
Step 1: Insert your hook into the first stitch and draw up a loop. (2 loops on hook)

Step 2: Insert your hook into the next stitch and draw up a loop. (3 loops on hook)

Step 3: Yarn over and pull through all 3 loops.

Pattern
With cream, CH 13.
Row 1 (Right Side): SC in 2nd chain from the hook and in each chain across, turn. (12 SC)
Row 2-24: CH 1 (does not count as stitch), SC in the first stitch and in each stitch across, turn. (12 SC)

Row 25: CH 1, DEC in the first 2 stitches. SC in the next 8 stitches, DEC in the last 2 stitches. Turn. (10 SC)
Row 26: CH 1, DEC in the first 2 stitches. SC in the next 6 stitches, DEC in the last 2 stitches. Turn. (8 SC)
Row 27: CH 1, DEC in the first 2 stitches. SC in the next 4 stitches, DEC in the last 2 stitches. Turn. (6 SC)
Row 28: CH 1, DEC in the first 2 stitches. SC in the next 2 stitches, DEC in the last 2 stitches. Turn. (4 SC)
Row 29: CH 1, DEC in the first 2 stitches. SC in the last 2 stitches. Turn. (2 SC)
Row 30: CH 1, DEC in the remaining 2 stitches. (1 SC)
Fasten off and weave in ends.

Cross Stitch
Some helpful tips: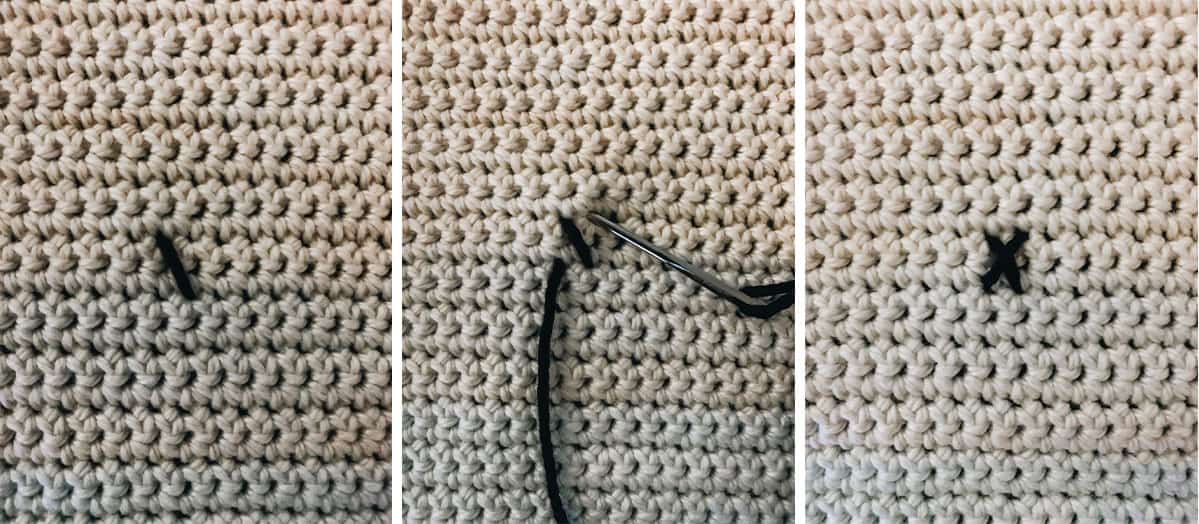
- Each square on the chart counts as one “X” or one cross stitch.
- You will be working an “X” over 2 rows of SC.
- It’s best if you stitch the design from the top-down.
- Be sure to make your “X” the same way every time so it looks neat and
consistent. - Correct tension is key when cross stitching: Not too tight, not too loose.
- Weave in ends as you normally would.
Step 1: With black yarn, cut a long piece (about 60″).
Step 2: Using a yarn needle, start with the top left stitch of the letter “H.” From the top of your first crochet piece, you will skip the very top row. Your first “X” will be made over the 2nd and 3rd rows from the top. Skip the first 3 stitches (from the left). Make first “X” over the next stitch.
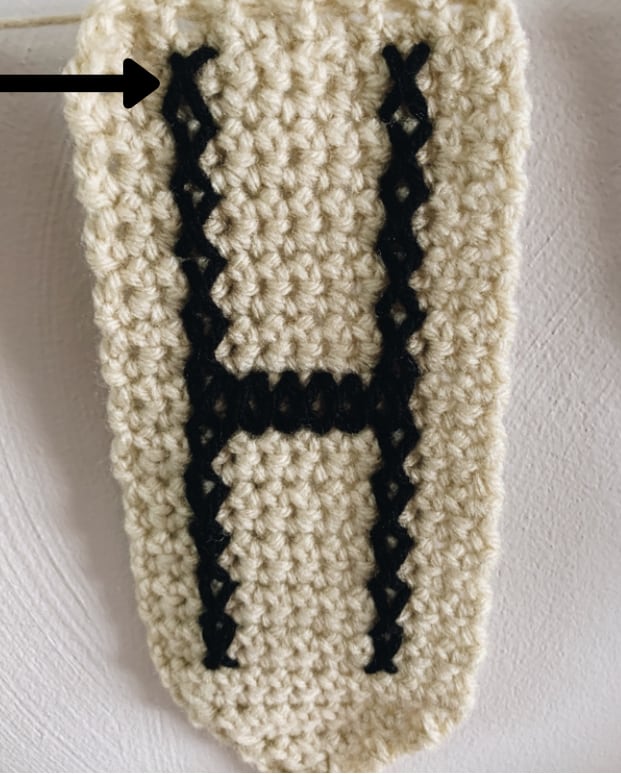
Note: Make sure you make your “X” the same way every time and that it is worked over 2 rows.
Step 3: Following the chart, continue to cross stitch the design onto the dishcloth. Make sure you center each letter on your crochet piece. For example, letter A will start on the same top row, but you will skip 6 stitches from the left so that it is centered.

If you’d like to customize your banner, you can purchase the pattern PDF on Etsy or Ravelry.
Step 4: When you are finished with a strand of yarn, weave in the ends on the back of your work as you normally would.
Step 5: When you are done with a letter, fasten off and weave in all ends.
How to Make & Add Tassels
Step 1: Make 13: Using your small Clover Tassel Maker, extend the maker as far as it can go. Wrap your yarn round the maker 10 times. Cut yarn. Using another strand of yarn, tie a knot in the middle.

Step 2: Using your scissors, cut the top and bottom off of the tassel maker. With another small piece of yarn, tie around the top of the tassel. Cut off the ends.

Finished tassel.

Step 3: At the bottom of your letter, thread one end of the tassel through.

Step 4: Turn over to the back, tie the two ends together. Weave in the ends.

Continue to attach the tassels to each letter.

String your Banner
Cut a very long piece of yarn. Using your needle, weave in and out on the very top of your letter. You will start with the last letter and in the top right corner.

Continue to join the next letter by weaving in and out.

Continue joining all of the letters. I used one long piece for “Happy” and another long piece for “Birthday.” But you are welcome to string it together however you’d like!

You have now finished making the Happy Birthday Banner!

Remember to tag me on Instagram @oakandwillowllc and use #oakandwillowllc so I can see your finished creations!! If you have any questions at all, please reach out to me on Instagram or email me at oakandwillowllc@gmail.com. I would love to answer any questions you may have! Thank you so much for your support!!
*** *** ***
Please do not copy, redistribute or sell my pattern in any way. You are more than welcome to sell your finished Happy Birthday Banner. I just ask that you please credit me for the pattern so other makers can find me as well. You may not use my pictures and pass them off as your own for they are my property. Thank you for understanding.
Find Oak and Willow on Facebook | Instagram | Pinterest | Etsy | Ravelry
Stay connected with Clover on Facebook | Twitter | Instagram | Pinterest | YouTube | Ravelry
[mc4wp_form id=”11289″]