Knitting 101: Knitting for Beginners
Hey Friends!
I’m Brittani, the owner/creator behind Crocheted By Boo. I’ve got a question for you. Have you ever wanted to knit or tried to knit but couldn’t quite get it? I was the same way. I would get lost looking at knit beanies on social media just wishing I could make one. I can crochet a beanie no problem, but knitting just overwhelmed me for some reason. Being a busy stay-at-home mom and caregiver I would overthink knitting so much I wouldn’t even try. How would I have time to learn a new skill? Then one day I gave it a go. I started out completely brand new. I bought some “long straight needles” and Red Heart Yarn.
I didn’t quite get what I was doing. I didn’t understand how to hold my needles and the yarn at the same time. After trying on and off for a couple of months I found a person on social media that helped me one on one through text messages. We sent videos back and forth. She was heaven sent. While talking, she asked me one question that helped me most. She asked “What do you want to make?” “A beanie” I told her. I then learned where I was messing up. Small yarn and straight needles. As a beginner she explained I should try some bulky yarn and circular needles. Back to the store I went. (Amazon is amazing.) This time I bought some Clover Takumi Bamboo Interchangeable Needles No.11 (8mm) and a Clover Interchangeable Cord (16in). When they came in the mail. It was like Christmas Morning! (Granted Christmas 2019 was only weeks away.) Magic was about to happen.
Today I want to teach you how to knit on straight needles. You will learn how to cast on, how to do the knit stitch, how to do the purl stitch, and how to cast off of your needles. This will give you some time to learn the stitches before we move on to making a knit beanie.
What you need to know when learning to knit!
- how to hold my needles
- cast on *longtail
- how to count stitches
- knit stitch
- purl stitch
- measuring gauge
- sewing in the tails
English vs. Continental
To start you will need to learn the how to hold your needles and your yarn at the same time. There are 2 way to hold your yarn. You can hold your working yarn in your right hand or left hand. When you hold yarn in your right hand it is called “English Style Knitting”. When you hold your yarn in the left hand it is call “Continental Style Knitting” . What’s the difference you ask? English style “throws” the yarn when wrapping, and continental style “picks” the yarn when wrapping. As a crocheter I have heard continental style is easier to learn. And I agree. I tried both but holding the yarn in my left hand felt more natural from crocheting.
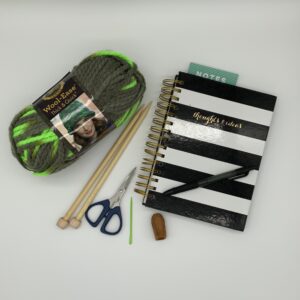
Supplies
- Bulky Yarn (I love Lion Brand Wool-Ease-Thick & Quick)
- Takumi Bamboo Knitting Needles No.13 (9.0mm) (Art. No 3012-13) – purchase on Clover Website or Amazon
- Mini Patchwork Scissors (Art. No 493/CW) – purchase on Clover Website or Amazon
- Jumbo Tapestry Needles (Art. No 3113) – purchase on Clover Website or Amazon
- Optional: Natural Fit Leather Thimble – purchase on Clover Website or Amazon (Small | Medium | Large) *helpful so the tip of your finger doesn’t get sore
- Knitting Counter (Art. No 336) – purchase on Clover Website or Amazon *you can also use a paper and pen to keep track
Casting On
Before casting on make a slip knot with a long tail. The tail string should be about 72 inches. (About 3 arm lengths)
Take your slip knot and slip it onto 1 needle.
*The slip knot WILL count as a stitch after the cast on row*
Here you see that I have the slip knot on my needle in the right hand and 2 strings hanging down. The “working yarn” and the “tail”. Make sure your “tail” string is in the front, facing you. Now holding the needle with the slip knot in your right hand, take your left hand and touch your thumb and index finger together. Go between the two strings. You want the “tail” to hang over your thumb and the “working yarn” to lay better your index and middle finger. I then hold the 2 hanging strings with my pinky. Keep your pinky holding the tail and working yarn loosely. Now separate your thumb and index finger. You will be left with a hole. We will be working in this hole. Point your index finger away from you. “Imagine you are giving your best friend a friendly finger gun movement”. With your right hand holding the needle, twist your wrist towards you, go over the yarn on your thumb, and up your thumb with the needle. Twist your wrist away from you, go under the working yarn on your index finger. Twist your LEFT WRIST down and drop your thumb. The string from your thumb will fall. Remove your index finger and thumb and pull the working yarn and the tail loosely to your needles.
Repeat the cast on step until you have 20 loops on your needle. To count your stitches start at the very first loop you created on your needle and count the complete row. If you need to add more just keep going. If you accidentally have to many loops, slowly take a loop off your needle and lightly pull on the working yarn and tail yarn to unravel the stitch.
After you cast on 20 stitches you are ready for the next step. We will work the knit stitch for 20 rows to learn the stitch better.
How To Knit Stitch
You will put the knitting needle you were just working with in you left hand and pick up the 2nd straight needle in your right. With the new right hand needle, go under the first loop on the left hand needle. With the working yarn and the tail together come from the front and go over your right hand needle. Hold the two strings on your right hand needle, pull the loop through the stitch on your left hand needle. Push the left hand loop off the needle. *Repeat again* Go under the loop on your left needle with the right needle. With the working yarn and tail go over the right needle. Holding the two loops with your finger, pull the stitch up to the top, and push the loop off of the left needle.
Now we will be dropping the tail string. Just let it go and keep on working with the “working yarn”. Continue to work the knit stitch for every stitch left on your needle.
After you have completed the entire row of knit stitches. Switch the right hand needle to your left hand, and the left hand needle to the right hand. We are going to keep doing the knit stitch for the entire row until there is only 2 stitches left on the left hand needle. On the last 2 stitches, each stitch will consist of 2 loops, BUT work them as ONE loop. Finish the row of stitches so all the loops are on your right hand needle.
After the last stitch. Switch your needles again. (Right hand needle goes in the left hand and the left hand needle goes in the right hand). Again knit every stitch until you come to the end of the row, and switch your needles in your hand after you finish a row. Do this until your “fabric” is about 7 inches tall.
How to Purl Stitch
FIRST, pull your working yarn to the front of the project. Pointing your right hand needle down, towards the left hand needle, go under the stitch. Your right needle should be on top of the left hand needle. Take the working yarn and tail, and go over the right hand needle. Twist your right hand so that it pushes the loop you just made towards the back of your project. Now slowly push the left hand loop off you needle.
We will do the purl stitch again. Take your right hand needle and go under the loop on the left hand needle, pointing down. Wrap the yarn around the right hand needle. Push the new stitch to the back of your project, and the loop on the left needle off
Keep doing the purl stitch for the entire row. (Just make sure your working yarn is in front or the project when your start each stitch). When you come to the last stitch, work it slowly so u don’t drop your stitch. Switch the needles in your hands and continue with the next row. Pull the working string to the front and purl stitch the whole row. On the last 2 stitches. Each stitch will have 2 loops, but work them as one loop. Continue to purl stitch until the next swatch is about 7 inches long
Casting Off
Now we will be casting off our project. (To do this you will be using the knit stitch.)
First knit the first 2 stitches. Then take the first loop on the right hand needle and bring it over the second loop. Drop that second loop off of the needle. Next knit one more stitch. Again take the first loop on the right needle and bring it over the second loop and off the needle. Keep repeating until you have 2 stitches left on your right needle. Loop the first loop over the second loop and off the needle. Cut the working yarn. Take the cut yarn and wrap it around the needle to make a loop. Pull the first loop over the second loop and off the needle. Pull on the working tail to tighten the knot.
Tune back in for Part 2 of this series, where Brittani teaches you how to knit a beanie!
Find Crocheted by Boo on Instagram | Ravelry | Etsy
Stay connected with Clover on Facebook | Twitter | Instagram | Pinterest | YouTube | Ravelry
[mc4wp_form id=”11289″]