Evergreen Tree Skirt – Crochet Pattern
Happy holidays, everybody! This is Sarah from Sarah’s Yarn, and I am excited to share a new holiday crochet pattern with you. I’ve always loved the last three months of the year and the holiday decorations everywhere – it brings a smile to my face each and every year.
I was so excited last year when I was able to make some seasonal decorations for my house, and this year I am thrilled to have designed one of my decorations. I hope you enjoy the Evergreen Tree Skirt as much as I do!
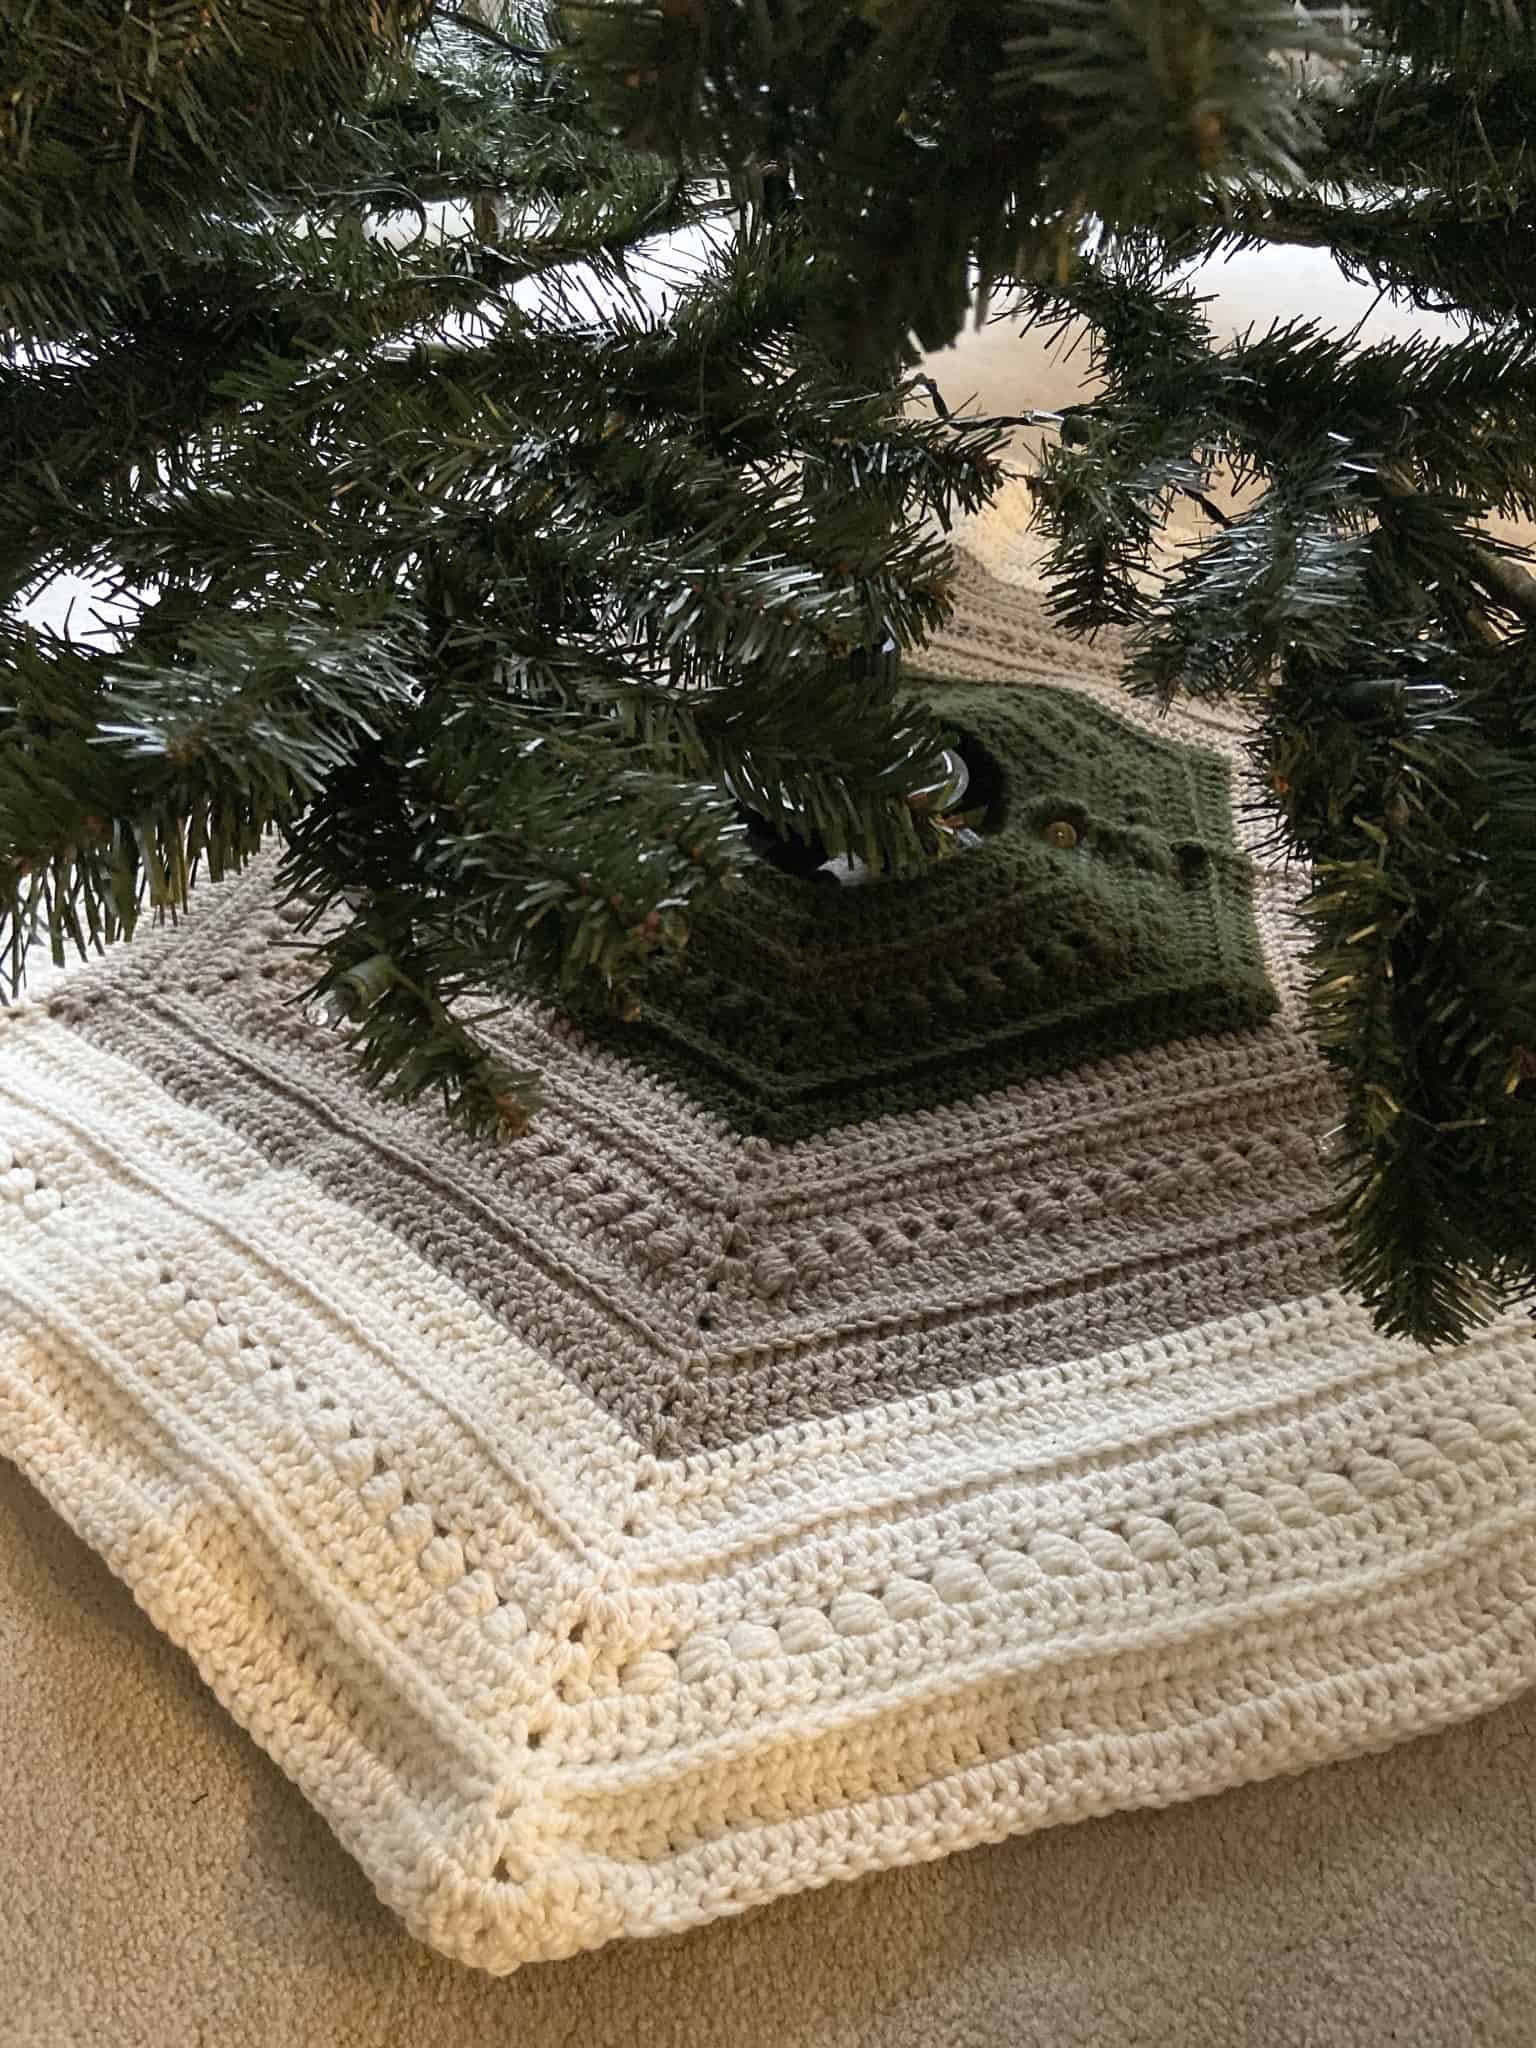
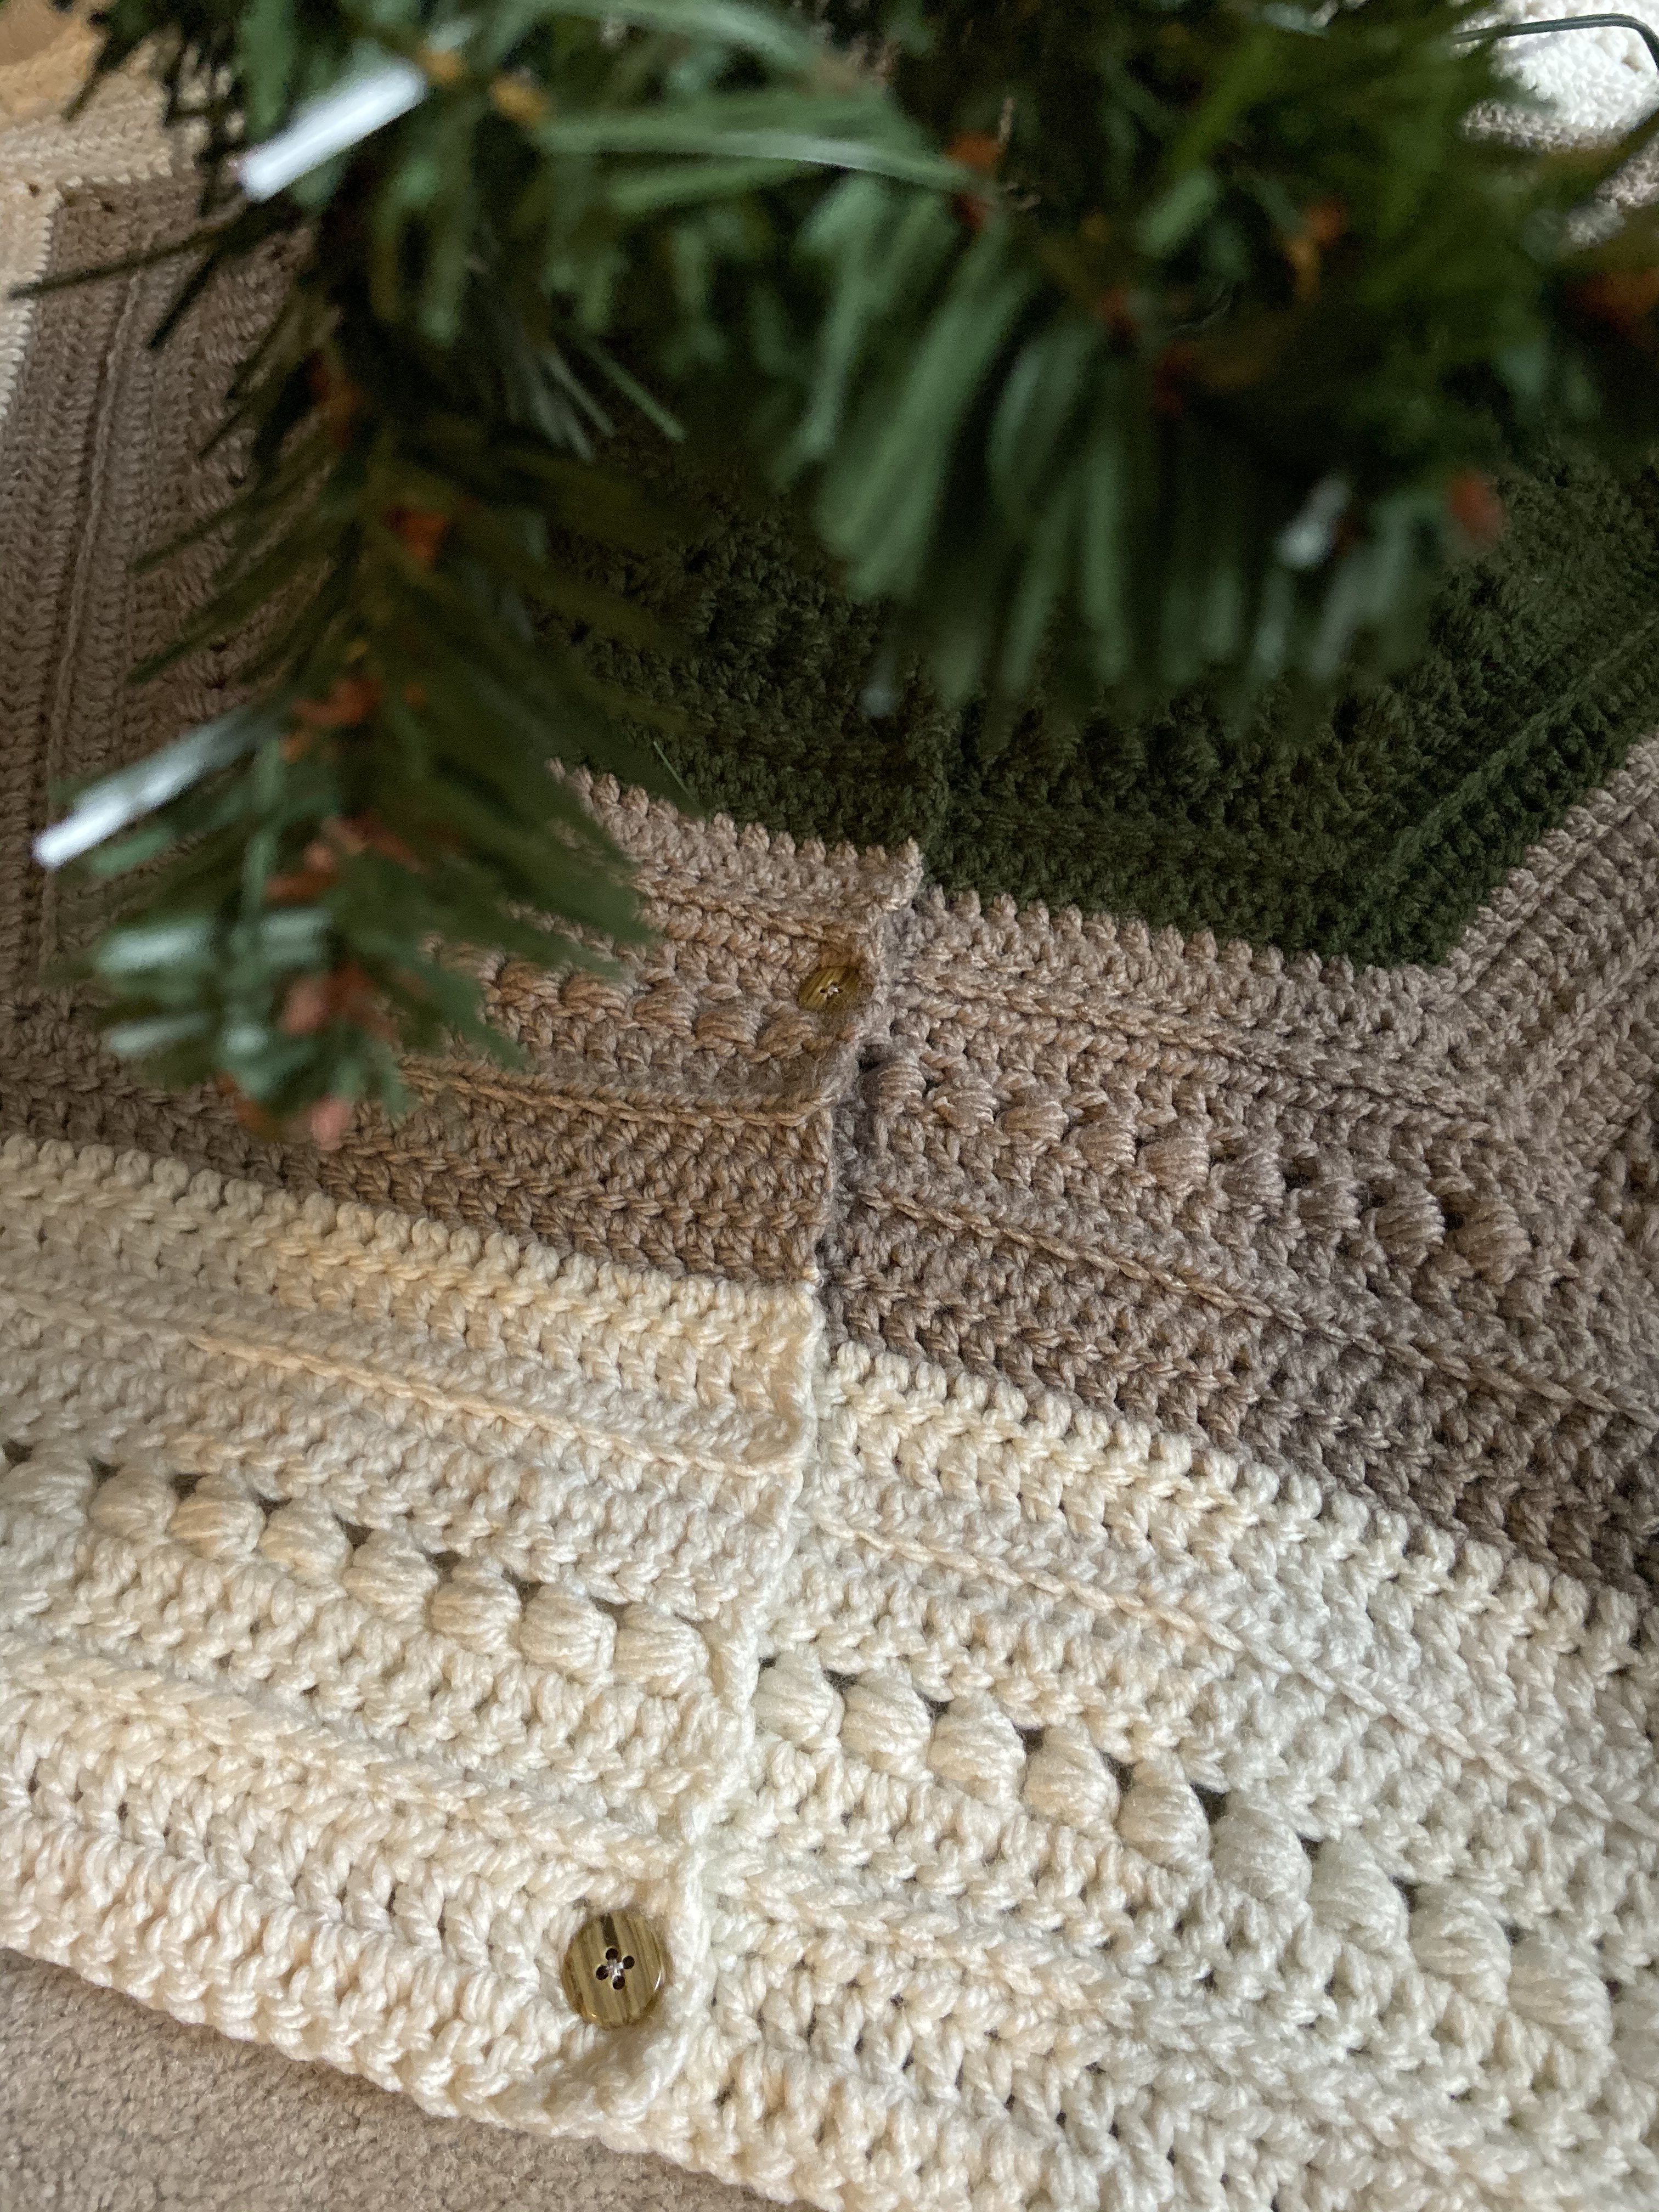
This pattern works up quickly in bulky weight yarn, and the variety of stitches give it a great texture under your tree. As I always do, I wanted to use Clover Amour hooks, and the K/6.5M hook is the perfect size for this yarn. While I made my tree skirt to fit my 7′ pre-lit tree, you can take out a repeat of the pattern for a smaller tree or add a repeat for larger trees. Enjoy!
Materials Needed:
- K/6.5mm hook (Art No 1053/K)
- 3 buttons (I used these tan ones from La Mode, as they worked with my color scheme. Use any buttons you’d like that will fit through the space in your DC stitches)
- Needle & thread
- Optional: Tassel Maker (Art No 9940)
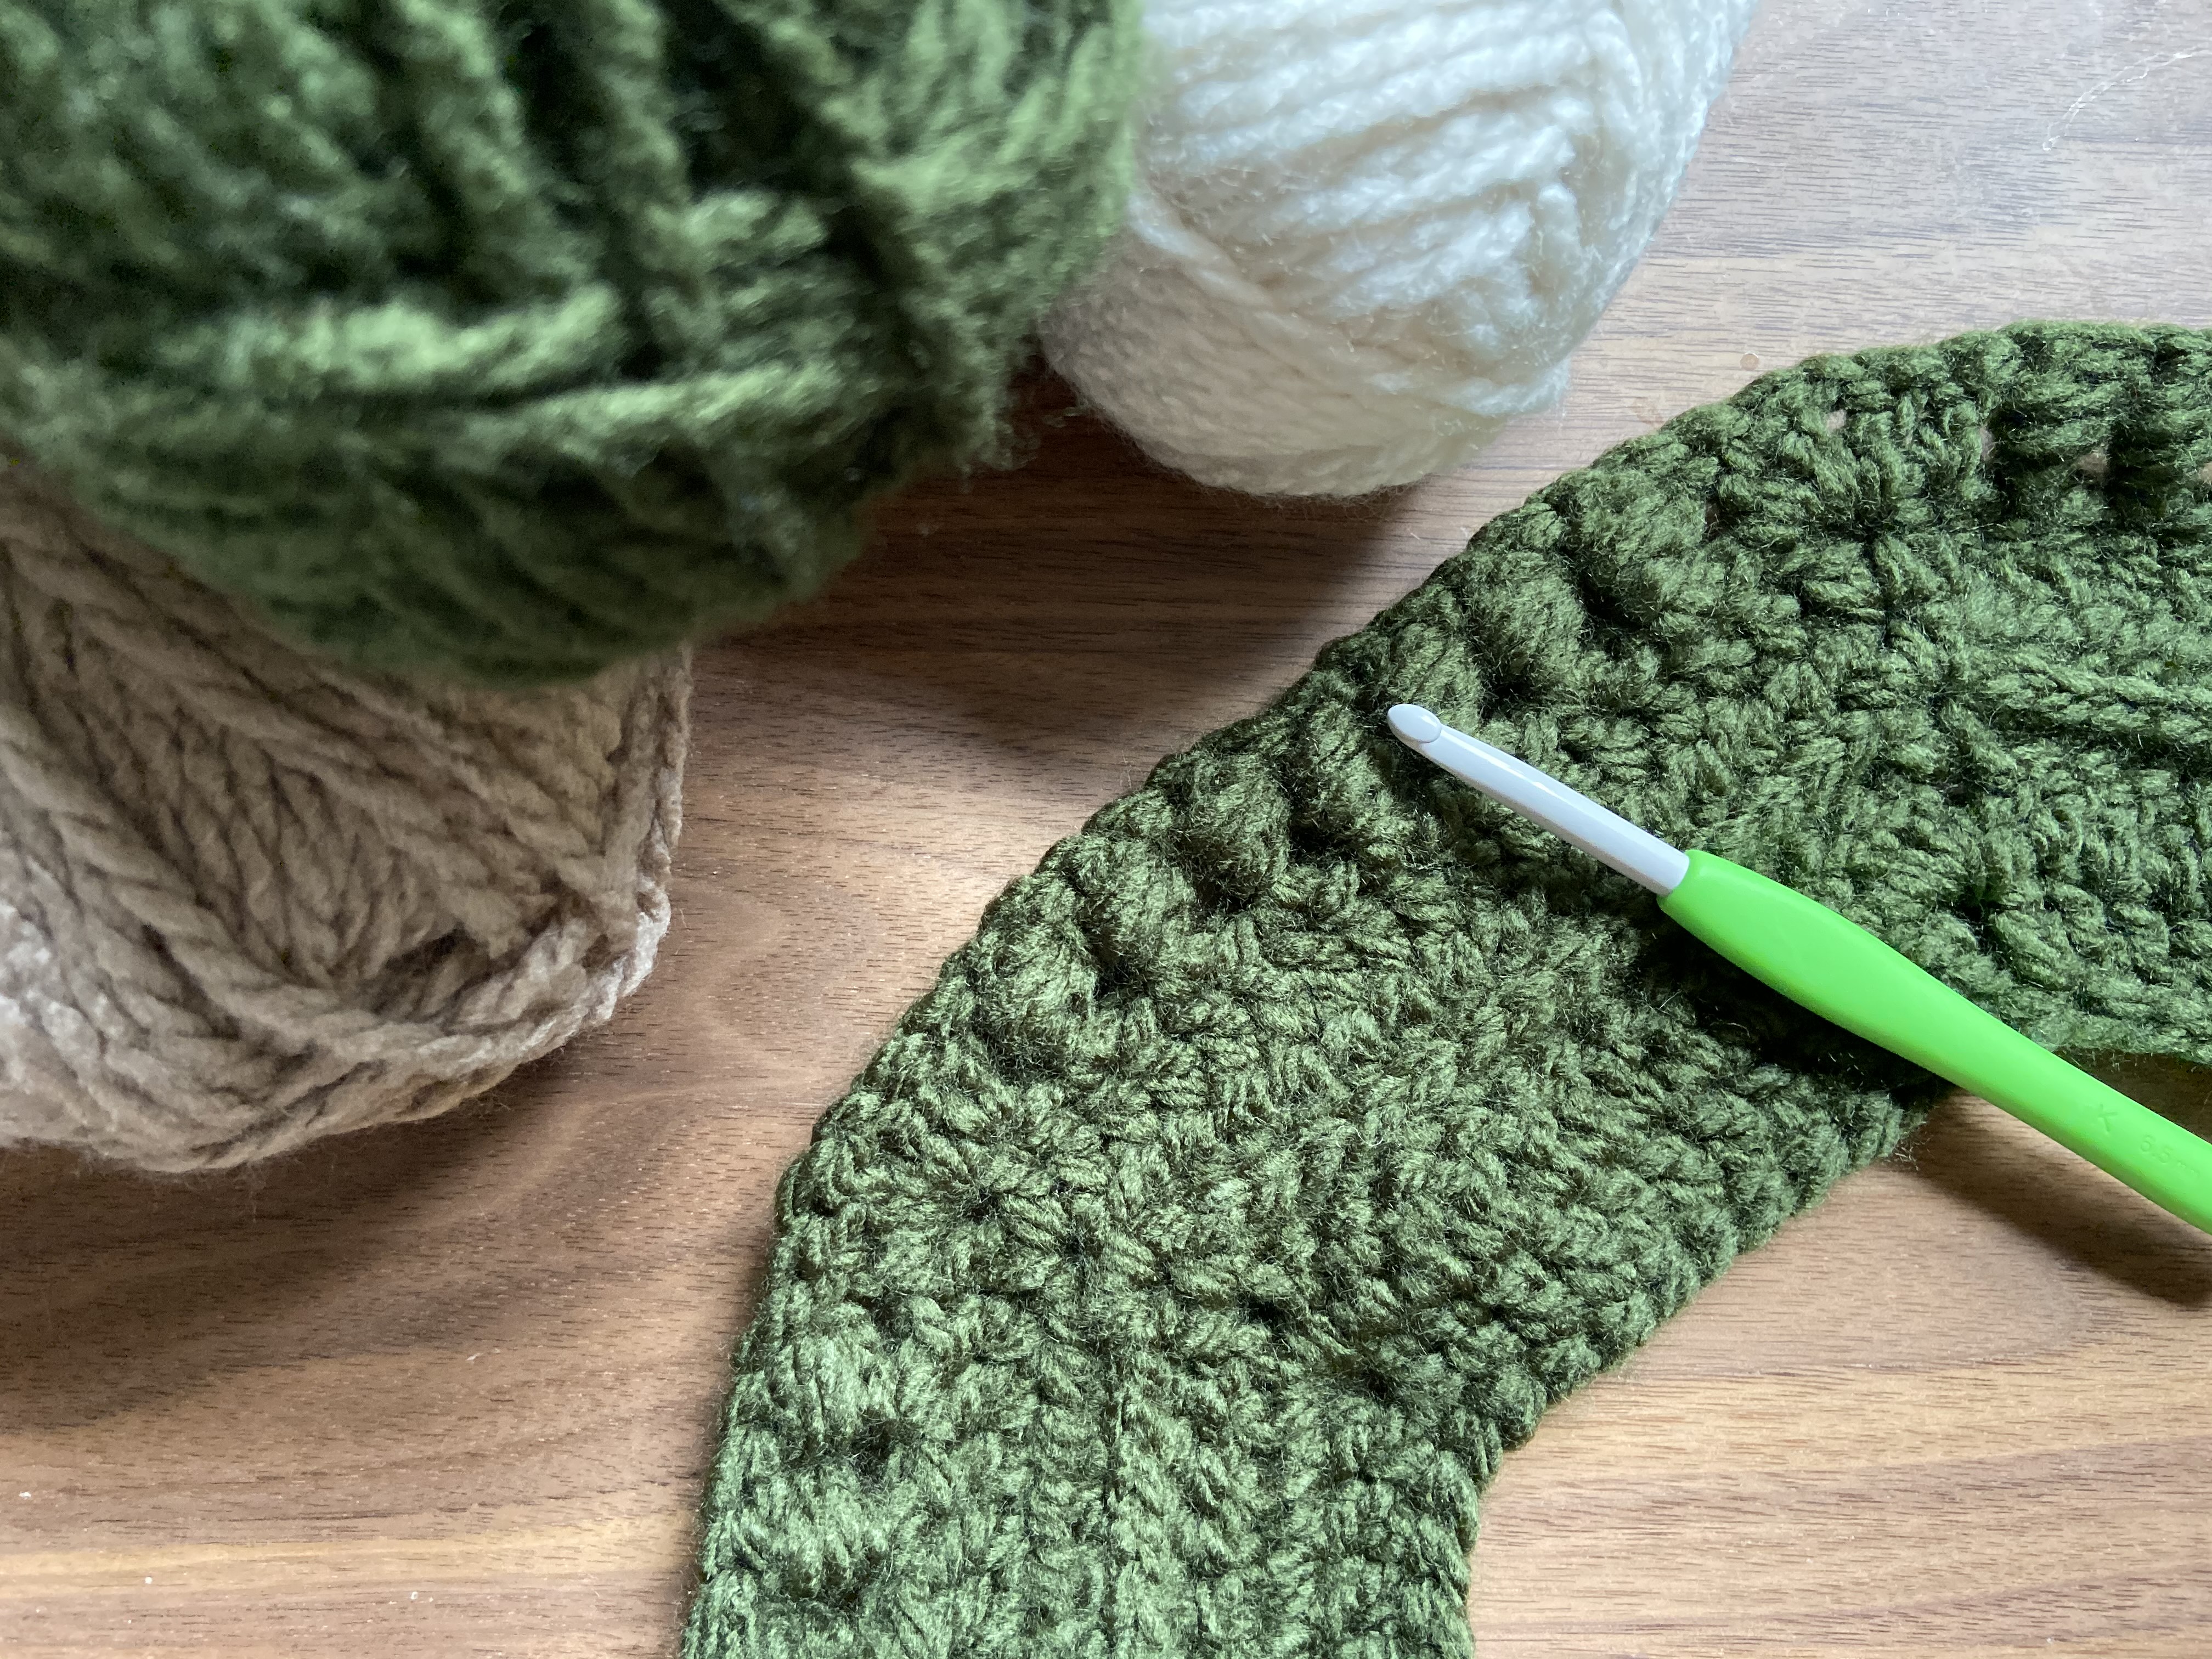
- Bulky weight yarn in 3 colors (I used Charisma from Loops & Threads)
- Color A: 2 skeins
- Color B: 3 skeins
- Color C: 5 skeins
Gauge:
Not particularly important here, but 11 DC x 6 rows = 4″ square
Finished Size:
Finished product should measure roughly 44.5” from edge to edge (51.5” from corner to corner”) with a 7” opening in the middle for your tree stand.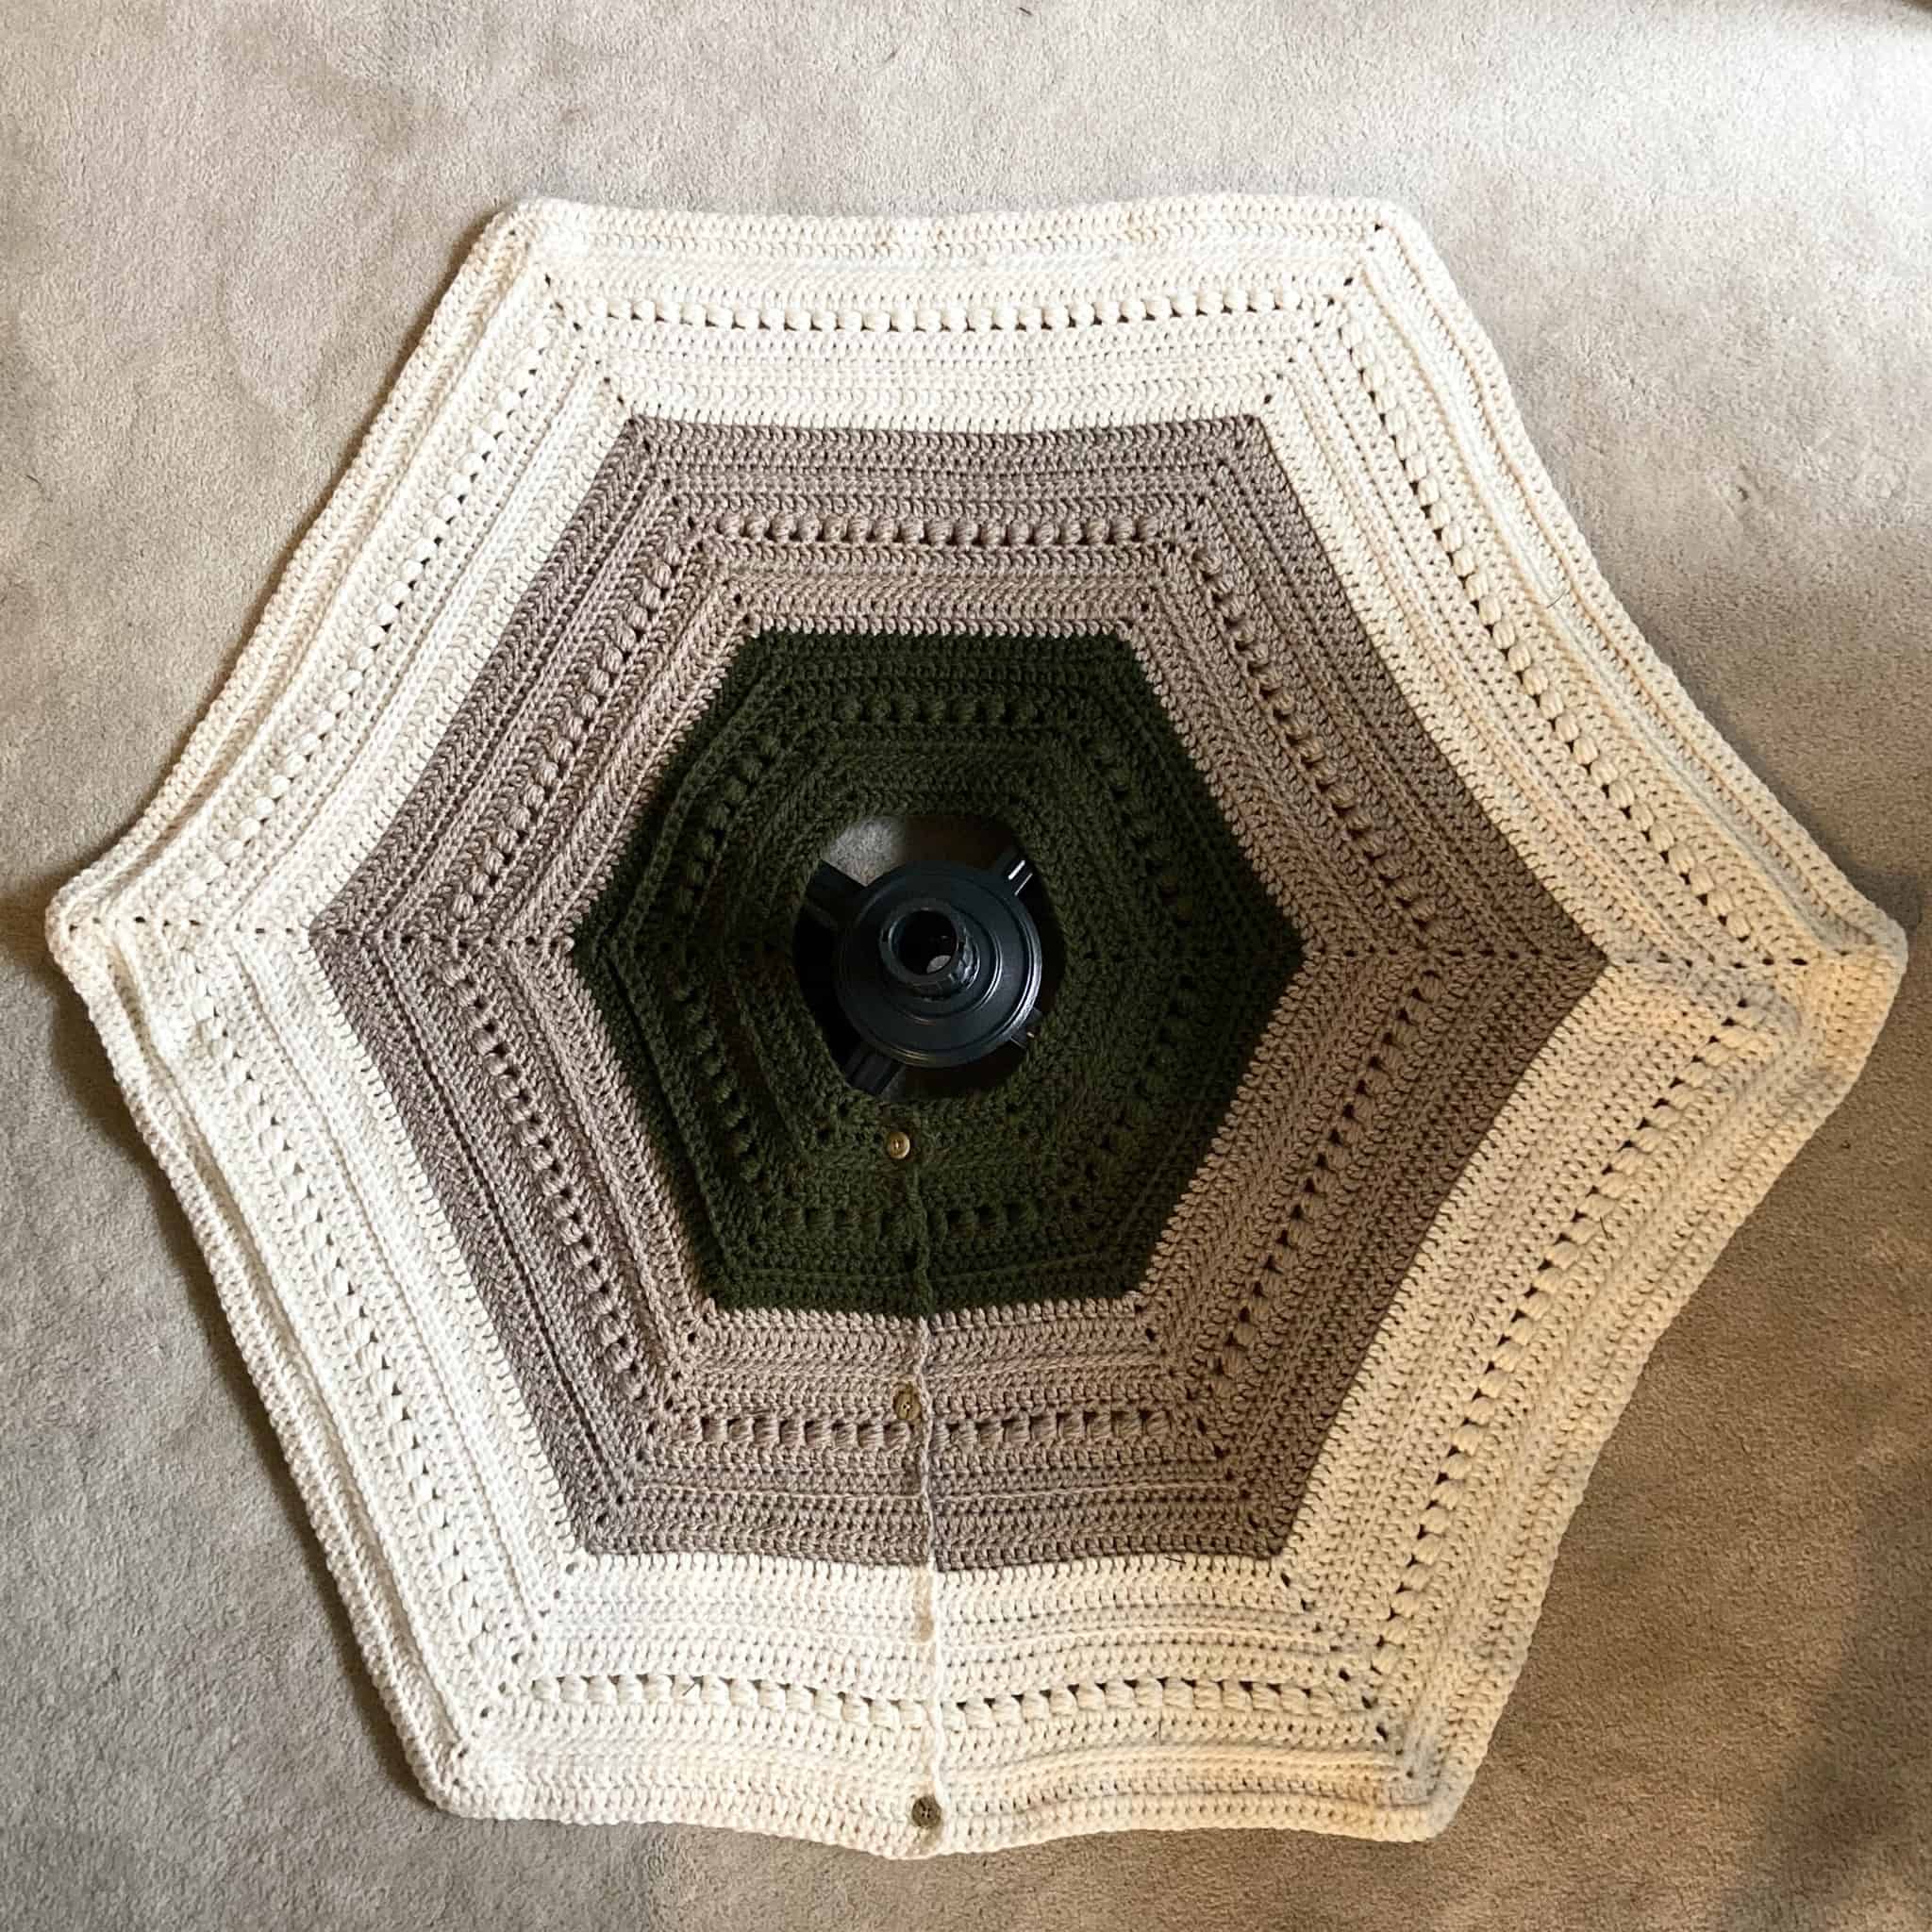
Stitches & Abbreviations Used:
- DC – double crochet
- FDC – foundation double crochet
- HDC – half double crochet
- CH – chain
- CS – camel stitch (see notes section)
- Bead Stitch (see notes section)
Notes:
- Camel Stitch – work in only one loop of the prior row’s HDC. For a video tutorial, I suggest this one from Crochet It Creations. When working your camel stitches, make sure they are appearing correctly on the right side of your skirt.
- If working across the WS of your work, work your HDC into the third loop (this will be the one closest to you.
- If working across the RS of your work, work your HDC in the back loop (the loop furthest away from you).
- Bead Stitch – skip a stitch and DC in next. Yarn over (YO), insert hook around prior DC, YO and pull back through – 3 loops on hook. YO, insert hook around prior DC again – 5 loops on hook. YO, insert hook around prior DC again – 7 loops on hook. Pull through 6 loops on hook. YO and pull through all loops on hook.
- Bead stitch video tutorial from Bella Coco Crochet can be found here (bead stitch begins at 2:20).
- Tree skirt is a hexagon with hole in the center for your tree. The ch 1 spaces will form the corners of your hexagon.
- Chains at start of rows do not count as a stitch.
- For each row, you will stitch across each side using the stitch indicated in ( ) by the row number. Each corner is created by a “stitch, ch 1, stitch” in the ch 1 from prior row.
- For a smaller tree, you may omit up to five of the DC rows (rows 2,12, 20, 23, 31) or take out rows 22-32 completely. For a larger tree, add rows of DC at the beginning and end of each color block or repeat rows 22-32 again. Note that adjusting size may change RS/WS of your skirt, so you may need to adjust your camel stitch.
- If you have any questions, please feel free to reach out to me via DM on Instagram (@sarahsyarn) or via email (sarahsyarn@gmail.com).
Pattern:
Starting with color A
Row 1 (DC row): FDC 6, ch 1. *FDC 11, ch 1* repeat from * to * 4 more times. FDC 5, turn. (RS)
Row 2 (DC row): Ch 2 (does not count as a stitch). DC to first ch 1 space. *DC, ch 1, DC in ch 1 space. DC to next Ch 1 space*. Repeat from * to * until last ch 1 space. DC, ch 1, DC in last ch 1 space, DC to end of row. Turn. (WS)
Row 3 (HDC row) : Ch 1. HDC to first ch 1 space. *HDC, ch 1, HDC in ch 1 space. HDC to next ch 1 space*. Repeat to last ch 1 space. HDC, ch 1, HDC in ch 1 space. HDC to end of row. Turn. (RS)
Row 4 (CS row): Ch 1. CS to first ch 1 space. *HDC, ch 1, HDC in ch 1 space. CS to next ch 1 space*. Repeat to last ch 1 space. HDC, ch 1, HDC in ch 1 space. CS to end of row. Turn. (WS)
Row 5 (DC row): Ch 2 (does not count as a stitch). DC to first ch 1 space. *DC, ch 1, DC in ch 1 space. DC to next Ch 1 space*. Repeat from * to * until last ch 1 space. DC, ch 1, DC in last ch 1 space, DC to end of row. Turn. (RS)
Row 6 (Bead stitch row): Ch 2. DC in first stitch. Bead stitch until 2 stitches remain before ch 1 space. DC in last stitch before ch 1 space. *DC, ch 1, DC in ch 1 space. Bead stitch until 2 stitches remain before ch 1 space. DC in last stitch before ch 1 space.* Repeat from * to * until last ch 1 space. DC, ch 1, DC in ch 1 space. Bead stitch until 2 stitches remain. DC in last stitch. Turn.
Row 7 (DC row): repeat row 5. (RS)
Row 8 (HDC row): Repeat row 3. (WS)
Row 9 (CS row): Repeat row 4. (RS)
Row 10 (DC row): repeat row 5. (WS)

Switch to color B
Row 11 (DC row): Repeat row 2. (RS)
Row 12 (DC row): Repeat row 2. (WS)
Row 13 (HDC row): Repeat row 3. (RS)
Row 14 (CS row): Repeat row 4. (WS)
Row 15 (DC row): Repeat row 5. (RS)
Row 16 (Bead stitch row): Repeat row 6. (WS)
Row 17 (DC row): Repeat row 7. (RS)
Row 18 (HDC row): Repeat row 8. (WS)
Row 19 (CS row): Repeat row 9. (RS)
Row 20 (DC row): Repeat row 10. (WS)
Row 21 (DC row): Repeat row 10. (RS)
Switch to color C
Row 22 -32: Repeat rows 11 – 21; however, be aware that RS and WS will be switched here.
Fasten off and weave in ends.
Finishing
Using appropriately colored thread, sew your buttons to one end of your tree skirt on the RS using the DC rows. I sewed mine to rows 2, 14, and 31. The DC on the other end becomes your buttonhole.
Optional: Use your tassel maker to make 6 tassels in color C. Sew one to each corner of your hexagon.
You’re done! Congrats on making your tree skirt! If you share it on Instagram, please tag me @sarahsyarn or using #evergreentreeskirt or #sarahsyarn.
*****
This pattern is an original design by Sarah’s Yarn and is for personal use only. Please do not redistribute, sell, or edit this pattern. You may sell items made from this pattern, but please credit @SarahsYarn as the original pattern creator.
You can find me on the internet through Instagram, Ravelry, Pinterest, or my blog!
Stay connected with Clover on Facebook | Twitter | Instagram | Pinterest | YouTube | Ravelry
[mc4wp_form id=”11289″]